Stand Mixer Sourdough Bread
A foolproof method for making sourdough bread, mixed in your stand mixer. No folding or complicated shaping needed!
Equipment
- Stand mixer (with dough hook attachment)
- Mixing Bowls
- Damp tea towel or clean kitchen towel
- Plastic Wrap
- Proofing baskets (or parchment-lined baking sheets)
- Lame or serrated knife
- cooling rack
Ingredients
- 6 cups bread flour (31.8 ounces)
- 2 cups lukewarm water (16 ounces)
- 1 ½ cups active sourdough starter (11.25 ounces)
- 1 tablespoon sugar
- 3 ½ teaspoons salt
Instructions
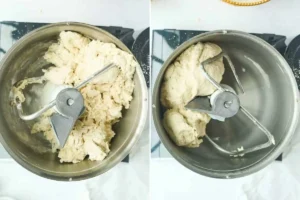
- Combine the ingredients. Combine the bread flour, sourdough starter, sugar, and lukewarm water in the bowl of your stand mixer. Mix on low until just combined. The mixture will appear rough and slightly dry. Then, cover it with a damp tea towel and let it rest at room temperature for 30 minutes.Tip: Measure the salt and place it on the towel to remind yourself to add it in Step 2.
- Knead the dough. After the dough has rested, add the salt and knead on low for 5-9 minutes until the dough is smooth and forms a ball. It should clean the sides and bottom of the bowl. If the dough feels too dry, add more water; if too wet, add more flour as needed.
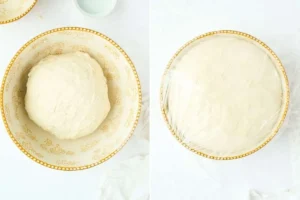
- First rise. Shape the dough into a smooth ball and transfer it to a clean, lightly oiled bowl. Then, cover with greased plastic wrap and place in a warm spot to rise for 3-4 hours or until the dough has doubled and looks very puffy.
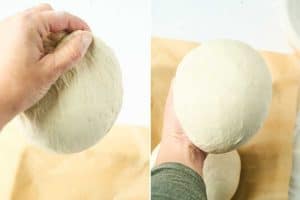
- Divide and shape. Once risen, divide the dough in half. Next, shape each half into smooth balls by gently pulling the dough from the bottom and tucking it until smooth.
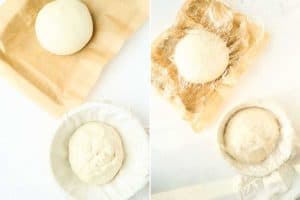
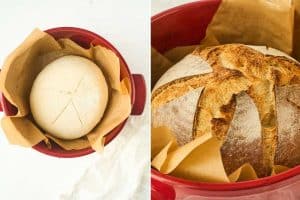
- Second rise. Place each dough ball into a flour-dusted proofing basket or onto a parchment-lined baking sheet. Then, cover with greased plastic wrap and refrigerate overnight or for up to 18 hours.
- Bake. Preheat your oven to 425°F (220°C) in the morning, placing an empty Dutch oven inside. Then, slash the top of each loaf with a lame or serrated knife. Next, transfer the loaf to a piece of parchment paper and carefully lower it into the hot Dutch oven. After that, cover with the lid and bake for 25 minutes, then remove the lid and bake for another 20 minutes until the bread is a deep golden brown.
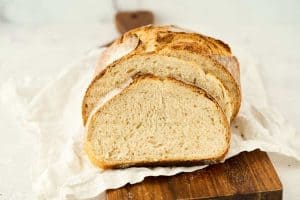
- Cool and slice. Remove the loaf from the Dutch oven and place it on a cooling rack. Allow it to cool for at least 4 hours before slicing. Store at room temperature in a bread bag or airtight container for up to 4 days.
Notes
Before using your sourdough starter, check that it’s active and full of bubbles. Feed it 4-6 hours before starting your recipe.
Using a kitchen scale to measure your flour, water, and starter accurately is a good idea. Since sourdough can be picky about measurements, weighing your ingredients can help make your bread better by making sure consistency and precision.
Remember to measure your salt and keep it close during the initial mixing stage so you don’t forget to add it later.
If the dough feels too sticky, mixing in a little more flour is okay to make it easier to work with.
Your flour type and the humidity in your area can affect your dough, so you might need to tweak the water amount. If the dough is too sticky, add some flour; mix in a little water if it’s too dry. The dough should feel a bit sticky but still be easy to handle.
Keep your dough covered with a wet towel while it rests and during the first rise to stop it from drying out.
Although slicing your bread as soon as it’s out of the oven is tempting, waiting at least 4 hours to cool down is crucial. Cutting into it too soon could make the texture sticky.
Making slashes on your dough before baking helps it expand the right way. Use something sharp, like a lame or a sharp knife, for best results. Shallow cuts might lead to the bread cracking in places you didn’t expect.
Nutrition
Calories: 138kcal | Carbohydrates: 28g | Protein: 4g | Fat: 1g | Saturated Fat: 1g | Polyunsaturated Fat: 1g | Monounsaturated Fat: 1g | Sodium: 408mg | Potassium: 38mg | Fiber: 1g | Sugar: 1g | Vitamin A: 1IU | Calcium: 6mg | Iron: 1mg
Servings: 20 slices
Calories: 138kcal