No-Knead Dinner Rolls
Just a few minutes of hands-on time and a long rise is all you need for these easy, crusty dinner rolls.
Equipment
- Large mixing bowl
- Plastic Wrap
- Baking Sheet
Ingredients
- 3 ¼ cups all-purpose flour (390 grams)
- 1⅓ cups water (281 grams)
- 1 tablespoon sugar (12 grams)
- 1 1/2 teaspoons salt (9 grams)
- 1 teaspoon yeast instant or active dry (3 grams)
Instructions
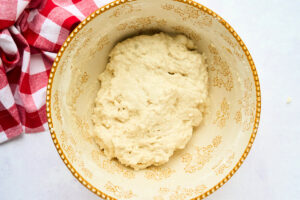
- Mix the ingredients. Combine the flour, sugar, salt, and yeast in a large mixing bowl. Then, add 1 cup of water and use a rubber spatula to mix well. The dough should form a shaggy and wet ball. If it appears dry, add more water, a bit at a time, until it looks as pictured.
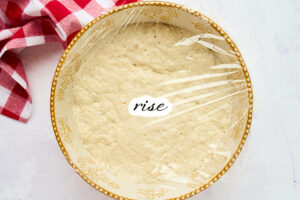
- Cover and allow to rise. Tightly cover the bowl of dough with plastic wrap. Place the covered bowl on the counter at room temperature and let it rise for 10 hours or overnight. This long rise is necessary since the recipe is no-knead. Ensure that you leave it for the full 10 hours. By the end of the rise, the dough should be very puffy and have doubled in size. When you poke it with your finger, the indentation should fill slowly. Give it more time if the dough is still firm or hasn’t expanded much.
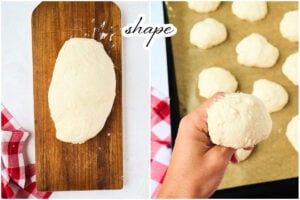
- Shape into rolls. Prepare a baking sheet by lining it with parchment paper or generously spraying it with non-stick cooking spray. Gently turn the dough onto a floured surface, careful not to deflate it. Shape the dough into a smooth ball. Using a sharp knife, divide the dough into 10 equal pieces. Shape each piece by pulling the edges under to form a smooth top. Place the rolls on the prepared baking sheet, spaced evenly apart. Lightly grease a piece of plastic wrap and cover the rolls to prevent sticking.
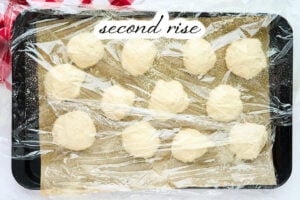
- Second rise. Prepare a warm place for the second rise by briefly turning on your oven or placing a bowl of hot water inside it. Let the rolls rise for 45 minutes while you preheat the oven for baking.
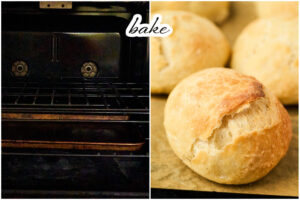
- Prepare the oven. Place a rimmed, metal baking sheet on a lower rack of the oven and preheat the oven to 425°F (220°C). This sheet will be used to create steam during the baking process.
- Bake. Once the oven is preheated, carefully pour 1 cup of water onto the hot, empty baking sheet to create steam. Immediately place the rolls on the middle rack and shut the oven door quickly to keep the steam inside. Bake for 17-20 minutes until the rolls are golden brown. Transfer the rolls to a wire rack to cool. Serve warm or at room temperature.
Notes
Don't skip the steam step—it's necessary for the rolls to rise properly. They will puff up a lot in the oven.
Make sure your yeast is fresh and active. If you're not sure, you can test it by dissolving a small amount in warm water with a pinch of sugar. If it bubbles and froths after a few minutes, it's good to go.
You can use bread flour for a crusty, chewy roll. You might need to add a bit more water in step one.
Let the dough sit for the full ten hours. When you poke it, your finger should leave an indentation that fills slowly.
After the first rise, the dough will be delicate and full of air. Handle it as gently as possible to avoid deflating it too much, which helps keep the rolls light and fluffy.
If your dough is too sticky to shape, spray your hands with nonstick spray.
Feel free to add some flavor to your dough. A sprinkle of dried herbs, grated cheese, or a bit of garlic powder can take these rolls to the next level without much extra effort.
Servings: 10 rolls