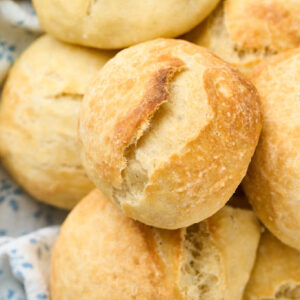
No-Knead Dinner Rolls
These no-knead dinner rolls are so easy to make that you’ll wonder why you ever bothered with the store-bought kind. With a perfectly crisp crust and a soft, fluffy interior, they will surely be a favorite at any meal.
They’re also fantastic for dinner as well as for making delicious sandwiches. The best part? You’ll only need a few minutes of prep and a long, hands-off rise to enjoy these goodies.
No-Knead Dinner Rolls
Equipment
- Large mixing bowl
- Plastic Wrap
- Baking Sheet
Ingredients
- 3 ¼ cups all-purpose flour (390 grams)
- 1⅓ cups water (281 grams)
- 1 tablespoon sugar (12 grams)
- 1 ½ teaspoons salt (9 grams)
- 1 teaspoon yeast instant or active dry (3 grams)
Save This Recipe
You'll join my email list which you will love. And if you don't, unsubscribe in one click. ❤️
Instructions
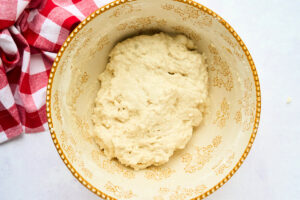
- Mix the ingredients. Combine the flour, sugar, salt, and yeast in a large mixing bowl. Then, add 1 cup of water and use a rubber spatula to mix well. The dough should form a shaggy and wet ball. If it appears dry, add more water, a bit at a time, until it looks as pictured.
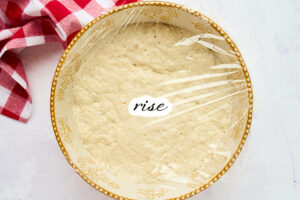
- Cover and allow to rise. Tightly cover the bowl of dough with plastic wrap. Place the covered bowl on the counter at room temperature and let it rise for 10 hours or overnight. This long rise is necessary since the recipe is no-knead. Ensure that you leave it for the full 10 hours. By the end of the rise, the dough should be very puffy and have doubled in size. When you poke it with your finger, the indentation should fill slowly. Give it more time if the dough is still firm or hasn’t expanded much.

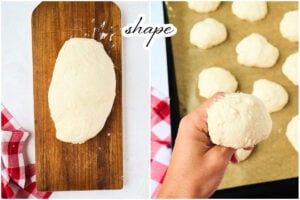
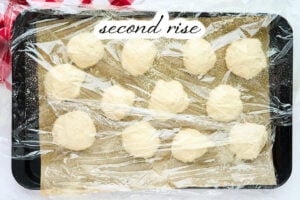
- Shape into rolls. Prepare a baking sheet by lining it with parchment paper or generously spraying it with non-stick cooking spray. Gently turn the dough onto a floured surface, careful not to deflate it. Shape the dough into a smooth ball. Using a sharp knife, divide the dough into 10 equal pieces. Shape each piece by pulling the edges under to form a smooth top. Place the rolls on the prepared baking sheet, spaced evenly apart. Lightly grease a piece of plastic wrap and cover the rolls to prevent sticking.
- Second rise. Prepare a warm place for the second rise by briefly turning on your oven or placing a bowl of hot water inside it. Let the rolls rise for 45 minutes while you preheat the oven for baking.
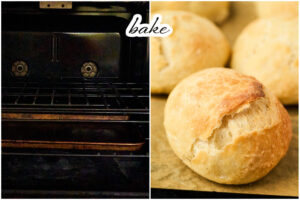
- Prepare the oven. Place a rimmed, metal baking sheet on a lower rack of the oven and preheat the oven to 425°F (220°C). This sheet will be used to create steam during the baking process.
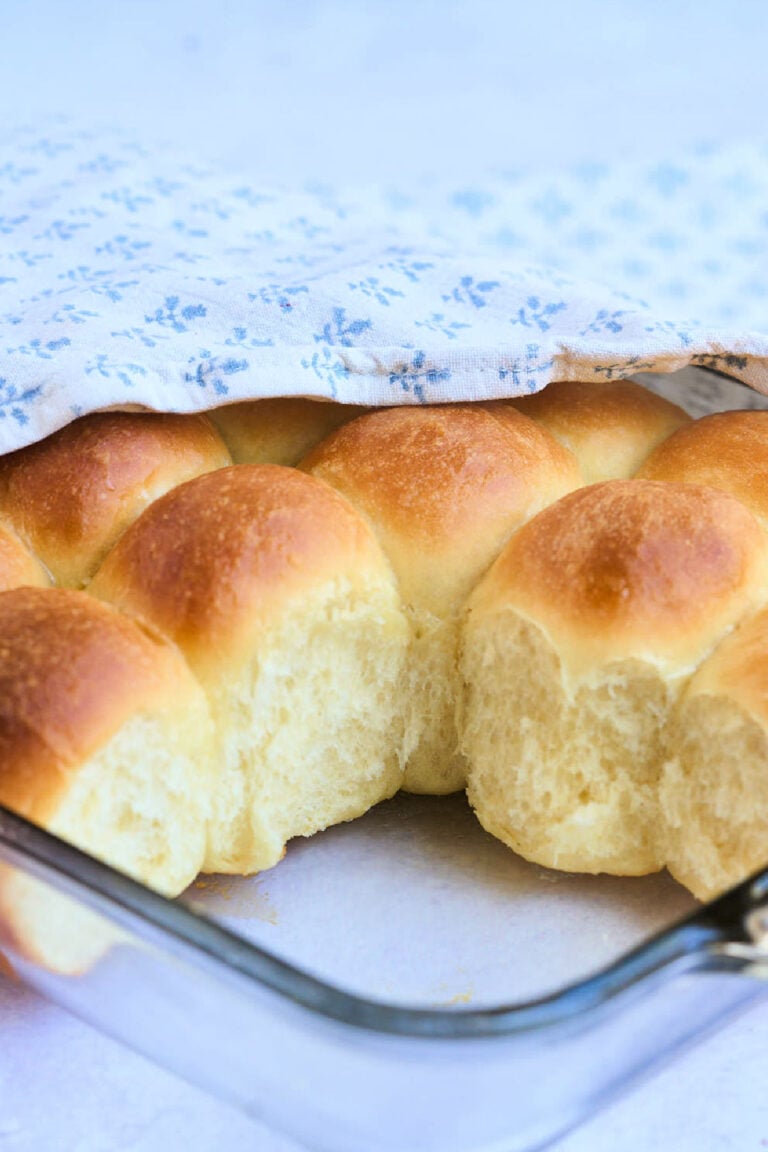
- Bake. Once the oven is preheated, carefully pour 1 cup of water onto the hot, empty baking sheet to create steam. Immediately place the rolls on the middle rack and shut the oven door quickly to keep the steam inside. Bake for 17-20 minutes until the rolls are golden brown. Transfer the rolls to a wire rack to cool. Serve warm or at room temperature.
Notes
More Tips:
The dough needs to sit at room temperature for a while to rise. If your kitchen is very cold, you can put the dough in a warmer place on top of the fridge or inside a turned-off oven with the light on to help it rise properly.

When adding hot water to the baking sheet in the oven for steam, be cautious—use an oven mitt and pour slowly. And avoid using glass, as it might break!
Cover the rolls with heavily greased plastic wrap during the second rise to prevent the rolls from sticking.
Keep an eye on your rolls during the last few minutes of baking, as every oven bakes differently. If they’re browning too quickly, you can loosely cover them with a piece of foil.
This is a beginner-friendly recipe, but if shaping rolls seems too hard, try making my no-knead without a Dutch oven. It’s even easier.
If you are baking at a high altitude, read this article for more help.

Key Ingredients and Tools
Here’s what you’ll need for these dinner rolls:

- Instant or active dry yeast: This is the essential ingredient for making the dough rise, so make sure it’s fresh. You can find it in the baking aisle of any grocery store.
- Plastic wrap: It’s important to cover the dough tightly with plastic wrap during the rise to trap moisture and create the right environment for the dough to expand.
- Parchment paper: Lining your baking sheet with parchment paper helps prevent the rolls from sticking and makes cleanup easier. You can find it near the aluminum foil and plastic wrap.
Having these items on hand will help make sure your rolls turn out perfectly.
Here are some ingredient alternatives you can test out:
- Bread or wheat flour: Use bread flour instead of all-purpose flour for chewier rolls. You might need to add a little more water. Or you can substitute half of the all-purpose flour with whole wheat flour for a heartier texture and flavor. You can also try mixing in some wheat flour with other recipes, like no-knead sandwich bread.
- Honey: Swap honey for sugar in the same amount for a different kind of sweet taste.
These changes will alter the recipe slightly, so feel free to try them out and see what you like best!
These No-Knead Dinner Rolls are an easy way to bring homemade comfort to your table with minimal effort. Whether you’re serving them with a cozy soup or a hearty roast, they’re sure to be a hit with everyone.
Give them a try, and enjoy the simple pleasure of warm, freshly baked rolls any time. Don’t forget to experiment with the variations and make them your own!


Hi Katie, I love your site. I tried to make these rolls and for some reason, they did not turn out. I am going to try again but want to ask you your advice first. I followed the directions but the dough seemed way to dry so I added a little water at a time until,I felt it looked similar to the picture. I let it rise for 10 hours, it seemed kind of cold in my home for room temp so I put it in the oven with the light on. After the 10 hours I did the thumb test and it seemed way too mushy and sticky. I put it back in the oven and left it about another hour or so. Poured it on board and still the same, too sticky to even cut? I know I goofed up after that by adding more flour and letting it raise another 1 hour. Here my question, do you think I wound up adding too much water, and I used active bread machine yeast, can that make a difference? Thank you, I’m not giving up 😁, I’m new at bread making. I have had great success with your soft Italian sub rolls.
Hey Diana, if you still have the dough cna you take picture and email it me? I would say it over rose without seeing it, it is does it will be almost “stringy” and hard to work with.
Thanks Katie for the reply. I don’t have a picture but it sounds like what you said could be the issue. It was definitely difficult to work with. I’ll try again using regular active yeast and not bread machine yeast and see if that makes the difference.
This sounds great! I’m going to try it with some rosemary if it ever gets warm again here. The temperature when I get up at 5:00 tomorrow is forecasted to be -15 degrees. Yikes!
The sentence about “shaping” doesn’t make any sense to me. Can you explain it another way?
Hi! What would happen if you left the dough to rise longer than the 10 hours? Closer to 15 hours, would it ruin it? Thanks in advance!
oh that would be totally fine! sometimes in a cool kitchen you need that long in fact.