Shea Butter Soap Recipe
A nourishing recipe that makes a hard bar and is great for your skin. Simple recipe suitable for beginners.
Equipment
- Safety gear
Ingredients
- 11 ounces coconut oil
- 11 ounces olive oil
- 11 ounces palm oil
- 5 ounces shea butter
- 5.43 ounces lye
- 10-14 ounces water (I use 12)
- 3 tablespoons fragrance oil (can vary by fragrance)
Instructions
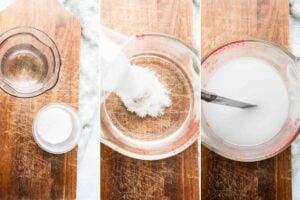
- Make the lye water. Using a digital scale, carefully measure out the lye and water in separate glass containers. Then, slowly add the lye to the water (never the other way around—remember, "snow floats on the lake"). Stir until the lye is fully dissolved. The temperature will rise quickly. Set the lye water in a safe, well-ventilated place to cool. Safety Tip: Be cautious during this step as the mixture releases fumes and can cause burns if spilled.
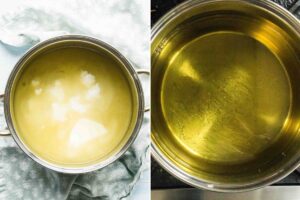
- Melt the oils and shea butter. While the lye solution cools, measure out the coconut oil, olive oil, palm oil, and shea butter. Combine them in a large stainless steel pot and melt over low heat. Heat the oils to a temperature of 130-140°F (54-60°C). Once melted, set the pot aside and allow the oils to cool.
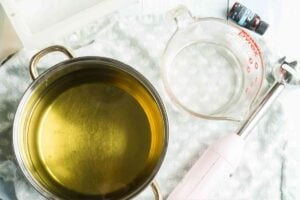
- Check temperatures. After about 2 hours, check the temperature of both the lye water and the melted oils. Both should be around 110°F (43°C) for the best results. A range of 100-120°F (38-49°C) is acceptable. If either solution is too warm, allow it to cool further until within this range.
- Prep mold and mix-ins. While the solutions are cooling, prepare your soap mold and measure out any fragrance or color additives you plan to use. If using colorants, mix them with a small amount of the melted oils for better blending.
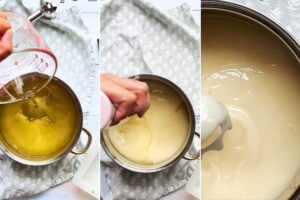
- Stick blend to trace. Once both the lye water and oils are at the correct temperature, slowly pour the lye solution into the pot with the melted oils. Use a stick blender to mix the solutions until a thin trace is reached—this is when the soap batter thickens slightly, and a trail of soap remains on the surface for a moment before sinking. This usually takes about 1 minute. If using color or fragrance, add them now and stir by hand until evenly incorporated.
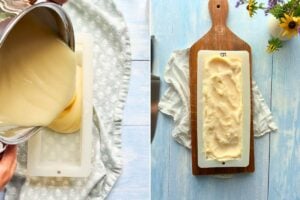
- Pour into mold. Immediately pour the soap batter into your prepared mold. Smooth the top with a spoon or spatula. Leave the mold uncovered and allow the soap to cure at room temperature for 24 hours.
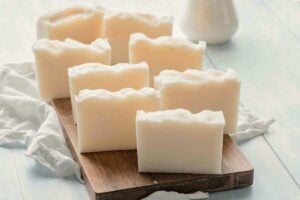
- Unmold and cut. After 24 hours, carefully unmold the soap and cut it into bars. Allow the bars to cure in a well-ventilated area for at least 3 weeks before use. This curing time allows the soap to harden and makes sure a better-quality bar.
Notes
Remember always to wear your safety gear when handling lye and soap batter. The lye water can be especially dangerous while cooling, so make sure it is placed in a secure area away from children and pets.
Tap water may contain minerals and impurities that could affect the soap's texture and quality. Using distilled water makes sure it's a pure, consistent batch every time.
Be cautious when your lye water is cooling. It can be dangerous if it spills and also releases fumes.
When mixing the lye and oils to reach a trace, avoid over-blending with the stick blender. Over-blending can lead to a too-thick batter that's hard to pour into molds. Aim for a light trace where the batter is just beginning to thicken.
Don’t leave the soap to cure in the mold for more than 24 hours, or it may become too hard to cut. Once unmolded, store the bars in a cool, dry place out of direct sunlight to make sure they cure properly.
If you're using more than one fragrance, mix them together in a small bowl before adding them to the soap batter for more even distribution and a well-balanced scent throughout your soap.
If you’re new to soap making, silicone molds can be a great choice because they make it easy to release the soap without sticking or breaking.