
Bread Machine Sourdough (Foolproof, No Yeast!)
A truly simple sourdough recipe that is kneaded in your bread machine. A great everyday bread for the sourdough lover.
Servings: 10 slices
Calories: 138kcal
Equipment
- Bread machine (with a dough cycle setting)
- Large mixing bowl
- Measuring cups and spoons
- Damp tea towel or kitchen towel
- Baking Sheet
- Rimmed baking sheet
Ingredients
- 3 cups bread flour (15.85 ounces/ 450 grams)
- 1 cup lukewarm water (7.75 ounces/ 220 grams)
- ¾ cup fed sourdough starter (5.65 ounces/ 165 grams)
- ½ tablespoon sugar
- 1 ¾ teaspoon salt
Instructions
- Autolyze. Combine the bread flour, sourdough starter, sugar, and water in a large mixing bowl. The dough will feel drier than typical sourdough—this is normal. Do not add more water. Use your hands to make sure all ingredients are incorporated into a cohesive ball. Cover the bowl with a damp tea towel and let the dough rest on the counter for 30 minutes.Tip: Pre-measure the salt and place it in a small container on the towel to remind yourself to add it later.

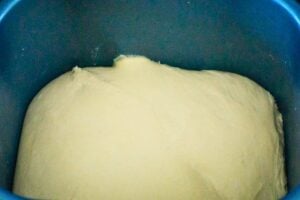
- Knead. After the autolyze, transfer the dough and salt into the bread machine bucket. Then, select the “dough” cycle. When the cycle ends, leave the dough in the machine to continue rising for 2-3 more hours.
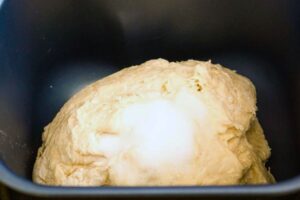
- First rise. Let the dough rise in the bread machine for 3-4 hours, including during the dough cycle. The dough should be noticeably puffier and soft to the touch, though it may not have doubled in size. This longer rise helps develop the flavor and texture of the bread.
- Shape the loaf. Prepare a baking sheet by lining it with parchment paper and sprinkling cornmeal over the surface. Carefully remove the dough from the bread machine and gently shape it into a round or oval loaf. The dough will be slightly sticky, but avoid using flour for shaping. Place the dough on the prepared baking sheet.
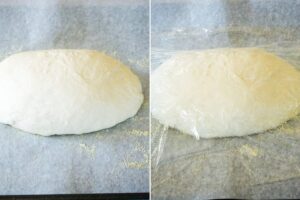
- Second Rise (overnight proof). Spray a piece of plastic wrap with cooking spray and loosely cover the shaped dough. Place the covered loaf in the refrigerator to proof overnight for 8 to 16 hours.
- Prep for baking. In the morning, preheat the oven to 450°F (230°C). Position two racks: one in the center of the oven and the other in the lower middle. Then, place an empty-rimmed baking sheet on the lower rack while the oven is preheating. Next, remove the loaf from the fridge. Dust it lightly with flour and use a lame or a sharp serrated knife to slash the top of the dough, allowing the loaf to expand during baking.

- Bake with steam. When the oven is fully preheated, carefully pour 1 cup of water into the baking sheet on the lower rack to create steam. Immediately place the loaf on the center rack and close the oven door. Bake the loaf for 45 minutes until it reaches a deep golden-brown color. Remove from the oven and allow the bread to cool on a wire rack for at least 4 hours.
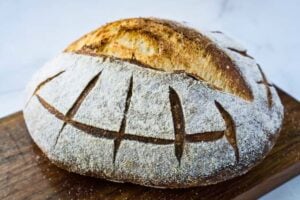
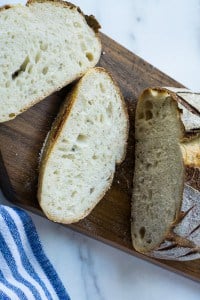
- Slice and serve. Once the bread has fully cooled (after at least 4 hours), use a sharp, serrated knife to slice the loaf into even pieces. Enjoy fresh or toasted with your favorite toppings!
Video
Notes
My sourdough starter is 100% hydration (equal parts flour and water). If yours is dryer or wetter, you’ll need to add a bit more flour or water.
To make ahead, fully bake the loaf, allow it to cool completely, and freeze, well-wrapped, for up to a month.
I have sometimes skipped the autolyze step and thrown everything in the machine. The loaf was still fine.😉
Before you begin, check that your sourdough starter is full of bubbles and ready to go. Give it food 4-6 hours before you start or the evening before if it usually takes a while to get going. This helps your bread rise well and taste amazing.
When you’re shaping the dough, it might be a bit sticky. Avoid throwing in a lot of flour to fix this, as it could make your bread too heavy. Wetting your hands can keep the stickiness at bay without messing with the dough’s moisture.
If you’re having difficulty moving or shaping the dough, a bench scraper can help. It lets you lift and move the dough more efficiently without adding extra flour or overdoing the kneading.
Though the recipe suggests bread flour, feel free to mix in whole wheat or rye flour to change the flavor and texture. Just remember, if you swap flours, you might need to tweak the amount of water since whole grains soak up more liquid.
It’s tempting to slice your bread fresh out of the oven, but waiting is key. Letting it cool down for at least 4 hours on a cooling rack so the inside sets up correctly and doesn’t get squishy.
If the bread’s crust loses its crunch after storage, you can bring it back to life. Heat your oven to 350°F (175°C), lightly mist the bread with water, and warm it for 5-10 minutes. This trick gets the crust crispy again without drying out the bread inside.
Want to add a bit more pizzazz to your loaf? After scoring, sprinkle on some sesame, poppy, or even a bit of coarse sea salt. A quick spritz of water on the loaf before adding these toppings helps them stick better.
Nutrition
Calories: 138kcal | Carbohydrates: 28g | Protein: 4g | Fat: 1g | Saturated Fat: 1g | Sodium: 408mg | Potassium: 38mg | Fiber: 1g | Sugar: 1g | Calcium: 6mg | Iron: 1mg