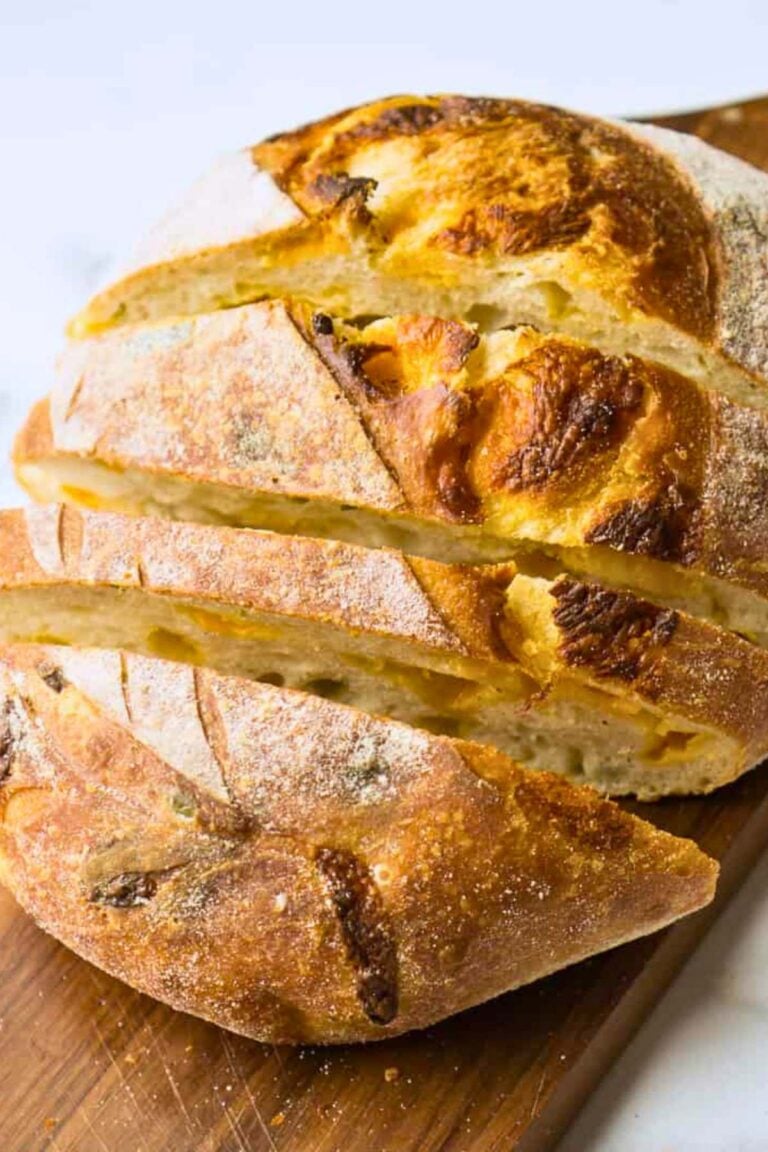
Sourdough Morning Buns
imagine the flakiest croissant you’ve ever eaten, but rolled in sugar and brightened with fresh orange zest. These are sticky, sweet, and shatteringly crisp on the outside, with soft, buttery layers hiding inside. I’ve been making these for years, mostly around the holidays, as a special weekend treat

Think of a morning bun as the sophisticated cousin of a cinnamon roll. Instead of a soft, bready dough, we use a laminated dough (similar to a croissant) loaded with butter. But here’s where they get really special: rather than a heavy glaze, they get tossed in a sparkling coating of cinnamon-orange sugar. The heat from the oven caramelizes the sugar on the bottom of the pan, creating a sticky, toffee-like crunch that contrasts perfectly with the tender, airy interior.
What You’ll Need
Must-Have Equipment
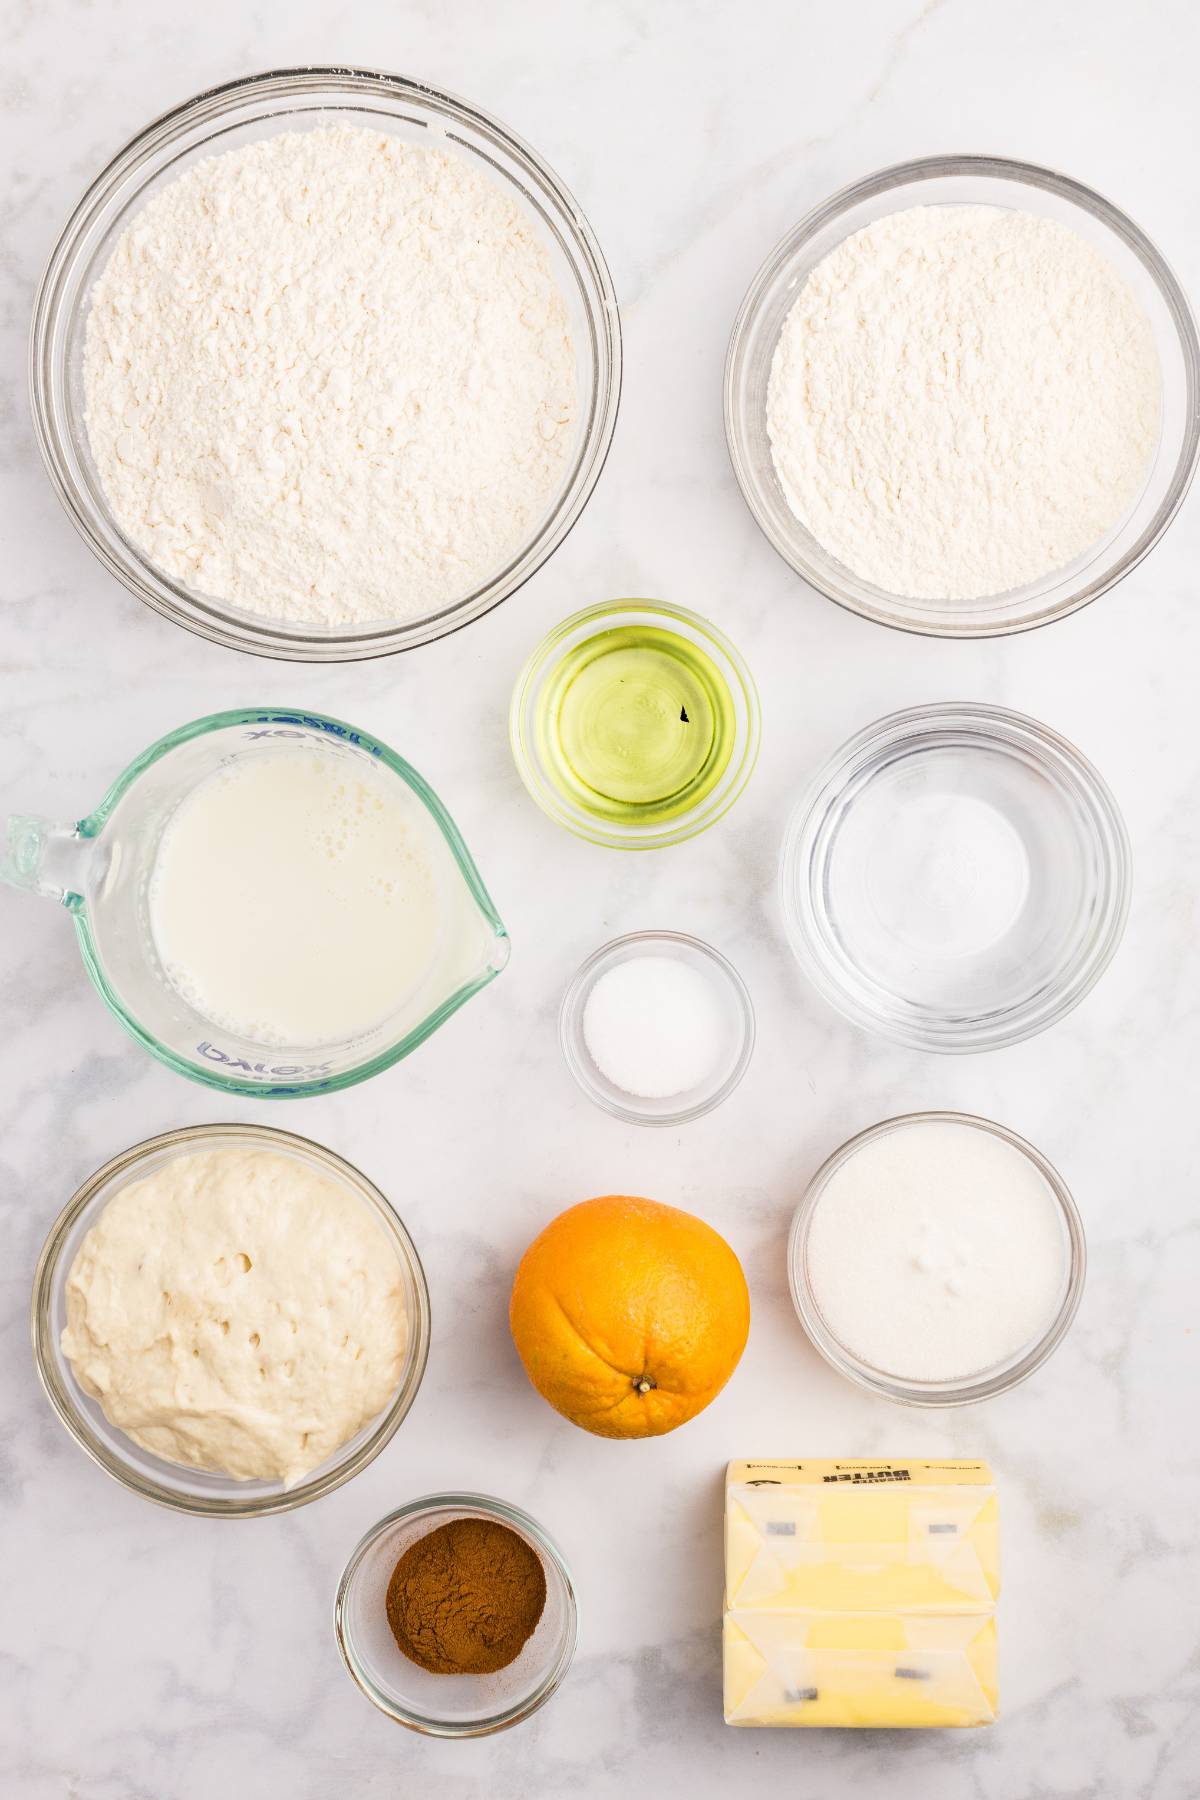
Ingredients
The mix of bread and AP flour keeps the dough workable but strong enough to hold the layers.
If you don’t have sourdough starter? You can still make these with a slight tweak. Substitute 2 ¼ teaspoon active dry yeast (skip starter and reduce water by 60 g).
For the Dough
- ¾ cup (150 grams) sourdough starter: Must be active and bubbly.
- ½ cup (120 grams) warm water
- ¾ cup (200 grams) warm milk
- ⅓ cup (75 grams) granulated sugar
- 1 ½ teaspoon salt
- 1 cup (120 grams) bread flour
- 3 – 3 ½ cups (360-420 grams) all-purpose flour
- 2 tablespoons unsalted butter, room temperature
- 2 tablespoons avocado or vegetable oil
For the Butter Block
- 1 cup unsalted butter, softened
- ½ teaspoon salt
- 2 tablespoons all-purpose flour
Cinnamon Orange Filling
- ⅔ cup granulated sugar
- 1 tablespoon cinnamon
- Zest of 1 orange:
- ¼ teaspoon salt
- 6 tablespoons softened butter
For the Pan & Coating
- 2-3 tablespoons melted butter (for brushing the pan)
- ½ cup sugar
- 2 teaspoons cinnamon
- Zest of 1 orange
Instructions
Remember:
If you ever feel frustrated, or if the dough starts to get sticky and the butter breaks through, stop and put it in the fridge. Cold is the secret to success here. Chilling the dough relaxes the gluten (making it easier to roll) and firms up the butter (saving your flaky layers). A 20-minute time-out in the fridge fixes almost anything.
Day 1: Mixing the Foundation
Today is easy. We are just getting the dough mixed and letting the sourdough do its heavy lifting overnight.
Get a Free + Pretty PDF Recipe Book
Sourdough Sunday Newsletter

Every Sunday evening I’ll send you a sourdough recipe to make that week, straight from my kitchen to your inbox.
And as a thank you for signing up, I’ll send you this e-book with beautiful printable recipes right away. Simple!
You will not be added to any other email lists or my daily newsletter. But if you’re already on my newsletter, you’re welcome to join and receive both.
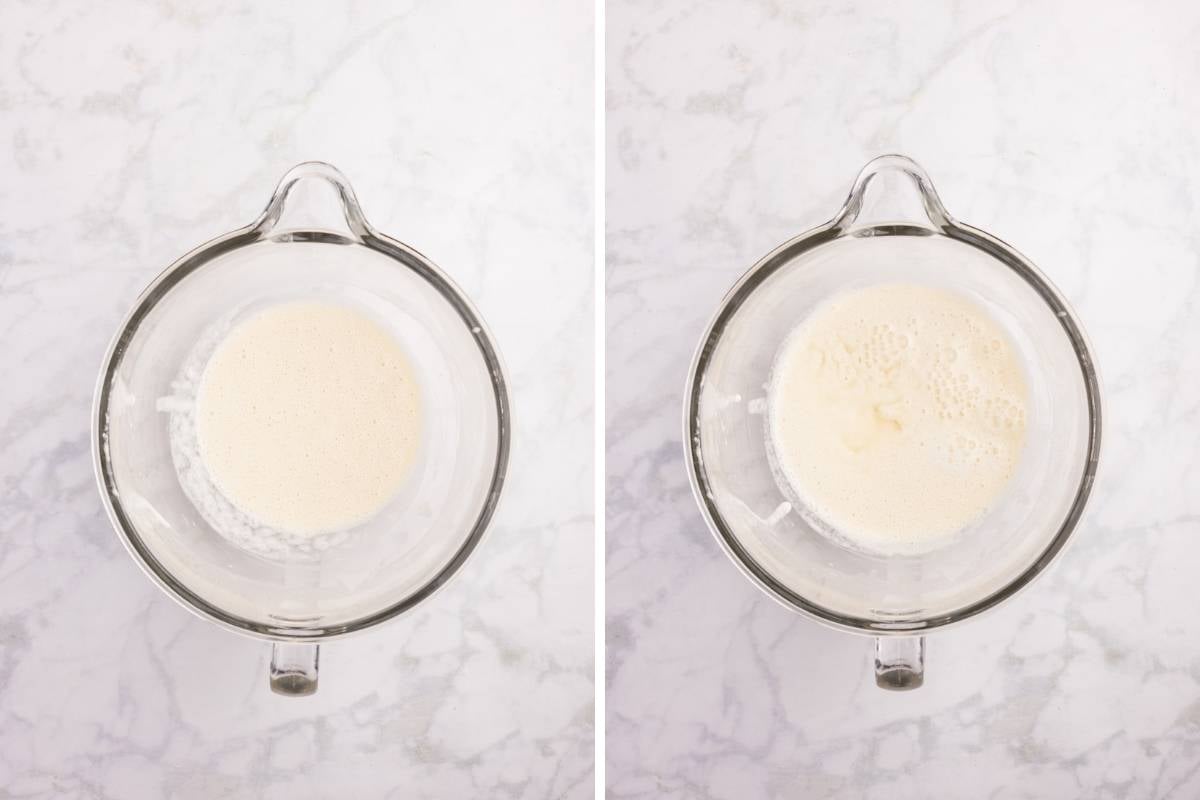
1. Mix the liquids and starter Start with your active sourdough starter, warm water, warm milk, and sugar in your mixer bowl. Give it a quick whisk just to break up the starter so it distributes evenly later.
2. Incorporate the flour and fats Switch to your dough hook. Add the bread flour, salt, and about a cup of the all-purpose flour. Once that’s incorporated, add your soft butter and avocado oil.
Now, slowly add the rest of the all-purpose flour a little at a time. You are looking for a dough that comes together and cleans the sides of the bowl, but still sticks a little bit to the very bottom.
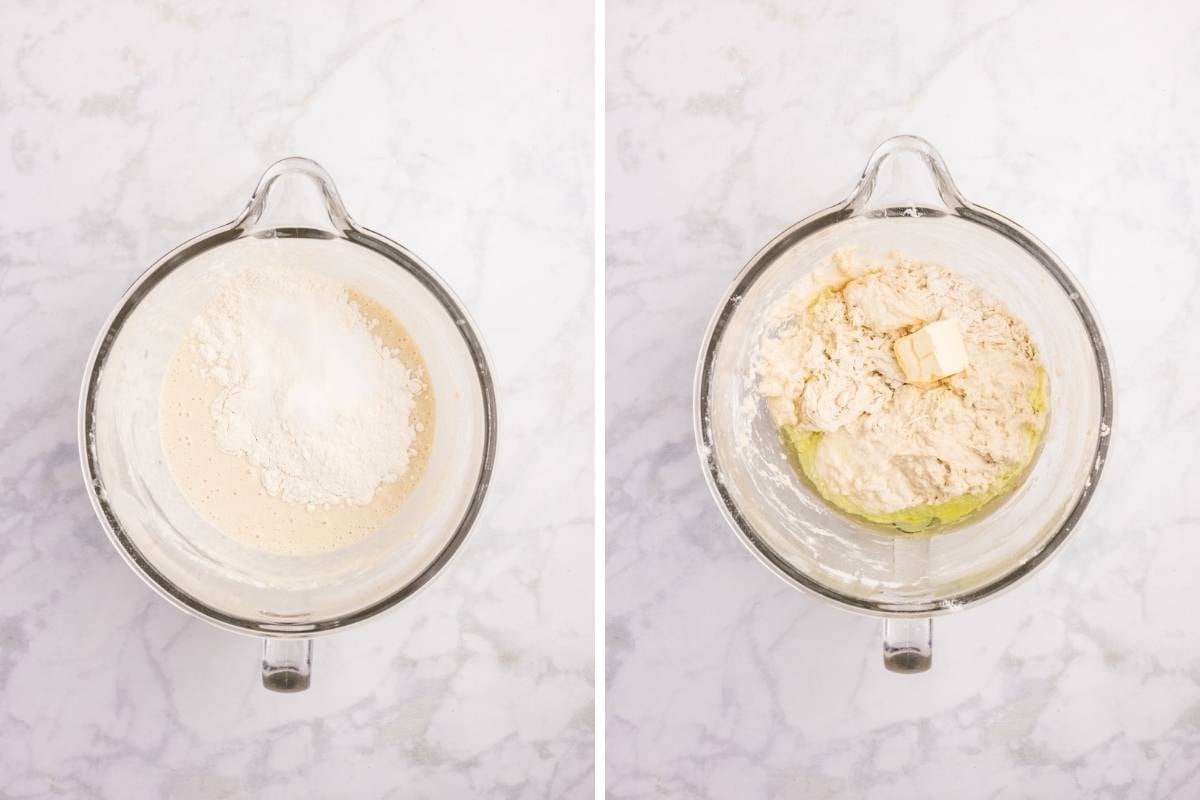
If the dough seems too wet, add a tablespoon of flour at a time. If it seems too stiff, add a teaspoon of water. You want soft and tacky, not sticky and sloppy.
3. The Knead Let your mixer run on medium speed for 6-8 minutes. This is crucial for building the structure that will hold all those buttery layers later.
You know it’s done when the dough looks smooth, shiny, and passes the “windowpane test” (you can stretch a small piece thin enough to see light through it without it tearing).

4. The Long Rest Place the dough in a lightly oiled bowl, cover it, and find a cozy spot on your counter.

Let it bulk ferment for 8-12 hours. It should double in size and look bubbly and alive by morning.
Day 2: Lamination (The Layers!)
This is where the magic happens. “Lamination” is just a fancy word for folding butter into dough to create hundreds of flaky layers.
1. Prep the Butter Block You need your butter to be malleable. Think the consistency of playdough. It should bend without snapping, but it shouldn’t be oily or melting.

Mix your softened butter with a little flour and salt (this helps absorb excess water), then shape it into a 13×18 inch rectangle between two sheets of parchment paper. Chill it until it’s firm but still flexible.
If your butter is too hard, it will shatter inside the dough. If it’s too soft, it will squish out and merge with the dough. The goal is for the butter and the dough to be roughly the same consistency.
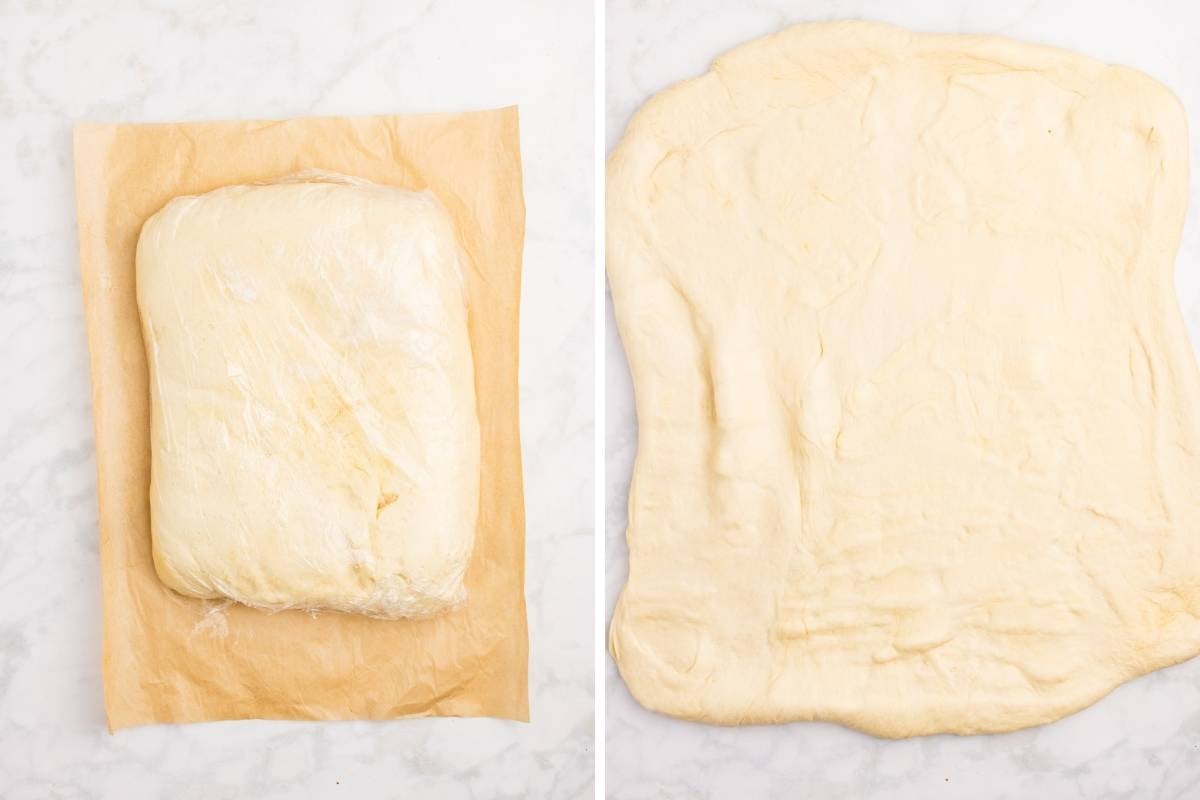
2. Enclose the Butter Roll your chilled dough out into a large rectangle (about 18×26 inches). Place your butter block on the bottom half and fold the top half of the dough over it, like closing a book.

Pinch the edges tightly to seal the butter inside.
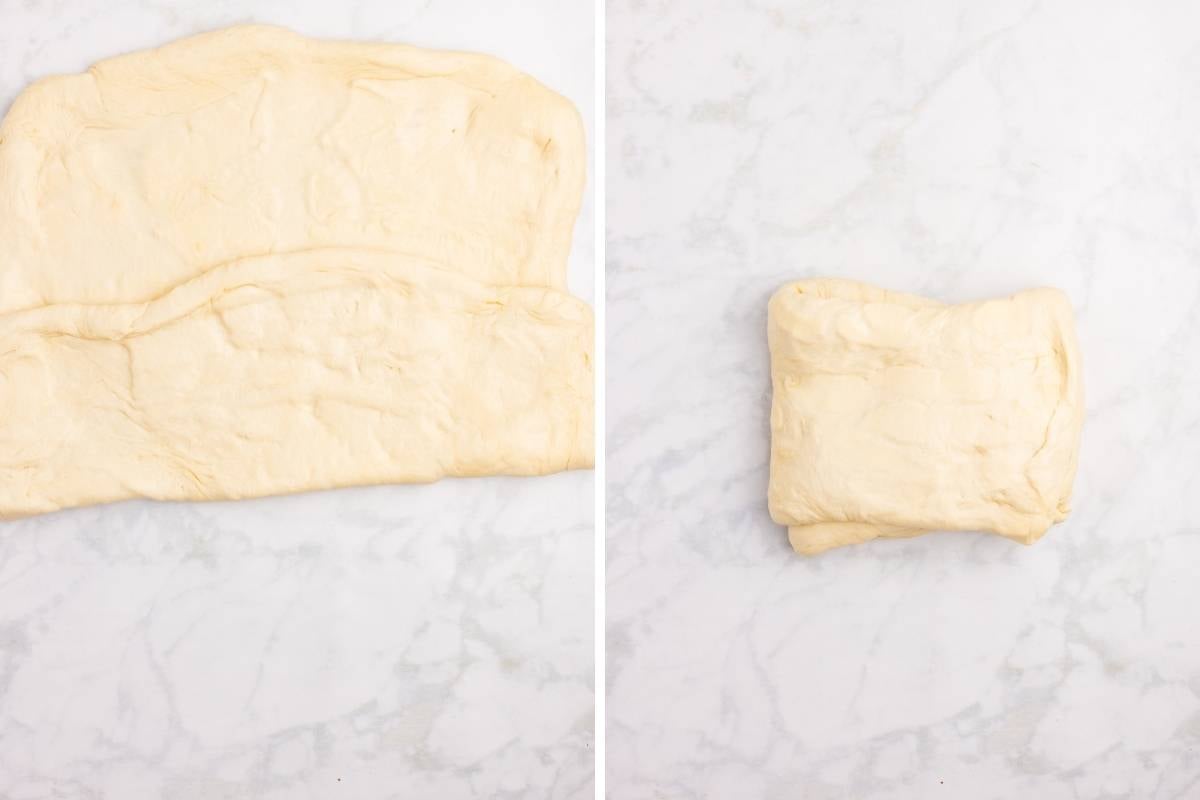
3. The Folds (Letter Folds) Now we create layers. Roll the dough out gently. Then, fold it like a business letter: fold the bottom third up, and the top third down over it. That’s one fold! Wrap it up and chill for 30 minutes to let the gluten relax and the butter firm up.
Repeat this rolling and folding process two more times, chilling for 30 minutes between each fold.
If at any point the dough fights back and shrinks when you try to roll it, or if the butter starts to feel too soft, stop immediately. Put it back in the fridge for 20 minutes. Don’t rush it, or you’ll lose your layers.
After your final fold, chill it for at least an hour before shaping.
Day 2: Shaping and Baking
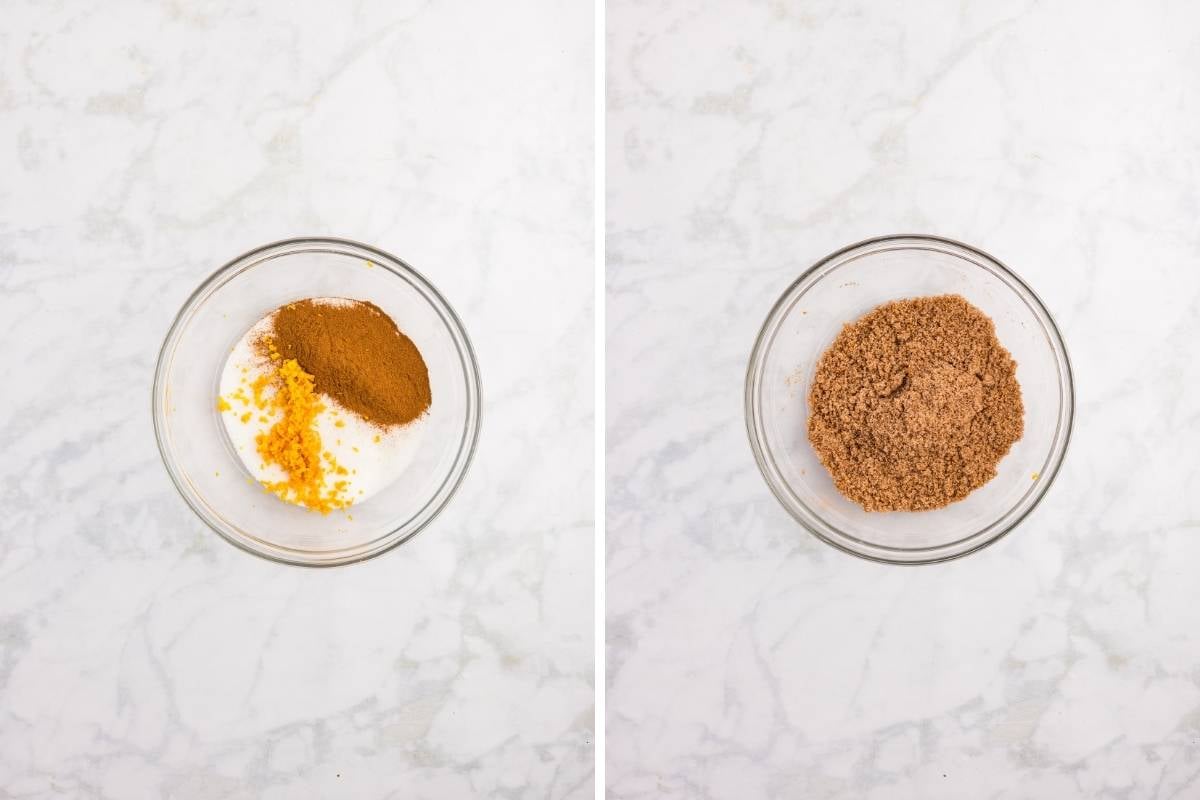
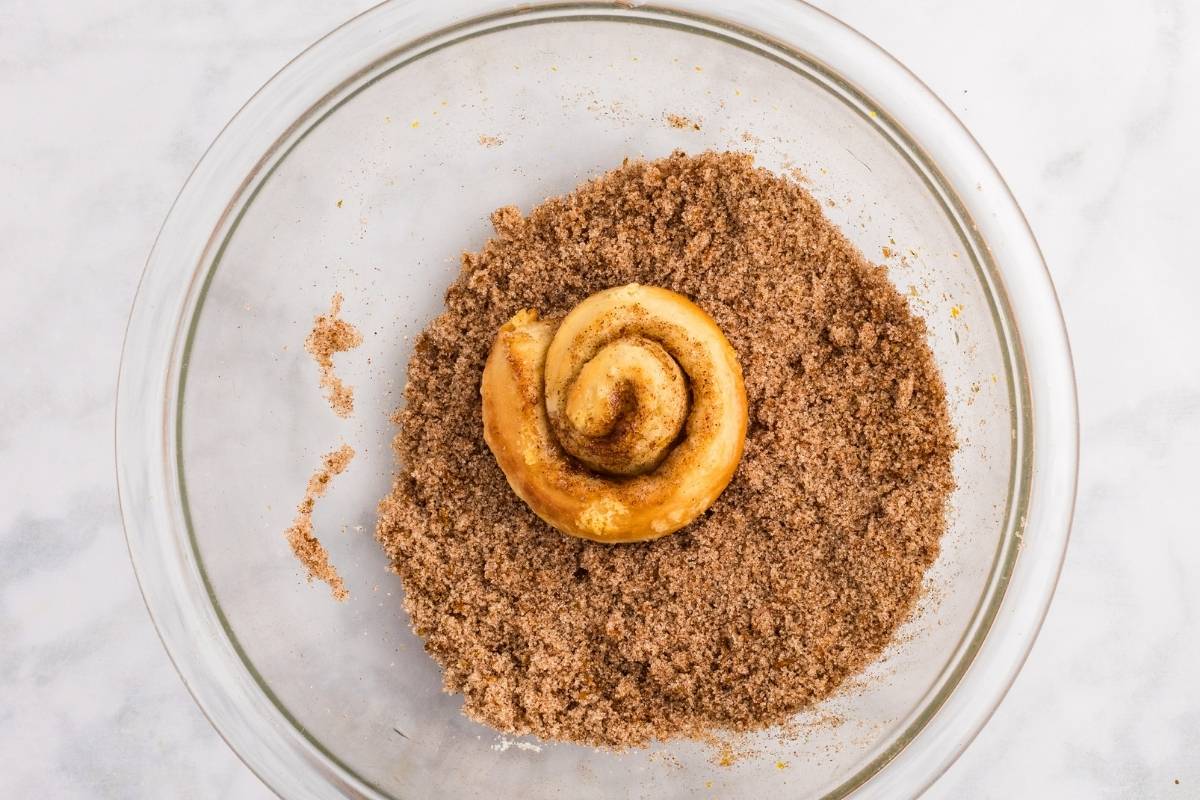
1. Make the Filling Rub the orange zest into the sugar with your fingertips. This releases the citrus oils and makes the sugar incredibly fragrant. Mix in the cinnamon and salt.
2. Roll and Fill Roll your beautiful, laminated dough into a large rectangle. I like to cut the dough in half here and work with one piece at a time so it stays cold. Spread softened butter over the entire surface.
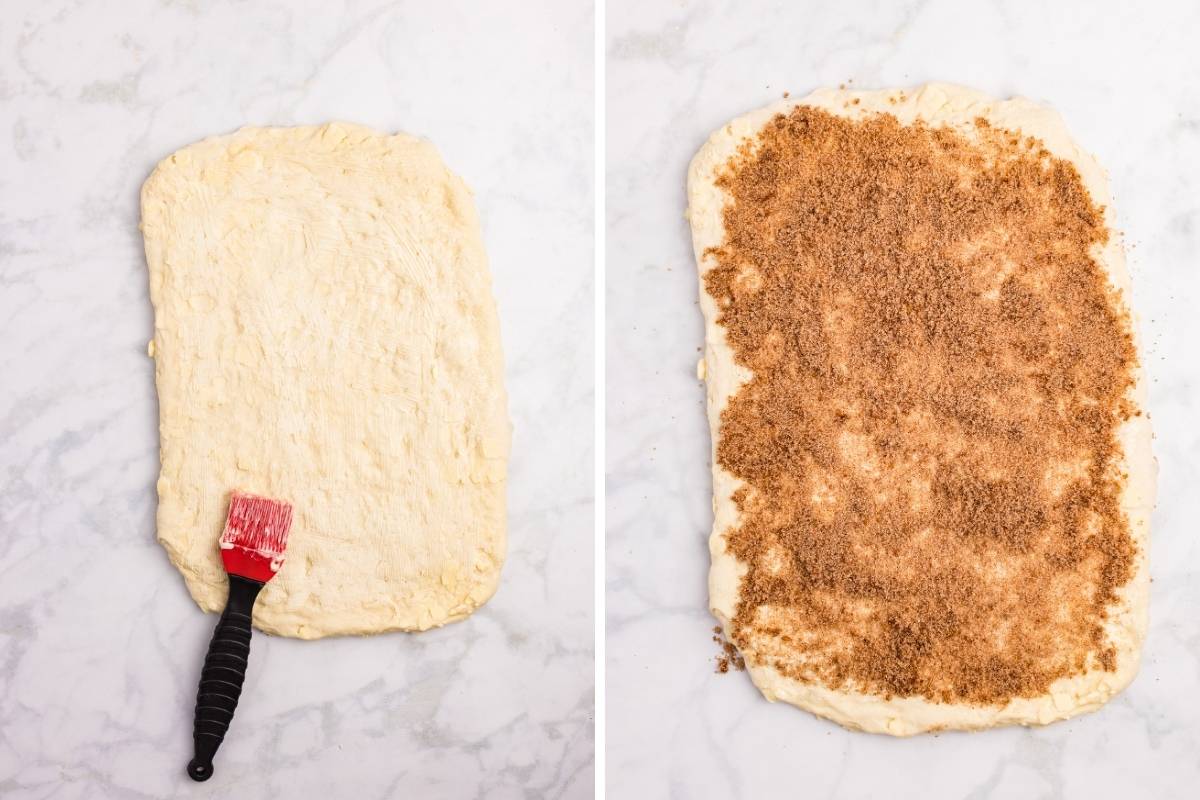
Be generous, this is the “glue” for the sugar! Sprinkle that amazing orange-cinnamon sugar evenly over the butter.
3. Cut and Curl Use a pizza cutter (my favorite tool for this!) or a sharp knife to cut strips. I do 12 strips for standard muffins, or 6 wider strips for jumbo ones. Roll each strip up loosely to form a spiral and place them cut-side up in your buttered muffin tin.
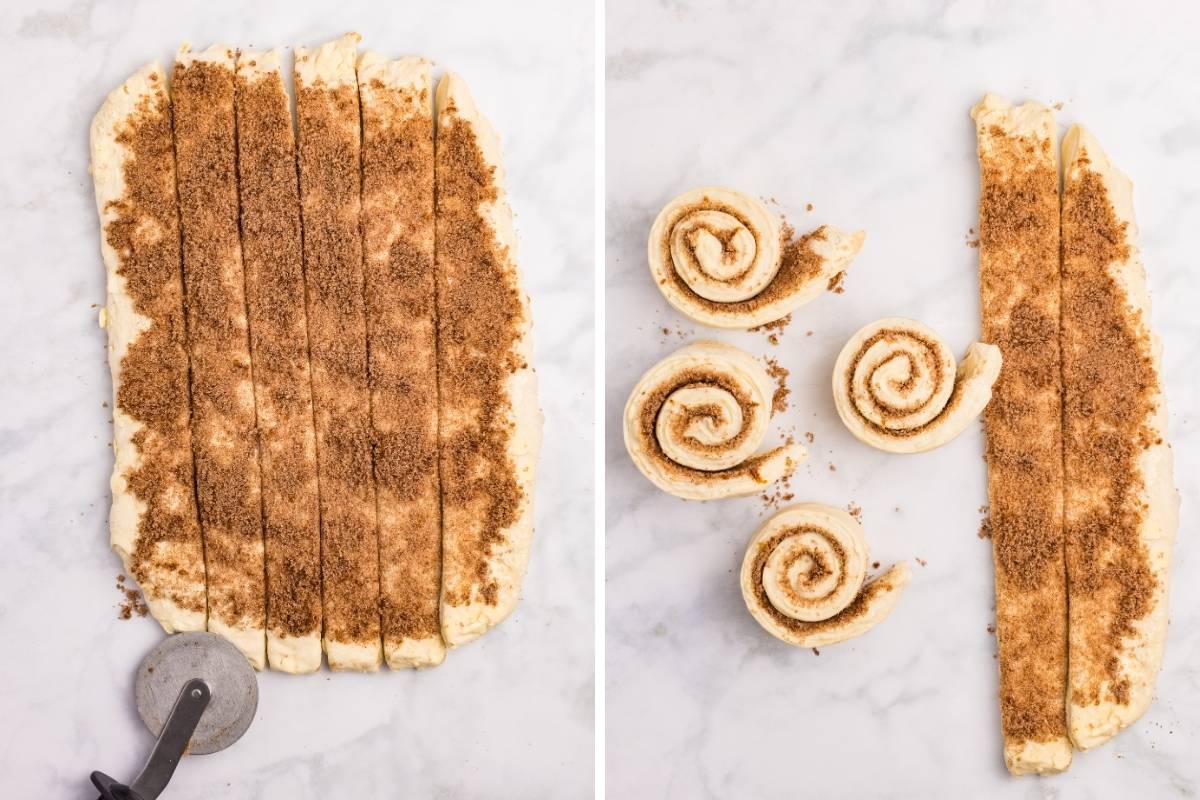
Don’t roll them too tightly. They need room to expand outwards. If they are too tight, the centers will pop up like little volcanoes while baking.
4. The Final Rise (Proofing) Let them rise in a warm spot for 2-4 hours.
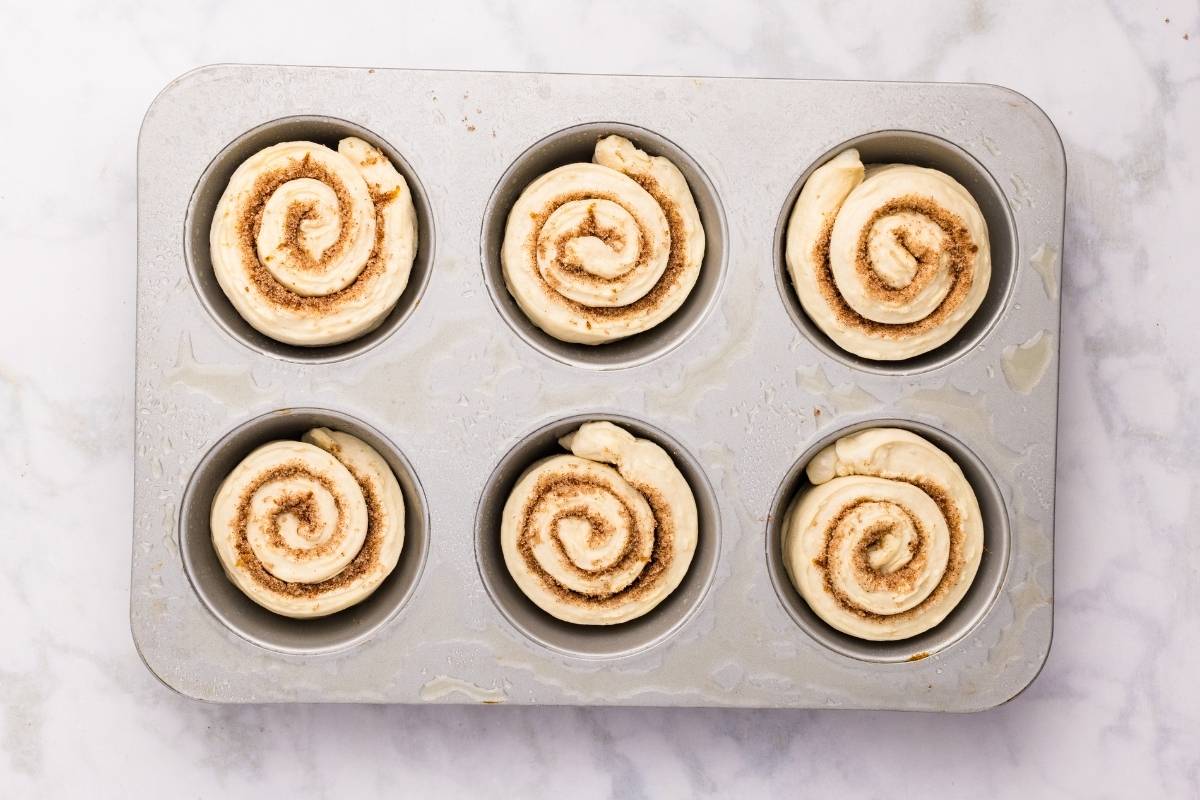
They won’t necessarily double again, but they should look puffy, airy, and jiggle slightly when you bump the pan.
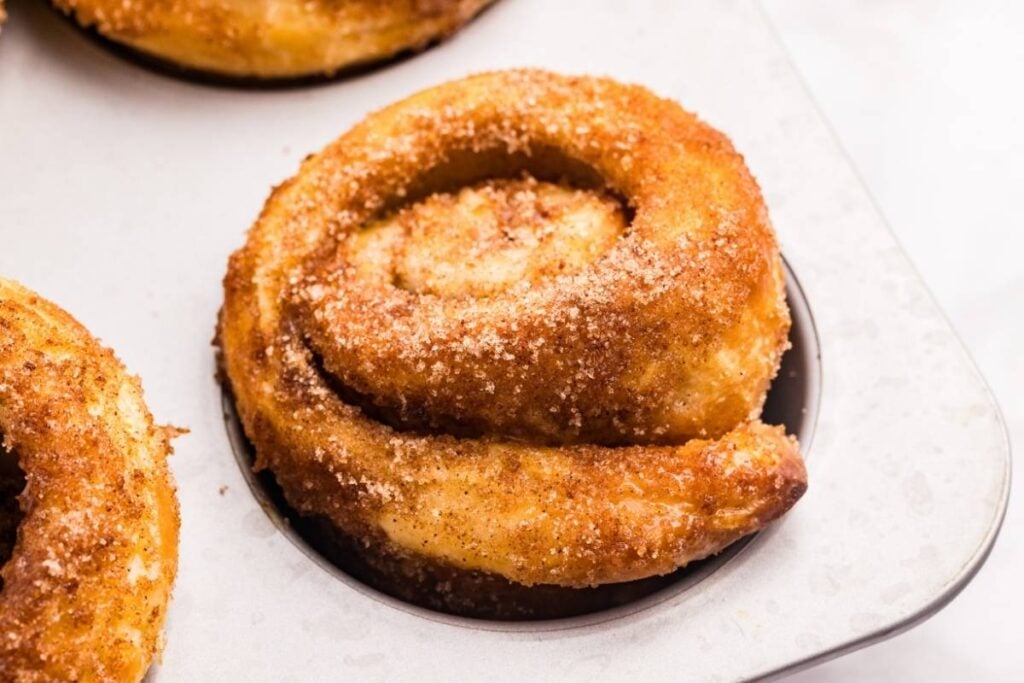
5. Bake and Flip! Bake at 375°F until deep golden brown on top.
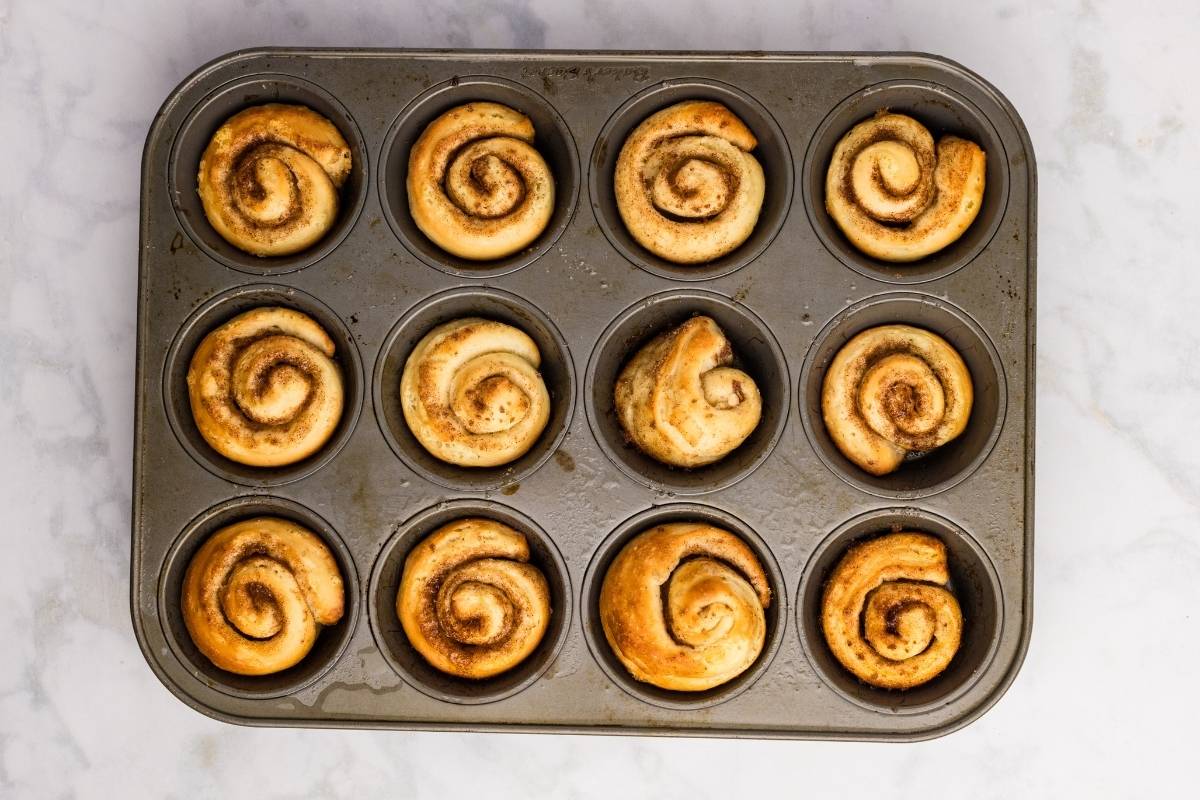
Important! Let them cool in the pan for only 5 minutes. The sugar and butter that dripped to the bottom has turned into caramel. If you let it cool completely, it will harden like cement and stick your buns to the pan forever. Use a butter knife to gently pop them out while they are still warm.
6. The Sugar Toss While the buns are still warm, brush them lightly with melted butter and toss them in your cinnamon-orange sugar coating.
Serve immediately, if you can!
Storage Instructions
You worked hard on these, so don’t let them go to waste.
- Room temperature: Store in an airtight container for up to 2 days. (You can refrigerate for up to 4 days, but the cold air can dry out the layers).
- Freezing (baked): Freeze fully cooled buns on a baking sheet until solid, then transfer to a freezer bag for up to 3 months.
- Freezing (unbaked): Freeze immediately after shaping (skip the proof!). When ready to eat, thaw overnight in the fridge, let them proof on the counter until puffy, and bake.
- To reheat: Place buns in a 350°F oven for 6-8 minutes. Avoid the microwave! It turns the crispy layers into a soft mess!
Variations
Here are a few lovely ways to tweak the flavors without changing the method. The dough stays exactly the same; we just play with the filling and sugar coating.
- Brown sugar & pecan: Use brown sugar instead of white sugar in the filling for a deeper, molasses-like flavor. You can also sprinkle finely chopped toasted pecans inside the swirl before rolling it up for a little crunch.
- Cardamom & vanilla: For a Scandinavian twist, swap the cinnamon in the filling for ground cardamom. Add the seeds of a vanilla bean (or vanilla bean paste) to the final sugar coating for a warm, floral flavor.
- Lemon & ginger: Swap the orange zest for lemon zest and add 1 teaspoon of ground ginger to the filling. It’s brighter, zestier, and perfect for spring.
Troubleshooting
You likely rushed the final proof. Sourdough takes its time; the buns need to look visibly puffy and airy in the tin before baking, otherwise the butter will just melt out rather than creating those airy layers.
The dough probably got too warm during the final rise. If your kitchen is hot (above 75°F), proof them in a cooler spot so the butter stays solid right up until it hits the hot oven.
Your butter block was too cold compared to the dough. Let the dough sit on the counter for 10-15 minutes to soften slightly, then try rolling again gently. You really want the butter and dough to be the same consistency.
Yes! Once you finish the folding process on Day 2, you can wrap the dough block and leave it in the fridge overnight, then shape and bake on Day 3 if that fits your schedule better.
You can, but you’ll lose the specific texture that makes a morning bun special. The individual muffin cups ensure every single bun gets that crispy, caramelized sugar coating on the sides and bottom, rather than just soft pull-apart edges.
Printable Recipe

Sourdough Morning Buns
Equipment
- 1 Stand Mixer (recommended)
- 1 Rolling Pin
- 1 Muffin Tin (12-cup standard or 6-cup large)
Ingredients
For the Dough
- ¾ cup sourdough starter active and bubbly
- ½ cup water warm
- ¾ cup milk warm
- ⅓ cup granulated sugar
- 1 ½ teaspoon salt
- 1 cup bread flour
- 3 ½ cups all-purpose flour
- 2 tablespoon unsalted butter room temperature
- 2 tablespoons vegetable or avocado oil (or other neutral oil)
For the Butter Block
- 1 cup unsalted butter softened
- ½ teaspoon salt
- 2 tablespoon all-purpose flour
For the Filling
- 2/3 cup granulated sugar
- 1 tbsp cinnamon
- 1 medium orange zest only
- 6 tablespoons unsalted butter softened
For the Coating and the Pan
- 3 tablespoons melted butter for brushing pan and buns
- ½ cup sugar
- 1 medium orange zest only
- 2 teaspoons cinnamon
Save This Recipe
You'll join my email list which you will love. And if you don't, unsubscribe in one click. ❤️
Instructions
Day 1: Make the Dough
- Mix dough ingredients. In a stand mixer with the whisk attachment, mix sourdough starter and warm water. Add milk and sugar; whisk until smooth. Add bread flour, 1 cup of AP flour, and salt.
- Finish and knead. Switch to the dough hook. Add the 2 tbsp butter and avocado oil. Slowly add remaining AP flour until the dough comes together but is still slightly tacky. Knead on medium speed for 6-8 minutes until shiny and smooth.
- First Rise. Place dough in an oiled bowl, cover, and let rise until doubled (8-12 hours).
Day 2: Laminate, Fill and Shape.
- Make butter block. Mix 1 cup softened butter with ½ teaspoon salt and 2 tablespoons flour. Shape into a 13×18 inch rectangle between parchment paper. Chill until firm but flexible.
- Enclose and seal. Roll the dough into a large 18×26 inch rectangle. Place the butter block on the lower half, fold the dough over to enclose it, and pinch seams to seal.
- Fold and roll. Roll out gently and perform a letter fold (fold into thirds). Chill for 30 minutes. Repeat this fold 2 more times (chilling 30 mins between each). Chill for 1 hour after the final fold.
- Make the filling. Mix the filling sugar, cinnamon, salt, and zest of 1 orange. Roll the dough into a large rectangle. Spread with 6 tablespoons softened butter and sprinkle with the sugar mixture.
- Shape. Cut into 12 strips (for standard tin) or 6 strips (for jumbo). Roll into spirals. Place in a buttered muffin tin. Proof for 2-4 hours until puffy.
- Bake Preheat oven to 375°F (190°C). Bake 18-20 minutes (standard) or 22-24 minutes (jumbo) until golden. Zest the remaining orange while they bake.
- Toss in coating. Cool in pan for 5 minutes only. While warm, brush with melted butter and toss in a mixture of the coating sugar, cinnamon, and remaining orange zest.
Notes
Nutrition