Inside: How to hatch your very own baby chicks at home using an incubator. It’s one of the most magical things you’ll ever see. First, I’ll show you an overview of the process, and then we’ll deep-dive into each aspect of it step-by-step.
There are DIYers, and then there’s you. You don’t just want to raise chickens; you want to hatch your own baby chicks. And there are so many reasons to do it. It saves money, lets you breed your own chicks, and gives you complete control over the process.
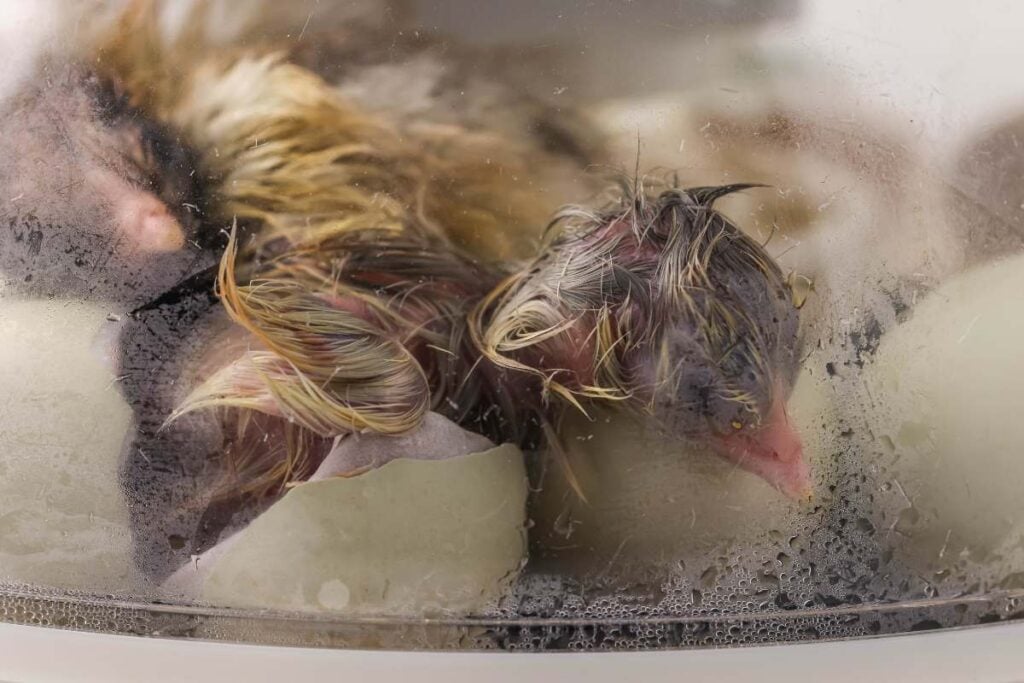
But most of all, and don’t discount this, it is absolutely magical. Seeing that first little newborn pop out of an egg is something you never, ever forget. Here’s how to do it.
Equipment
- Incubator
- Fertile chicken eggs
- Thermometer most incubators have this included
- Hygrometer most incubators have this included as well
- Fresh water
- Grip shelf liner
- Syringe optional… Use this to draw water out if you overfill the tank
- Alternate power source This is optional, but it DOES come in handy if there is a power outage!
- Plastic bin (A 20-gallon size bin should be sufficient for the first week or two after hatching.) for hatch day
- Thermometer for hatch day
- Heat lamp for hatch day
- Bedding (pine needles or shavings) for hatch day
- Water source (I use a thoroughly cleaned plastic peanut butter jar with a lid and chicken nipples) for hatch day
- Chick feed for hatch day
Cut out Liner for Hatch Day (Optional). First, we need to measure and cut out the grippy shelf liner material. Place the egg-turning frame on the material and trace around it using a Sharpie marker. You will need to trace around the outside of the frame AND don’t forget that inner circle *if you are using an incubator similar to mine*. Cut out the material on your traced lines, and TEST IT to determine if it is a good fit on the inside of your incubator. Make any trimmings necessary to make it fit properly. This will be used keep the chicks from slipping after they hatch. The grippy shelf liner NEEDS TO BE REMOVED and stored in a safe place until you are ready to use it on Day 18, Lockdown. The egg turner will not work properly if the shelf liner is in the incubator. Please note that the shelf liner IS OPTIONAL. I have used this method several times, and I prefer using the grippy material instead of watching the newly-hatched, very clumsy chicks slip and slide in the incubator! It really DOES help them!
Gather Baby Chick Supplies. You want to have everything ready now, before incubation, to make sure you are ready to care for the chicks when they hatch. Purchase your plastic bin, thermometor (yes another one), heat lamp and clamp, bedding such as pine shavings, and a waterer and feeder for baby chicks.
SET UP INCUBATOR AND PLACE EGGS INSIDE
Set Temperature and Humidity in Incubator. How to do this exactly will vary greatly depending on your supplies. You’ll want to let it run for a fewhours before placing any eggs inside. The temperature needs to stay steady at 99.5 degrees Fahrenheit, and the humidity for days 1 through 17 must be around 50%. Place the eggs in your incubator, laying on their sides, with the narrow, pointed ends towards the center of the incubator. This will ensure the eggs roll properly. I would suggest performing a test roll after you place all the eggs in the incubator to make sure they all roll smoothly.

Place eggs. Place the eggs in your incubator, laying on their sides, with the narrow, pointed ends towards the center of the incubator. This will ensure the eggs roll properly. I would suggest performing a test roll after you place all the eggs in the incubator to make sure they all roll smoothly.
DAYS 1-7 (WAITING)
Wait Patiently. Now it is time to WAIT. This can be the hardest part. It is SO exciting to anticipate the chicks hatching, but they need to be left alone to develop properly! Handling them too much can cause issues for the growing chick.
Check the temperature and humidity a few times daily. Make it a habit to check every time I walk by the incubator. If the humidity is low, add a little bit of water. It is better to add too little and need to add more than to add too much and have to take some back out. I keep a little syringe close by in case I accidentally add too much water. If this happens, it is easy to suck some of the water back out of the pour spout. Also, it is important to keep the incubator free from drafty air and pets or small children that may bump into the growing chicks!
DAYS 7-18 (WAITIING + CANDLING)
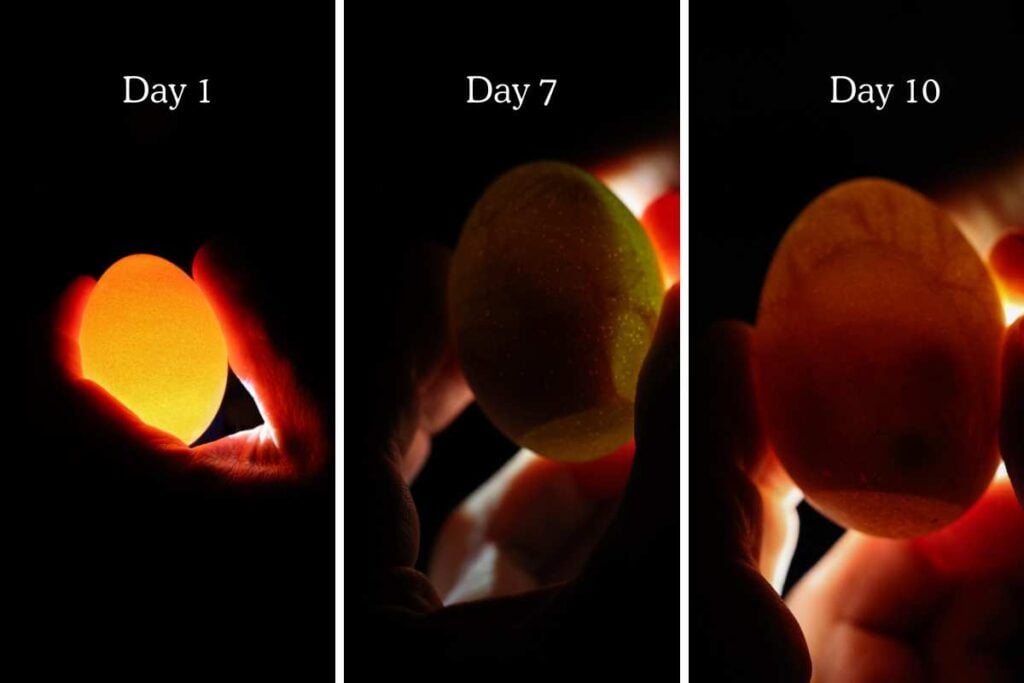
Candle on Days 7, 10, and 18. On days 7, 10, and 18, it is important to candle the chicks to check for growth and development. If you want to use more of a hands-off approach, I recommend checking only on days 10 and 18. You will be checking for signs of development such as the size of the chick, veins, air pocket, and movement within the eggs.
Cull as Needed. If there are any eggs that stop developing, it is a good idea to remove them from the incubator to avoid complications. This is why I recommend candling on days 7 and 10 and then one more time just before lockdown on day 18. Sometimes there will be a questionable egg on day 7, and then upon further examination on day 10 you can either: 1. Cull due to lack of development, or 2. Determine that the chick in question IS still viable and developing correctly!
Mark Questionable Eggs. When candling on day 7, if I see an egg that doesn’t seem to be growing as well as the rest, or I can’t really confirm movement, I will mark it with an X using a pencil. Then, on day 10, as I candle and check for development again, I can easily see which egg was questionable. Many times, that questionable egg is perfectly fine and still developing, and there is noticeable movement on day 10. But sometimes, my suspicions are right and the egg needs to be culled because the chick stopped developing at some point. This will be very noticeable. You will not see movement within the egg, you may even see a streak or ring of red amongst the veins, and the chick is much smaller in size when compared to the rest. It is VERY important to not be rushed through the candling process. Sometimes it is easy to mistake our own movement and think that the chick is moving inside, so it is important to take your time and watch carefully!
DAY 18: LOCKDOWN
Stop Handling and Remove Egg Turner. This will help them get into position so that they have the best chance to hatch properly. You will need to be very careful removing the turner. Make sure to have a nice, clean and dry towel placed in my work space. If you are working on a countertop, make sure that the towel is not hanging off the edge of the counter because it CAN be pulled… which would be quite the disaster! Make sure your towel is placed far from the edge of your work space. Remove ALL the eggs from the incubator and place them on the towel carefully. (You can candle them one last time at this point, if you would like.) Remove the egg turner.
Place Grippy Liner Inside (Optional). Place your precut shelf liner (grippy material) in the incubator and ensure that the water spout on the inside of the incubator is COVERED with the guard. Newly hatched chicks are VERY clumsy, and you wouldn’t want them to fall in the water!
Raise the Humidity. Follow the directions on your incubator to raise the humidity. You are aiming for 65%-75% humidity for the last 3 days. For the brand incubator that I have, I have to FULLY open the air vent on this day.
Return the Eggs. Carefully place the eggs back in the incubator on the grippy material, evenly spaced, and close the lid.
Wait and Check Incubator but Leave Eggs Alone. Continue to check the temperature and humidity a few times each day, and remember that the humidity level is higher (about 70%) for the last three days!
DAY 21: HATCH DAY
Assemble Bins. This is where your babies will go! Line with a couple inches of pine shavings and check to make sure their heat lamp works properly and can hold a steady temperature within the bin. The chicks need to have an area that stays 98-100 degrees Fahrenheit under the lamp, with plenty of space to move away from the lamp if they become too hot! Double-check that food and water and ready to go!
Watch for Pipping. On day 20 or 21, you may notice some little cracks near the larger end of the eggs. This means that the chicks have pipped and are getting ready to hatch! The time it takes from pip to hatch can vary greatly. Some chicks hatch fairly quickly (within an hour) and some can take a whole 24 hours! Each chick needs to pip, unzip, and finally, hatch on their own. 
Let Them Hatch WITHOUT Handling. It is VERY important to leave them alone as they go through this process. The less you handle them, the better. They can do everything on their own! Hatching is hard work, and it is an important part of their development. During this time, monitor humidity and make sure that it stays at 70% or above. As chicks hatch, the humidity level naturally rises because they are wet. This is perfectly fine! During hatch, I noticed that the humidity got as high as 85%. With high humidity levels, they must have enough airflow. I simply follow the directions on my incubator by opening the vent fully for the last three days. This ensures proper humidity and airflow.
Transfer to Bins After Hatching. You will notice after the chicks hatch that they are very sleepy. Hatching is a LOT of work on such a tiny little chick, so they will require a lot of rest during the first few hours of life. As they dry and fluff up, they will typically become more active, but they still like to get plenty of rest. I like to remove them from the incubator as they begin to fluff up and it becomes crowded. I find this gives the chicks that are still trying to hatch a chance to finish up without being bumped and rolled by the active chicks. I am just quick and careful when removing the hatchlings from the incubator, and I have the bin close by!
Notes
Before you incubate eggs make sure the incubator works by turning it on for 3-5 hours before you plan to put your eggs in to begin the incubation process. You need to verify that it will hold a steady temperature of 99.5 degrees F (99 degrees-100 degrees is acceptable) and a humidity level of about 50% (45%-55% is acceptable).
I also recommend having an alternate power supply. A whole house generator or a small power bank works well. The one that I have listed above in the supplies list works well with my incubator. If you decide to use a power bank, I highly suggest that you do some research on the specs of your incubator and the power bank to make sure they will be compatible.
For this session, I am using the Kebonnixs brand incubator. It self-regulates the temperature for 99.5 degrees. It has a built-in hygrometer and pour spout… You never have to lift the lid to adjust humidity! It also turns the eggs automatically for days 1-17 (up until lockdown). This incubator is AMAZING!
Terms to Know
We’ve used some weird words here, right? Here’s an overview:

- Broody: A descriptive term used for a hen who is ready to sit on eggs and raise chicks. You’ll recognize her by her determination to stay on the nest and potentially ruffled feathers if disturbed.
- Candling: The process of shining a bright light through an egg to check on the chick’s development. You’ll be able to see the chick’s outline, veins, and movement.
- Egg Tooth: A tiny, sharp bump on a chick’s beak that helps it break through the eggshell during hatching. It disappears shortly after hatch.
- Fertile Egg: An egg that has been fertilized by a rooster. Only fertile eggs can develop into chicks.
- Humidity: The level of moisture in the air. It’s critical to maintain the right humidity in the incubator for proper chick development.
- Incubator: A specialized device that provides the ideal temperature and humidity for fertilized eggs to hatch.
- Lockdown: The final stage of incubation (around day 18) when you stop turning the eggs and increase the humidity to prepare for hatching.
- Pip: The first tiny hole a chick creates in the eggshell as it starts the hatching process.
Why hatch in an incubator vs using a broody hen?
Great question! While hens are natural incubators, using an incubator gives you more control. Here’s how:
- More Chicks: Incubators can hold many more eggs than a single hen can comfortably cover.
- Predictable Hatching: By controlling the temperature and humidity, you can create a perfect environment for chicks to develop, leading to a more predictable hatch time.
- Uninterrupted Incubation: Sometimes, hens may abandon their nests or get spooked. Incubators provide a safe and consistent environment for the entire incubation period.
OHSUL Cute Cartoon Chickens Highly Absorbent Kitchen Towels Dish Towels Dish Cloth,Funny Chicken Hand Towels Tea Towel for Bathroom Kitchen Decor,Chicken Lovers Farm Girls Women GiftsHen Rooster Chicken 3.75 Inch Cookie Cutter from The Cookie Cutter Shop – Tin Plated Steel Cookie Cutter – Made in the USARoosty’s – Top Fill 1.5KG Chick Feeder and 1.5L Chick Waterer – Chicken Feeders and Waterers | Small Chicken Feeder and Hanging Chicken Waterer | Duck Feeder, Quail Feeder | Baby Chicken SuppliesRentACoop Chick Swing and Versatile Chick Feeder Waterer and Accessory Stand SetEnsayeer Mini Chick Perch with Mirror, Strong Bamboo Roosting Bar for coop and brooder, Training Perch for Baby Chicks, El Pollitos, La Pollita, Easy to Assemble and Clean, Fun Toys for Chick


Think of an incubator as a cozy, high-tech nest that mimics the warmth and humidity a hen naturally provides.
Recommended Supplies for Hatching Chicks
Here’s a breakdown of the key supplies you’ll need and how they contribute to a successful hatch:

- Incubator: This is the heart of the whole operation! A good incubator does these important things:
- Automatic Egg Turning: Saves you from manually turning the eggs several times a day, ensuring even development of the chicks.
- Temperature Control: Maintains a steady 99.5 degrees Fahrenheit (37.5 degrees Celsius), which is critical for proper chick development.
- Humidity Regulation: Allows you to adjust humidity levels, especially during the final “lockdown” stage leading up to hatching.
- Fertile Eggs: Not all eggs will hatch! To get those adorable fluffy chicks, you’ll need fertile eggs from a flock with a rooster. You can source these from local farms, online hatcheries, or your own flock if you have one.
- Thermometer and Hygrometer: Your incubator may have these built-in, but if not, they’re essential. They allow you to monitor the temperature and humidity levels inside the incubator precisely. Accuracy is key!
- Fresh Water: Maintaining the correct humidity involves adding water to the incubator. Make sure to use clean, fresh water and change it regularly to prevent bacterial growth.
- Candling Light: Allows to see inside and check on developing chicks.
- Grippy Shelf Liner: (Optional, but highly recommended!) This non-slip material goes in the incubator during the lockdown stage and hatch. It prevents newly hatched chicks from slipping and potentially injuring themselves.
- Hatch Day Setup: Before those chicks start pipping, have their post-hatch home ready! You’ll need:
- Plastic Bin: A clear, 20-gallon bin provides enough space initially.
- Heat Lamp: Keep the chicks warm with a heat lamp designed for chicks. Adjust the height to maintain a temp between 98-100 degrees F (36.5 – 37.5 degrees C) in one area of their bin.
- Bedding: Pine shavings or pine needles work well for chicks. Avoid cedar as it can be toxic.
- Chick Feed: Specially formulated feed with the right nutrients for baby chicks.
- Waterer: A shallow waterer designed for chicks minimizes the risk of drowning.
Optional, but Helpful:
- Syringe: Helps draw out water if you accidentally overfill the incubator’s water tank.
- Alternate Power Source: A generator or power bank is useful in case of power outages, which can be detrimental during the delicate incubation process.
Where to Get Fertile Eggs
There are two main ways to obtain fertile eggs for hatching:
- Acquiring from a Breeder or Hatchery: This is the simplest option, especially for beginners.
- Local Breeders: Search online or ask at feed stores for poultry breeders in your area. They’ll often have fertile eggs available for purchase, sometimes from specific breeds.
- Hatcheries: Many hatcheries ship fertile eggs directly to your home. This allows you to choose from a wider variety of breeds.
2. Collecting from Your Own Flock: If you have your own hens and a rooster, you can collect fertile eggs from your coop.
- Ensure a Rooster is Present: Only eggs laid by hens that have mated with a rooster will be fertile.
- Fresh Eggs: The fresher the egg, the better the hatch rate. Aim to collect eggs daily or every other day.
- Storage: Store eggs for incubation with the pointed end down at room temperature (around 60-70 degrees Fahrenheit) for no more than a week before placing them in the incubator.
Important Note: Regardless of how you obtain your eggs, never wash them before incubation. A hen’s natural protective coating helps prevent bacteria from entering the egg during hatching.
Why Temperature and Humidity Are So Crucial
Temperature Control: A Delicate Balance
Think of an egg as a tiny incubator itself. The developing chick relies on the heat from the hen to stay warm. Inside an incubator, maintaining a steady temperature (usually around 99.5°F (37.5°C)) is crucial. Here’s why:
- Too Hot: Temperatures that are too high can cause chicks to develop abnormally or even die. Excessive heat can also lead to dehydration and difficulty hatching.
- Too Cold: If the temperature dips too low, chick development will slow down. In severe cases, the chick may not be strong enough to hatch.
Humidity: Keeping the Perfect Moisture Balance
Along with temperature, humidity plays a vital role. Humidity refers to the amount of moisture in the air. Here’s how it affects hatching:
- Just Right: Proper humidity levels (around 50-60% early on, increasing to 65-70% for hatching) help the egg lose moisture at a healthy rate. This creates a crucial air sac inside the egg that the chick will need to breathe after hatching.
- Too Dry: If the air is too dry, the egg will lose too much moisture. This can make the chick weak and hinder its ability to pip (break through) the eggshell.
- Too Wet: Excess humidity can prevent air from entering the egg and make it difficult for the chick to breathe. It can also lead to the growth of bacteria inside the egg.
By precisely controlling temperature and humidity, an incubator creates an environment that mimics a hen’s warmth and allows chicks to develop healthily and hatch successfully.
How to Candle Developing Eggs
Candling is like taking an ultrasound of your developing chicks! This simple process lets you check on their growth and ensures only healthy eggs remain in the incubator. Here’s what you need to know:
When to Candle:
- Days 7, 10, and 18: These are the key check-in points. Check for:
- Day 7: Veins, movement, developing air pocket
- Day 10: Increased growth, larger air pocket, continued movement
- Day 18: Chick filling most of the egg, prepare for lockdown!
- Problem Eggs: Candle any eggs that seem questionable earlier (lack of development, unusual markings) to identify if they’re still viable.
Equipment:
- Candling Light: A bright flashlight or dedicated candling lamp works well. Even your phone’s flashlight can suffice in a pinch!
- Dark Room: Dimming the lights makes it much easier to see inside the egg.
Technique:
- Work Quickly and Carefully: Remove one egg at a time from the incubator to minimize temperature fluctuations.
- Hold Against Light: Place the egg against the light, with the larger, rounded end facing upwards.
- Look for:
- Movement
- A network of blood vessels
- An air pocket at the wide end of the egg
- The size and development of the chick inside
What to Do with Problem Eggs:
- No Development: Eggs that show no progress whatsoever on consecutive candlings should be removed to prevent contamination.
- Questionable Eggs: Sometimes, you might see a tiny spot or ring within the egg. Mark these eggs with a pencil and re-candle them at the next check-in point to determine if development continues.
Tips:
- Don’t Be Hasty: If you’re unsure, take your time. Sometimes your hand movements can be mistaken for movement in the egg.
- Practice Makes Perfect: Candling gets easier the more you do it!
When Things Go Wrong
Even with the best care, sometimes things don’t go quite as planned during incubation. Don’t worry – every experienced chicken keeper has been there! Here are some common troubleshooting scenarios and what you can do:
Problem: Nothing seems to be happening inside the egg.
- Candling is Key: Double-check if you candled your eggs at the beginning to confirm they were fertile. Unfertilized eggs won’t develop.
- Double-Check Your Settings: Did you start the incubation process with the right temperature and humidity levels? Even small fluctuations can cause problems.
- Patience is a Virtue: Sometimes, development is a little slow. Re-candle in a few days to see if there’s any progress.
Problem: Chicks are hatching too early or too late.
- Temperatures Off-Track: Temperature inconsistencies are the number one culprit. Recheck your thermometer for accuracy, and make sure the incubator’s heat source is functioning properly.
- Genetics: Some breeds naturally hatch a bit earlier or later than others. If you are hatching multiple kinds of eggs, don’t be surprised if they’re not perfectly in sync.
General Tips:
- Document EVERYTHING: Keep a notebook and write down the temperature, humidity, and any other observations you make throughout the process. This will help pinpoint problems if something goes wrong.
- Don’t Give Up Too Quickly: Chicks can be incredibly resilient. Sometimes, even those with seemingly slow progress can fully hatch and grow into healthy birds.
- Resources: Online forums and experienced chicken keepers are a great source of help. Don’t be afraid to ask questions!
Important Note: Sadly, sometimes, no matter what we do, certain chicks won’t survive. It’s a natural part of the process.
Hatching chicks at home is a rewarding experience filled with wonder and anticipation. By following these steps, carefully controlling the environment, and observing the amazing process of development, you’ll soon have the joy of welcoming new, fluffy members into your life.
Now, get ready to embrace the chirps.


This is so informative! Thanks for this tutorial!