
Mud Kitchen Painted Food Rocks

Inside: How to make your own adorable (and strangely realistic) food rocks for a mud kitchen. Fun to make, and even more fun to play with. I’ll walk you through all 26 designs.
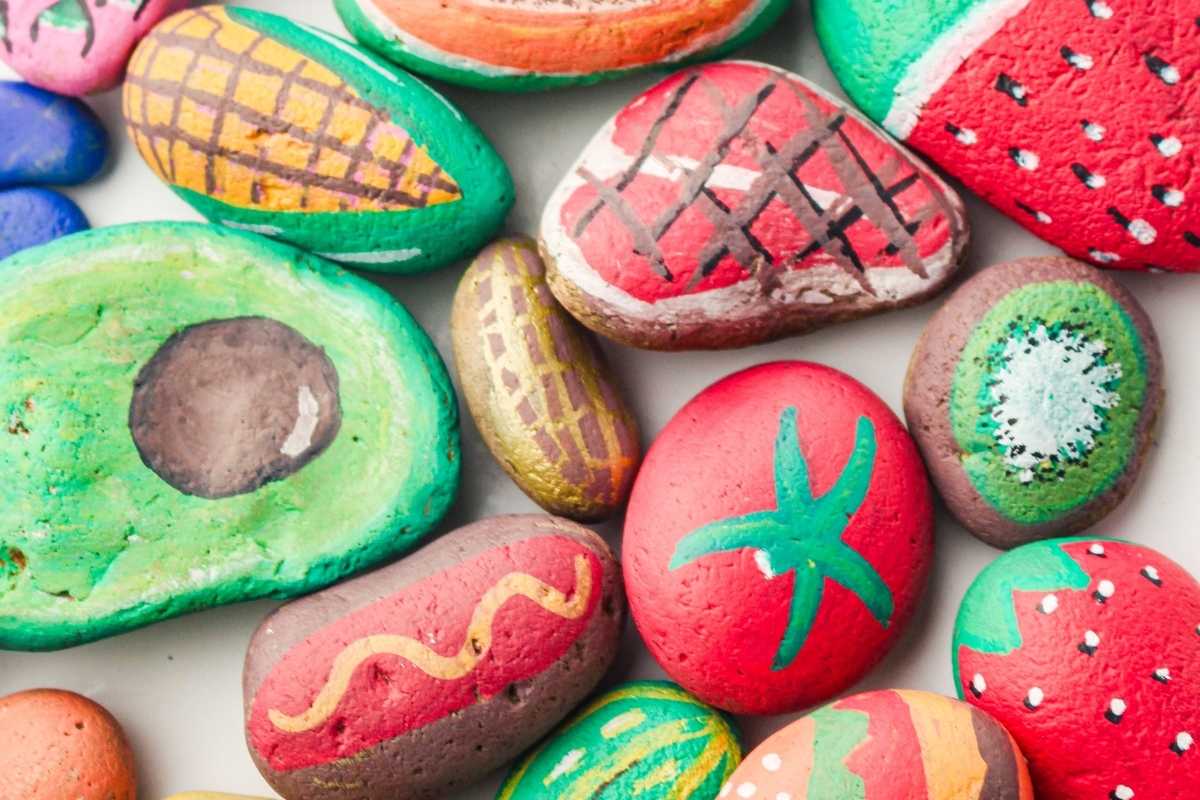
What You’ll Need (for the Full 26-Piece Set)
Stones: 26 smooth, flat stones (plus a few extra, just in case!). You’ll want one stone for each food. Smoother stones make the details way easier, so leave the bumpy ones in the yard. And there is no shame in buying rocks! A bag of river rocks from the craft store or garden center works great. They’re smooth, clean, and all about the same size.
Acrylic craft paint for the base coats:
- White
- Black
- Red
- Bright pink
- Light pink
- Yellow
- Light yellow
- Orange
- Light brown
- Dark brown
- Cream
- Green
- Dark green
- Dark blue
- Light blue
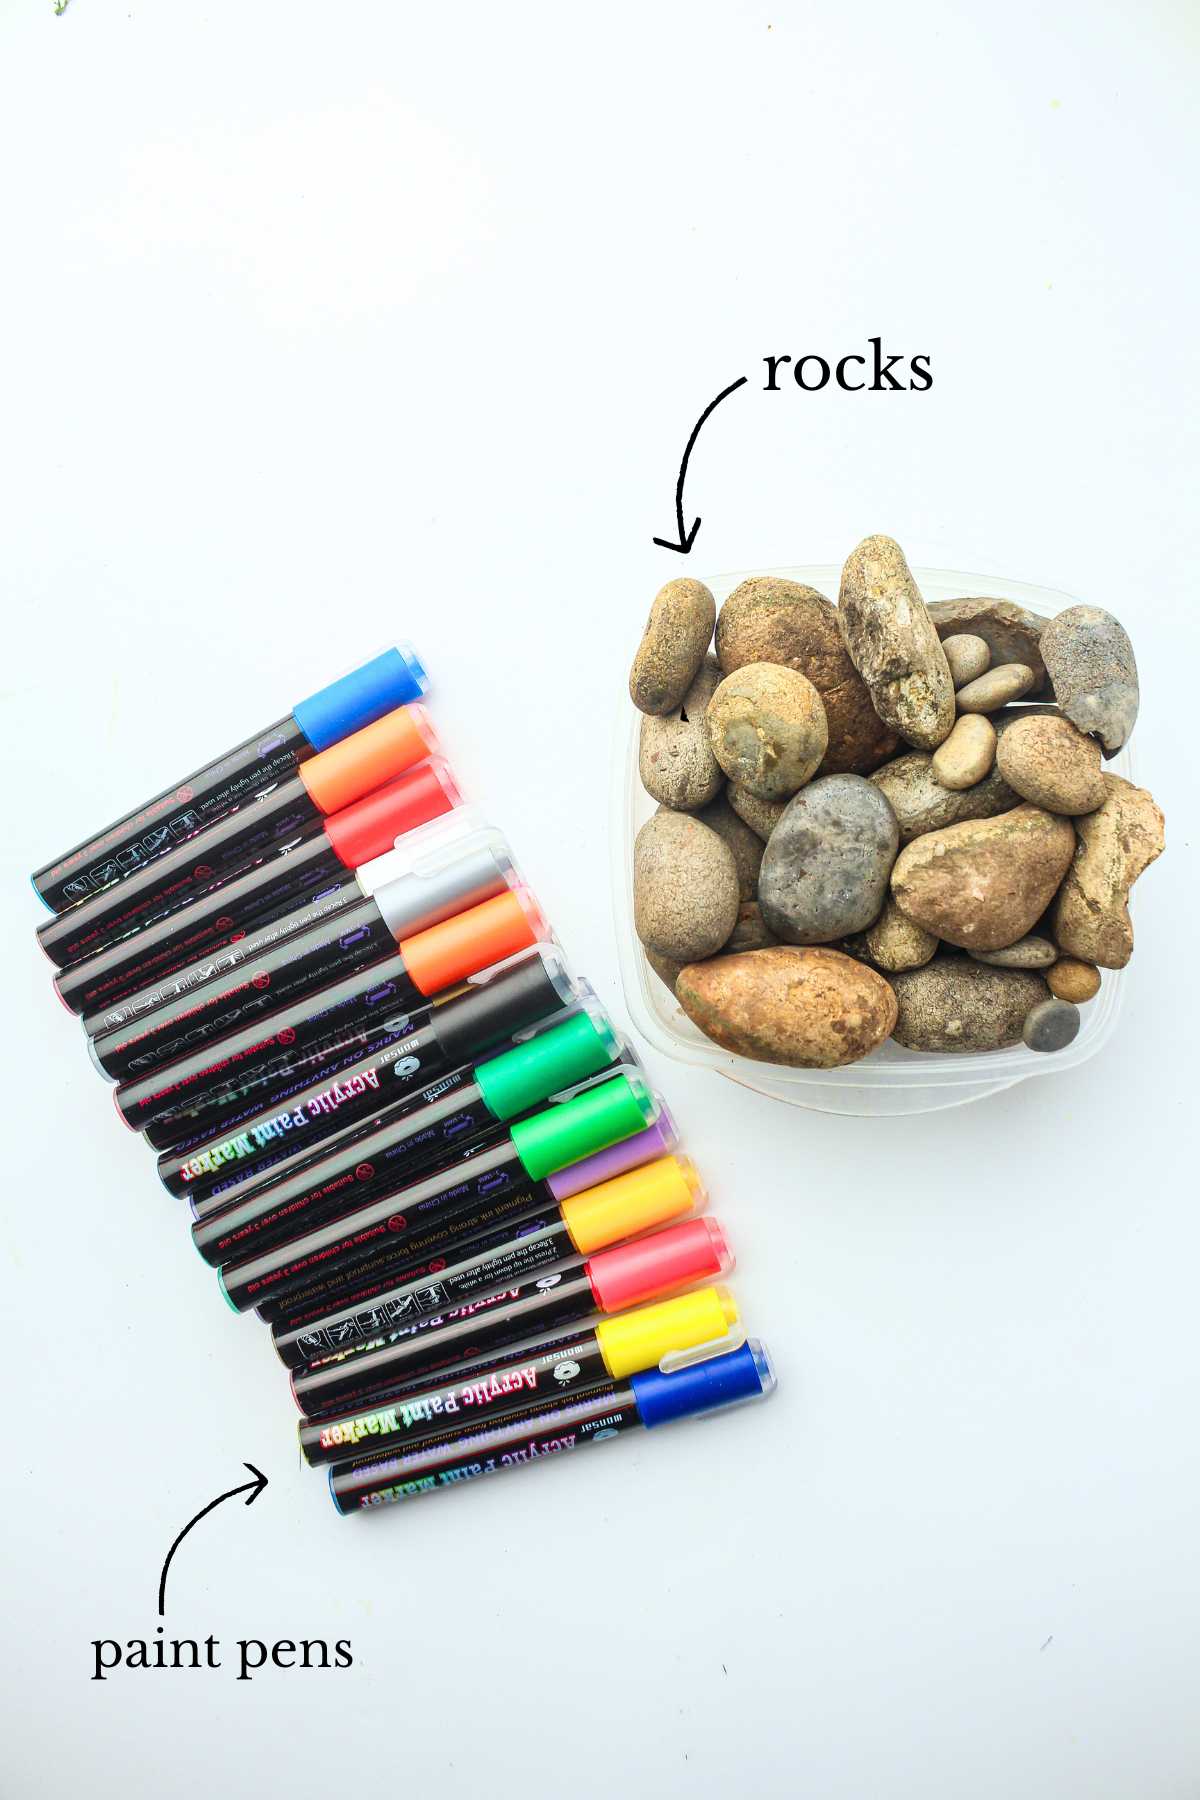
Paint pens for the details. All the seeds, outlines, grill marks, and sprinkles are much easier with pens than a brush. At minimum you’ll want black and white, plus a few bright colors for the sprinkles (whatever you have is fine).
Clear sealer. A spray-on acrylic sealer is easiest. These rocks are headed for a mud kitchen, so they need it.
A medium flat brush for the base coats.
A fine detail brush (size 0 or smaller!) if you’d rather brush the details instead of using pens. A regular kids’ brush is just too thick for seeds and outlines.
How to Paint a Food Rock
Every single one of these follows the same four steps. Learn it once and you can make the whole set. But I also have step-by-step photos and instructions for each individual food if you keep on reading.
1. Wash and dry the stones
Hunt for smooth stones with a mostly flat face, and grab more than you think you need. Look for shapes that already look like food. A long skinny one is basically a banana, and a fat round one is halfway to a burger already. 😊
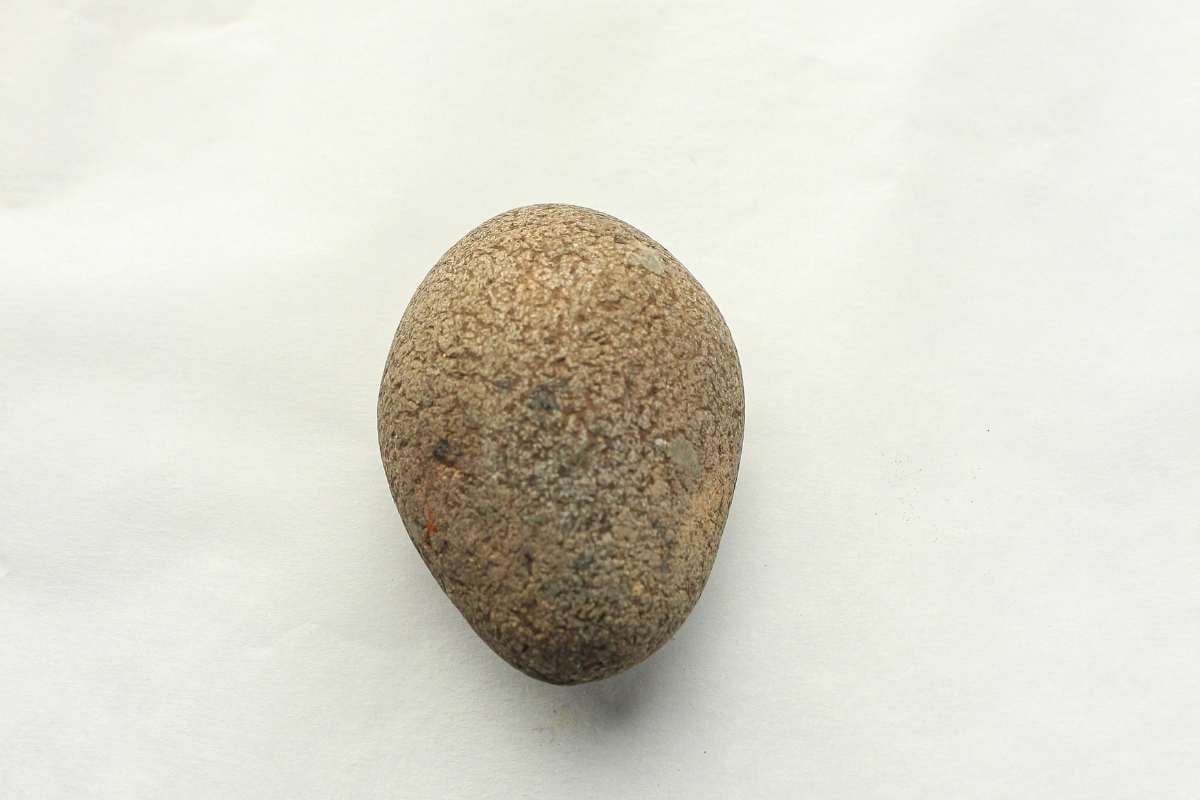
Wash them well and let them dry completely. Paint won’t stick to a dusty or damp stone, and a base coat that peels takes the whole design with it.
2. Paint the base coat
Every food starts with one solid coat of acrylic. Do all the bases in one sitting so the stones can dry while you clean up. Each design below tells you its base color in step 1.
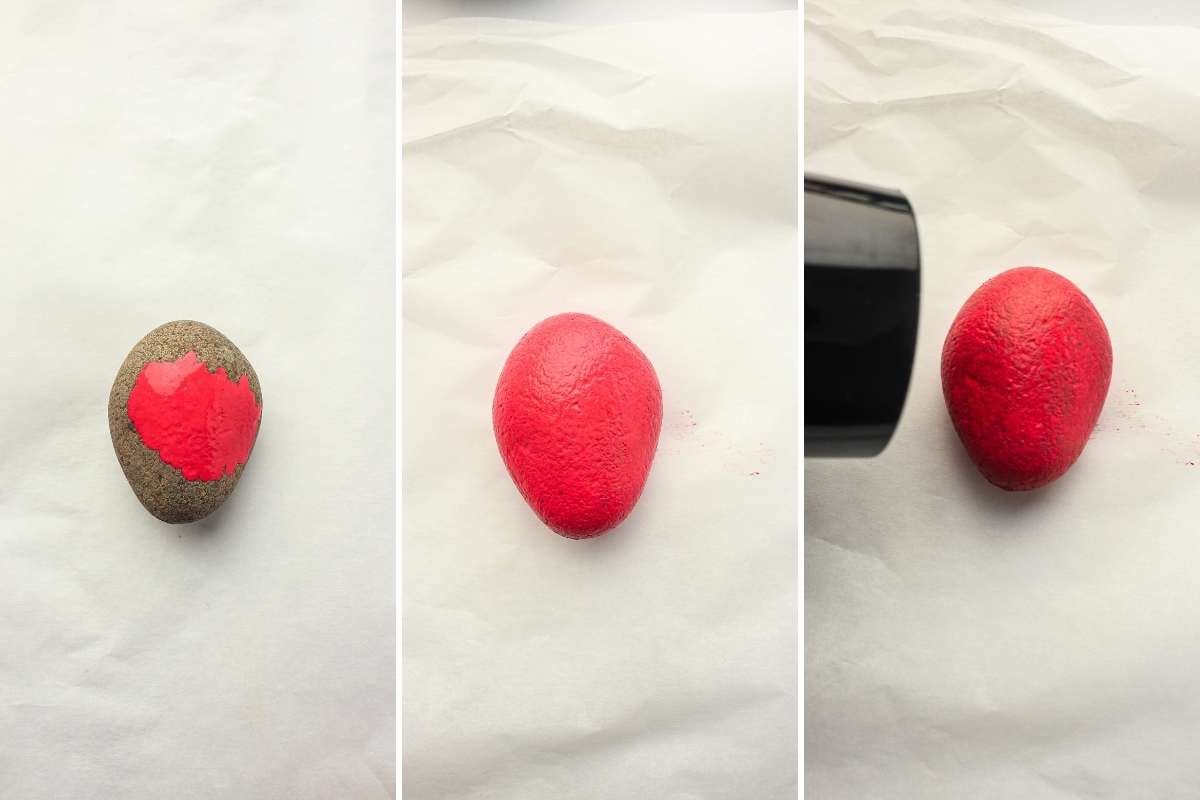
Darker stones usually need two or three coats, and each coat has to dry fully before the next. Acrylic dries fast (usually 20 to 30 minutes between coats), but watch the paint, not the clock. If the base is even a little tacky, your detail lines will drag and smear through it.
3. Add the details
This is where the magic happens. The seeds and sprinkles and outlines are what makes these look like food and not just painted rocks. Use your paint pens (or a tiny detail brush) and follow the steps for each design below.
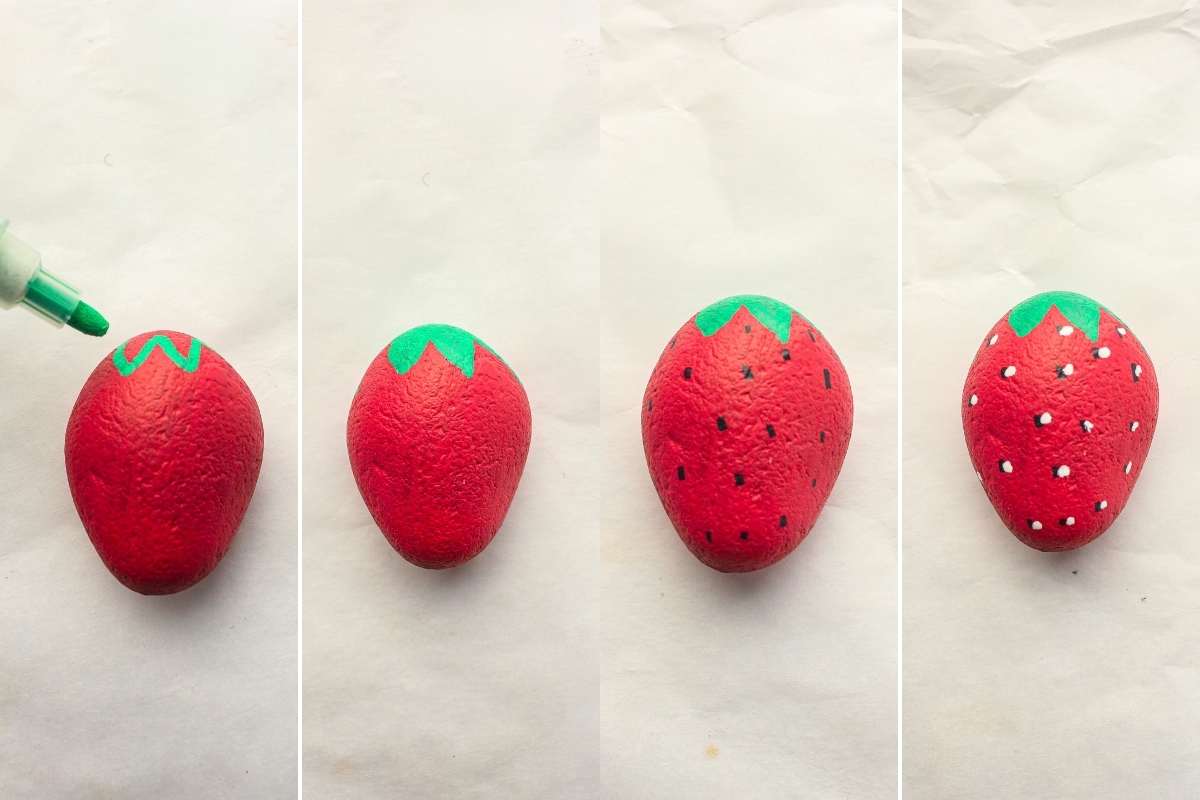
A few tricks that come up again and again:
- Don’t skip the black outlines! Without them a burger just looks like a striped rock. With them, it’s a burger. They also hide wobbly edges and make it all look like you meant to do it. 🙂
- Blend with your finger, not a brush. For the kiwi, mango, and avocado, a brush leaves streaks, but your finger makes it look like actual fruit. Trust me on this one! (Acrylic craft paint washes right off skin with soap and water, so let the kids do this part.)
- The tiny white dot trick. Wherever there are black seeds (watermelon, strawberry), paint a tiny white dot right next to each one. That little dot is what makes the seeds pop off the stone.
4. Let them dry, then seal
Let everything dry fully. Then give the rocks two coats of clear sealer and let that cure before playtime.
Then hand them over and let the pretend cooking begin.
All 26 Designs, Step by Step
Hamburger
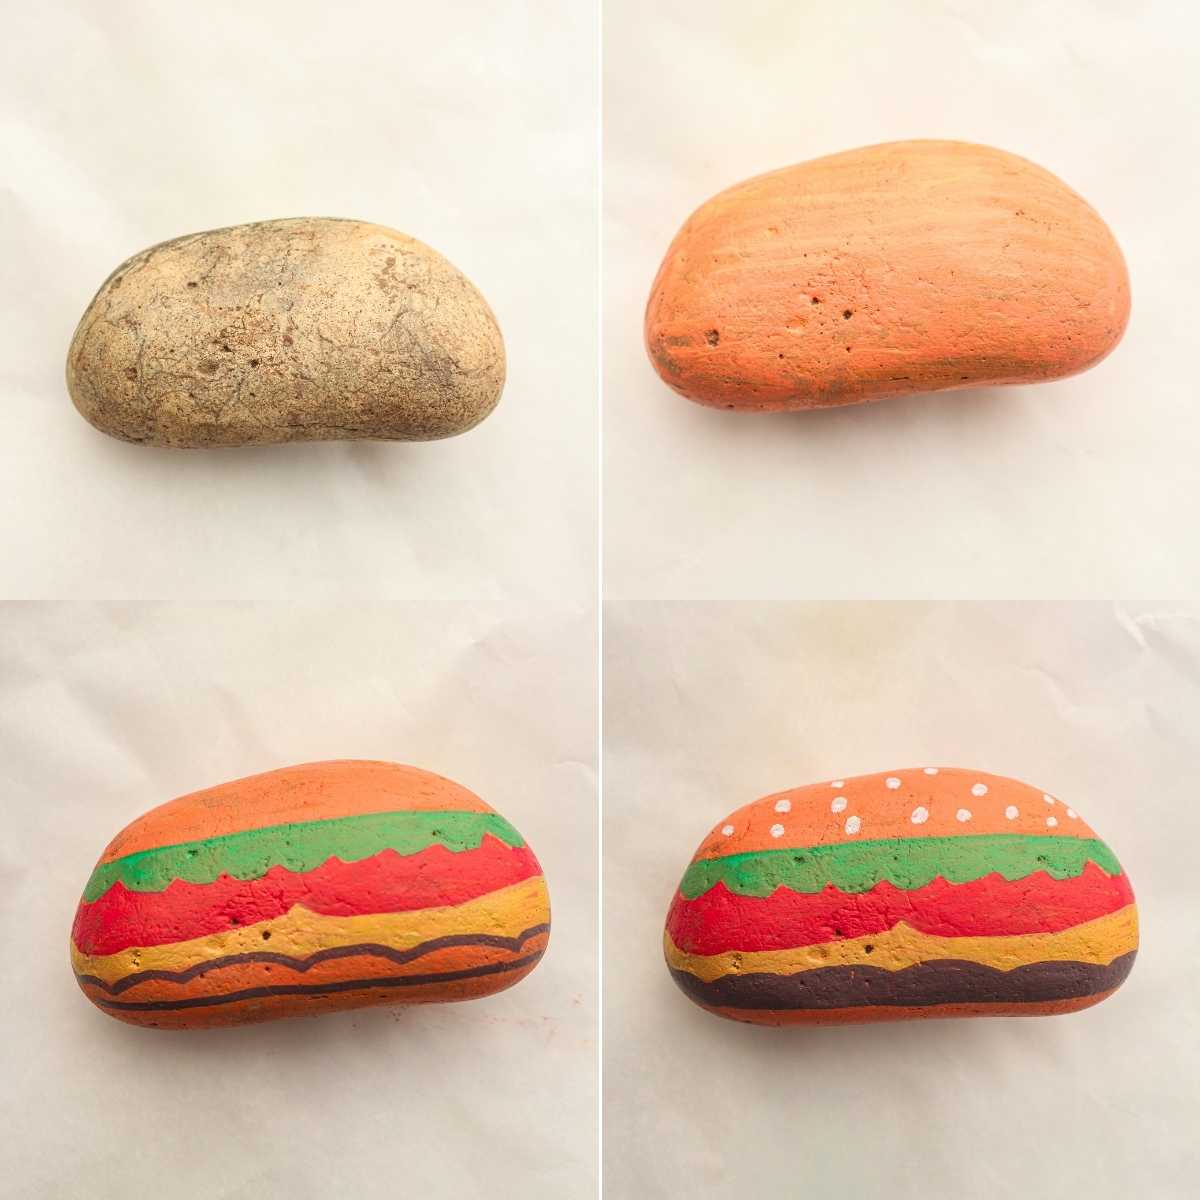
- Paint the entire stone light brown and let it dry.
- Paint the fillings across the middle: a green lettuce layer, a red tomato layer, a yellow cheese layer, and a darker brown patty.
- Add black outlines between the layers to define the fillings.
- Dot sesame seeds on the top bun and let it dry.
Hot Dog
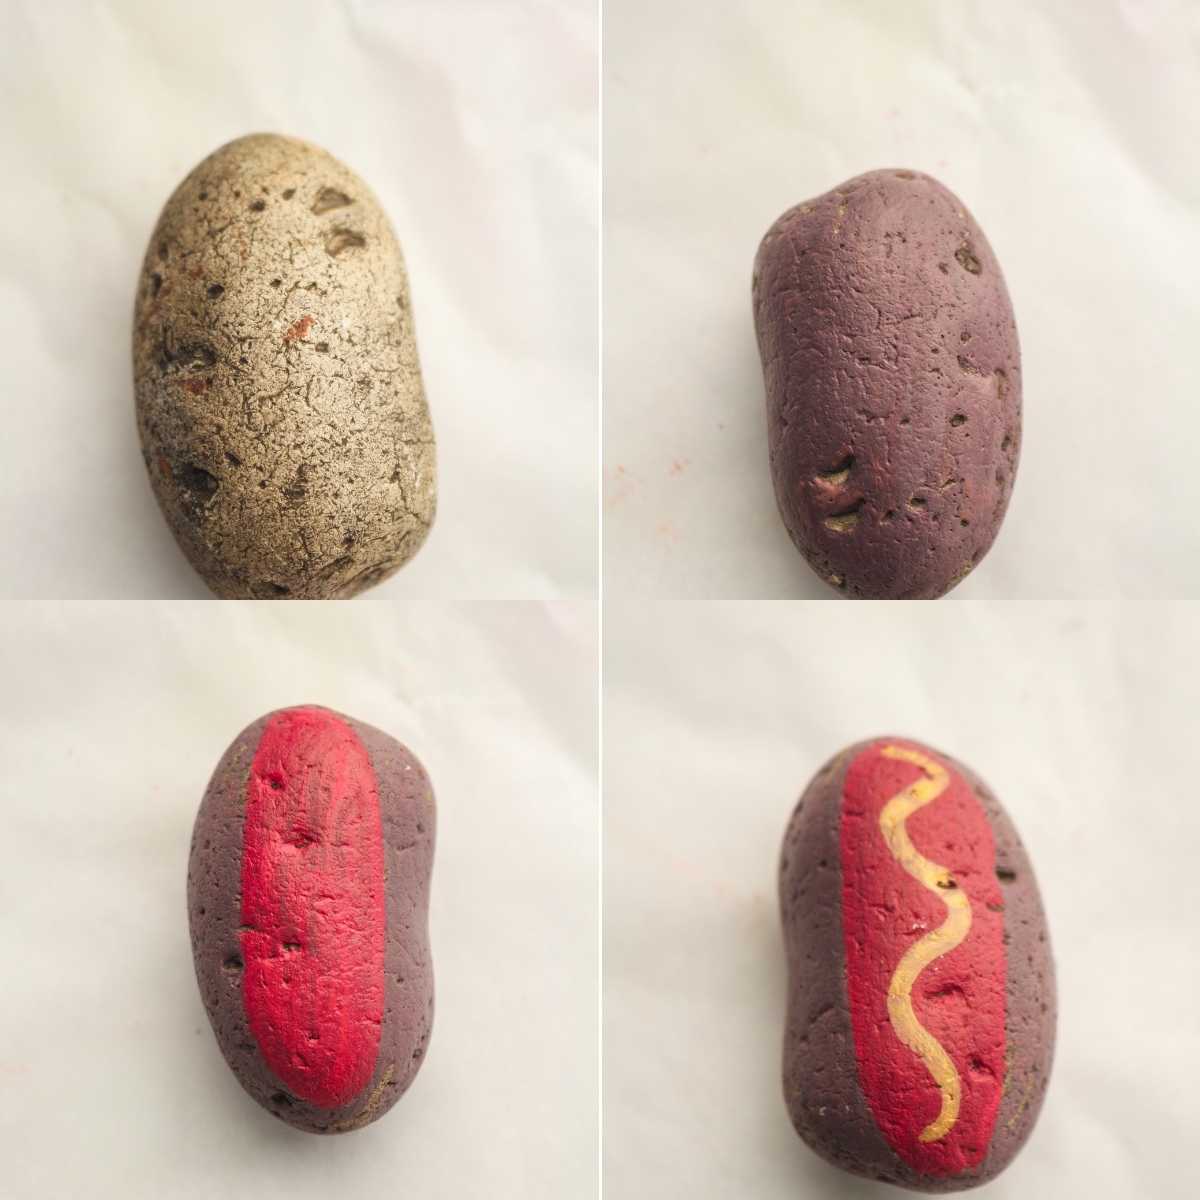
- Paint the entire stone light brown and let it dry.
- Paint a red strip down the center for the sausage.
- Add a curly yellow mustard line over the sausage.
- Outline in black if you like, then let it dry.
Steak
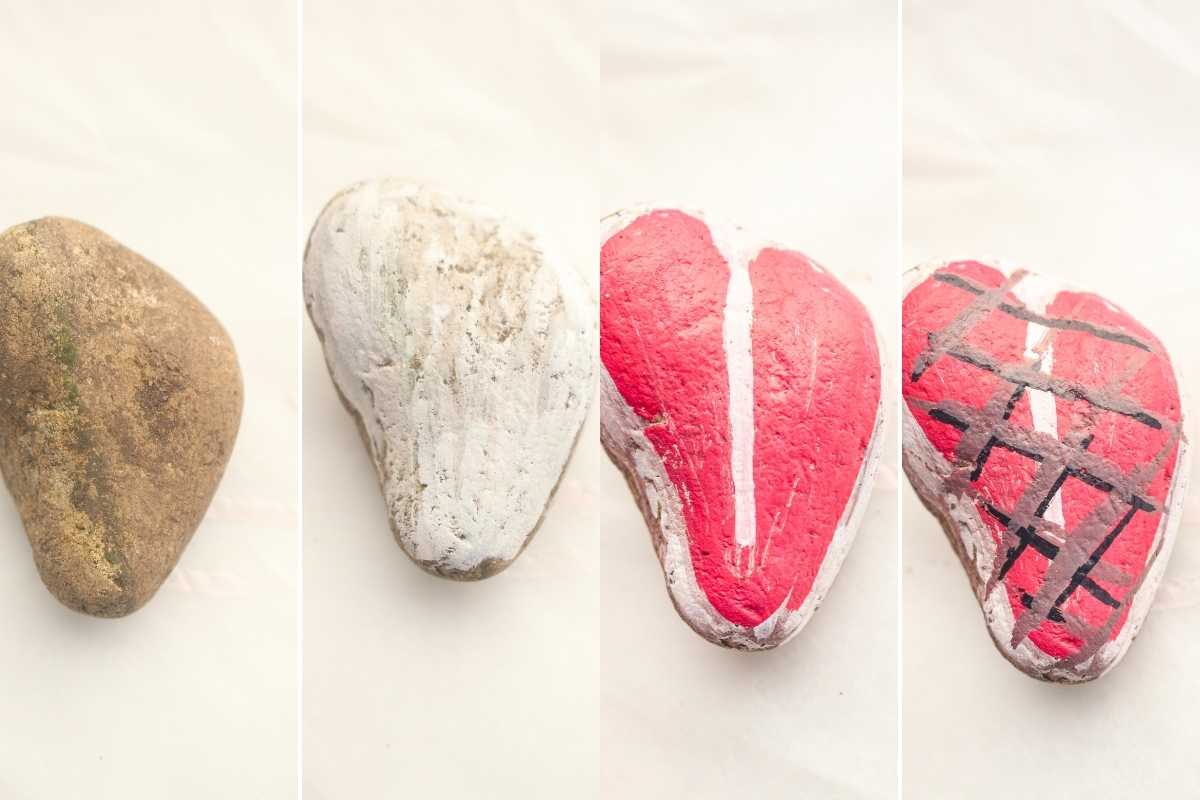
- Paint the entire stone white and let it dry.
- Paint two red sections in the center, leaving a white border for that marbled look.
- Streak a lighter pink highlight through the red.
- Crisscross black and brown grill marks over the top and let it dry.
Fried Egg
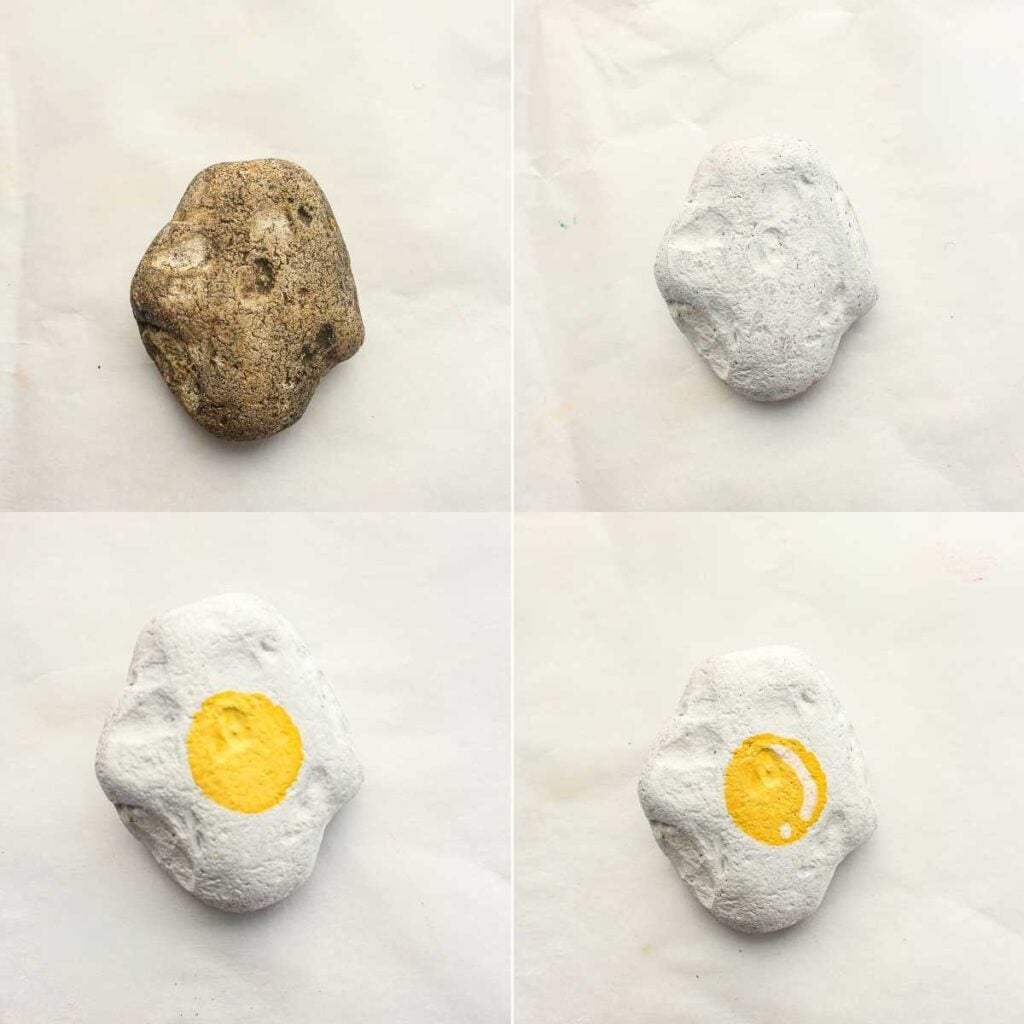
- Paint an uneven white egg shape and let it dry.
- Paint a yellow circle in the center for the yolk.
- Add a little orange shading to one side of the yolk.
- Finish with a small white semicircle and a tiny white dot on the yolk for shine.
Whole Egg
- Paint the entire stone cream (or white) and let it dry.
- Add a second coat if the stone shows through.
- Add light brown speckles for a farm-fresh look.
- Finish with a soft white highlight on one side and let it dry.
Ice Cream Cone
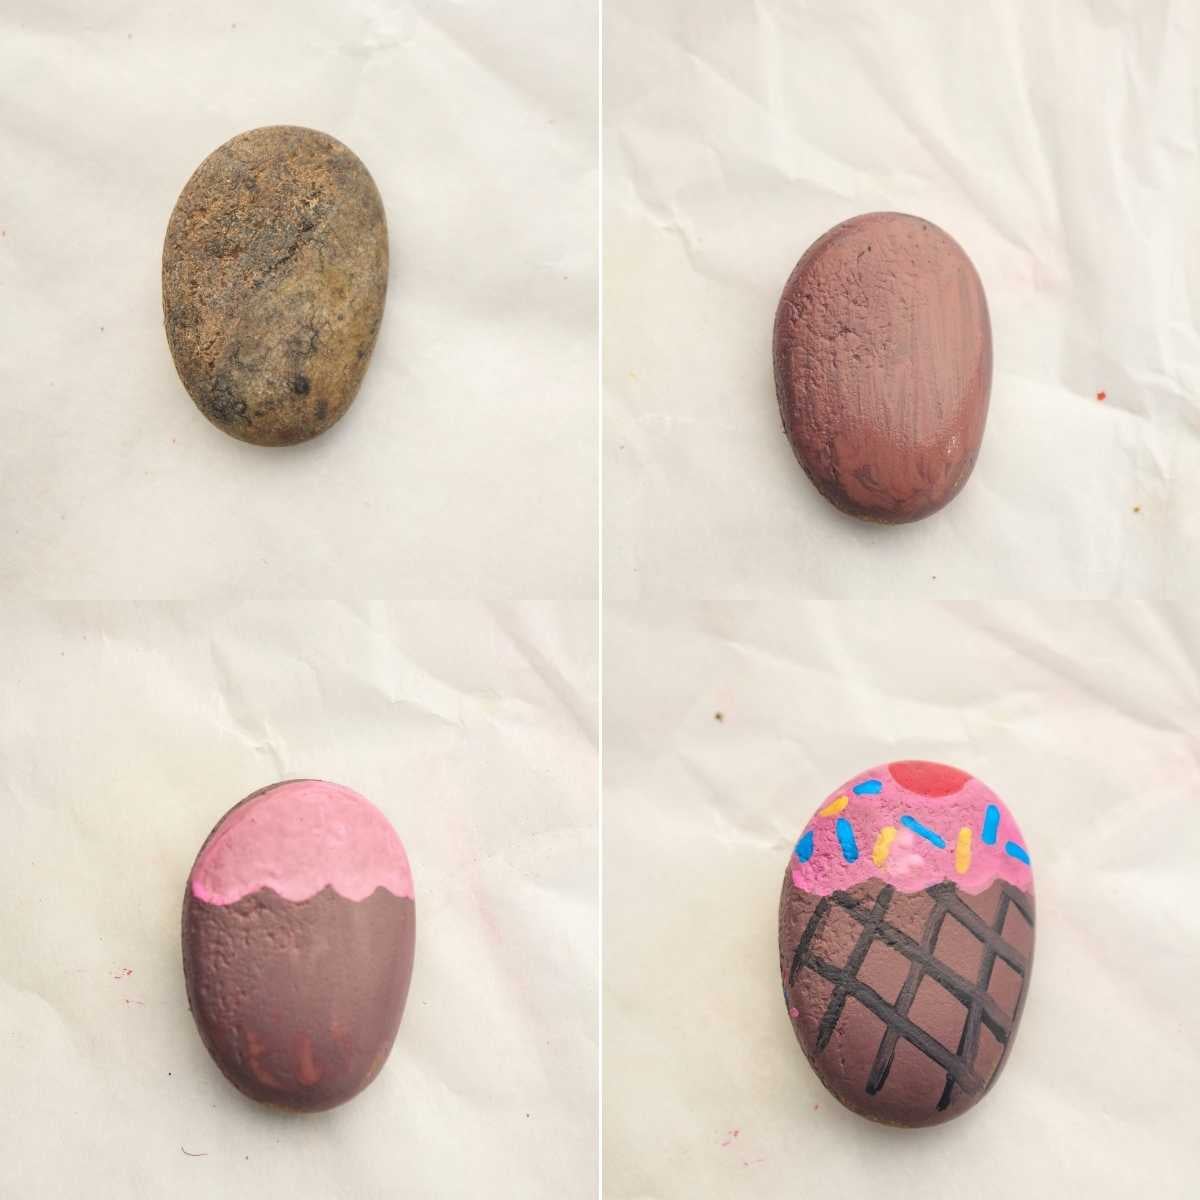
- Paint the cone light brown and add crisscross lines for the waffle pattern.
- Paint a fluffy pink scoop on top of the cone.
- Add a small red cherry on top.
- Add colorful sprinkle lines over the scoop and let it dry.
Pink Sprinkle Donut
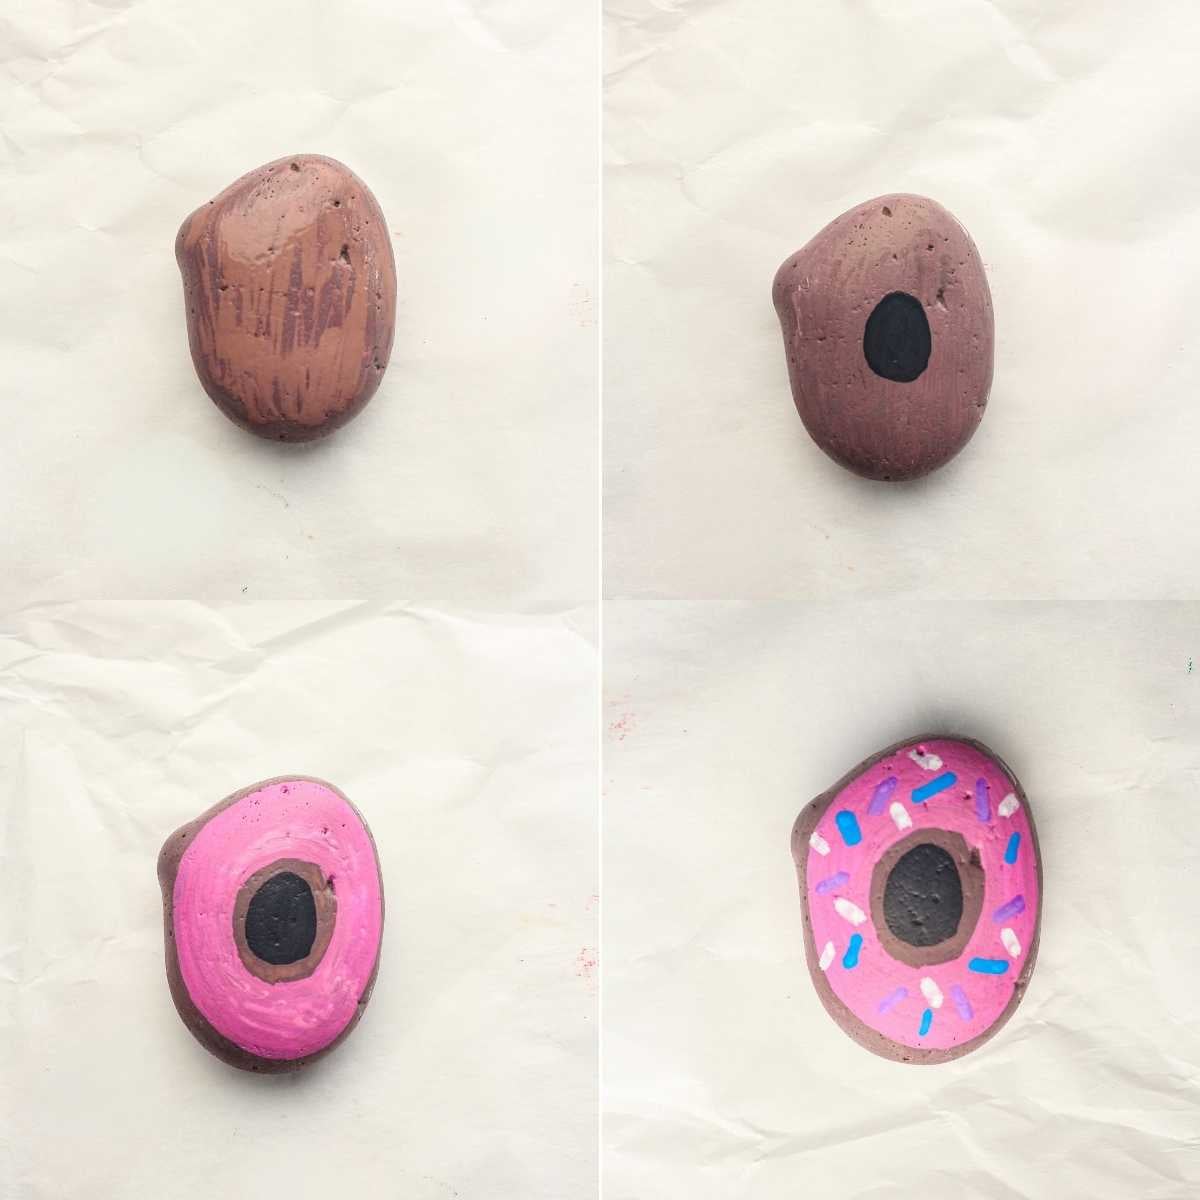
- Paint the entire stone light brown and let it dry.
- Paint a black oval in the center for the donut hole.
- Paint pink icing over the top half, leaving a little of the “dough” showing around the hole and edges.
- Add colorful sprinkles over the icing and let it dry.
Lemon
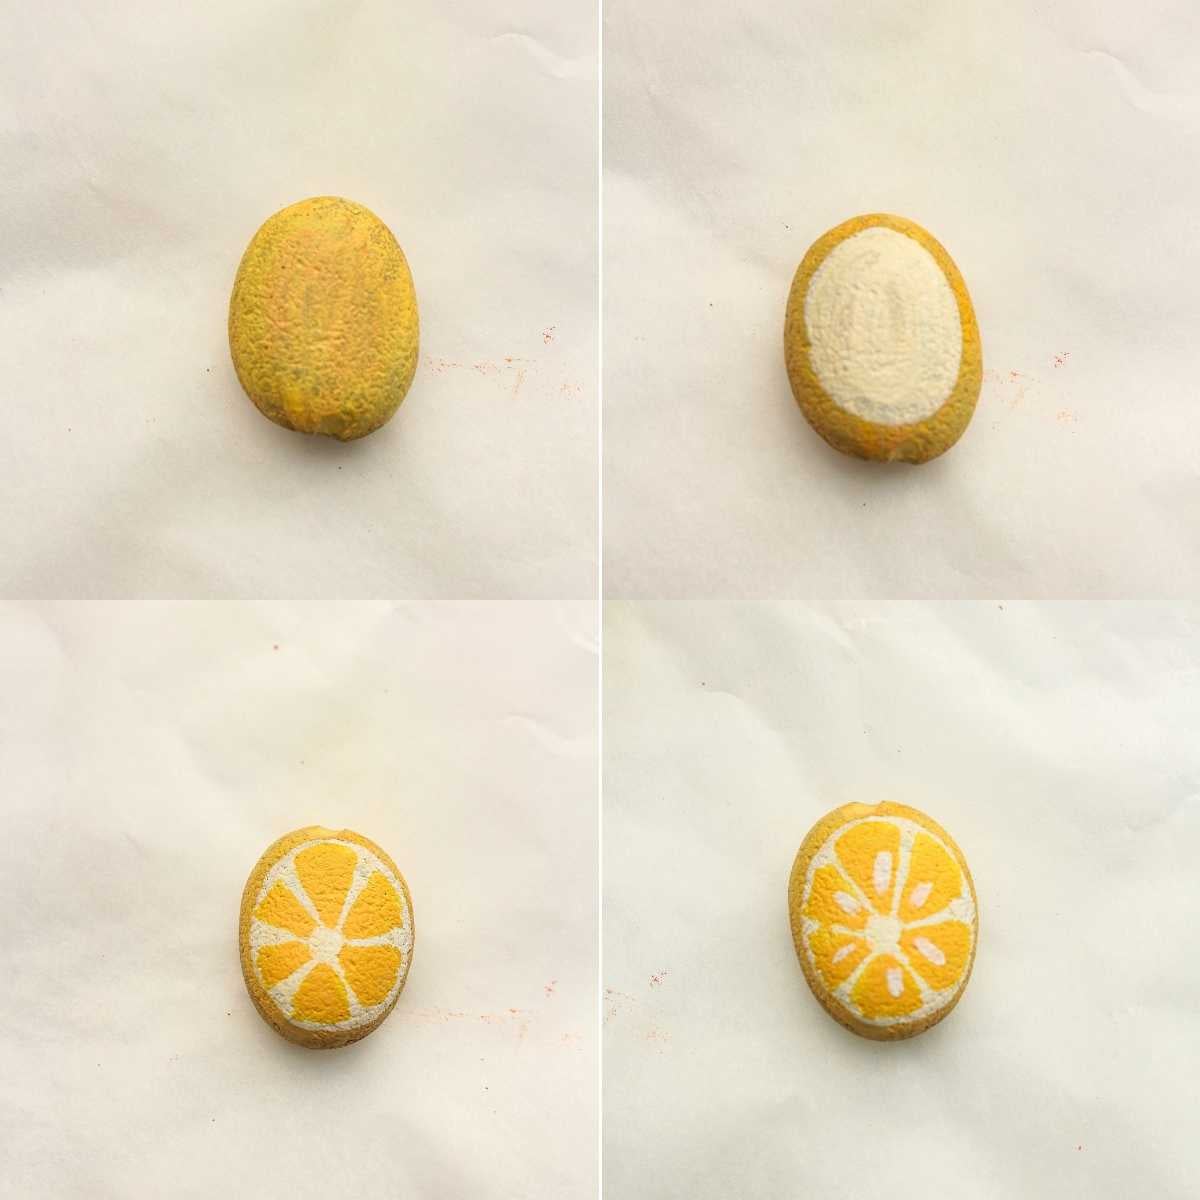
- Paint the entire stone yellow.
- Add a lighter yellow center section.
- Paint white segment lines from the center outward.
- Finish with a thin yellow outline around the edge.
Orange Slice
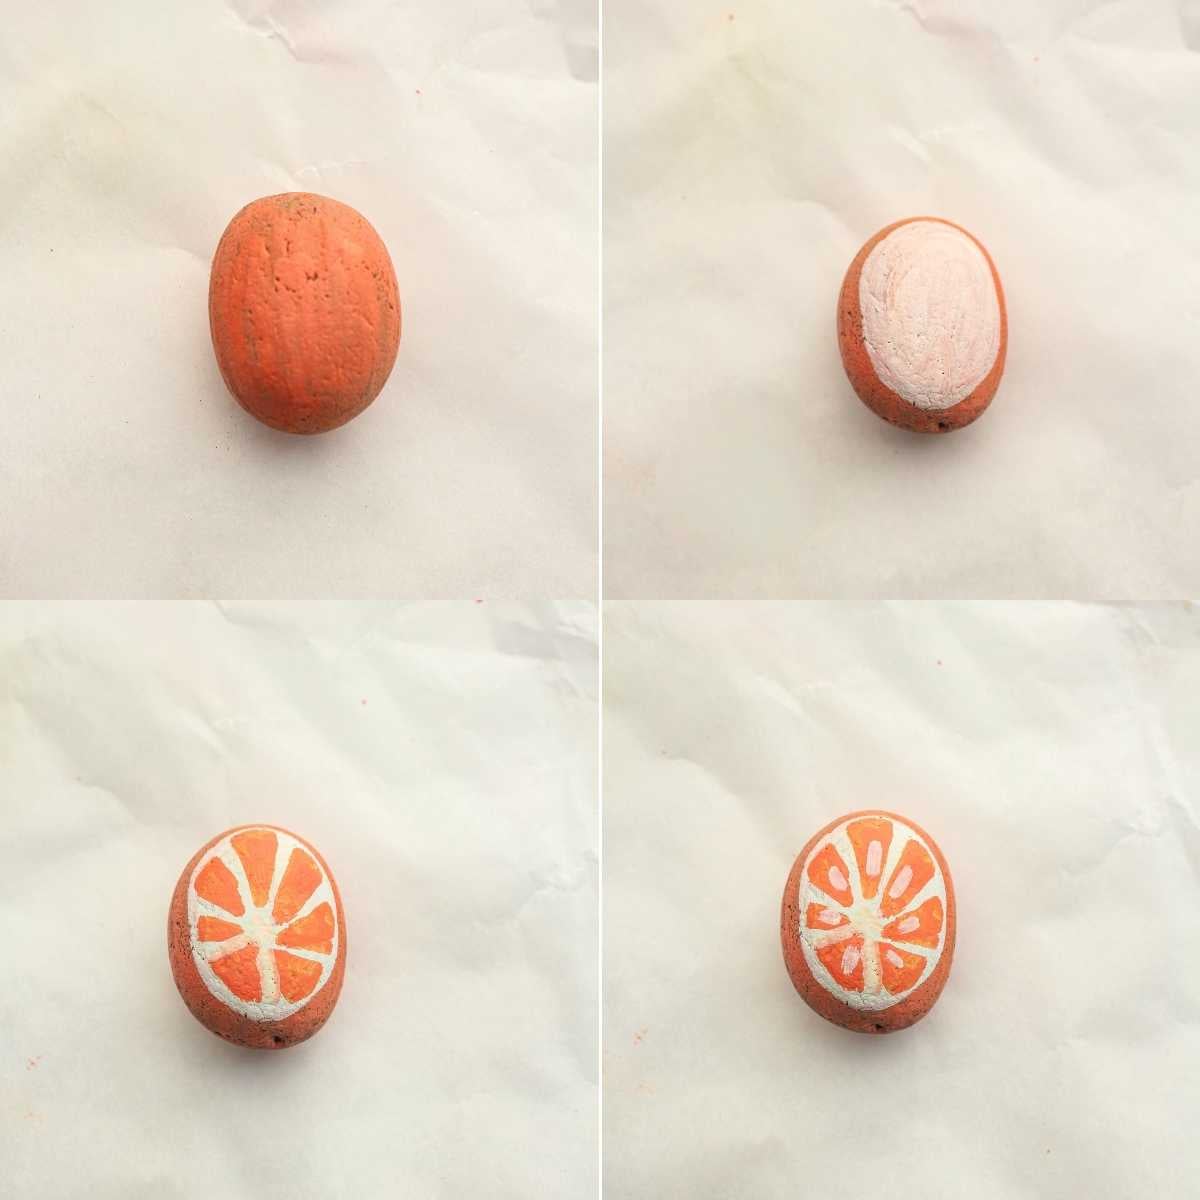
- Paint the entire stone orange and let it dry.
- Paint a white circle in the center.
- Paint orange segment lines from the center out to the edge.
- Add a thin orange outline around the rim if you like, then let it dry.
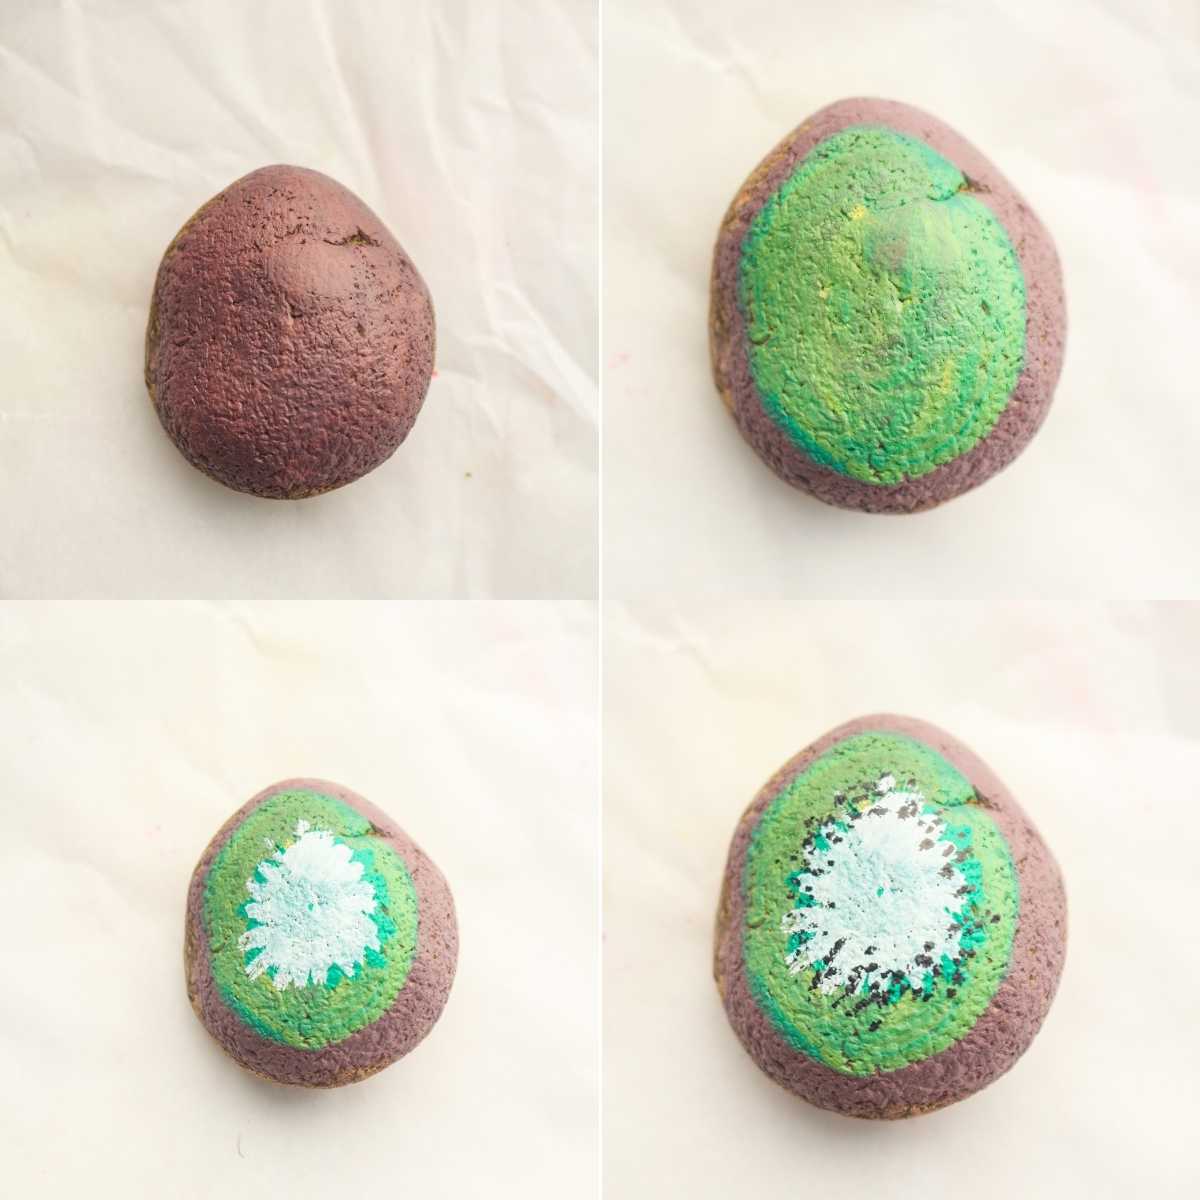
Kiwi Slice
Save This Post
You'll join my email list which you will love. And if you don't, unsubscribe in one click. ❤️
- Paint the entire stone brown and let it dry.
- Paint a green circle in the center, blending a little yellow in with your finger.
- Paint a dark green starburst in the middle, then once it’s dry, a smaller white starburst on top.
- Dot small black seeds around the white center and let it dry.
Apple Slice
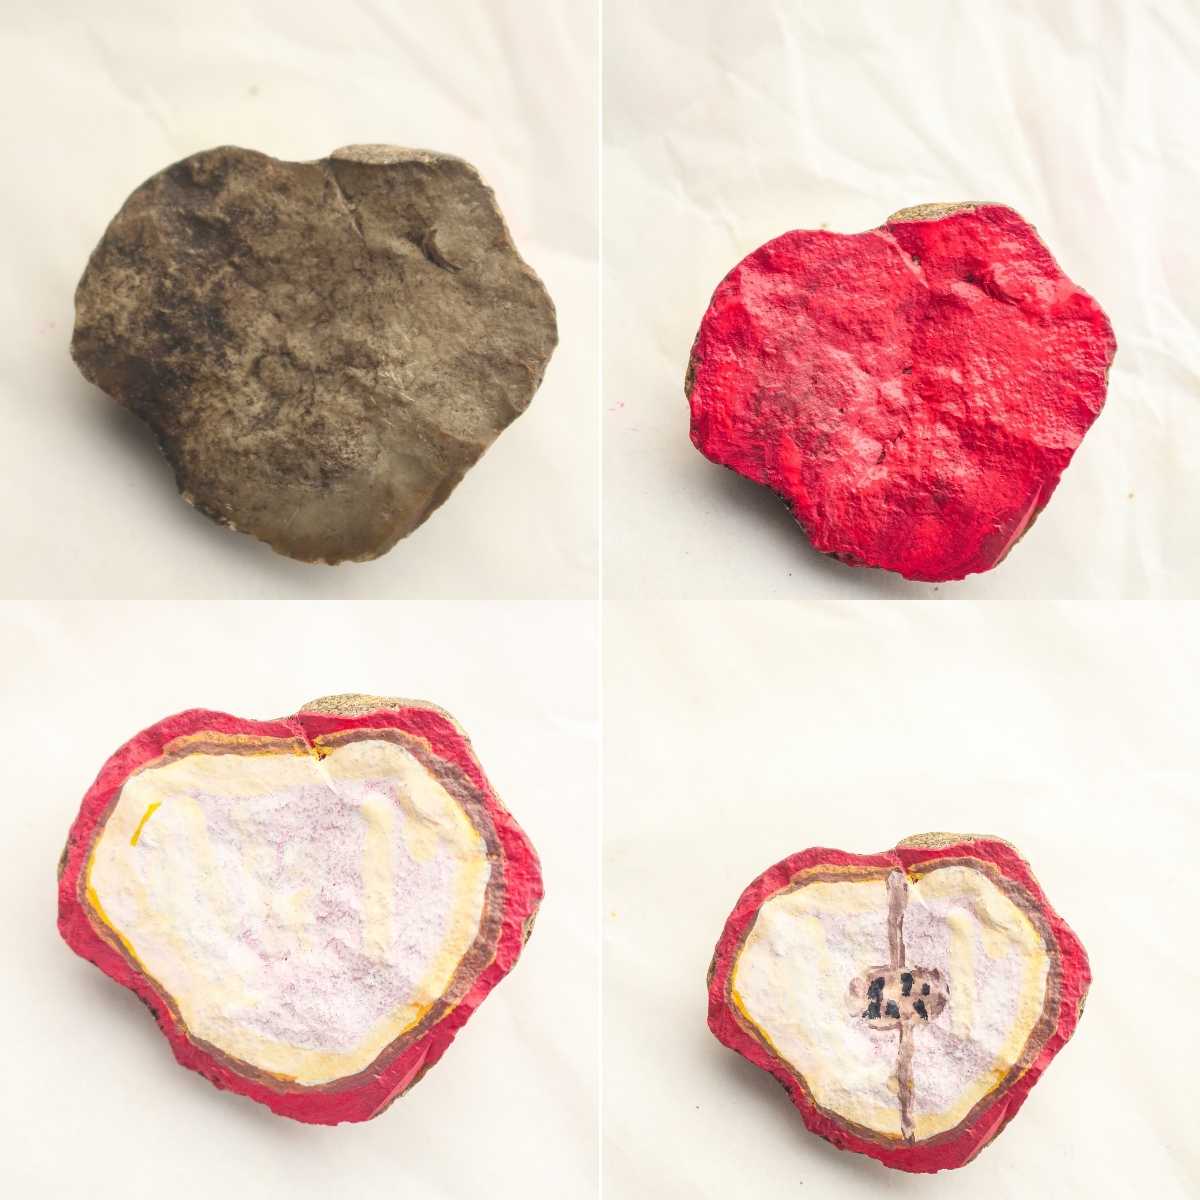
- Paint the entire stone red and let it dry.
- Paint a big white apple shape in the center, leaving a red border of “skin.”
- Add a thin brown line down the middle and a little brown seed cluster in the center.
- Add a light yellow outline between the skin and the flesh, then let it dry.
Papaya Half
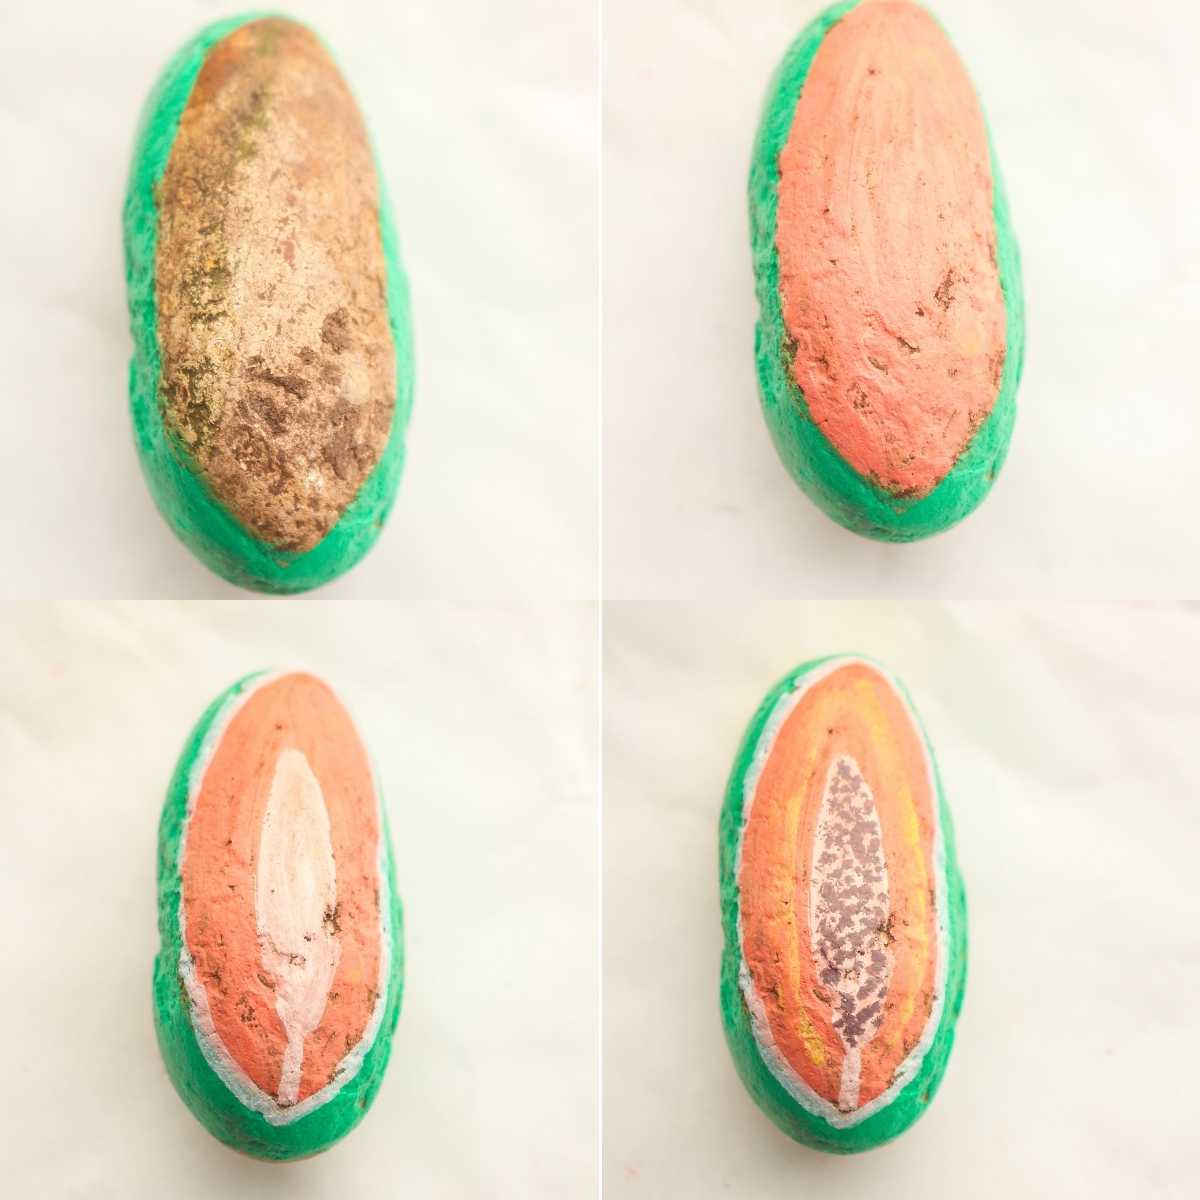
- Paint one side of the stone green for the outer skin.
- Paint a thin green outline around the cut side.
- Paint the flesh orange, leaving a white oval in the center.
- Dot black seeds all through the white center and let it dry.
Dragon Fruit
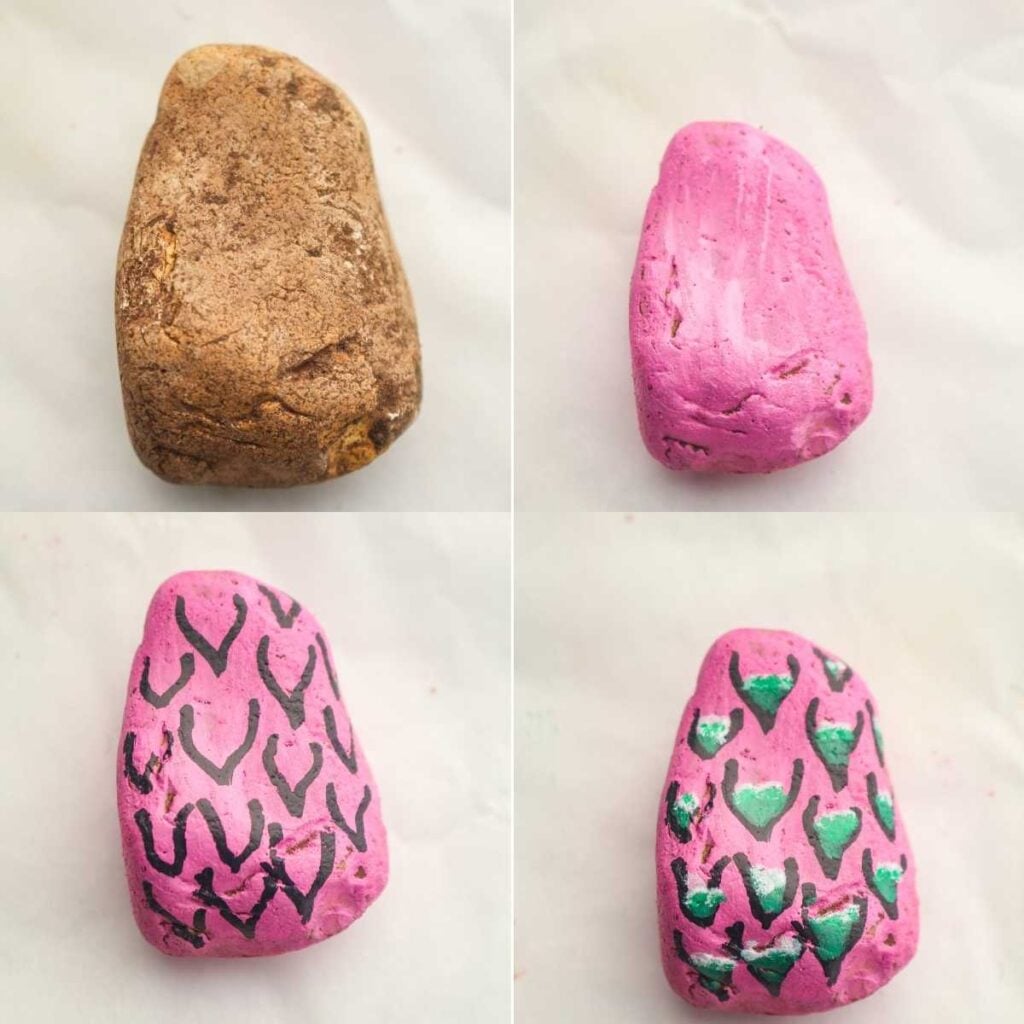
- Paint the entire stone bright pink and let it dry.
- Paint curved V-shaped scales all over.
- Fill each scale partly with green and add a thin white line along one edge of each scale.
- Add a few more white highlight lines through the scales for depth, then let it dry.
Mango
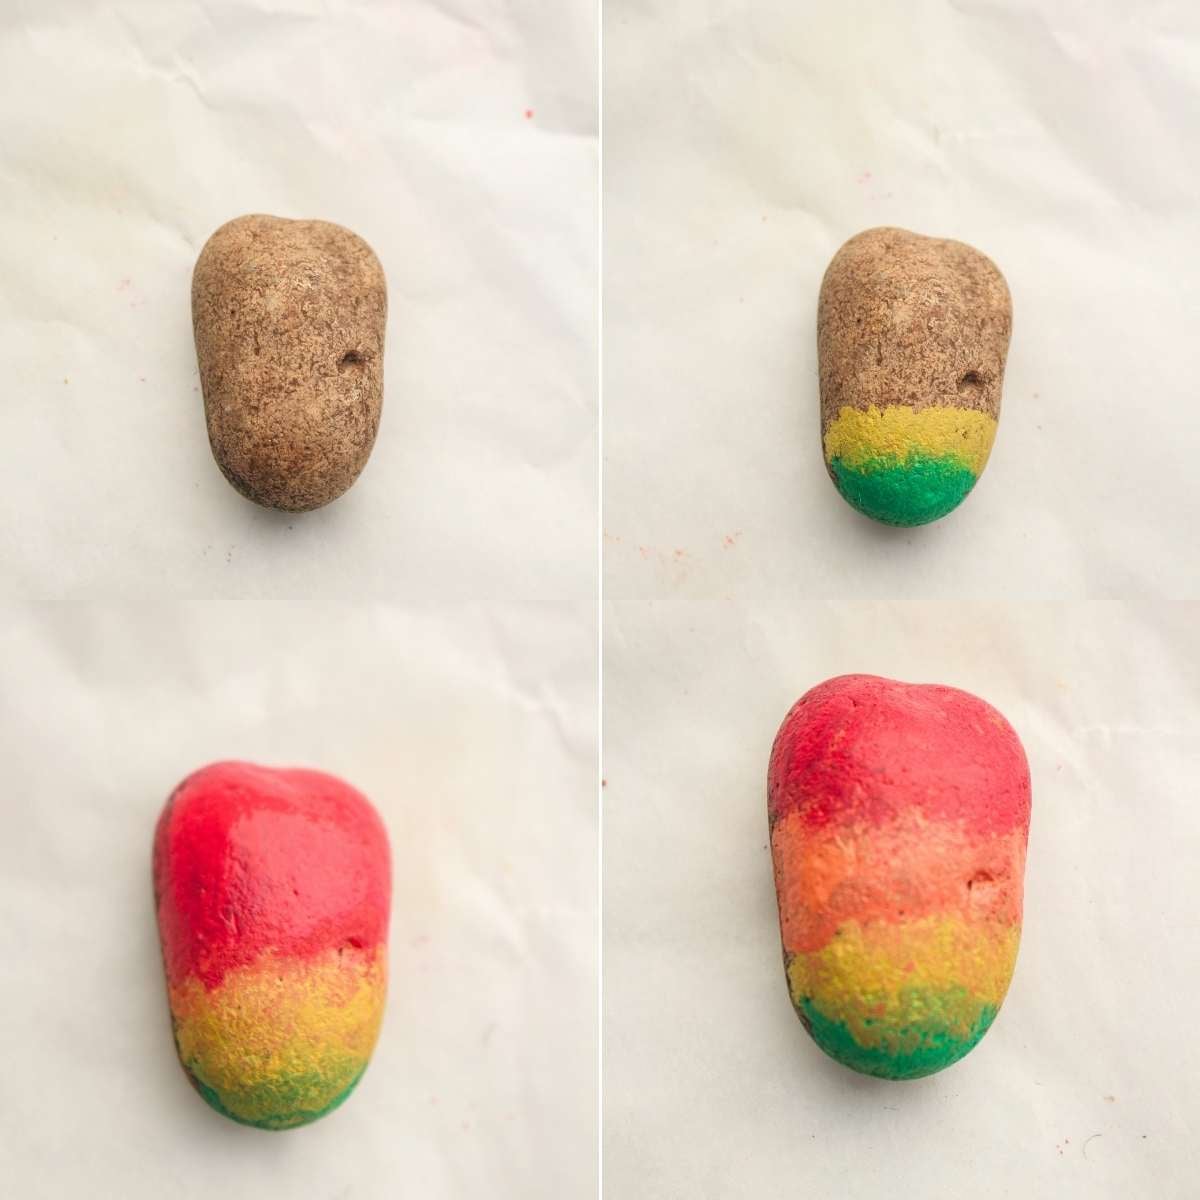
- Paint the bottom portion of the stone cream and let it dry.
- Paint the main body yellow.
- Add orange and red around the edges, blending gently with your finger.
- Keep blending until the colors fade into each other, then let it dry.
Banana
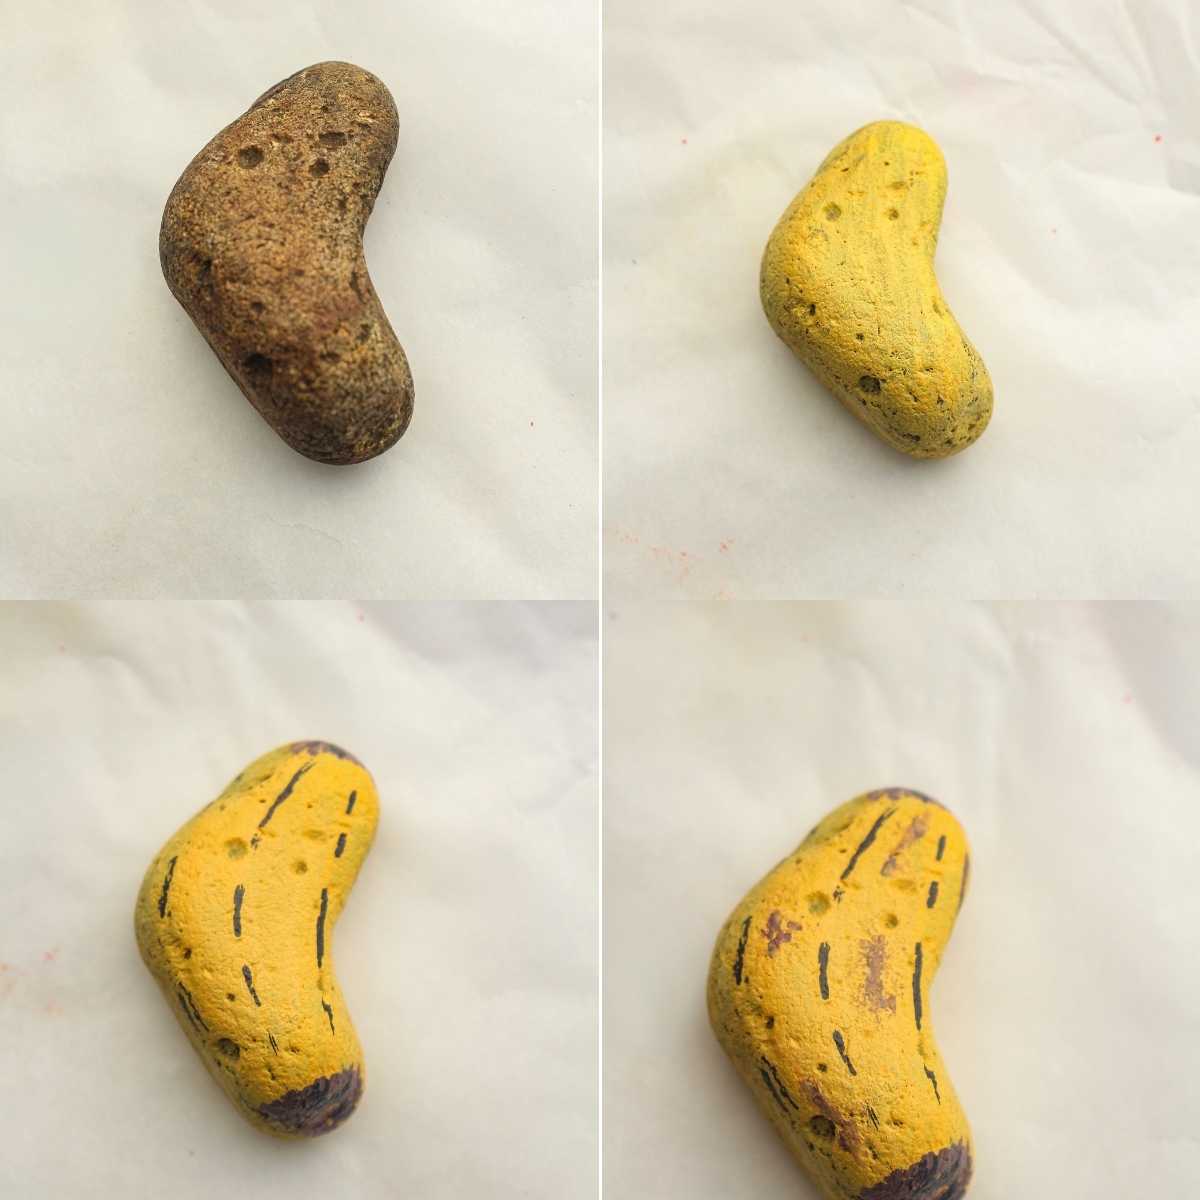
- Paint the entire stone yellow and let it dry.
- Paint the stem and tip dark brown.
- Add a few thin vertical lines down the banana.
- Add small brown speckles and patches so it looks ripe (and not like a yellow canoe!), then let it dry.
Watermelon Slice
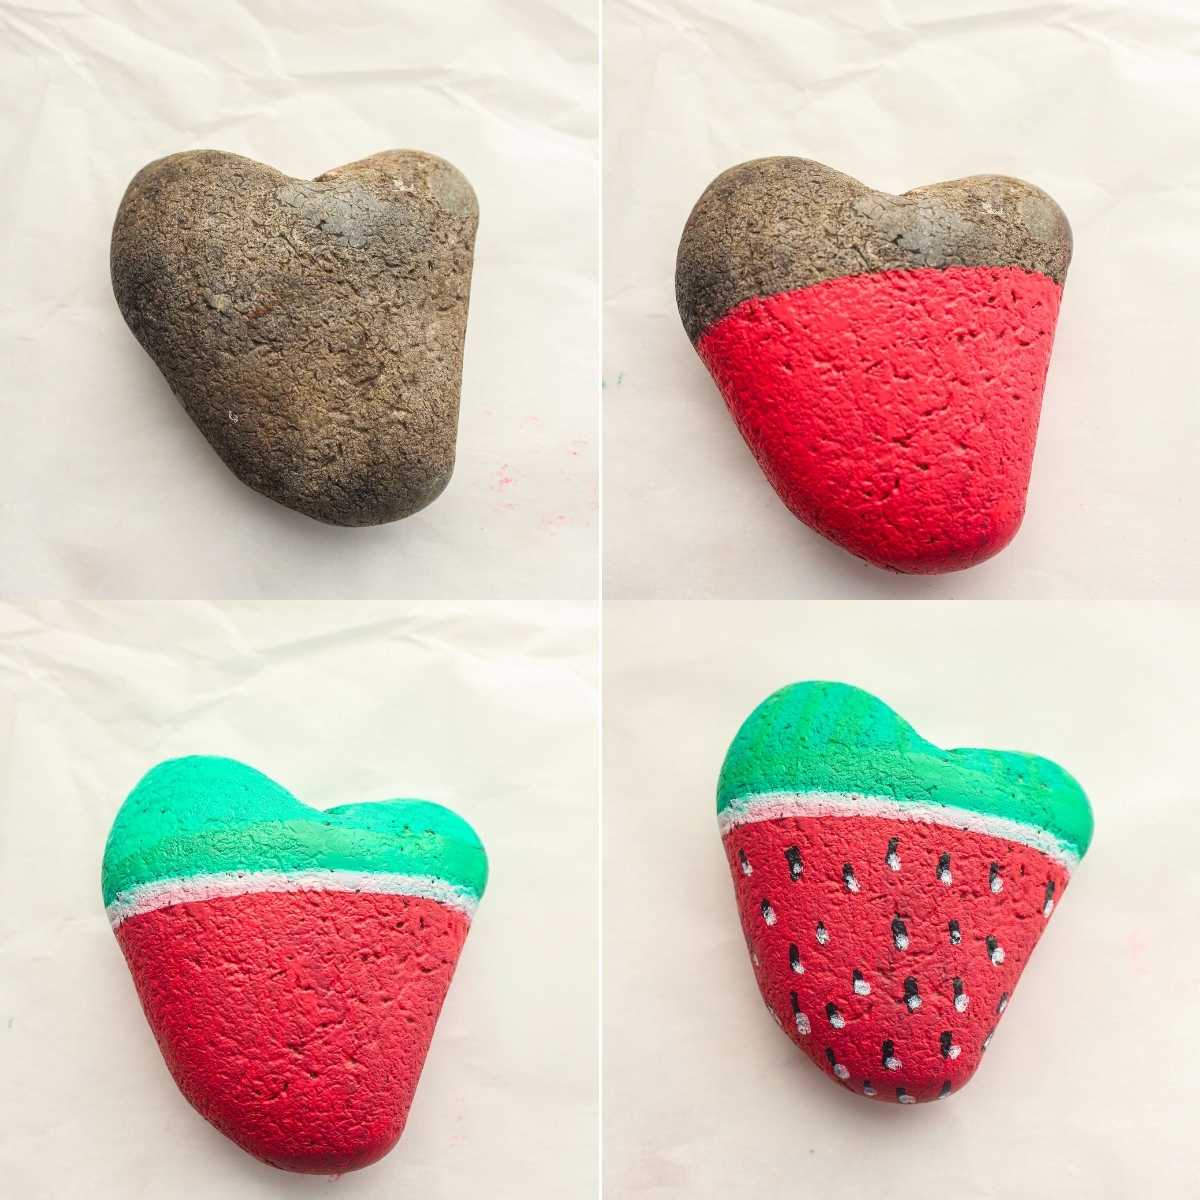
- Paint about three quarters of the stone red and let it dry.
- Paint a white strip along the curved edge of the red.
- Paint a green strip outside the white one for the rind.
- Dot black seeds on the red, then add a tiny white dot beside each seed.
Strawberry
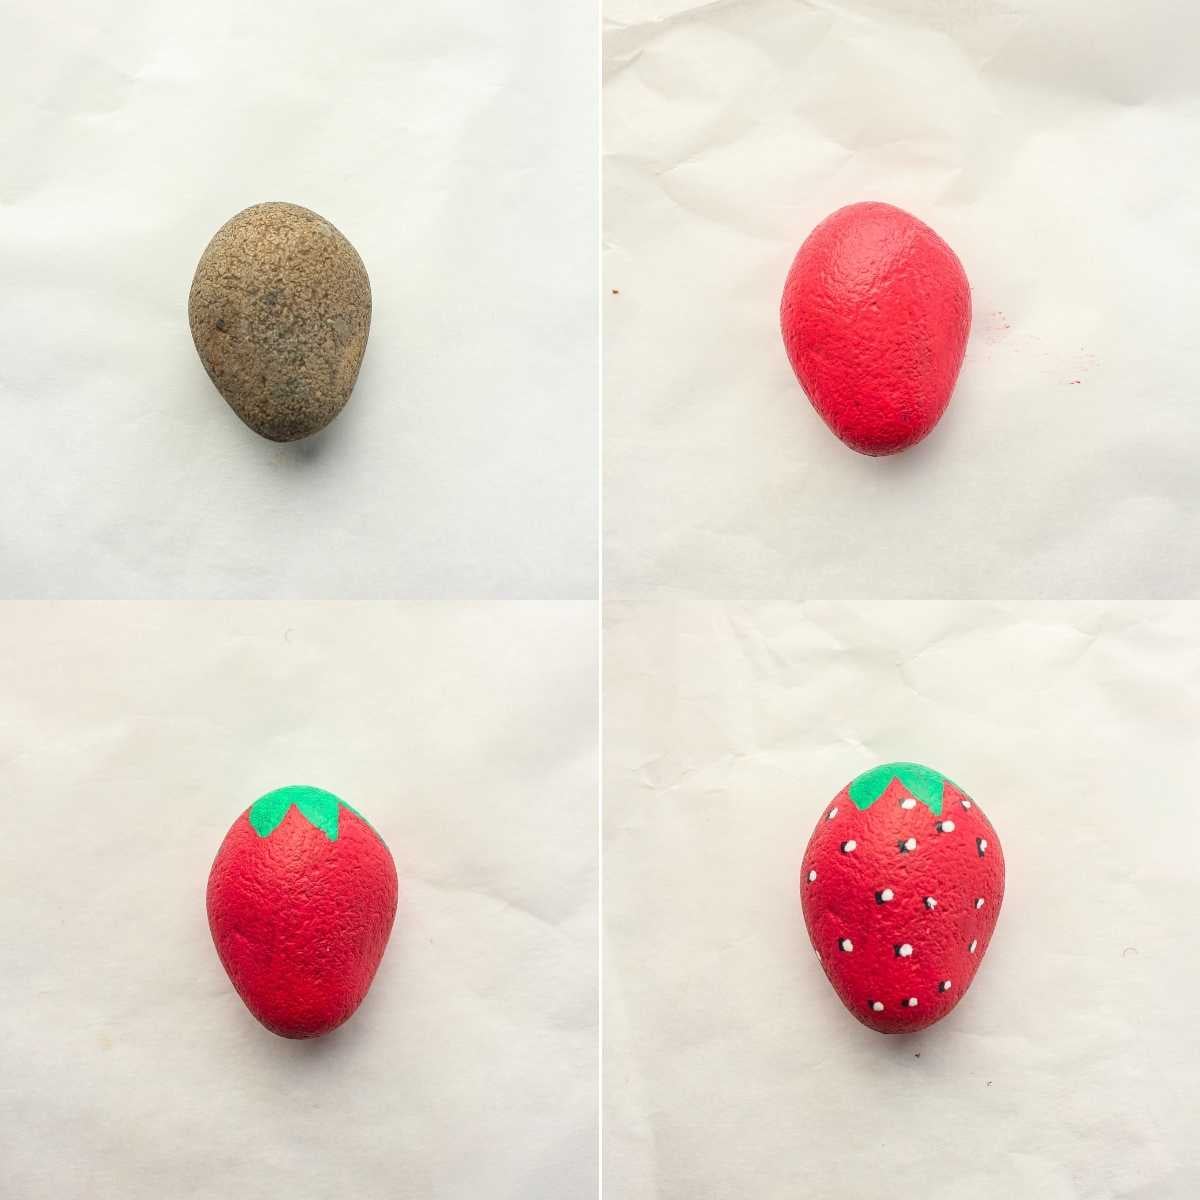
- Paint the stone bright red.
- Add a green leafy top.
- Dot tiny black seeds all over the berry.
- Paint a tiny white seed next to each black one.
Blueberries
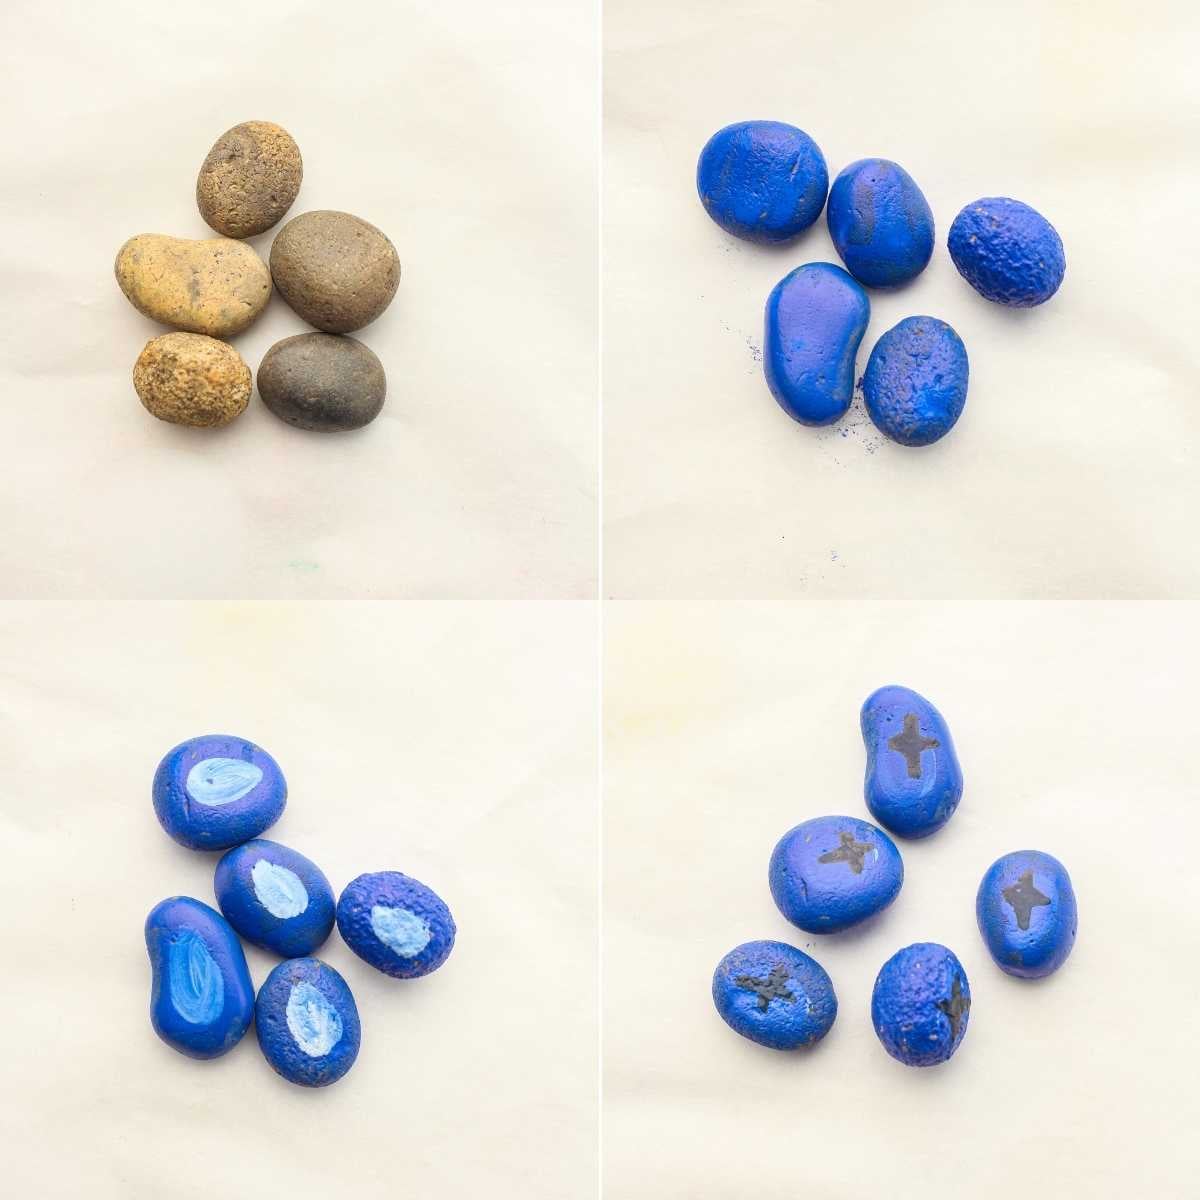
- Paint five small circles dark blue.
- Add a lighter blue highlight to each berry.
- Paint a tiny star shape on top of each one.
- Outline lightly if you like.
Tomato
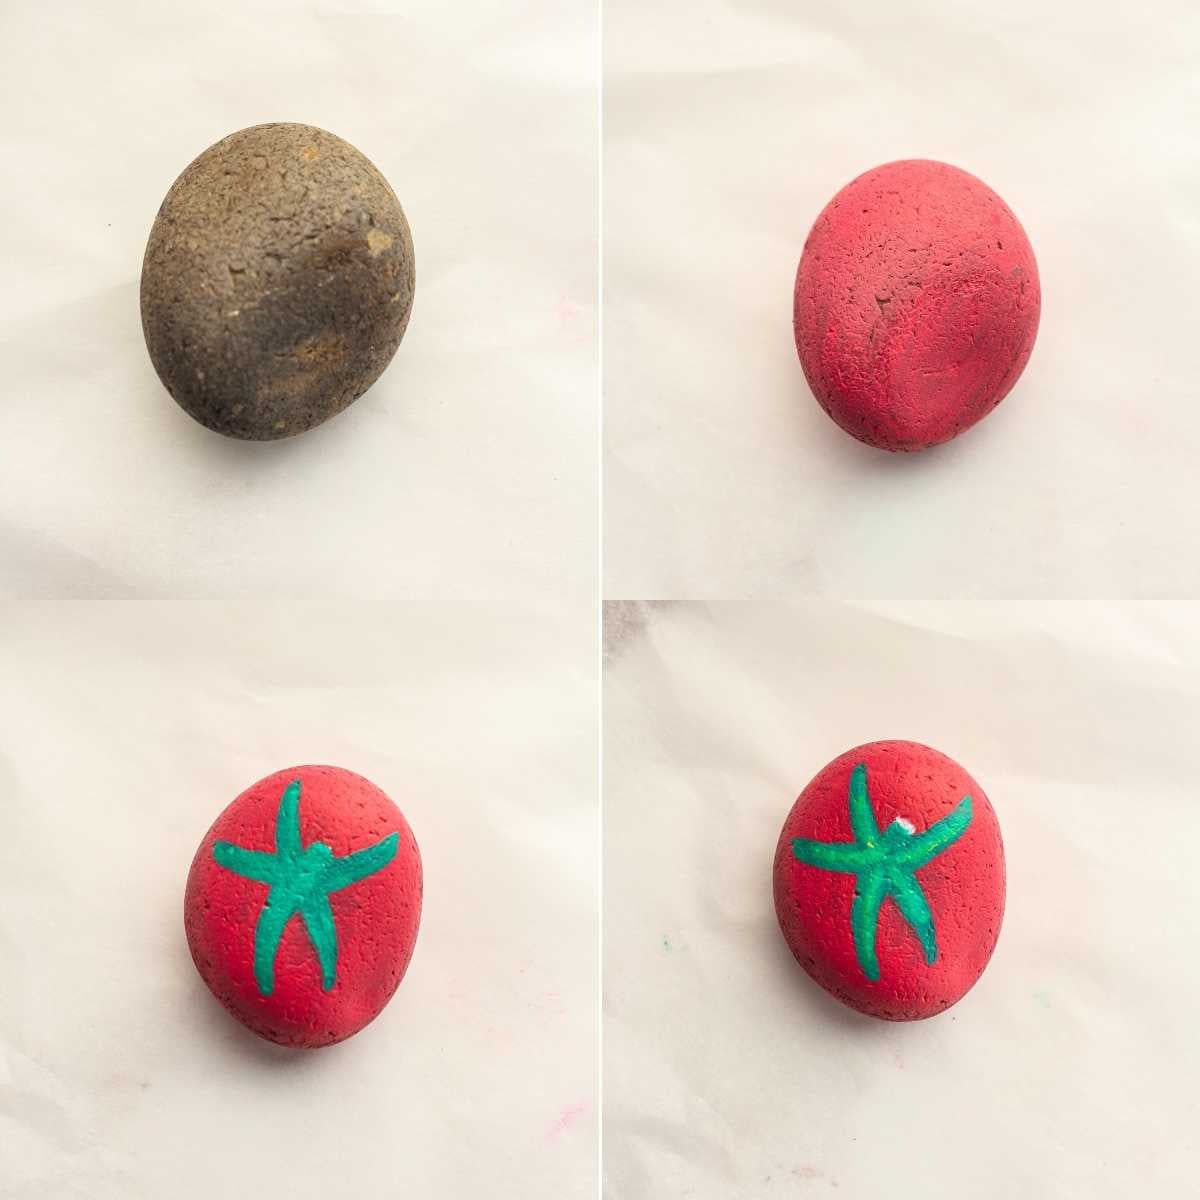
- Paint the stone bright red.
- Add a green star-shaped stem on top.
- Add a small white highlight on one side.
- Outline lightly if you like.
Zucchini
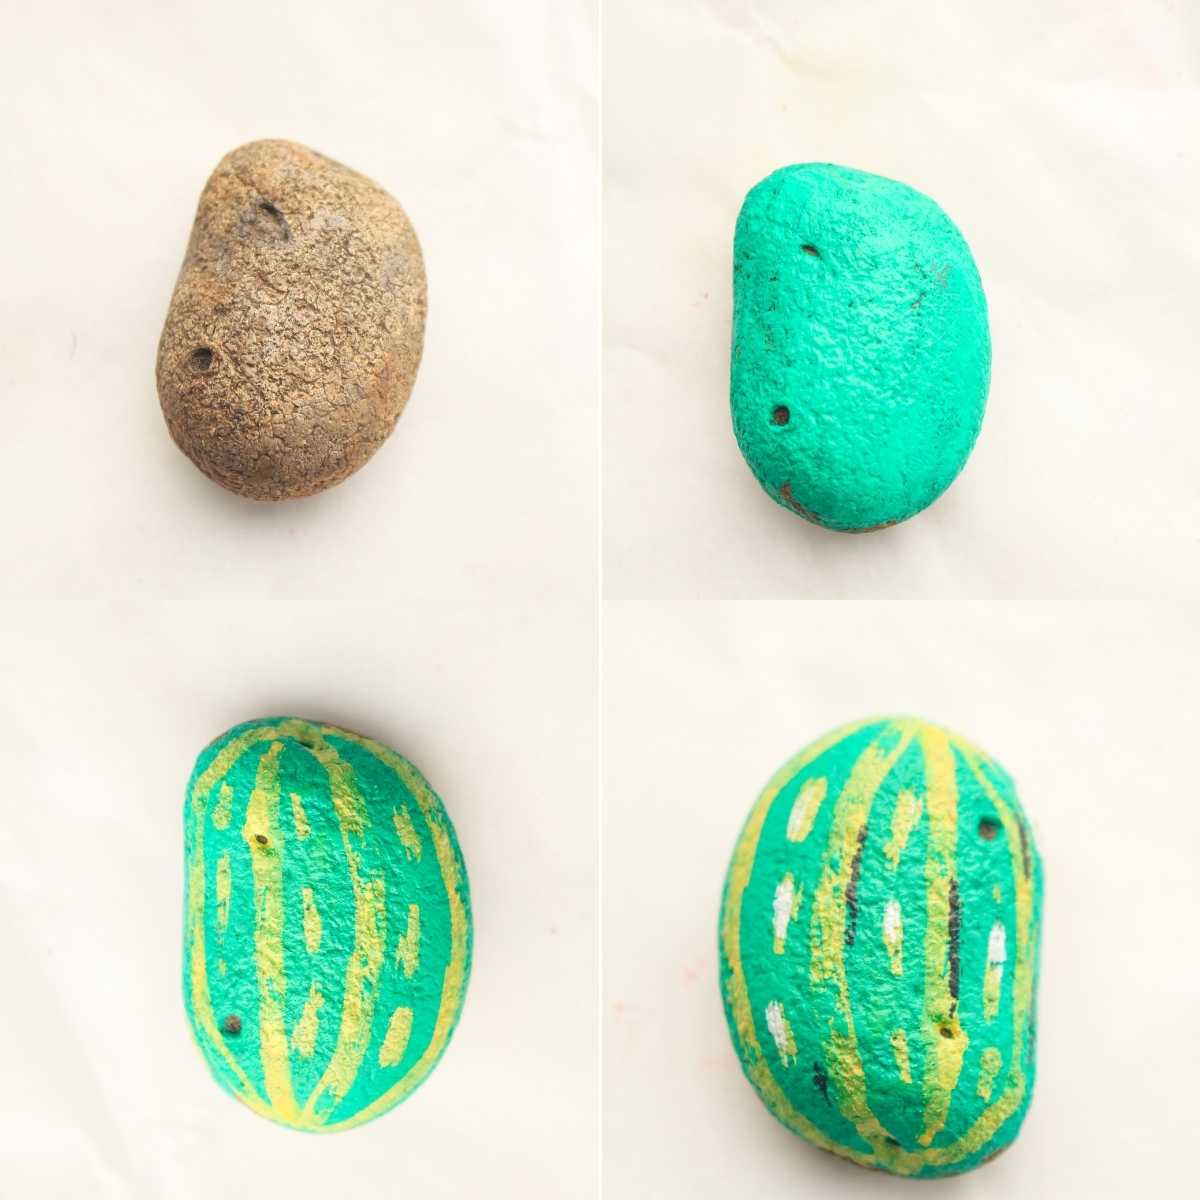
- Paint the entire stone green and let it dry.
- Paint several yellow lines running top to bottom.
- Add thin black lines alongside a few of the yellow ones for texture.
- Highlight a few lines with white, then let it dry.
Corn on the Cob
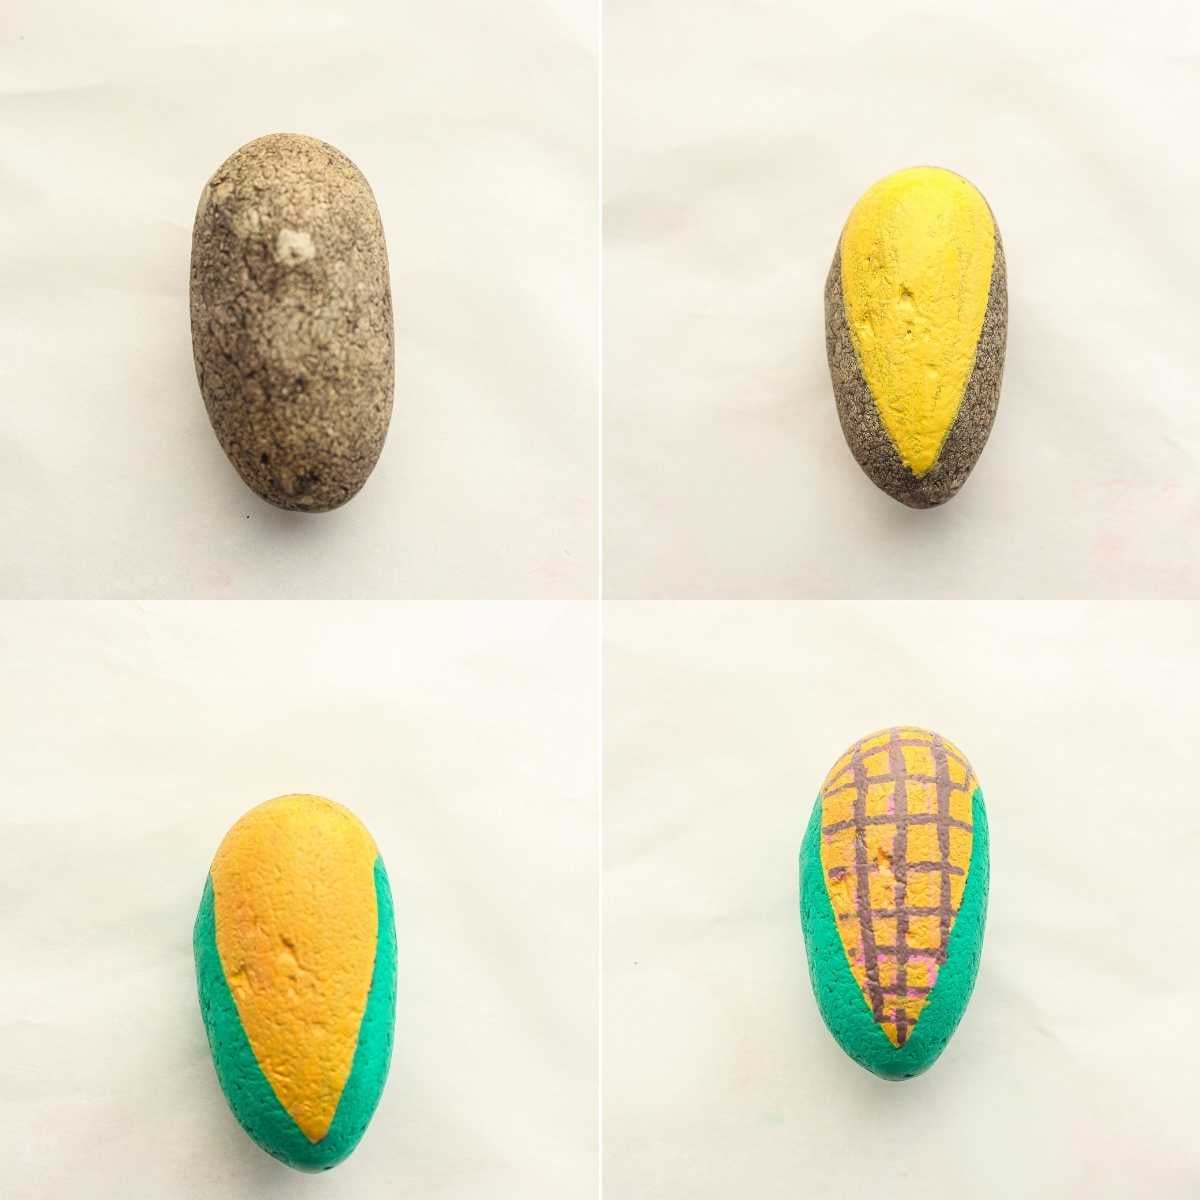
- Paint the center of the stone yellow, leaving a V-shape at the top unpainted.
- Extend the yellow down the stone for the cob.
- Paint the outer sections green for the husks.
- Add crisscross lines over the yellow for kernels, then let it dry.
Peas in a Pod
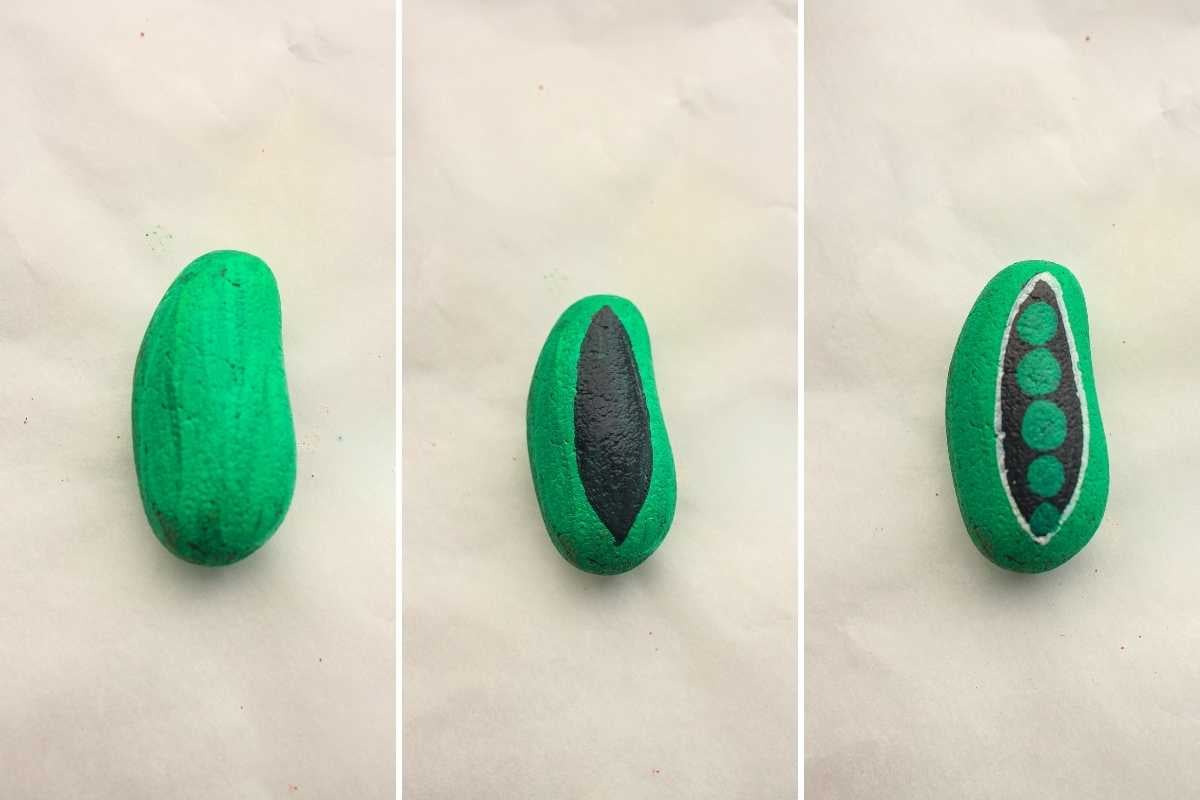
- Paint the entire stone green and let it dry.
- Paint a black line down the center from top to bottom.
- Paint the peas as green circles marching down the line.
- Add small black outlines around the peas and pod, then let it dry.
Peanut
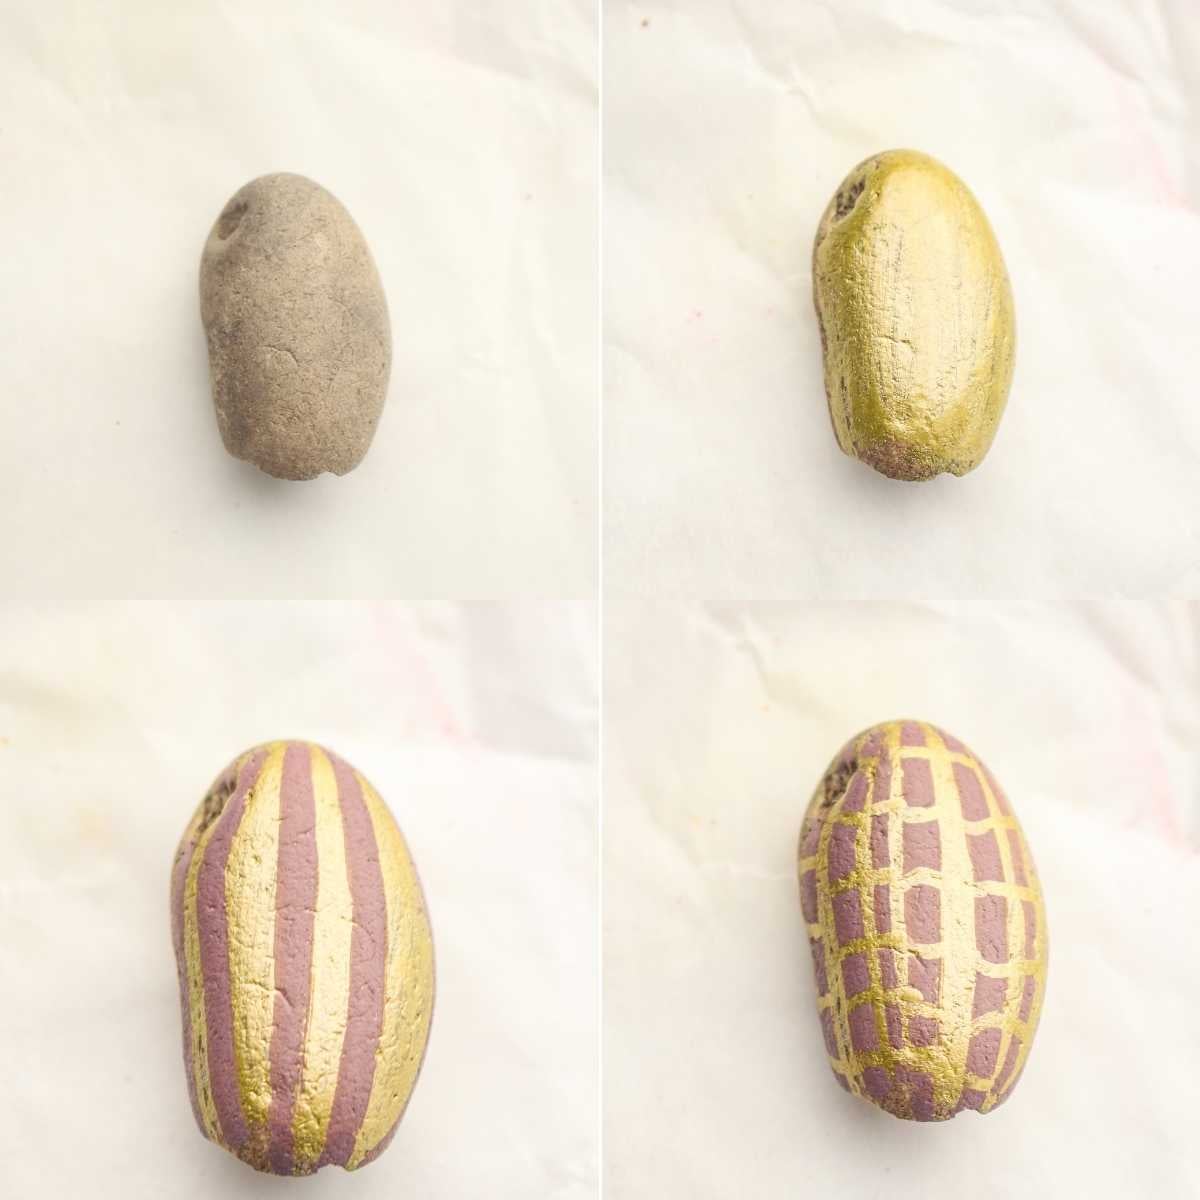
- Paint the entire stone light brown and let it dry.
- Paint several brown vertical lines from top to bottom.
- Cross them with horizontal lines in the base color for that waffly shell texture.
- Add a few darker brown accents where the lines cross, then let it dry.
Avocado Half
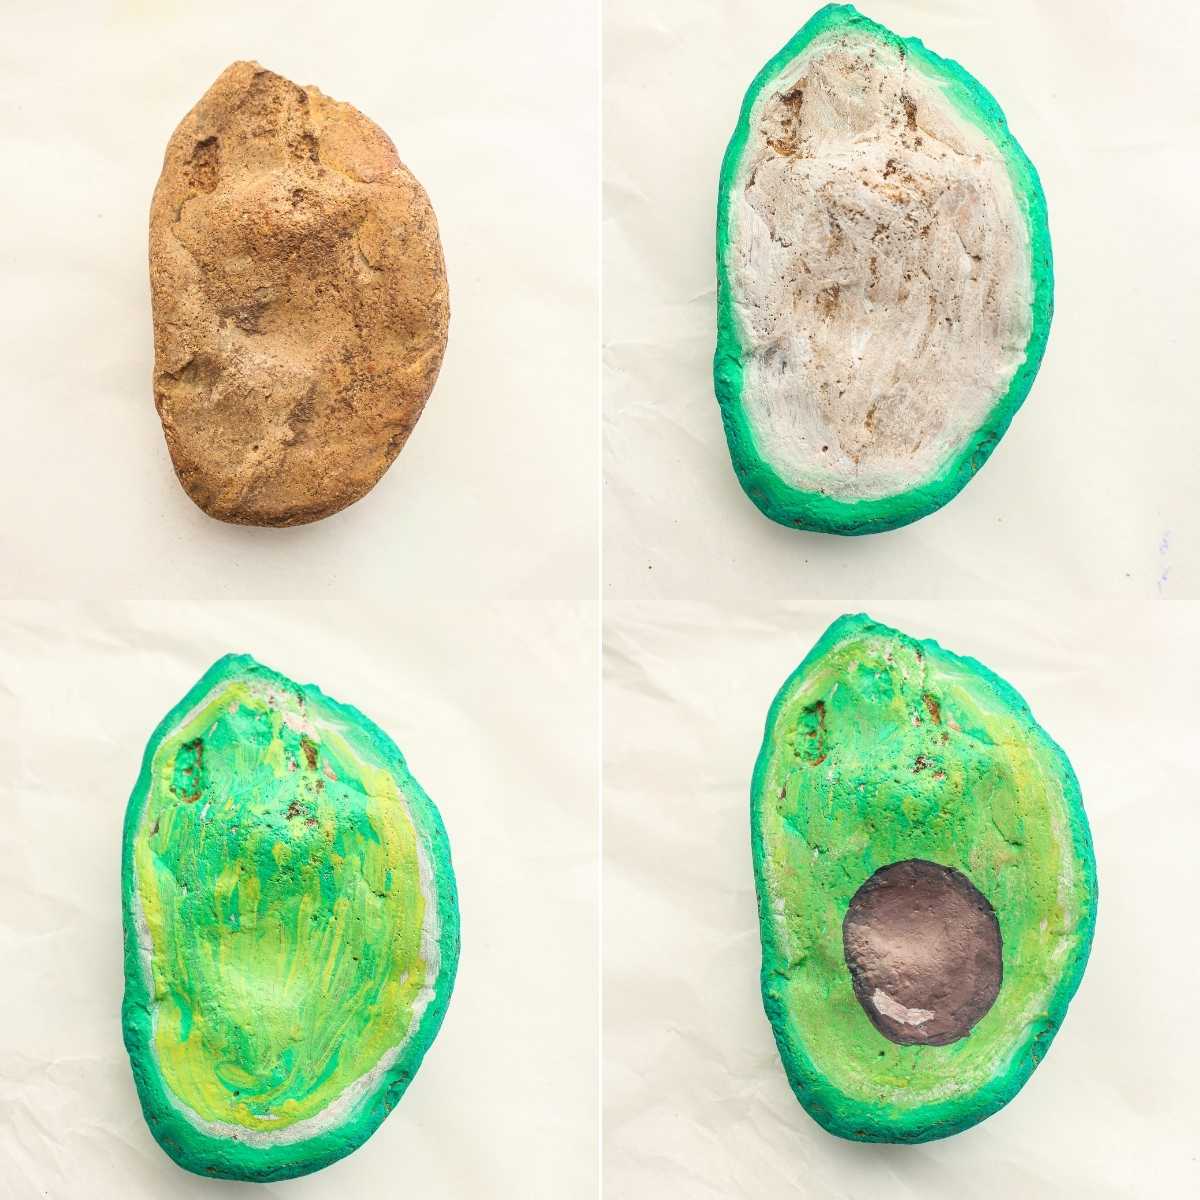
- Paint the flesh area white, leaving a green outline around the edge.
- Add a darker green border just inside that outline.
- Blend yellow and green into the center with your finger, leaving some lighter spots for a natural look.
- Paint a brown pit in the middle with one small white highlight line.
French Fries
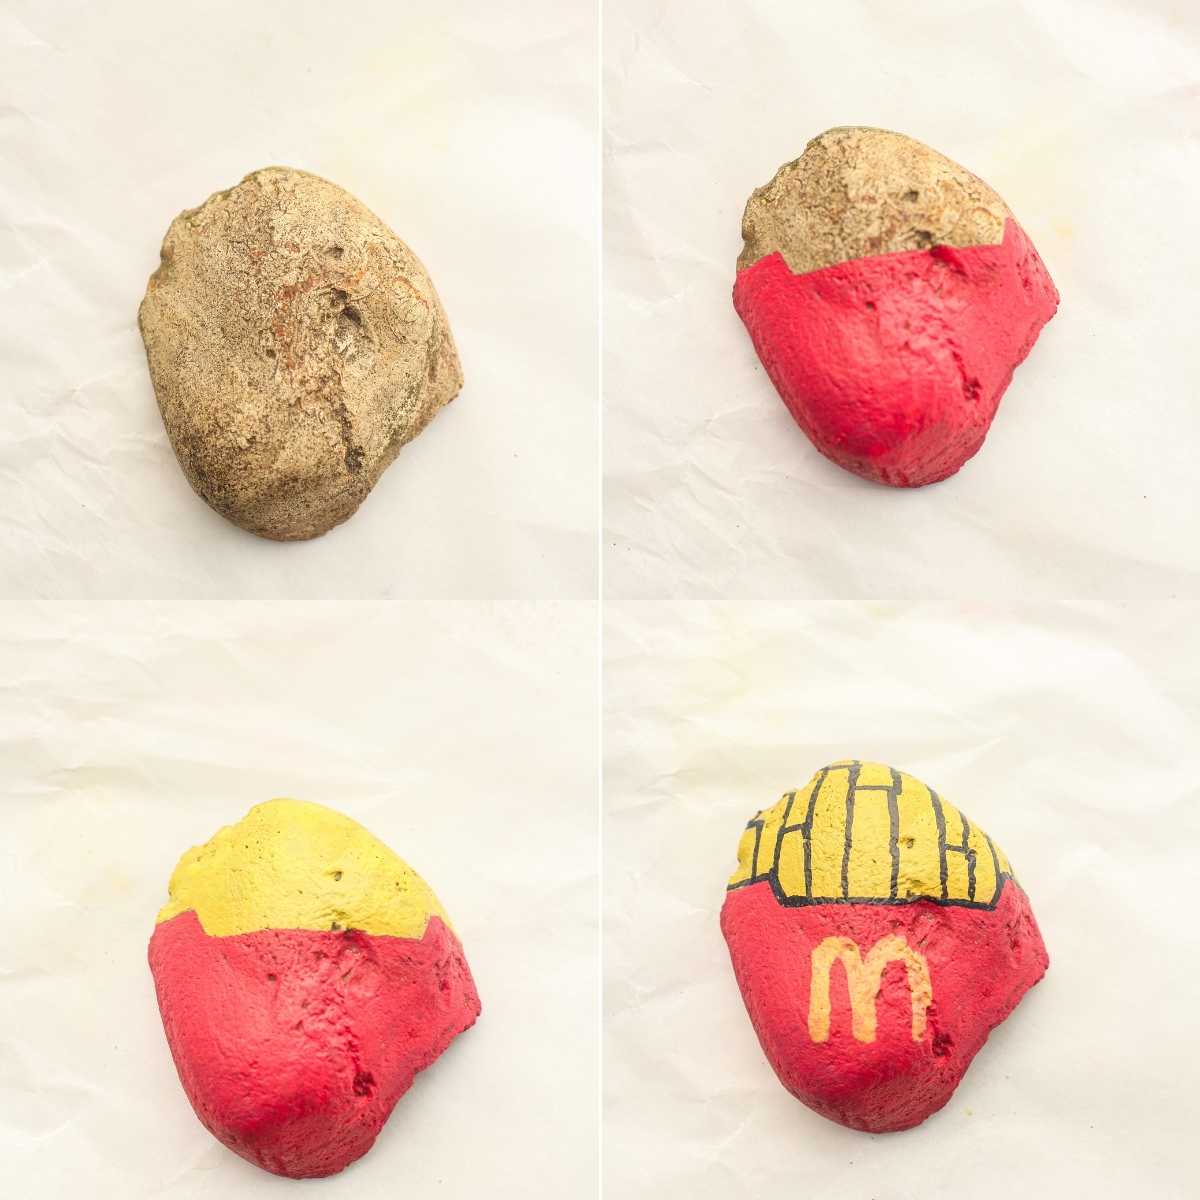
- Paint a red fries carton, with the center dipped a little lower than the sides.
- Paint the top section yellow for the fries.
- Add vertical black lines to separate the fries, and outline the carton in black.
- Paint a yellow “M” on the front of the carton and let it dry.
Ways to Use Them
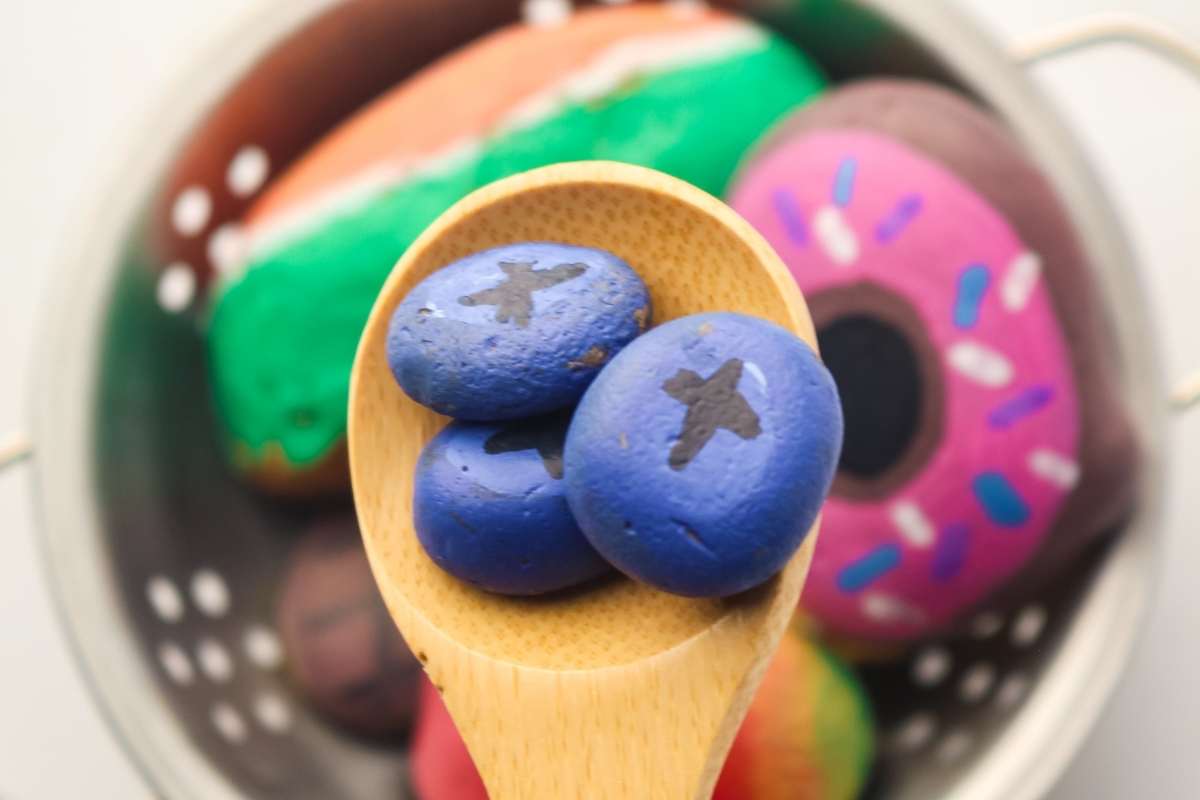
- Stock a mud kitchen. This is what we made ours for!
- Set up a pretend farm stand and let the kids sell the produce to each other.
- Perfect for an indoor play kitchen too. 🙂
- Bundle the whole set in a small basket as an affordable but lovely birthday gift.
Questions and Troubleshooting
What kind of paint should I use? Regular acrylic craft paint for the base coats, and paint pens for the fine details. Both are cheap, cover well, and dry fast. You can get through the whole project in an afternoon or two.
Do I need to seal them? If they’re going to live in an outdoor mud kitchen, yes. Two coats of a clear spray-on acrylic sealer will keep all that detail work from wearing off. If you skip the sealer, they’ll fade fast once the kids really get playing with them. One note: sealed or not, these are toys for pretend play, not for mouths, so I’d skip them for babies and toddlers who still taste-test everything.
How long do I wait between coats? Acrylic craft paint is usually dry to the touch in 20 to 30 minutes. Darker stones need two or three base coats, so plan on a relaxed afternoon (or spread it over two days and do details on day two).
Is it okay to blend the paint with my finger? Yes! Acrylic craft paint washes off skin with plain soap and water. This is actually the best job to hand to a kid who wants to help.
My base coat looks streaky and the stone shows through. What went wrong? Nothing. You just need another coat. Darker stones almost always take two or three, and each one has to dry fully before the next.
I can’t find smooth stones anywhere. Can I buy them? Yes, grab a bag of river rocks from the craft store or garden center. They’re smooth, flattish, and roughly the same size, which honestly makes the whole project easier.
Do I really have to make all 26? Definitely not. Start with the citrus slices… lemon, lime, and orange are the exact same design in three colors, so you get a whole fruit stand for very little effort.
I’m not artistic. Will mine still look good? Yes. The black outlines do most of the work. They hide wobbly edges and make it all look like you meant to do it. And your kids are not going to grade your kiwi seeds. 🙂

Looking for more?
Favorites from the archives.
9 Old-Fashioned Cutting Flowers with Vintage Charm
How to Make Tomato Powder from Leftover Skins (A Frugal Favorite)
Soft Sourdough Chocolate Chip Cookies
Old-Fashioned Penuche Fudge