Dutch Oven French Bread (Easy)
This is the easiest bread recipe ever and is great for beginners. And even if you’re an experienced baker, you’ll make it all the time because it’s good, not just easy.

This rises easily and uses very few ingredients. If you knead it in the bread machine or stand mixer, there is very little hands-on time, just rising time.
Table of Contents
What You’ll Need
- 4 cups bread flour All-purpose flour can be used in a pinch, but bread flour gives better structure and chew.
- 2 teaspoons salt
- 2½ teaspoons instant yeast (SAF brand recommended) active dry is okay too but will be a little slower
- 1½ cups water
- Pinch of cornmeal (Used for sprinkling on parchment to prevent sticking)
Instructions
Step One: Combine all ingredients and knead
Combine all ingredients. There’s no need to proof yeast or wait for it to foam. If you’re using instant yeast, just dump it in with everything else.


- Bread machine: Add everything to the bucket and set on the dough cycle.
- Stand mixer: Add ingredients to the bowl, fit with the dough hook, and knead on low.
- By hand: Knead until smooth (a bit tedious, but works fine).

After a few minutes of kneading, evaluate the dough. It should form a ball and pull away cleanly from the sides of the bowl. If it’s sticky, add flour a teaspoon at a time. If it’s dry, add water a teaspoon at a time.
When the dough forms “windowpanes” when stretched, it’s ready.
Step Two: The First Rise
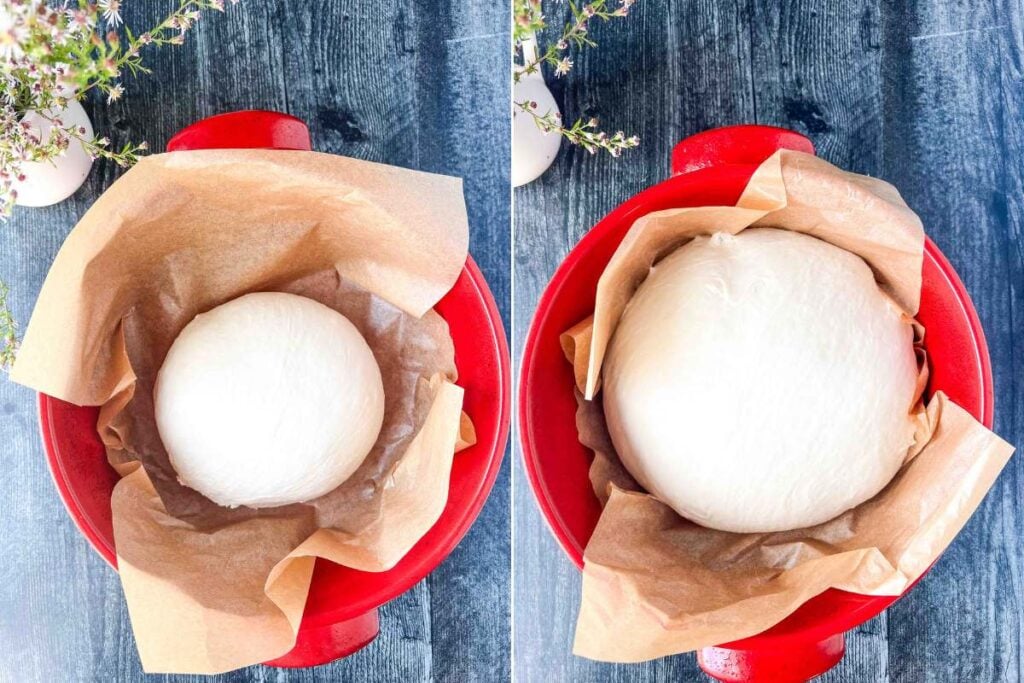
Shape the dough into a ball, place it in a lightly oiled bowl, cover with a damp towel, and let rise in a warm place for about 1 hour.

Don’t overthink the shaping, you’re just forming a ball. And don’t be married to the rising time. Watch the dough, not the clock. It should look like the picture above before moving on.
Step Three: Shape and Rise Again
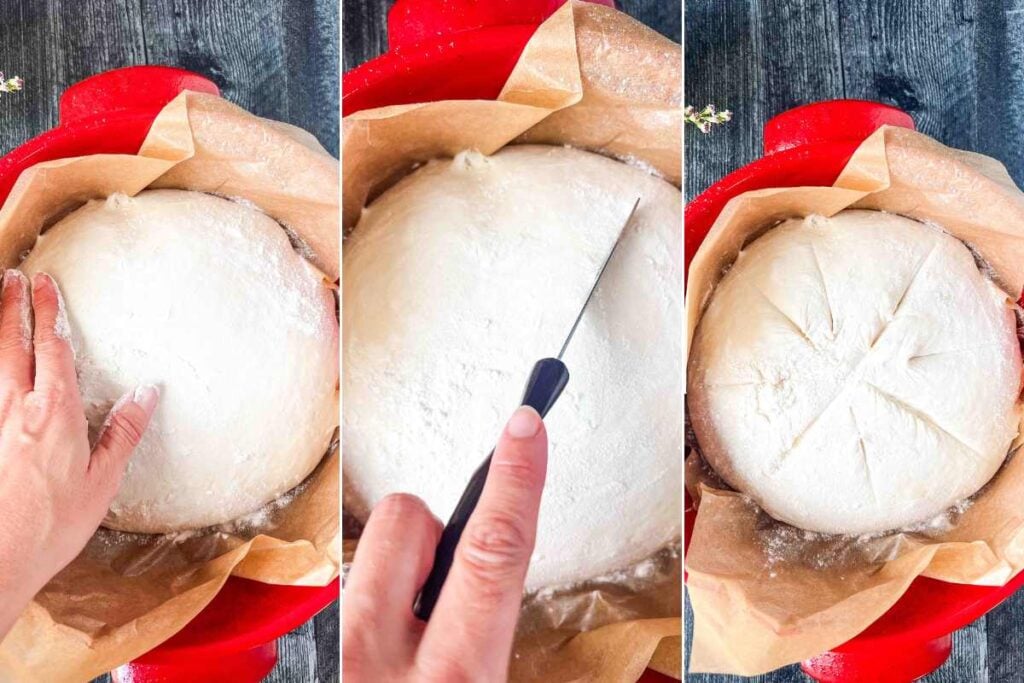
Line the Dutch oven with parchment paper. Shape the risen dough into a ball, place on the parchment, dust with flour, and slash an “X” on top.
Cover with the lid and let it rise again for about 45 minutes. Towards the end of the rise, preheat the oven to 450°F.
Step Four: Bake
Once the dough is puffy, prep it for baking by flouring the top and making a few slashes. This is just for looks so do it however you’d like.
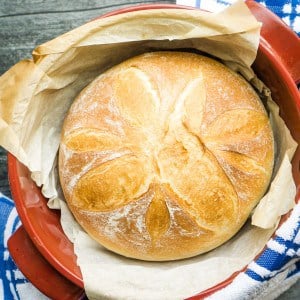
Bake for 20 minutes with the lid on and 20 minutes with it off, until golden brown.
A finished loaf will feel light for its size and be about 200 degrees in the center.

Cool on a wire rack before slicing.
Storage Instructions
Once cooled, store in a bag or container on the counter for 1–2 days. For longer storage, you can freeze any leftover slices and toast them from frozen or defrost at room temp.
Printable Recipe
French Bread in a Dutch Oven
Equipment
Ingredients
- 4 cups bread flour
- 2 teaspoons salt
- 2½ teaspoons instant yeast (SAF brand recommended)
- 1½ cups water
- pinch cornmeal (for sprinkling on the parchment)
Save This Recipe
You'll join my email list which you will love. And if you don't, unsubscribe in one click. ❤️
Instructions
- Mix the dough. Combine the flour, salt, yeast, and water in a large mixing bowl or the bowl of a stand mixer. There’s no need to proof instant yeast—toss everything together. Then, mix until the dough clears the sides of the bowl but remains slightly sticky to the touch. If it’s too dry, add a tablespoon of water at a time. If it’s too wet, sprinkle in a bit of flour.
- Knead the dough. Knead by hand (15–20 minutes) or with a stand mixer (5–10 minutes). You’ll know it’s ready when the dough is smooth, elastic, and passes the windowpane test: stretch a small piece thin enough to see the light through it without tearing.
- First rise. Place the dough in a lightly oiled bowl and cover with plastic wrap or a clean towel. Let it rise in a warm, draft-free place for 60 minutes or until doubled in size.Tip: An oven warmed briefly (then turned off), or a sunny windowsill works well.
- Shape the loaf. Turn the risen dough onto a floured surface. Gently shape it into a round loaf by folding the edges under and pinching the bottom until the top is smooth. Then, line your Dutch oven with parchment paper and sprinkle a pinch of cornmeal on top. Place the loaf seam-side down on the parchment.
- Second rise. Cover the loaf with heavily greased plastic wrap or the lid of your Dutch oven. Let it rise for 45–60 minutes until it significantly puffs up. Preheat your oven to 450°F during the last 15 minutes of rising.
- Slash and flour. Dust the top of the dough lightly with flour for a rustic finish. Using a very sharp knife or bread lame, make three or four shallow slashes across the top. This helps the bread expand evenly in the oven.
- Bake. Place the Dutch oven in the preheated oven (with the lid on). Bake for 35–40 minutes total:First 20 minutes: Bake with the lid on to trap steam, which creates a crisp crust.Final 15–20 minutes: Remove the lid and bake until the loaf is golden brown and has an internal temperature of at least 190°F.
- Cool and serve. Remove the bread from the Dutch oven and cool on a wire rack. Let it cool for at least 20 minutes before slicing—if you can wait that long! Serve warm or at room temperature.
Notes
Nutrition


I love this simple delicious bread!
This was so delicious! Can’t wait to make it again!
I love making my own bread and can’t wait to try your recipe. It sounds delicious and the process is really simple!
This looks amazing! Can’t wait to make it!
What an incredible recipe! This looks so good! I Can’t wait to make this one.
Easiest bread recipe ever! Thank you!
Bread is my weakness! This looks delicious and so easy, I cannot wait to make it.
This looks soooo good!! I love homemade bread!
Easy enough to follow, looks great, but having rising issues. Loaf seems flat, not the beautiful round and high loaf so many others get. Will keep trying.
What size Dutch oven??
Anything bigger than 4qt will work.
My 3.5 quart Dutch oven was the perfect size for this recipe. Turned out beautifully!
Made this and it turned out perfectly! Delicious and so easy.
wonderful! thanks for letting me know! 🙂
Hi. Can I use all purpose flour for this recipe, in place of bread flour? I know the protein content is slightly different.
yes, but start with less water, about 20% less. then add more if needed. all purpose will absorb quite a bit less.
This is my first recipe ever making bread. Now I’ve made 3 successful loaves. I feel so accomplished!!! Thanks so much! We love to eat ours with butter + blackberry jam.
hi Julie! I’m so glad the recipe is going well for you! keep baking 🙂
Is a clay baker the same as the Dutch oven ?
yes it works the same for baking bread. its lighter (most dutch ovens are cast iron), and you aren’t supposed to use it on high on the stove. but f or baking, it works exactly the same 🙂
Great recipe! Things I have discovered that have improved my process and end product: using a stand mixer with dough hook, add dry ingredients to wet (seems to eliminate having to stop and scrape down sides of bowl). I do the second rise and bake in my smaller (4 qt) Dutch oven and don’t slash loaf until just before baking. When I slashed first and did the second rise in my larger one (7 qt) it didn’t hold its shape, just expanded horizontally – still delicious but a very flat loaf.
Oh interesting! Sometimes when I slash right before baking the whole thing instantly deflates for some reason. I do have a smaller dutch oven so I’m going to try that. Thanks!
I want to try the recipe but I’m scared because I really suck at baking bread or cake ???? Can someone please tell me what I can do if I have the Dutch oven but not the lid? is there any option like putting aliminium foil over it? and on how many degrees should the bread be baked? Thankyou in advance ????
the purpose of the lid is to trap the moisture and create steam. you could put a rimmed metal baking sheet on a lower rack while the oven preheats then pour a cup of water on that. you’ll geet steam which will help the bread rise even higher in the oven 🙂
Katie Ioved your honesty and simple methods.
Thank you Kathleen, that means a lot to me ????
More like an autobiography, sorry I didn’t watch all, boring.
Thanks for letting me know….it’s my first video and need the feedback ????
Could not disagree more! This is so informative!! So glad you are taking the time to explain all of this! I am going to bake bread this week and I’m so thankful for all the info!
I am SOOOO excited! Soon we will both be baking and crocheting.
Definitely Yum! And so simple! Just the way I like it.
Yummy!
Yum! ????????