Dutch Oven French Bread (Easy)
This is the easiest bread recipe ever and is great for beginners. And even if you’re an experienced baker, you’ll make it all the time because it’s good, not just easy.

This rises easily and uses very few ingredients. If you knead it in the bread machine or stand mixer, there is very little hands-on time, just rising time.
Table of Contents
What You’ll Need
- 4 cups bread flour All-purpose flour can be used in a pinch, but bread flour gives better structure and chew.
- 2 teaspoons salt
- 2½ teaspoons instant yeast (SAF brand recommended) active dry is okay too but will be a little slower
- 1½ cups water
- Pinch of cornmeal (Used for sprinkling on parchment to prevent sticking)
Instructions
Step One: Combine all ingredients and knead
Combine all ingredients. There’s no need to proof yeast or wait for it to foam. If you’re using instant yeast, just dump it in with everything else.

- Bread machine: Add everything to the bucket and set on the dough cycle.
- Stand mixer: Add ingredients to the bowl, fit with the dough hook, and knead on low.
- By hand: Knead until smooth (a bit tedious, but works fine).

After a few minutes of kneading, evaluate the dough. It should form a ball and pull away cleanly from the sides of the bowl. If it’s sticky, add flour a teaspoon at a time. If it’s dry, add water a teaspoon at a time.
When the dough forms “windowpanes” when stretched, it’s ready.
Step Two: The First Rise
Shape the dough into a ball, place it in a lightly oiled bowl, cover with a damp towel, and let rise in a warm place for about 1 hour.

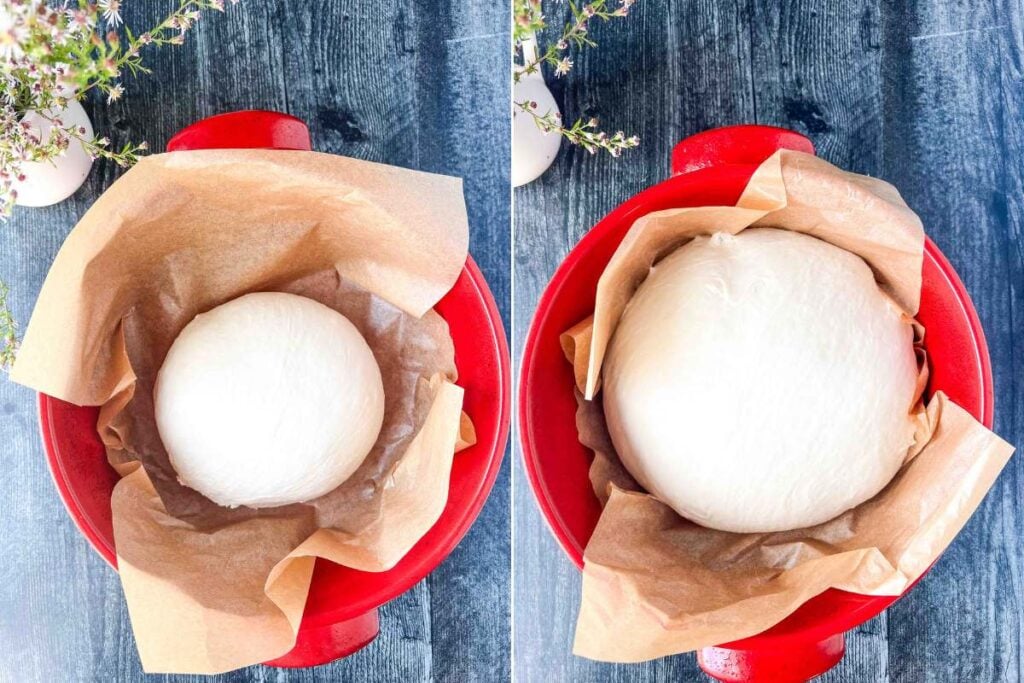
Don’t overthink the shaping, you’re just forming a ball. And don’t be married to the rising time. Watch the dough, not the clock. It should look like the picture above before moving on.
Step Three: Shape and Rise Again
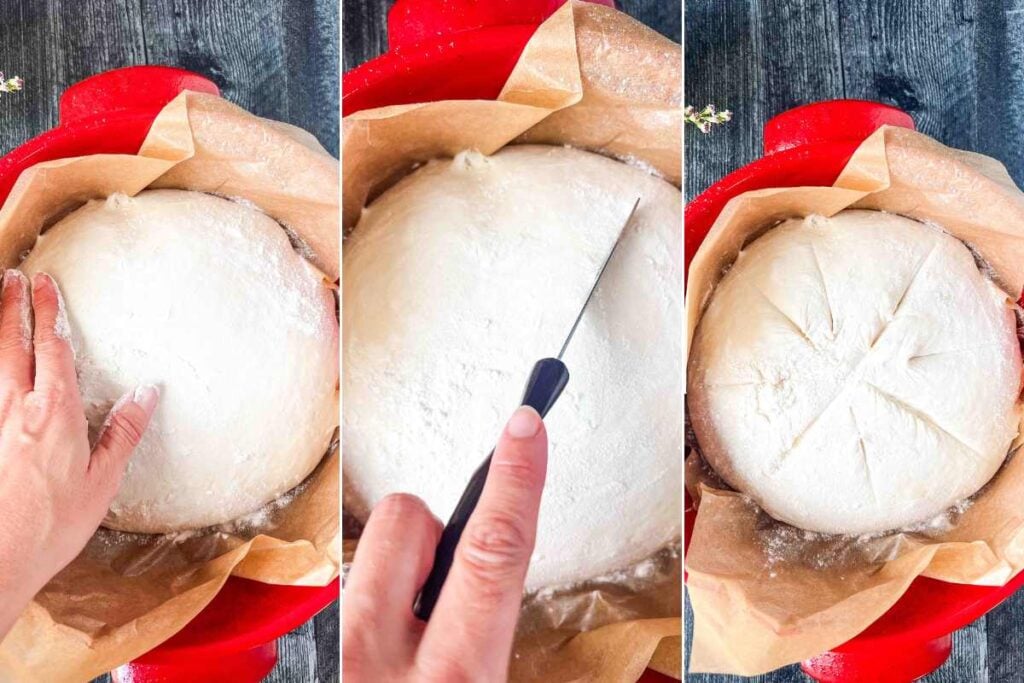
Line the Dutch oven with parchment paper. Shape the risen dough into a ball, place on the parchment, dust with flour, and slash an “X” on top.
Cover with the lid and let it rise again for about 45 minutes. Towards the end of the rise, preheat the oven to 450°F.
Step Four: Bake
Once the dough is puffy, prep it for baking by flouring the top and making a few slashes. This is just for looks so do it however you’d like.
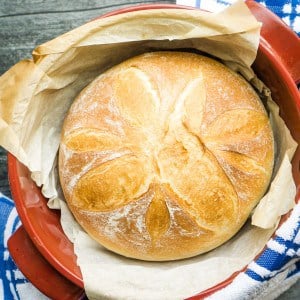
Bake for 20 minutes with the lid on and 20 minutes with it off, until golden brown.
A finished loaf will feel light for its size and be about 200 degrees in the center.

Cool on a wire rack before slicing.
Storage Instructions
Once cooled, store in a bag or container on the counter for 1–2 days. For longer storage, you can freeze any leftover slices and toast them from frozen or defrost at room temp.
Printable Recipe
French Bread in a Dutch Oven
Equipment
Ingredients
- 4 cups bread flour
- 2 teaspoons salt
- 2½ teaspoons instant yeast (SAF brand recommended)
- 1½ cups water
- pinch cornmeal (for sprinkling on the parchment)
Save This Recipe
You'll join my email list which you will love. And if you don't, unsubscribe in one click. ❤️
Instructions
- Mix the dough. Combine the flour, salt, yeast, and water in a large mixing bowl or the bowl of a stand mixer. There’s no need to proof instant yeast—toss everything together. Then, mix until the dough clears the sides of the bowl but remains slightly sticky to the touch. If it’s too dry, add a tablespoon of water at a time. If it’s too wet, sprinkle in a bit of flour.
- Knead the dough. Knead by hand (15–20 minutes) or with a stand mixer (5–10 minutes). You’ll know it’s ready when the dough is smooth, elastic, and passes the windowpane test: stretch a small piece thin enough to see the light through it without tearing.
- First rise. Place the dough in a lightly oiled bowl and cover with plastic wrap or a clean towel. Let it rise in a warm, draft-free place for 60 minutes or until doubled in size.Tip: An oven warmed briefly (then turned off), or a sunny windowsill works well.
- Shape the loaf. Turn the risen dough onto a floured surface. Gently shape it into a round loaf by folding the edges under and pinching the bottom until the top is smooth. Then, line your Dutch oven with parchment paper and sprinkle a pinch of cornmeal on top. Place the loaf seam-side down on the parchment.
- Second rise. Cover the loaf with heavily greased plastic wrap or the lid of your Dutch oven. Let it rise for 45–60 minutes until it significantly puffs up. Preheat your oven to 450°F during the last 15 minutes of rising.
- Slash and flour. Dust the top of the dough lightly with flour for a rustic finish. Using a very sharp knife or bread lame, make three or four shallow slashes across the top. This helps the bread expand evenly in the oven.
- Bake. Place the Dutch oven in the preheated oven (with the lid on). Bake for 35–40 minutes total:First 20 minutes: Bake with the lid on to trap steam, which creates a crisp crust.Final 15–20 minutes: Remove the lid and bake until the loaf is golden brown and has an internal temperature of at least 190°F.
- Cool and serve. Remove the bread from the Dutch oven and cool on a wire rack. Let it cool for at least 20 minutes before slicing—if you can wait that long! Serve warm or at room temperature.
Notes
Nutrition


Just made this(got a Dutch oven as a retirement gift😊), and it turned out amazing!
This isn’t a recipe, it’s more like a general guideline for people who already know how to do it. I’d recommend finding an actual recipe that lists ingredients, directions and temperatures. Plainly.
Arvie what are you talking about? Can you not see a recipe below the first paragraph?
Left out a lot of details,
What’s the oven temperature?
Preheat the Dutch oven?
Dutch oven size?
I would like a jump to recipe option at the top.
Natasha are we looking at the same thing? The oven temp is in the recipe and the recipe is at the very top of the page.
After room temperature rise, I separate into two loaves and refrigerate overnight.
I was sent this recipe from a friend and have made it easily a dozen times. Sometimes adding nuts, oil, even a bit of sugar. everyone loves it and I even bring it as a gift when going for dinner at a friends house. Thanks for posting such a useful recipe.!
so happy to hear this tony! thanks for taking time out of your day to let me know 🙂
I use my 4.5qt enamel Dutch oven. It’s perfect every time and this bread is very good for French toast or when used for grilled cheese sandwiches!
so glad you’re enjoying the bread karen 😊
First time making bread! I wouldnt say this recipe is beginner friendly…. Initially my dough looked VERY dry, I added more water until it became a dough i could knead. It was tough for ages and despite kneading for 30 minutes it didnt seem to want to past the windowpane test. After some googling I have no idea if my yeast was active or not active…. It just says its dry yeast!!
TLDR I have no idea what im doing but i tried XD
This bread turned out excellent.
I mixed it in a stand mixer for four minutes and finished kneading on a floured counter.
The crust is flakes crisp and chewy.
Will definitely be making it again.
How long is the bake time using an enameled dutch oven. I saw you mentioned a clay pot with cooking times. Thanks
hey Lisa, same times 😊
I made this recipe today and it looks sooo good! I can’t wait to try it in the morning. I used my bread machine to mix and do the first rise then into my Dutch oven for the second rise and baking. I just wondered if you had any tips to get it to have more holes in the dough? Or maybe this isn’t that kind of recipe.
I’m not an expert but from what I’ve read and the few recipes I’ve tried, to get the air holes in the bread (the more traditional baguette structure) you want a no-knead bread recipe with a wetter dough that you fold.
Thank you for this really easy recipe! I am a newbie to the bread machine and also baking bread and this was very simple, easy to follow. Thanks again!
I have used this recipe many times in my bread machine and it comes out wonderful every time. I do add 2 TBS of olive oil . Sometimes I add flax seeds , or 7 grain cereals to make it multigrain. But, it is a great recipe to keep and modified from time to time the way you want it. I love the fact that there is no sugar in this recipe. Thank you so much for sharing.
thank you lolly! I will have to try the flax seeds that’s a great idea 🙂
Can I use all purpose flour?
What size dutch oven are you using for this?
4.5 quart
Didn’t rise at all after a few hours
Hi! What would happen if I let it rise for longer than the recommended time? Thanks!
if it over-rises it can ccollapse in the oven (or before you bake) i’d recommend putting it in the fridge and that way it will rise muuuuuch slower. you can take it out and put it on the counter an hour or so before you’re ready to bake
I also dissolved the yeast into warm water and it turned out great. I guess it’s just a habit I have and when I saw it wasn’t mentioned I thought I better do that. So instant yeast doesn’t need dissolving, good to know 🙂 Great bread so soft and delicious. Thank you for this easy recipe and one that doesn’t need me to wait 12-16 hours before baking like other recipes I have tried.
I dissolved the yeast in warm water first and this recipe turned out very good! So easy to make. Thank you!
My dough didn’t rise on my first try, I started over but dissolved the yeast in warm water and then added to the dry ingredients. This worked much better. Other than that the recipe is very easy. I’m keeping this recipe with a note to dissolve the yeast.
jill i’m glad it worked out on the next try! did you use active dry yeast or instant?
I can’t wait to make this yummy looking bread, all I have is regular yeast, is that ok to use?
yes! you may just need slightly longer rise times 🙂
Regular yeast (it looks like little balls) should be proofed in water with a little sugar or honey before adding to the flour and other ingredients.
Instant yeast (it looks all ground up) can be used without prior proofing. Just add the dried instant yeast in with the dry ingredients.