This recipe is the favorite sandwich bread of my pickiest child, and it’s no wonder why. It’s the fluffiest bread I’ve ever made. The secret is the milk and roux technique that creates this incredibly soft, pillowy texture that’s nothing like regular sourdough. Yes, it takes time and patience, but the actual hands-on work is totally manageable, maybe 30 minutes spread out over two days.
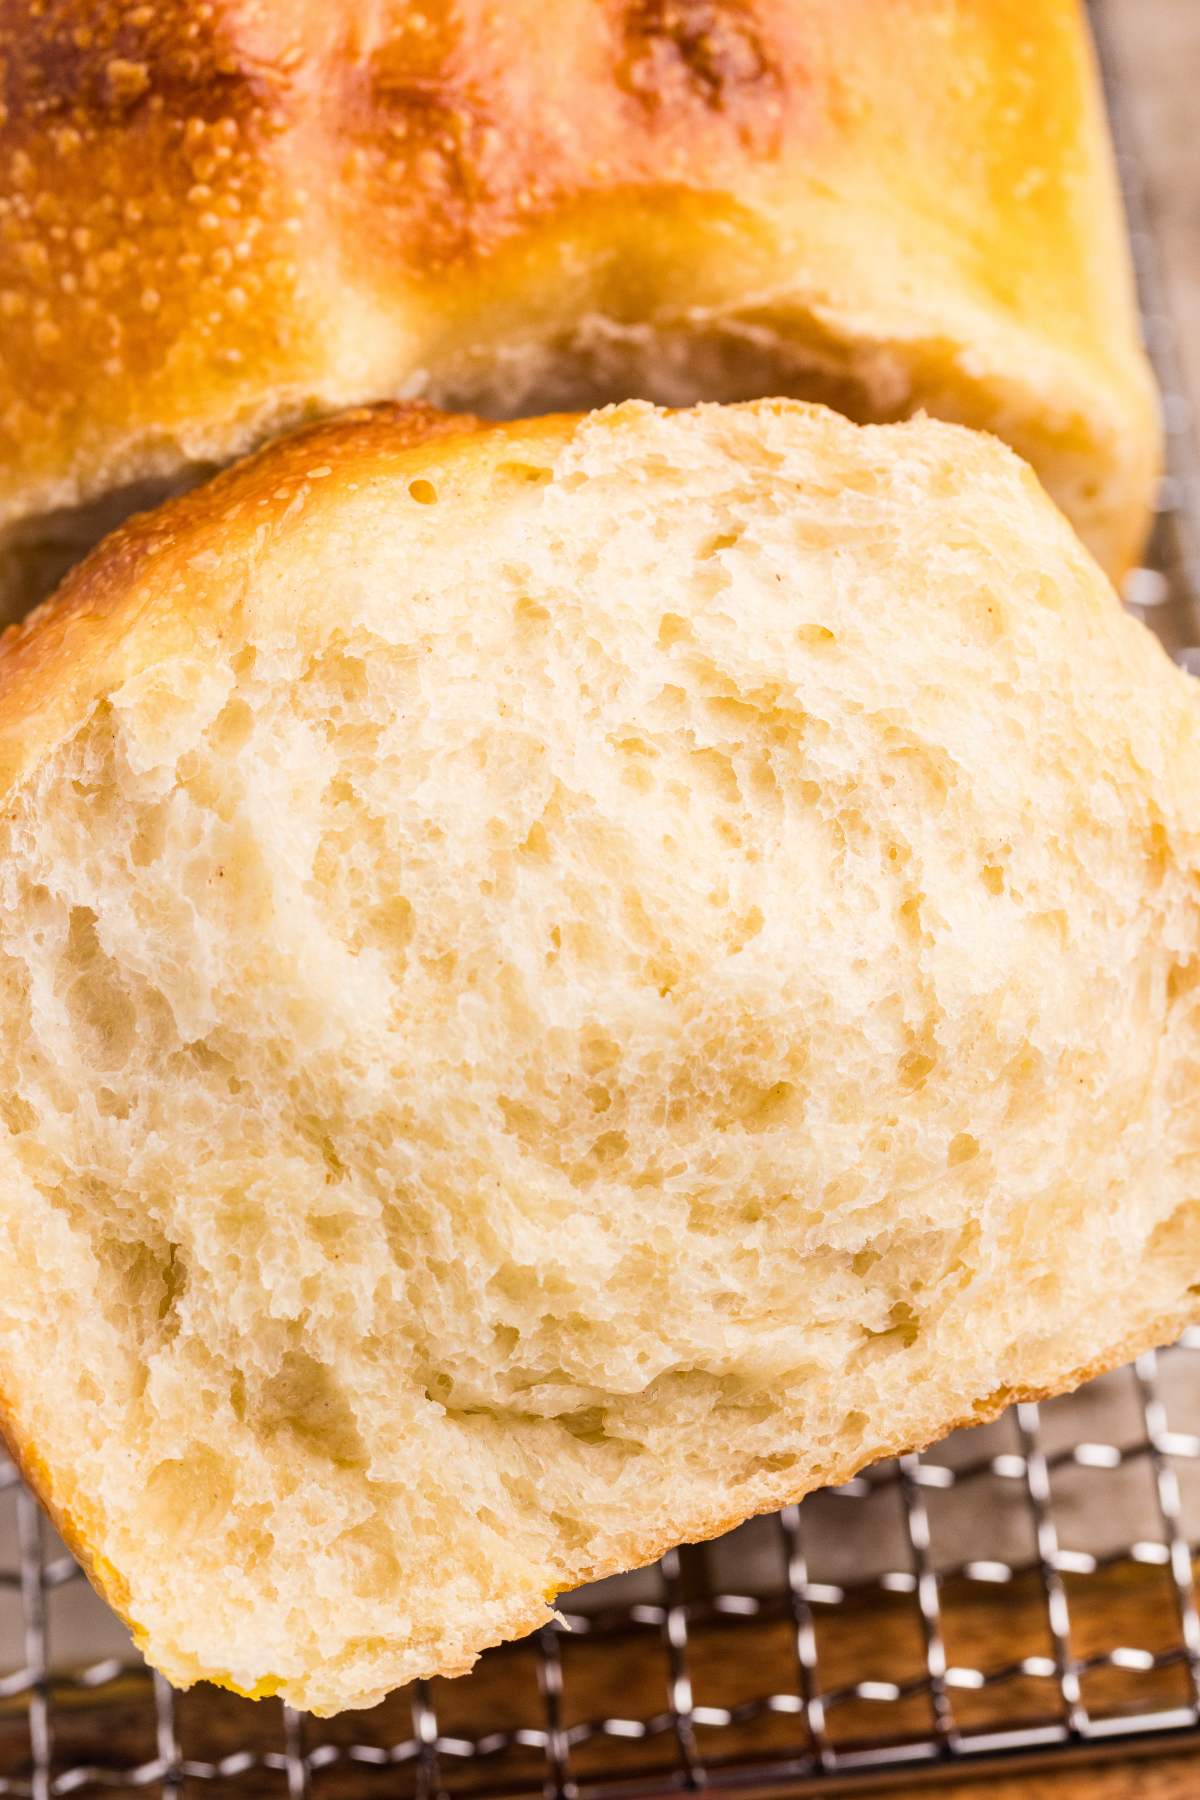
The key to getting that perfect fluffy texture is timing this right, and once you get the rhythm down, it’s actually pretty simple. I always start by feeding my starter Friday morning if I want fresh bread for Saturday lunch: that way the dough rises overnight and I’m shaping it Saturday morning. Your starter needs to be bubbly and active (if it’s sluggish, add a tablespoon of rye flour), and don’t skip the roux step. It’s what makes this bread so much softer than regular sourdough. The dough will feel sticky, but that’s normal. Just wet your hands when you’re handling it and trust the process.
Table of Contents
Ingredients and Tools You’ll Need
A healthy, active starter here is crucial to make your bread rise beautifully. If you have any questions about your starter, I’ll help you learn how to make it, use it, and maintain it. Add a tablespoon of rye flour if it’s slow to activate.
Get a Free + Pretty PDF Recipe Book
Sourdough Sunday Newsletter

Every Sunday evening I’ll send you a sourdough recipe to make that week, straight from my kitchen to your inbox.
And as a thank you for signing up, I’ll send you this e-book with beautiful printable recipes right away. Simple!
You will not be added to any other email lists or my daily newsletter. But if you’re already on my newsletter, you’re welcome to join and receive both.
While you can knead this dough by hand, a stand mixer makes this much easier, since the dough is quite sticky. If you use your hands, wet them with water to stop the sticking.
This already makes two loaves, so you can freeze one if you want. But if you want to double or triple this recipe, or use metric measurements, you can make adjustments in the recipe card at the bottom of this post. Just make sure your stand mixer bowl is big enough!
Equipment
- Stand mixer
- digital scale
- Bench Scraper
- Pastry brush
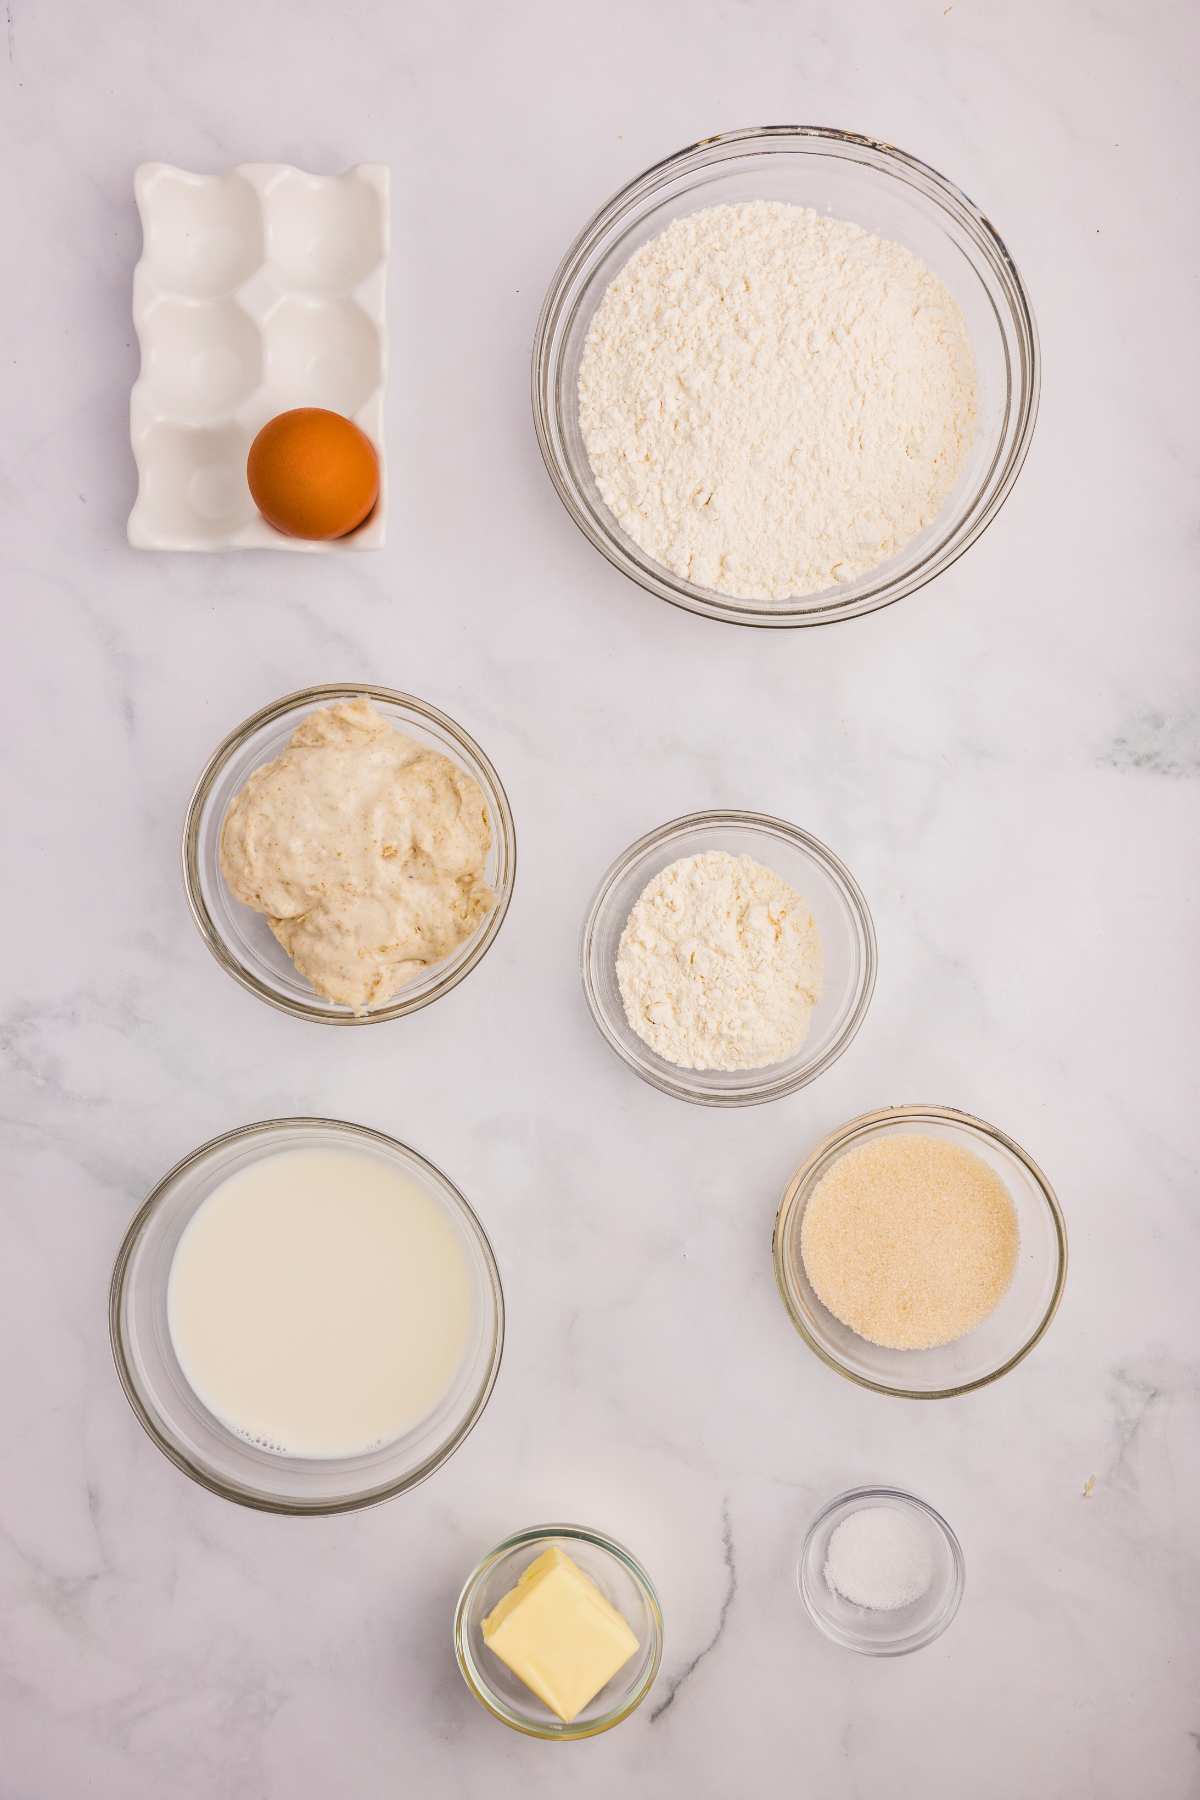
Ingredients
For the starter
- 25 grams sourdough starter
- 70 grams all-purpose flour, unbleached is recommended
- 70 grams water, filtered room temperature
For the roux
- ¼ cup all-purpose flour
- ½ cup whole milk (If you use 1% or non-fat, reduce the amount of milk you use by 2 tablespoons and add 2 tablespoons of butter.)
For the dough
- 1 ½ cup whole milk, see note above
- ¼ cup sugar
- ½ teaspoon salt
- 3 cups bread flour (You can use all-purpose, but the texture will be different.)
- 2 ½ cups all-purpose flour
- 1 medium egg, room temperature
- ¼ cup unsalted butter, softened
- Active sourdough starter, listed above
Egg wash (optional)
- 1 egg
- 1 tablespoon water
Step by Step Sourdough Milk Bread
As always, adjust the recipe if you live above sea level. This website has some charts to help you.
Step One: Feed Starter Ahead of Time
Feed 25 grams of your starter with 70 grams each of flour and water. Just mix it up and leave it on the counter overnight (or throughout the day) until it doubles. If it’s slow to activate, add a tablespoon of rye flour.
Step Two: Make The Roux
Roux sounds fancy, but it’s not. Just whisk ¼ cup flour with ½ cup milk in a pan over medium heat for about 3 minutes until it gets thick and pasty. Add it to your mixer bowl and let it cool down. If you’re not using whole milk (like a 1% or non-fat), you need to cut the milk by 2 tablespoons and add 2 more tablespoons of butter instead.

Step Three: Make Milk Mixture
Heat up 1½ cups milk with ¼ cup sugar and ½ teaspoon salt – just warm, not hot. Add this to your cooled roux and mix it up. Same rule with the milk here as with the roux.

Step Four: Add Starter
Now add in your bubbly starter and stir.

Step Five: Add Bread Flour
Next, we add the bread flour. Start with 2 cups first, stir, then add the final cup.

Step Six: Add Egg
Add the egg to the dough and don’t panic! It’s going to look really wet and sticky, but this is normal.

Step Seven: Add All-Purpose Flour
Switch to your dough hook and slowly add 2½ cups all-purpose flour, about ½ cup at a time.

Step Eight: Add Butter And Knead
Once that’s mixed in, add ¼ cup soft butter and knead for 3 minutes.

The dough will still be sticky but should hold together.

Step Nine: Rest + Stretch And Folds
Place the dough in a greased bowl, cover it with plastic wrap or a damp tea towel, and let it rest for 30 minutes. Now it’s time for stretch and folds. The dough will be sticky, so wet your hands with water. Grab one side, stretch it up, and fold it over. Do this to each side, then cover again. Repeat this whole thing 1-3 more times every 30 minutes.

Step Ten: Long Rise
Now comes the LONG wait – cover and let it rise for 6-12 hours until it doubles. Time this to happen overnight if you can. Place it in a warm spot to speed it up.

Step Eleven: Divide And Shape
When it’s ready (or the next morning), grease two loaf pans and line with parchment. Split the dough in half, then divide each half into 3 balls.

Flatten each ball into a rectangle, and take one end, gently roll it up about halfway, fold in the sides, then finish rolling it up. Do this to all the dough balls and place them in the loaf pan.

Step Twelve: Second Rise
Cover the pans and let the dough rise again for 2-4 hours until they’re puffy and doubled.

Step Thirteen: Optional Egg Wash
Heat your oven to 375°F. Brush the tops with beaten egg mixed with a tablespoon of water. You don’t have to do this, but I like how it makes the top look.

Step Fourteen: Bake And Cool
Finally, it’s time to bake! Bake for 35-40 minutes until the top is golden brown. Let the loaves cool for at least 20 minutes before you slice into them (I know, more waiting).

Storage Instructions
Store in an airtight container for 3 days on the counter, or 4 days in the fridge.
You can also make some extra and freeze it. Slice it (or leave it whole), wrap it in plastic wrap, and then place it in a freezer-safe bag or wrap it again in foil. It will stay good for 3 months, and you can just thaw it overnight in the fridge when you’re ready. Or pop frozen individual slices right into the toaster.
Questions and Troubleshooting
That’s normal! This dough is supposed to be a bit sticky. Wet your hands before you handle it. It’ll keep the dough from sticking to you.
Your starter probably wasn’t active enough. Make sure it’s in a warm place and try adding a teaspoon of rye flour to give it a boost.
Don’t worry. It happens. Brush the top with some melted butter to soften it. But if you don’t want to eat it, you can still turn it into croutons or bread crumbs!

More Sourdough Bread Recipes
If you just want to stick with this bread recipe for the rest of your life, that’s perfectly fine. BUT if you DO want to try other flavors, here are some good ones.
- Sourdough bread with gruyere cheese and caramelized onions sounds complicated, but it’s the same process, plus adding stuff to the dough. It’s a little weird, but so, so good!
- Carrot cake sourdough quick bread is a faster breakfast option using your discard.
- Another regular go-to bread option to add to your rotation is this soft honey wheat sourdough bread.
- These sourdough bread bowls are great for serving soup. They sound fancy, but it’s just like making a big roll.
Printable Recipe

Sourdough Milk Bread
Equipment
- Stand mixer
- Bench Scraper
- Pastry brush
Ingredients
For the starter
- 25 grams sourdough starter
- 70 grams all-purpose flour unbleached is recommended
- 70 grams water filtered room temperature
For the roux
- ¼ cup all-purpose flour
- ½ cup whole milk see notes
For the dough
- 1 ½ cup whole milk see notes
- ¼ cup sugar
- ½ teaspoon salt
- 3 cups bread flour
- 2 ½ cups all-purpose flour
- 1 medium egg room temperature
- ¼ cup unsalted butter softened
- Active sourdough starter listed above
Egg wash (optional)
- 1 egg
- 1 tablespoon water
Save This Recipe
You'll join my email list which you will love. And if you don't, unsubscribe in one click. ❤️
Instructions
- Feed your starter. Feed your sourdough starter the night before by combining the sourdough starter, all-purpose flour, and water. Store at room temperature for about 12 hours or until it has doubled in size.
- Make the roux. Add the ¼ cup all-purpose flour and ½ cup milk to a saucepan. Place over medium heat, using a whisk, stirring constantly, and allow the mixture to thicken and become a paste. This process takes about 3 minutes. Transfer to the bowl of your stand mixer and cool to about 80-90℉.
- Make milk mixture for dough. To a saucepan, add the milk, salt, and sugar. Place the milk mixture over medium-low heat and bring it to 80-90℉. You want the milk to be slightly warm but not hot.
- Combine with roux. Transfer the milk mixture to the bowl of your stand mixer with the roux already added. Using the paddle attachment, stir to combine.
- Add sourdough starter. Next, add the active sourdough starter. Stir to combine.
- Add bread flour. Add 2 cups of the bread flour to the mixture and stir to combine. Slowly add the rest of the bread flour.
- Add egg. The dough will be very wet and sticky. Add the egg and stir to combine fully.
- Slowly add all-purpose flour. Switch the attachment to the dough hook and slowly add the all-purpose flour to the dough by adding ½ cup at a time, incorporating the flour with each addition.
- Add butter. Once the flour is fully incorporated, add the softened butter. Stir to combine.
- Knead. Set your stand mixer to medium speed and knead for 3 minutes. You will notice the dough taking shape. It should still be sticky but holding its shape.
- Cover and rest. Transfer the dough to a greased bowl, cover, and allow to sit for 30 minutes.
- Stretch and folds. After 30 minutes, remove the cover from the bowl, wet your hands, and grab the dough from one side. Stretch the dough up and fold it over, turn the bowl slightly, and repeat this process 2 or 3 more times until the dough has been released from the bowl. Cover and allow the dough to sit for 30 minutes. Repeat this process 1-3 more times. Your dough should be soft and stretch without breaking.
- Bulk rise. Cover and allow the dough to rise for 6-12 hours or until the dough has doubled in size.
- Prepare pans. Grease 2 loaf pans, place a piece of parchment paper inside, and set them aside.
- Divide dough. Turn the dough out onto a clean, dry surface. Using a bench scraper, divide the dough in half. Take each half and divide it into 3 balls.
- Shape dough balls. Lightly flatten each ball into a rectangle, take one end and gently roll it up about halfway, fold in the sides, then finish rolling it up. Transfer the rolled dough to the prepared loaf pan. Repeat this process until all 3 balls have been rolled.
- Second rise. Cover and allow to rise for 2-4 hours or until the loaves have doubled in size.
- Preheat oven. Preheat the oven to 375℉.
- Top with egg wash. Make the egg wash in a bowl by adding an egg and water. Stir to combine. Using a pastry brush, brush on the egg wash.
- Bake. Bake at 375℉ for 35-40 minutes or until the tops are golden brown.
- Cool. Remove from the oven, place them on a cooling rack, and allow to cool for 20 minutes before serving.
Notes
Nutrition