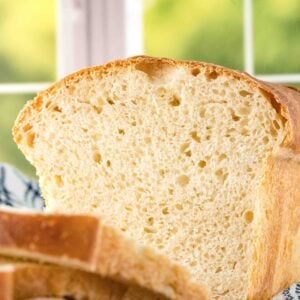
Buttermilk Sourdough Bread
I’ve found this buttermilk sourdough bread recipe to be my go-to for sandwiches. This recipe is a real winner for anyone like me who loves sourdough bread with a good tang, with just enough brown sugar to balance the sourness. Its soft texture makes it perfect for an everyday loaf. It’s one of those sourdough bread recipes that will become a kitchen staple.
Soft Buttermilk Sourdough Bread
Equipment
- Large mixing bowl
- Tea towel
- Plastic Wrap
- Wire cooling rack
Ingredients
For the Dough
- 2½ cups all purpose flour (11.5 ounces)
- 3 tablespoons brown sugar
- ¾ cup buttermilk (6 ounces)
- ½ cup active starter (5 ounces)
- 2 tablespoons melted butter (or vegetable oil)
- 1½ teaspoons salt
For Topping
- 1 tablespoon melted butter
Save This Recipe
You'll join my email list which you will love. And if you don't, unsubscribe in one click. ❤️
Instructions
- Mix the dough and autolyze. Combine the flour, brown sugar, buttermilk, melted butter (or oil), and sourdough starter in a large mixing bowl. Then, stir until a sticky dough forms. Cover the bowl with a clean tea towel and rest on the counter for 30 minutes. This rest period, autolyze, allows the flour to hydrate fully and helps improve the dough’s texture.
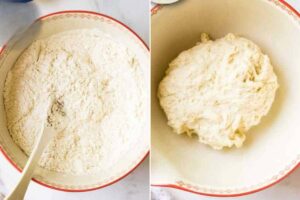
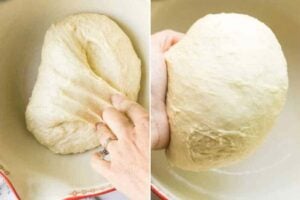
- Knead briefly and add salt. After the dough has rested, sprinkle the salt over it and knead by hand for 1-2 minutes directly in the bowl or on a lightly floured counter. The dough will still feel sticky, but it should begin to smooth out as you knead. Make sure the salt is fully incorporated and the dough no longer feels gritty.
- First rise. Cover the dough with a damp towel and allow it to rise warmly for 4 hours or until it has doubled in size. During this time, gently fold the dough back into a ball once or twice (about every hour or two) to help build the structure. If the towel dries out, re-dampen it to keep the dough from forming a skin.

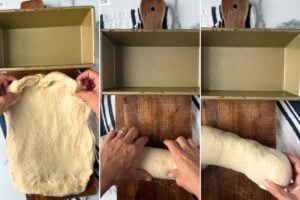
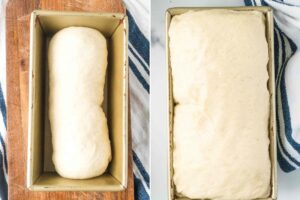
- Shape the dough. Turn the dough onto a clean surface and gently stretch it into a rectangle, approximately 9 inches by 18 inches. Then, fold the corners inward and roll the dough tightly into a log. Next, tuck the ends under and pinch the seams along the side and bottom to seal the loaf. Transfer the dough to a greased loaf pan, seam side down. Cover the loaf with greased plastic wrap.
- Second rise. Let the dough rise again in a warm place for 3-4 hours or until it rises 1-2 inches above the edge of the loaf pan, forming a dome shape. Towards the end of this rising time, preheat your oven to 350°F with the rack in the center.
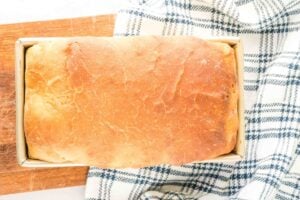
- Bake the bread. Once the loaf has risen, carefully remove the plastic wrap. Brush the top of the dough with 1 tablespoon of melted butter. Bake for 35-45 minutes until the bread is golden brown, and the internal temperature reaches 200°F in the center. If the top starts to brown too quickly, loosely cover it with foil.
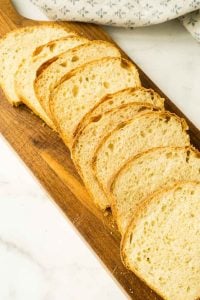
- Cool and slice. Remove the bread from the loaf pan and allow it to cool on a wire rack. Wait until the bread has cooled completely for the neatest slices before slicing.

Video
Notes
Nutrition
There’s something magical about homemade bread, and this soft buttermilk sourdough loaf is no exception. It’s soft, a bit tangy, and great for almost anything – sandwiches, toast, or just with butter right out of the oven. The buttermilk tastes even better, mixing well with the sourdough’s slight tang. What’s great is that this recipe is simple and perfect for beginners in sourdough baking. You can even split the baking over two days if you’re busy!
If you love the flavor that buttermilk adds to bread but like a simpler, non-sourdough version, you might enjoy this classic Buttermilk Bread recipe. It’s just as soft and rich without the tang of sourdough.


I hope it becomes a favorite for you, too.
Key Ingredients and Tools
Here’s what you’ll need to make this recipe easier and make sure your bread comes out great:

- Active Sourdough Starter: This is key for making the bread rise and giving it a tangy taste. If you don’t have one yet, you can start one at home, though it’ll take about a week to be ready. However, using 1 teaspoon of instant yeast and skipping the long rise time is an option.
- Buttermilk: It makes the bread creamy and a bit tangy. No buttermilk? No problem. Just mix some regular milk with 1 tablespoon of lemon juice or vinegar and wait 5 minutes for it to thicken.
- Melted Butter: It brings moisture and richness to your bread. If you’re avoiding dairy, vegetable oil is a good substitute that won’t change the flavor too much for a dairy-free choice.
- All-Purpose Flour: The main ingredient for your bread, it gives it structure. If you want your bread a bit denser, you can replace some with whole wheat flour; just know it’ll make it heavier.
- Kitchen Scale: It’s better to weigh your ingredients than to measure them by volume, especially for flour. This will help you avoid making the bread too dense and keep your bake consistent.
- Loaf Pan: A 9×5-inch pan is just right for shaping your bread and ensuring it bakes evenly. Remember to grease it well to avoid sticking.
- Bench Scraper: Great for dealing with sticky dough and shaping it. Don’t have one? A spatula or a knife can work, too.
These tools and ingredients will smooth the baking process and help you get the best out of your buttermilk sourdough bread!
Norpro Melamine 1017 Grip-EZ Mixing Bowl, 4 quart, Yellow, 3.8 litersMaxjoy Danish Dough Whisk,Large Wooden Danish Whisk for Dough With Stainless Steel Ring,Original Dutch Style Dough Hook for Kitchen Bread Making Tools and Supplies,Dough Whisk 13 InchKINGSBULL HOME Bread Pan Loaf Pan Ceramic Bread Pans for Baking Porcelain Baking Pans Nonstick Meatloaf Pan
Troubleshooting and Help
It’s normal for sourdough to be a bit sticky! Avoid adding more flour, as that can make the bread denser. Instead, lightly flour your hands and work surface to help manage the stickiness.
Not at all! Once you’ve added the salt, this dough needs a quick knead—about 1-2 minutes. It should still feel sticky but starts to smooth out as you go.
Sourdough naturally takes time to rise, but if you’re in a hurry, placing the dough in a slightly warmer spot, like inside your oven with the light on, can help speed things up a bit. Don’t rush it too much—sourdough needs that time to develop flavor and texture.
Yes, you can! If you need more flexibility, you can pop the dough in the fridge overnight after the first rise. It’ll rise slowly in the fridge, and in the morning, you can shape and continue with the second rise as usual.
If your dough isn’t rising, the most common culprit is an inactive starter. Make sure your starter is bubbly and fed before using it. Also, colder temperatures can slow the rise, so try placing the dough in a warmer spot near a window or in a turned-off oven with the light on.
This is an easy and satisfying recipe for sandwiches, toast, or to enjoy warm from the oven with some butter.


This is the best bread I’ve ever made! Everyone loved it!
Thank you, Marilyn. I’m so glad everyone liked it, and thanks so much for leaving me a review.
Wondering if I can replace the brown sugar with honey or maple syrup? Or even coconut sugar? Thanks!
yes both will work just fine! 🙂
For a newbie, can I use the bread machine?
It’s fine for kneading and the first rise, then I’d remove it and follow to rest of the recipe as written 🙂
Thank you for sharing this recipe. I am on the fence about this bread. The flavor is good, no question. However, I have two cons with the bread loaves I produced (I did double the recipe).
The first is the crumb was larger and less dense than what I get with my sourdough sandwich bread recipes that only use water. I dont want a lot of larger holes in my sandwich bread, even if it tastes great. The second con is somewhat related to the first. My loaves were much shorter than the loaves I produce with my other recipes. This may be because my double loaf sourdough sandwich bread recipes have almost twice the amount of flour, so the loaves are taller. However, while I could have probably gotten a taller rise with this recipe, I would have ended up with an even more open crumb with my finished loaves, which for me is not desirable for sandwich bread. I guess I’ll look for other ways to use up my buttermilk.
hey robin, i totally get it! for a lot of buttermilk i like to make a big batch of waffles or pancakes and freeze them. works great!
I make sourdough bread weekly and when I saw this recipe I was intrigued. I luv buttermilk biscuits so I was ready to give this a try. Hands down the best bread I ever made!!
I’m so glad gray! thanks for letting me know 💕
I really, really love this recipe and have made it several times. My only complaint would be if you could include in the directions adding the 2 T. of butter with the other ingredients in the autolyze? It doesn’t specify when to add it and I always forget. Thanks for the recipe! It’s fantastic!
Hey Jess, Yes! I’ll add that now! 🙂
This bread is a big hit with everyone who has tried it! I’ve also made it with part white whole wheat flour and it comes out great that way as well.
thanks jennifer! i haven’t been able to find buttermilk for months and i wish i could make a loaf too! 🙂
Katie, take 1 tbsp white vinegar and put it in a 1 cup measuring cup then fill the measuring cup the rest of the way to the top with milk. Stir and let it sit for a few minutes. There is your replacement for buttermilk!
Happy baking!
Suzi Q
Or make your own butter & buttermilk with your starter. One liter of heavy cream (preferably not UHT) combined with 50 ml of kefir or 150 ml of active yogurt (not pasteurized) and ferment for 24 to 72 hrs at room temp. Will depend on room temp. But it will be thick a buttery smelling. Whip until the solid separates. The liquid is lovely buttermilk (about 500 ml) and the solids are lovely butter. Strain off the buttermilk, wash the butter in ice water until liquid is clear. Salting is optional – 1.5% max
One more question: Can you substitute some WW flour for the AP flour?
yes, absolutely. up to 25% with it stillcoming out light.
Do you melt the butter that goes into the dough? There is no mention of it in the printed recipe.
hi sally! i just add it softened with the other ingredients and it smooths out while you knead.