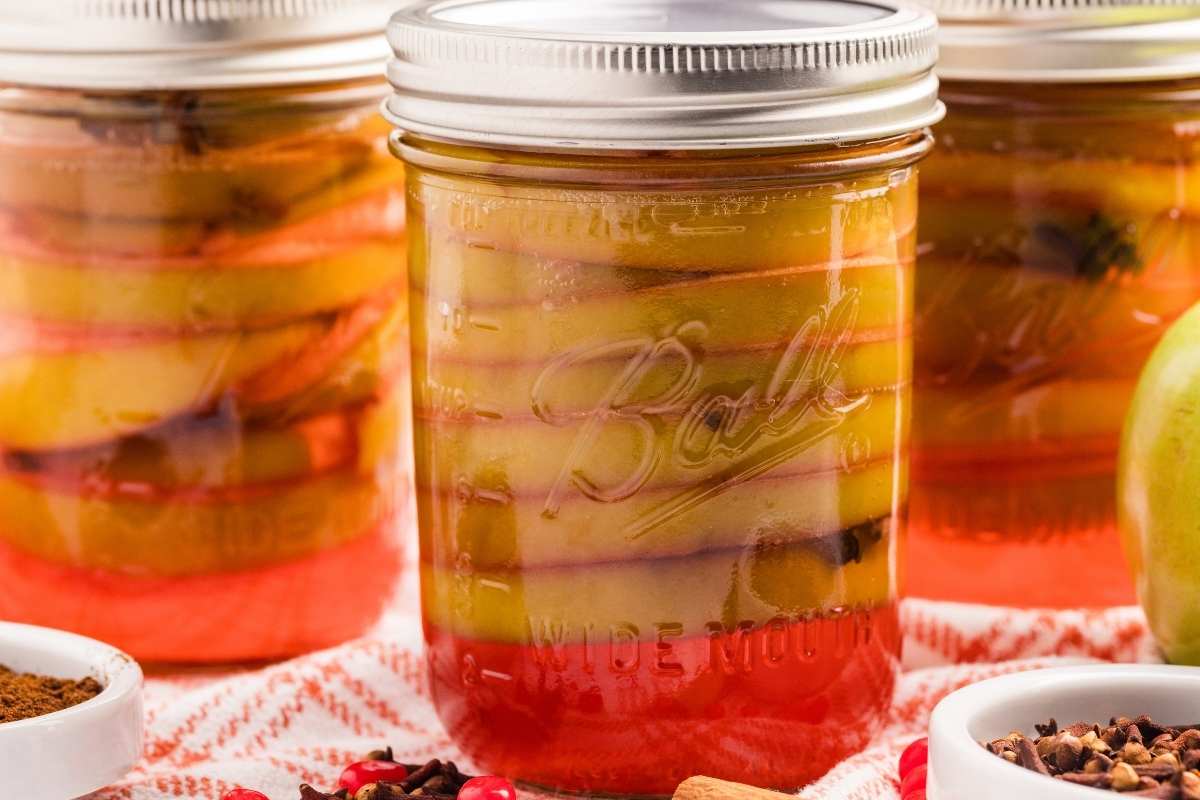
These are the real deal: firm tart apples simmered in a cinnamon-clove syrup that tastes like fall in a jar. They keep their shape, look gorgeous on a holiday table, and make the whole kitchen smell amazing. If you love practical canning projects with a big payoff, this is one you’ll want to save.
The best part of this recipe is how impressive it looks compared to how simple it actually is. You slice, simmer, and stack, and suddenly you have jars that look like they came from an old-fashioned country market. It’s one of those waterbath canning projects that makes you feel wildly productive without taking all day.
Table of Contents
What You’ll Need
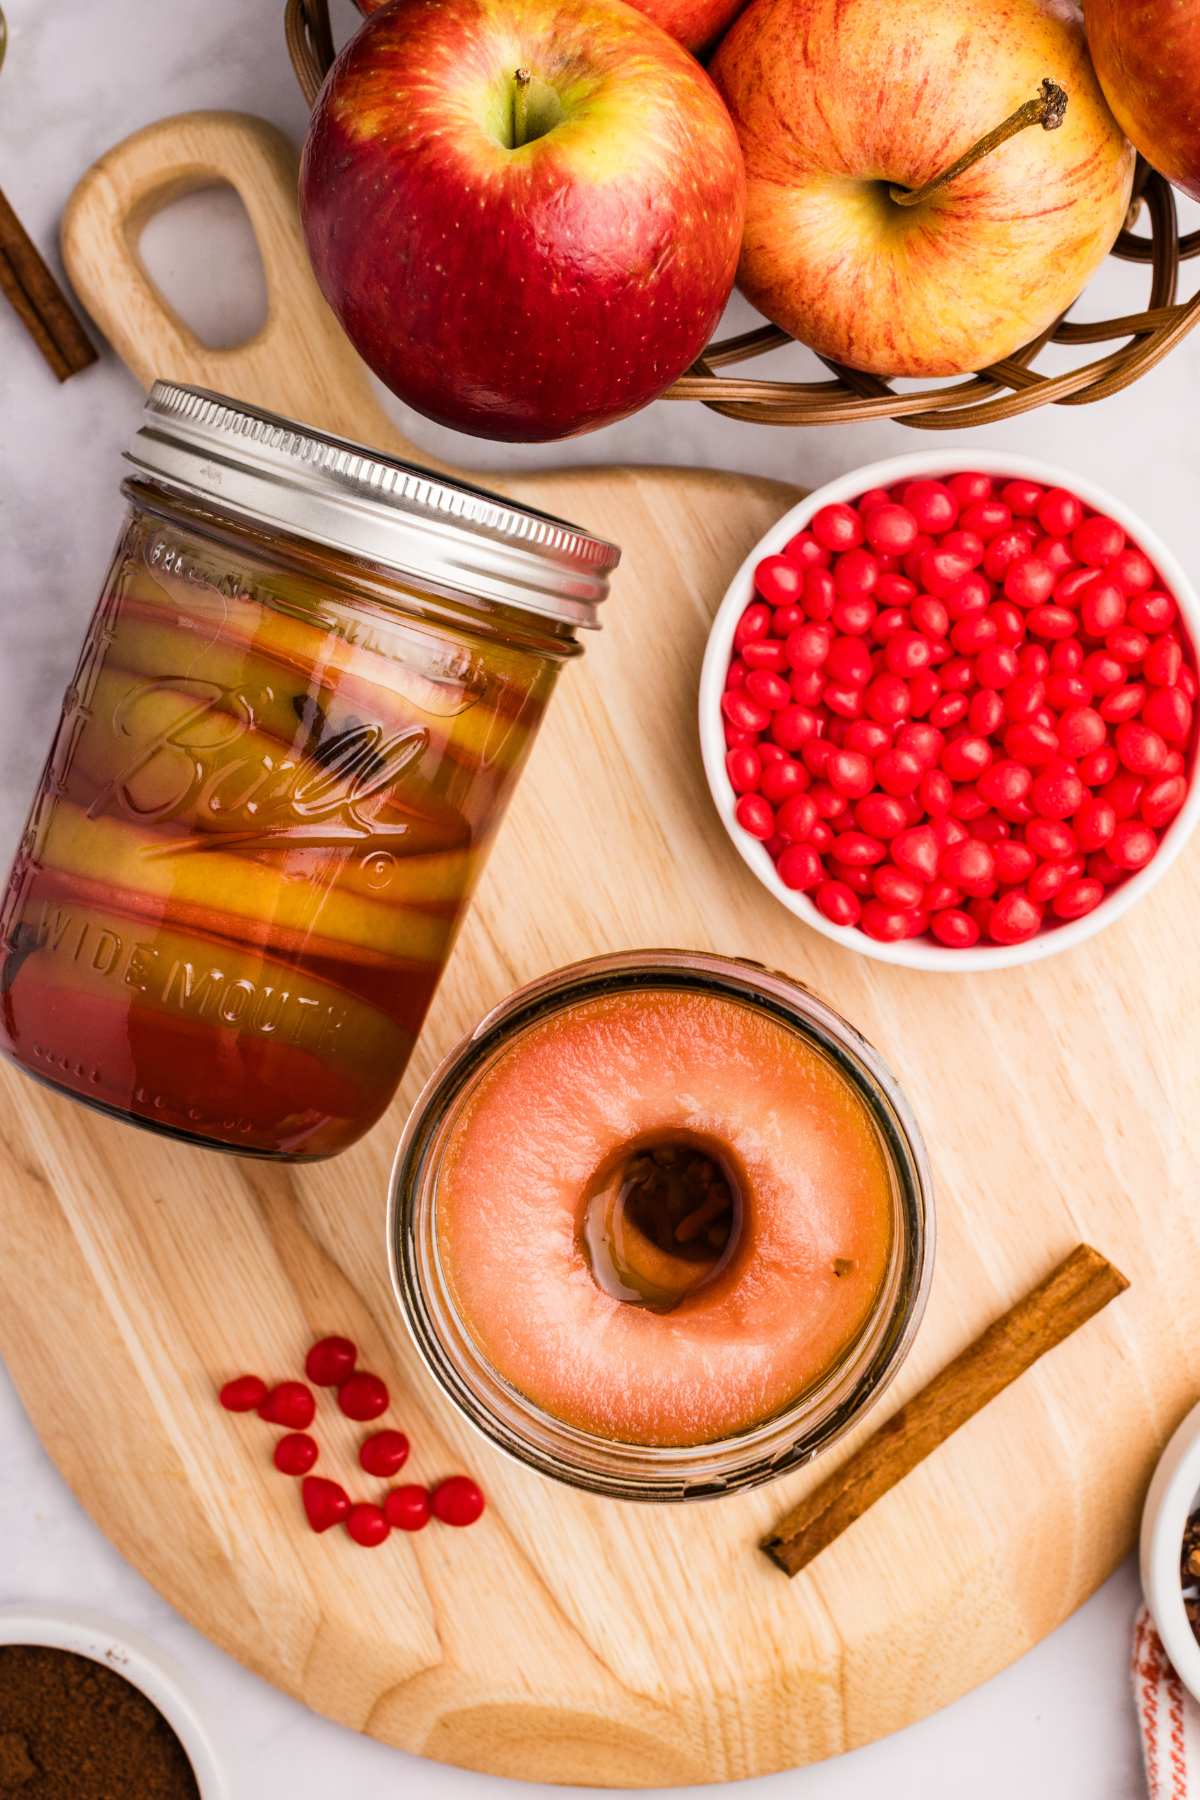
The type of apple you use isn’t a huge deal, but I have my favorites. Granny Smith, Jonathan, Pink Lady, and Honeycrisp are all good options.

For the Apples
- 4 pounds firm tart apples
- ¼ cup lemon juice
- Water
For the Spiced Syrup
- 6 cups granulated sugar
- 3 cups water
- ½ cup + 2 tablespoons white vinegar
- 3 tablespoons whole cloves
- 4 cinnamon sticks
- ½ cup red hot cinnamon candies
- ½ teaspoon red food coloring (optional, for a deeper red)
Instructions
Doubling: you can double this recipe but make sure you have a big stockpot. Processing time will stay the same.
1. Get Your Jars Ready
Before you start cooking, make sure your jars are clean, warm, and ready to fill. Wash them in hot soapy water, then place them in your water bath canner and let them heat while you prep the apples. Warm jars help prevent cracking when the hot syrup goes in.

FREE FOR SUBSCRIBERS
Canning Binder
Subscribe (free!) to my newsletter to receive this PDF + dozens of others in my printable library. You’ll also get emails you’ll truly love, with a weekly meal and so much more.
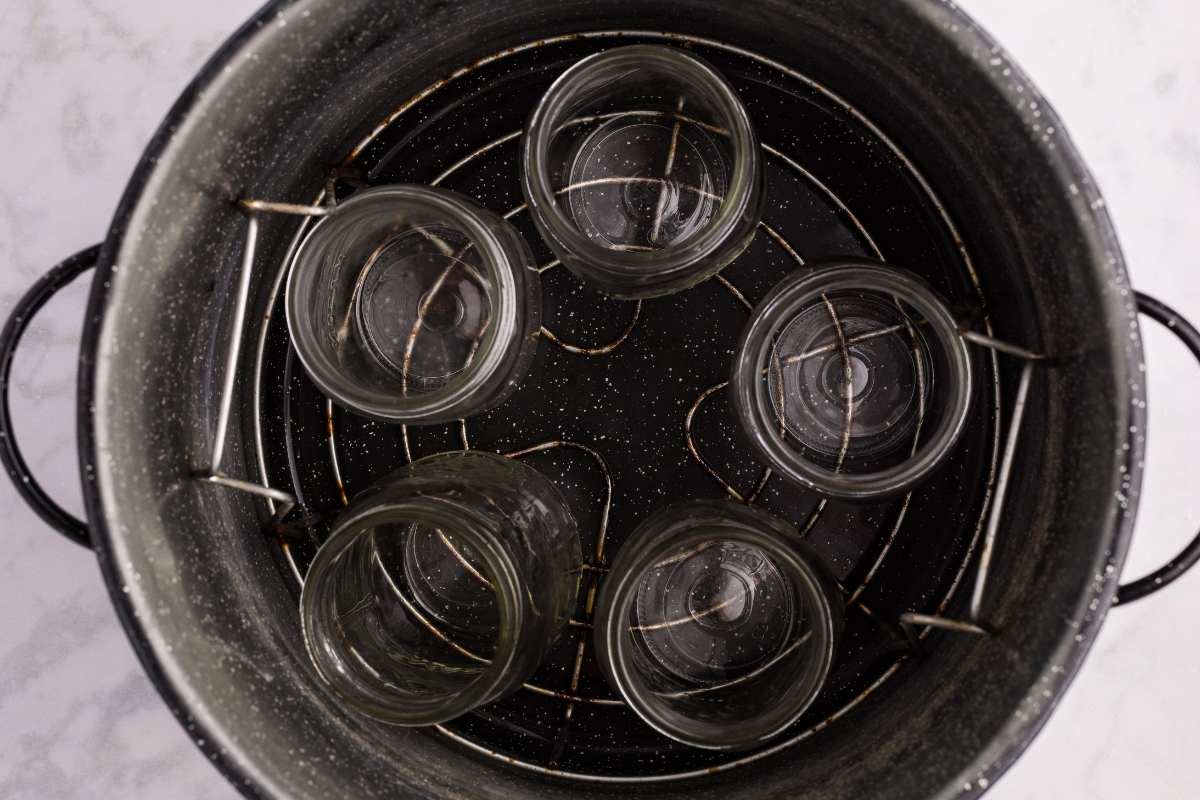
Wide-mouth jars make stacking the apple rings much easier. Regular mouth works, but you’ll do more wiggling and adjusting.
2. Prep a Bowl of Lemon Water
Fill a big mixing bowl with cool water and stir in the lemon juice. Every apple ring will go straight into this bowl as you slice, and it keeps them from turning brown while you work.
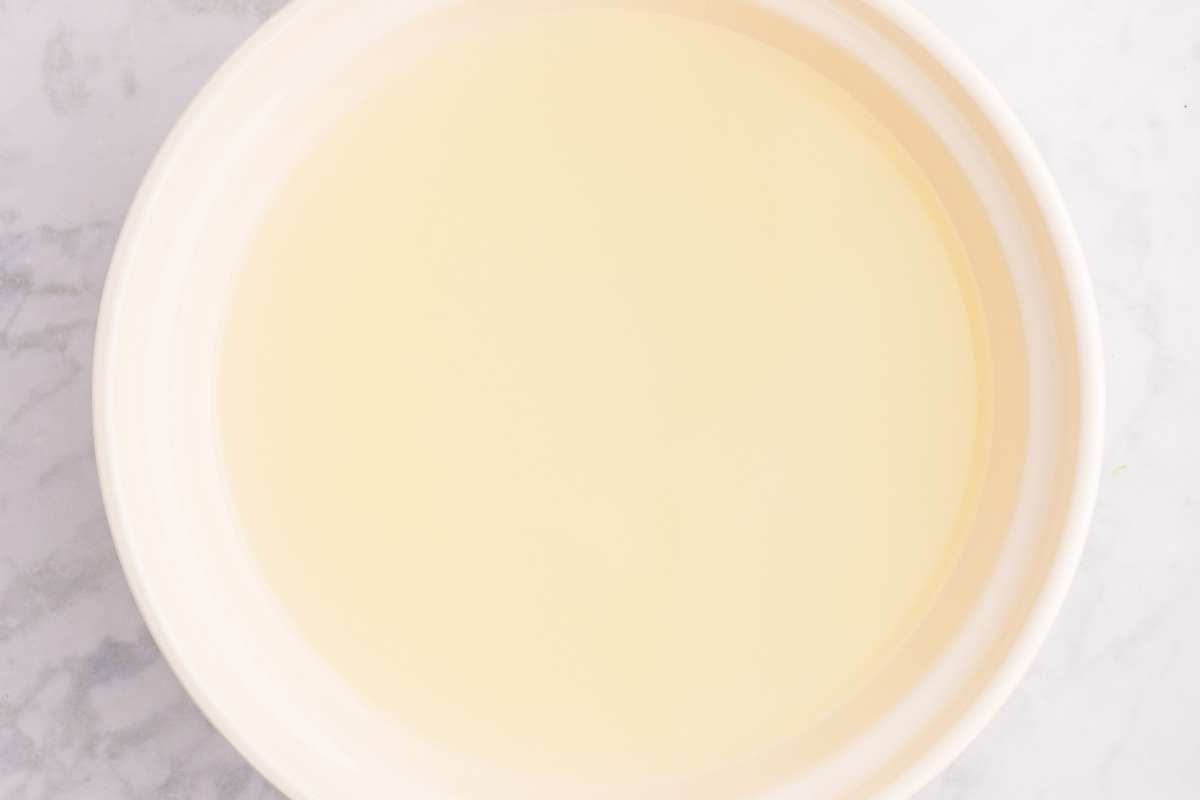
If you’ve ever sliced apples for pie and watched them turn tan in minutes, this step prevents that. And it matters even more in canning because you want the final product a pretty pink, not brown.
3. Make the Spiced Syrup
In a large pot, combine the sugar, water, vinegar, whole cloves, cinnamon sticks, and red hot candies. Bring it to a boil and stir until everything dissolves. Let it boil for about 3 minutes so the spices start to flavor the syrup.
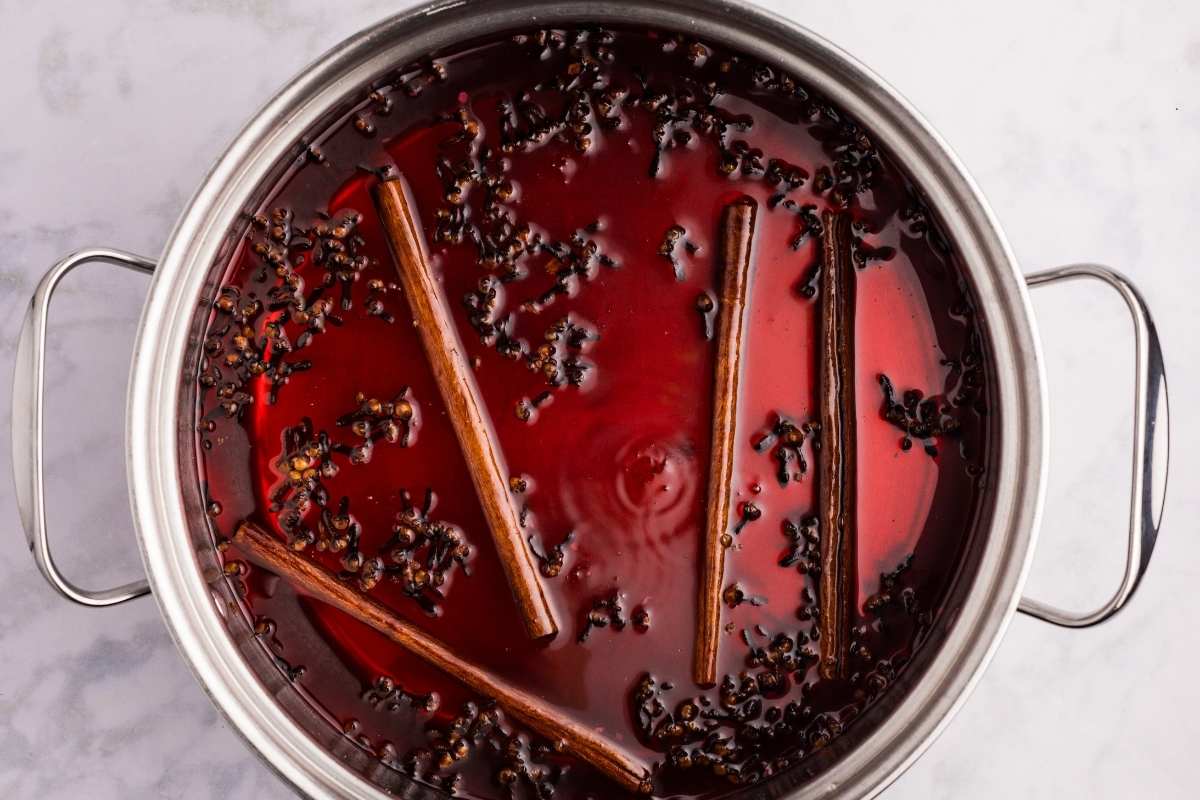
The vinegar might seem strange, but don’t skip it. It keeps the apples bright and balances the sweetness. You won’t taste it in the finished jars.
4. Slice the Apples into Rings
Slice the apples into ½-inch thick rings, not thinner, or they’ll fall apart. Use a small round cutter or melon baller to pop the cores out. Drop each slice straight into the lemon water.
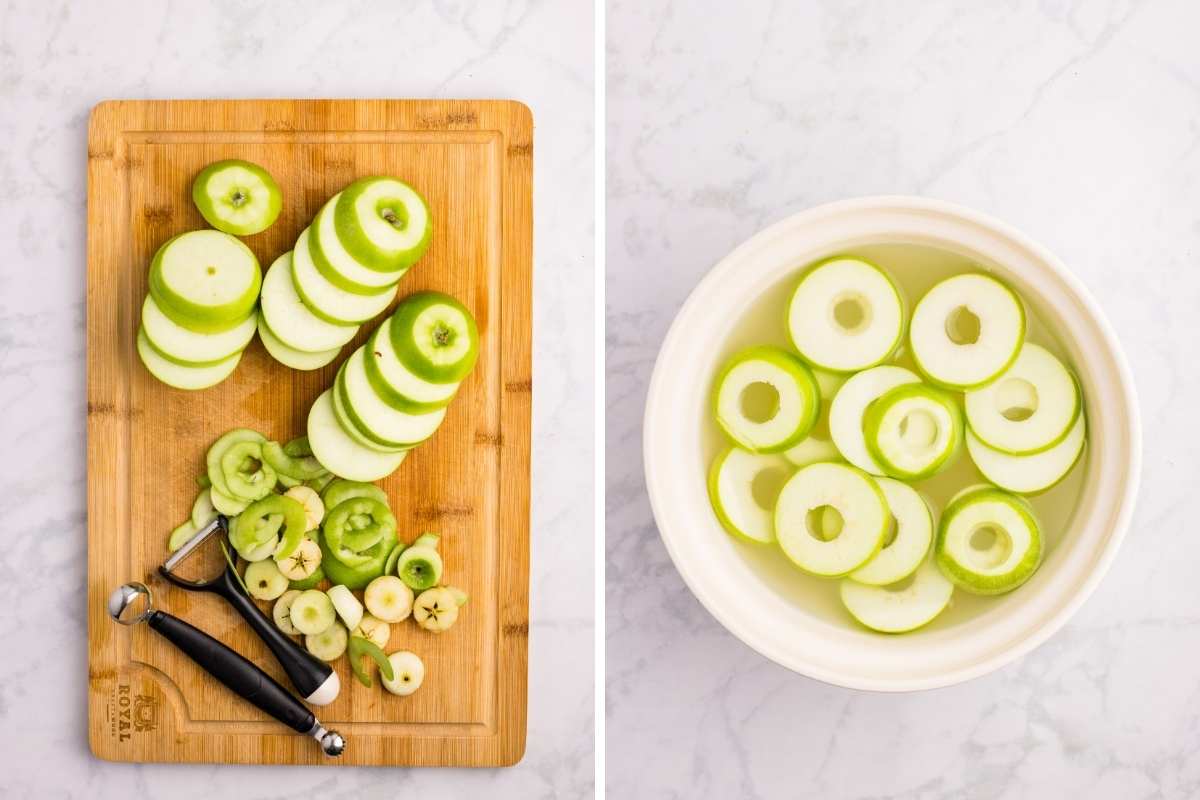
I leave the skins on because it helps the slices hold their shape during canning. You can peel them if you prefer softer rings or if the look of the peel bugs you.
5. Simmer the Apples in the Syrup
Drain the apples and gently add them to the hot syrup. Stir slowly so you don’t break them. Let them simmer about 5 minutes, just long enough to soften slightly and absorb some flavor.
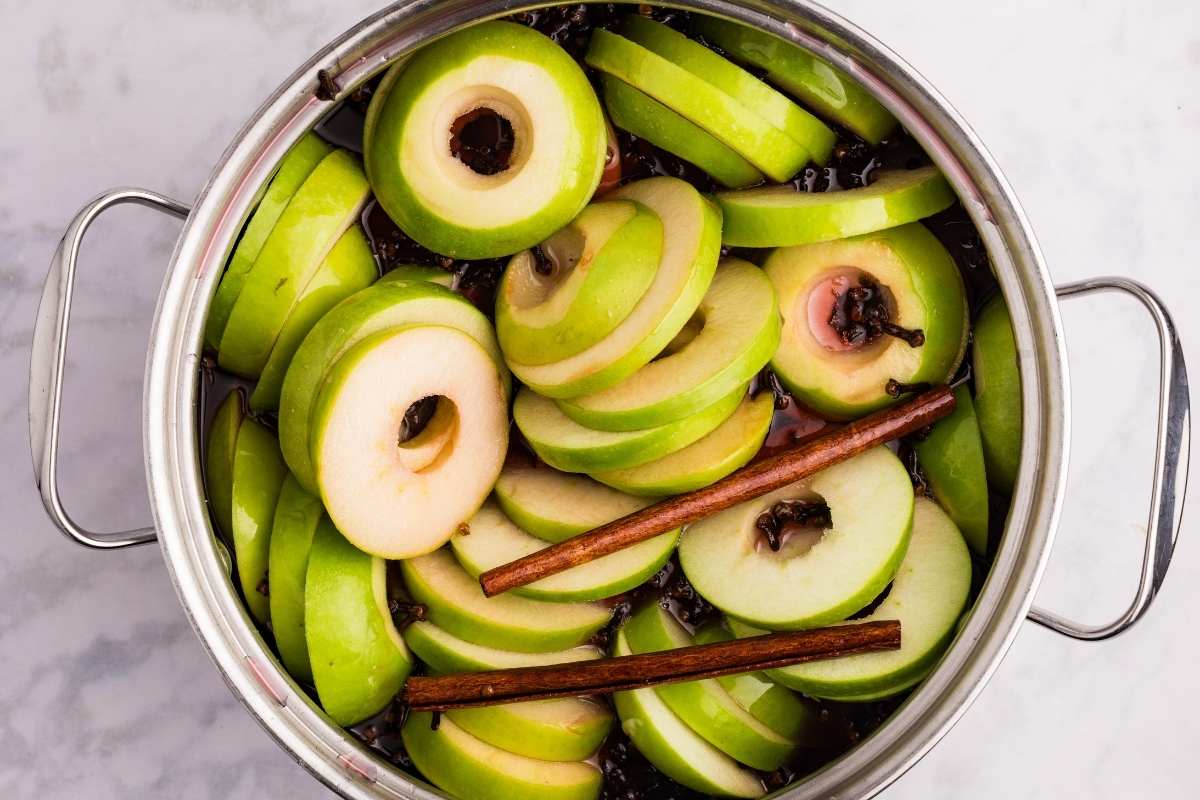
If you rush this step, the apples may float in the jars later. The brief simmer helps them stay put.
6. Pack the Jars
Use tongs to stack the apple rings into the warm jars, stopping at ½ inch from the top. Then ladle the hot syrup over them, keeping that same ½-inch headspace.
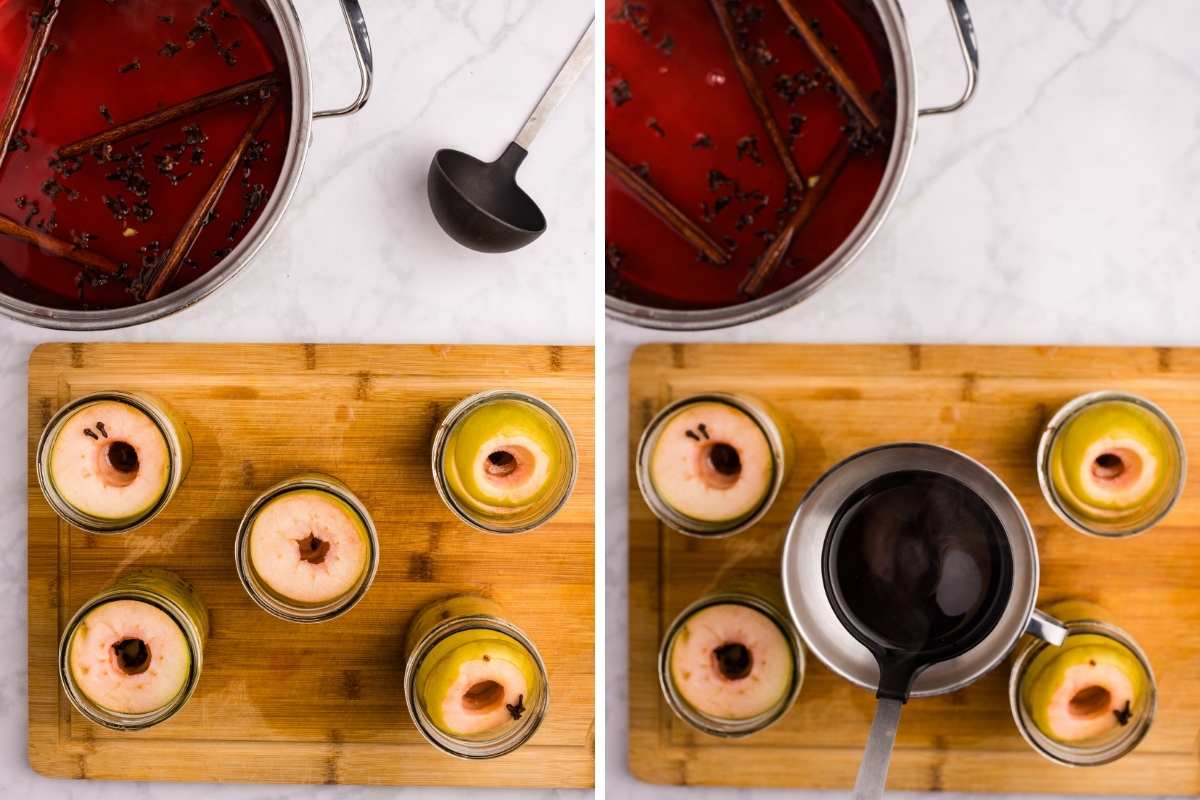
If you see little air pockets between slices, that’s normal. We’ll get them in the next step!
7. Remove Air Bubbles and add Lids
Run a debubbler or a clean chopstick down the inside of the jar to release trapped air. You’ll see bubbles rise to the top. Add more syrup if the level drops below ½ inch headspace.
Skipping this step leads to siphoning (liquid loss) during canning.
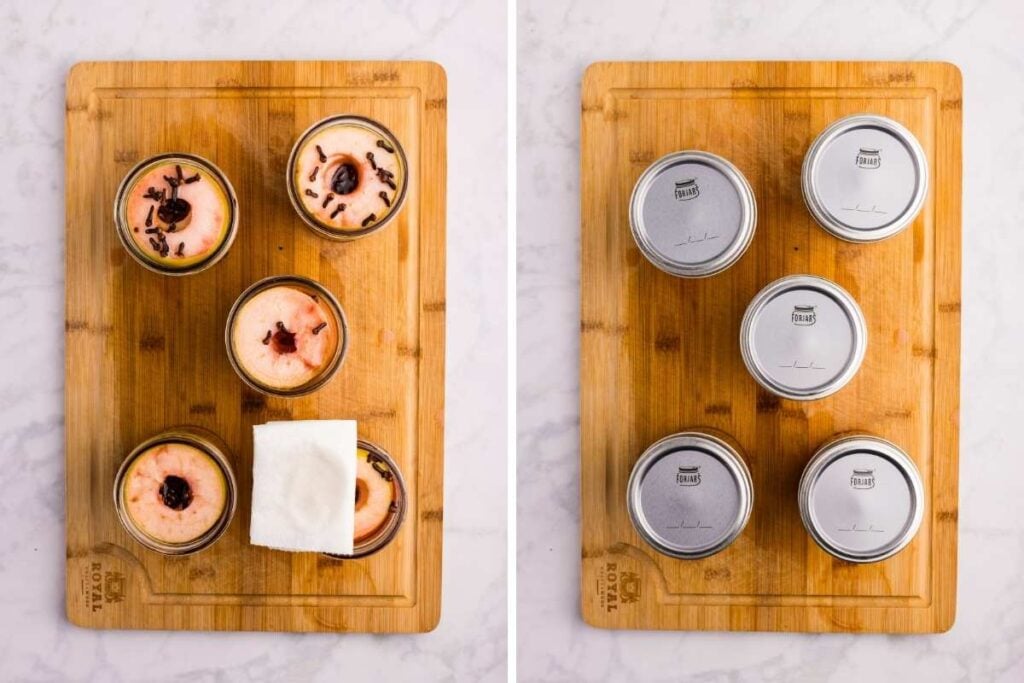
Wipe the rims, add the lids, tighten the bands fingertip-tight, and
8. Process in boiling water bath
Place the jars into the canner. Make sure they’re fully covered with water.
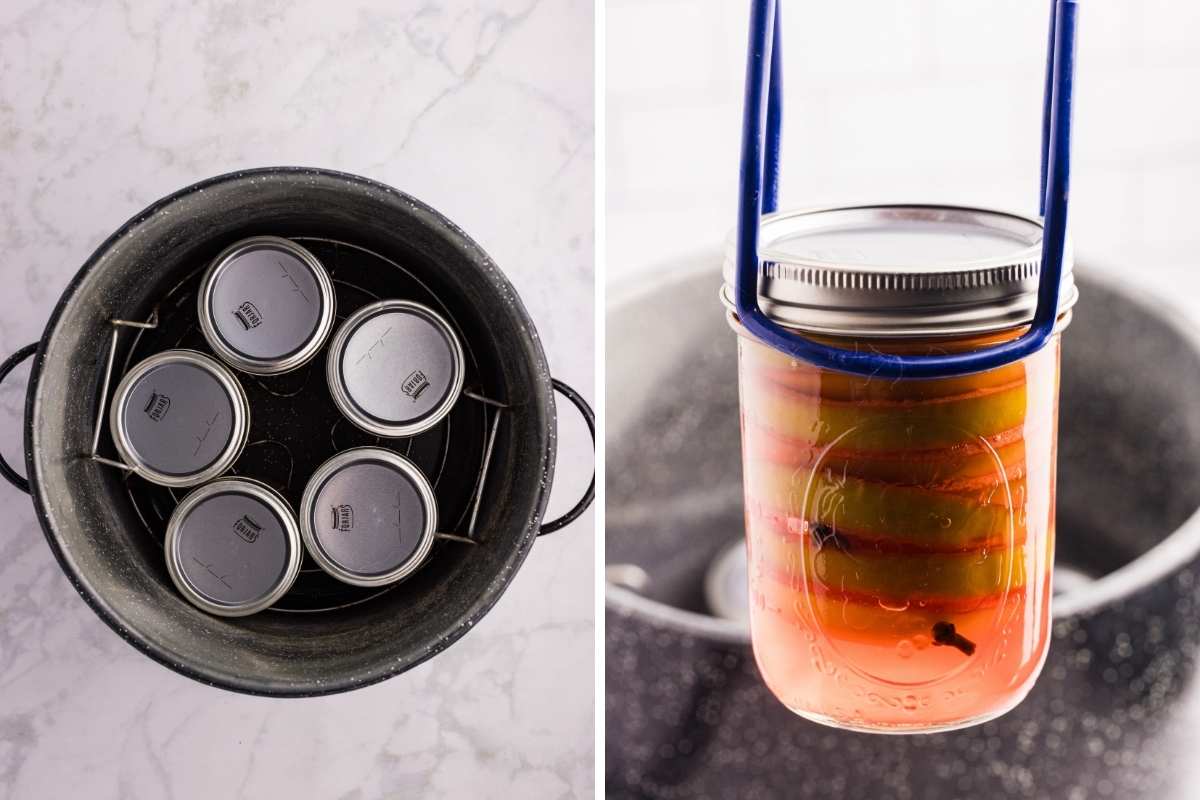
Bring to a full rolling boil and process for 10 minutes (adjust if you’re at high altitude).
Turn off the heat, remove the lid, and let the jars sit in the hot water for 5 minutes.
9. Cool + Store
Then carefully lift them out and let them rest on a towel for 12–24 hours. Once cooled, check seals, wipe jars, label, and store.
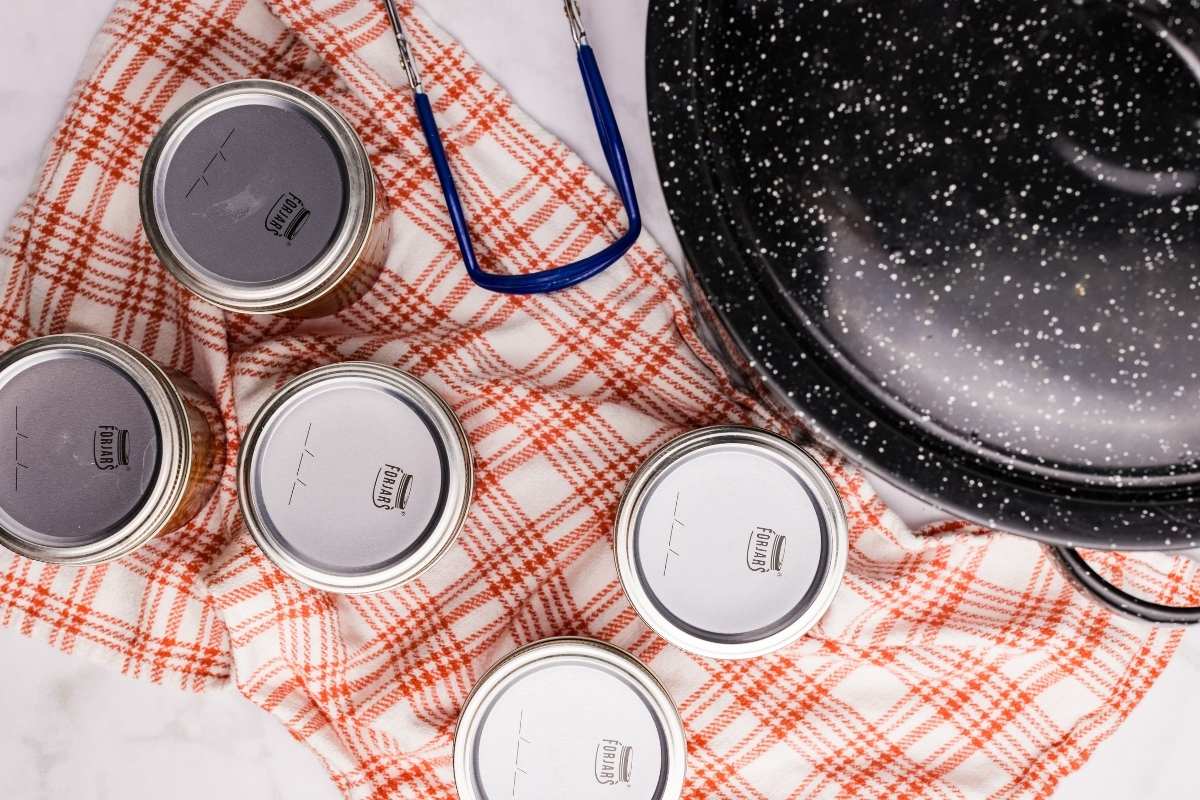
Unsealed jar? No problem. Just pop it in the fridge and eat it within a week.
Storage Instructions
- Shelf Life: Once processed and sealed, the jars will keep for 12–18 months in a cool, dark place (pantry, basement shelf, or cabinet away from heat).
- After Opening: Store in the refrigerator and use within 7–10 days. The syrup will thicken slightly as it chills — that’s normal.
- Make Ahead Tip: These actually improve after a couple of weeks on the shelf. If you’re planning to serve them for a holiday, party, or gift basket, make them at least 2–4 weeks in advance for the best flavor and color.
- Gifting Tip: Small half-pint jars make great hostess or teacher gifts. Tie with ribbon and include a little card with serving ideas (like spooning over ice cream or pork roast).
Troubleshooting
That usually happens when the slices weren’t simmered long enough in the syrup. Make sure they get the full 5 minutes so they soften slightly before packing.
No. It’s only for appearance. The candies alone will give a soft pinkish tint.
Once cooled, the lid should be flat or slightly indented and shouldn’t flex when pressed. Any unsealed jars go straight to the fridge and are still safe to eat.
More Ways to Preserve Your Apple Harvest
Apple season is long and lovely, and perfect for canning because it’s not too hot. Here are more favorites:
- Apple pie jam
- Apple juice
- Apple syrup that uses cores and peels
- Apple pie filling
- Our favorite apple butter
Printable Recipe

Spiced Apple Rings
Equipment
- 1 water bath canner with rack
- 5 pint jars with lids and bands
- 1 melon baller or small round cutter
Ingredients
For Apples + Soak
- 4 pounds firm tart apples Granny Smith recommended
- ¼ cup lemon juice for soaking
- water for lemon soak
For Syrup
- 6 cups granulated sugar
- 3 cups water
- ½ + 2 tablespoons cup white vinegar
- 3 tablespoons whole cloves
- 4 cinnamon sticks
- ½ cup red hot cinnamon candies adds flavor and light red color
- ½ teaspoon red food coloring optional, for deeper color
Save This Recipe
You'll join my email list which you will love. And if you don't, unsubscribe in one click. ❤️
Instructions
- Prep for canning. Wash jars, lids, and bands. Place jars in the water bath canner to warm while you prepare the apples.
- Prep soak. Fill a large bowl with cool water and lemon juice. This prevents the apples from browning as you slice.
- Make syrup. In a large pot, combine sugar, 3 cups water, vinegar, cloves, cinnamon sticks, and red hot candies. Bring to a boil and stir until dissolved. Boil 3 minutes.
- Slice apples. Slice apples into 1/2-inch rings and remove cores with a melon baller or cutter. Place slices immediately into lemon water.
- Add apples to syrup. Drain apples and gently add to the hot syrup. Simmer 5 minutes to soften slightly.
- Pack and fill. Pack apple rings into warm jars, leaving 1/2 inch headspace. Ladle hot syrup over top, keeping the same headspace.
- Fill jars. Remove air bubbles with a chopstick. Wipe rims, apply lids, and tighten bands fingertip-tight.
- Process in canner. Process in a boiling water bath for 10 minutes (adjust for altitude if needed).
- Store. Let jars cool 12–24 hours. Check seals, label, and store in a cool dark place.
Notes
Nutrition


These were super easy to make and turned out beautiful and so delicious! I had some syrup leftover and I’m wondering if you have a recipe for a cocktail or something else that I could use the syrup for. It in itself is pretty and would make a great gift in a little jar.
Thanks!
Hi Darlin! This would be PERFECT for a nice apple latte. I love using the blonde instant espresso powder, mix with some milk, shake it, pour over ice, add the syrup, then a bit of whipped cream on top and some cinnamon sprinkled on the whipped cream. a little home treat :). also would be great with spiced rum and ginger ale.