Buttercream-Filled Thumbprint Cookies
A classic buttery cookie base filled with creamy buttercream frosting, these are pure fun and sweetness.. You can keep the buttercream plain or add fun colors and flavors depending on the season.

There’s nothing like freshly baked cookies. These are easy to make, but they feel like a real treat.
Table of Contents
Ingredients and Tools You’ll Need
Everything is pretty standard baking pantry items. Feel free to pick any color for the buttercream or just leave it plain. Using a small cookie scoop will give you more cookies of the same size, but a tablespoon works too. To make the indent, the back of a wooden spoon works great. (The part, not the spoon part.)

This will make about 30 cookies. They freeze great unfrosted so if you’d like to double or triple this recipe, you can make adjustments in the recipe card at the bottom of this post.
Equipment
- Stand mixer or handheld mixer
- Mixing Bowls (large and small ones)
- Plastic Wrap
- Cookie scoop or tablespoon
- Baking sheets
- Piping bag
- Parchment paper
- Wire cooling rack
Ingredients
Cookie Dough
- 1 cup unsalted butter (room temperature)
- ½ cup granulated sugar
- 2 egg yolks
- 1 teaspoon vanilla extract
- 2¼ cups all-purpose flour
- ½ teaspoon salt
Buttercream
- ½ cup unsalted butter (room temperature)
- 3 cups powdered sugar
- 1-2 tablespoons heavy cream or milk
- ½ teaspoon vanilla extract
- 4 drops food coloring (optional)
How to Make Buttercream Filled Thumbprint Cookies
Step One: Get Ready
Heat your oven to 350°F and line two baking sheets with parchment. Don’t skip the parchment – trust me.

Step Two: Mix
Cream that butter and sugar together for 2-3 minutes until it’s fluffy. Then add your egg yolks and vanilla and beat it for another minute or two.

Step Three: Add the Flour
Mix your flour and salt in a small bowl first, then slowly add it to your butter mixture. Don’t go crazy mixing it – just until it comes together.

Step Four: Chill
Cover your dough with plastic wrap and stick it in the fridge for 30 minutes. This step matters – it keeps the cookies from spreading into weird shapes.
Step Five: Shape
Scoop out portions (about a tablespoon each) and roll them into balls. Roll each ball in a little extra sugar – this gives them a nice texture. Put them on your baking sheets about an inch apart.

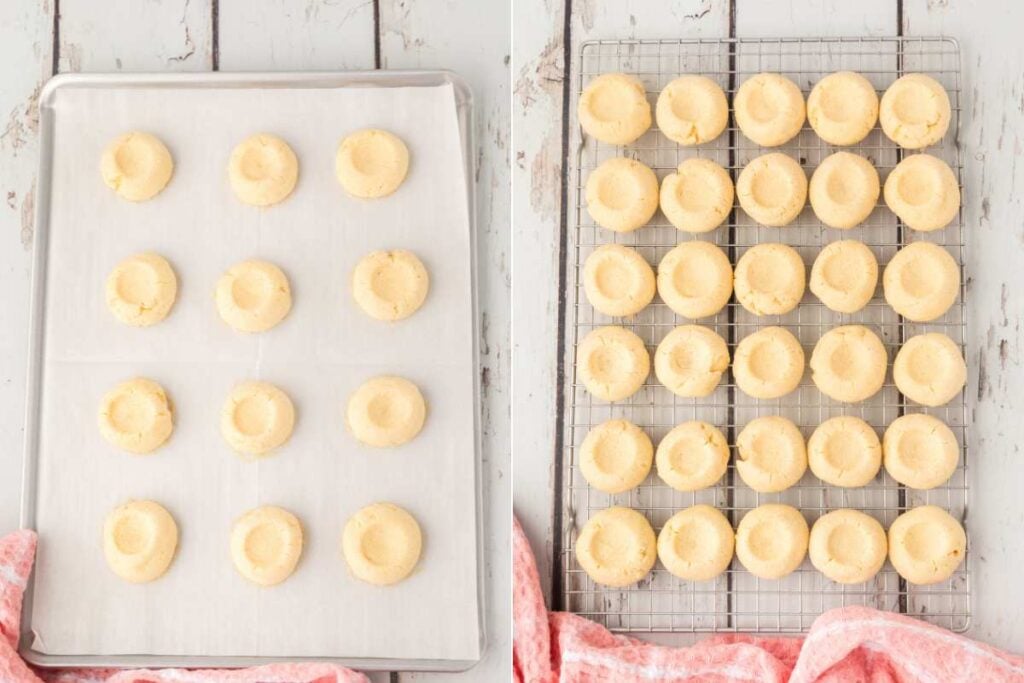
Step Six: Make the Thumbprint
Use the back of a ¼ teaspoon or a wooden spoon handle to press a little well in the center of each cookie. Don’t go too deep.

Step Seven: Bake
Bake for 12-14 minutes until the edges just start turning golden. Don’t overbake them or they’ll be tough.
Step Eight: Make the Filling
While they’re cooling, beat your softened butter until it’s smooth. Add the powdered sugar bit by bit, then add vanilla and enough cream to make it pipeable. If you want colored filling, add a few drops now.

Step Nine: Fill
Once the cookies are COMPLETELY cool (this is important), pipe or spoon the buttercream into those little wells you made.

Storage Instructions
Store the cookies in an airtight container at room temperature for 3 days or in the fridge for a week.
Like most cookies, these can be made ahead of time easily
- Make-Ahead: You can prepare the dough in advance and refrigerate it for up to 3 days.
- Freezing: Both the unbaked dough balls and the baked, unfilled cookies freeze well. Freeze them on a baking sheet, then transfer to a ziplock bag for up to 3 months. Thaw and then bake or fill as directed.
- Defrosting: Thaw the dough or cookies overnight in the refrigerator before baking or filling.
The only thing I wouldn’t recommend is freezing them already frosted.
Questions and Troubleshooting
Yes, chilling is important! It keeps the cookies from spreading too much in the oven and helps them hold that nice, round shape. Even a quick 15-20 minutes in the fridge will make a difference if you’re short on time.
Definitely! Try a drop or two of almond, peppermint, or lemon extract in place of or with the vanilla for a fun twist. Just be careful—a little goes a long way with extracts!

More Drop Cookie Recipes
I have plenty of cookies to share.
- Old fashioned jam thumbprint cookies are perfect for the holidays and you can use any jam you want.
- Lemon sour cream cookies are a top ten cookie for me.
- Apple butter thumbprint cookies are the classic you love with amazing apple butter.
- Chewy molasses cookies have just the right amount of spice and are the first to disappear from the Christmas cookie platter.
- Old fashioned sugar roll out cookies can be any fun shape you want! Perfect for baking with kids.
Printable Recipe

Thumbprint Cookies with Buttercream Filling
Equipment
- Stand mixer or handheld mixer
- Mixing Bowls (large and small ones)
- Plastic Wrap
- Cookie scoop or tablespoon
- Baking sheets
- Wire cooling rack
Ingredients
Cookie Dough
- 1 cup unsalted butter (room temperature)
- ½ cup granulated sugar
- 2 egg yolks
- 1 teaspoon vanilla extract
- 2¼ cups all-purpose flour
- ½ teaspoon salt
Buttercream
- ½ cup unsalted butter (room temperature)
- 3 cups powdered sugar
- 1-2 tablespoons heavy cream or milk
- ½ teaspoon vanilla extract
- 4 drops food coloring (optional)
Save This Recipe
You'll join my email list which you will love. And if you don't, unsubscribe in one click. ❤️
Instructions
- Prep. Preheat the oven to 350°F and position two racks in the center. Then, line two large baking sheets with parchment paper.
- Cream butter and sugar. In a stand mixer fitted with the paddle attachment or a large mixing bowl using a handheld mixer, cream the butter and sugar together for 2–3 minutes until light and fluffy. Then, add the egg yolks and vanilla extract and beat for another 1–2 minutes until the mixture is pale and airy.
- Add dry ingredients. In a small bowl, whisk together the flour and salt. Then, slowly add this dry mixture to the butter-sugar mixture, mixing at low speed after each addition until combined. Avoid overmixing to keep the dough tender.
- Chill the dough. Cover the bowl tightly with plastic wrap and refrigerate for 30 minutes. Chilling will help the cookies hold their shape during baking.
- Form the cookies. Use a cookie scoop or tablespoon to portion the dough, then roll each portion into a ball. Then, roll each ball in granulated sugar to create a lightly crisp exterior. Next, place the dough balls on the prepared baking sheets, spacing them one inch apart.
- Indent the cookies. Press an indentation into the center of each dough ball using the back of a ¼ teaspoon or the handle of a wooden spoon. The indentation will spread slightly as the cookies bake.
- Bake. Bake the cookies at 350°F for 12–14 minutes or until the edges are lightly golden. Transfer to a wire rack to cool completely before filling.
- Make buttercream filling. While the cookies cool, make the buttercream. In a medium mixing bowl, beat the softened butter until smooth and creamy. Gradually add the powdered sugar, beating until fully incorporated and smooth. Add the vanilla extract and enough heavy cream or milk, one teaspoon at a time, to get a piping consistency. Add a few drops of food coloring and mix until evenly blended.
- Assemble. Once the cookies are completely cool, pipe the buttercream into the indentations of each cookie using a piping bag fitted with a star or round tip. If you don’t have a piping bag, use a small spoon or a plastic bag with a snipped-off corner.
- Serve and store. Allow the buttercream to set slightly before serving. Store cookies in an airtight container at room temperature for up to 3 days, or refrigerate for up to one week.
Notes
Nutrition


