Canning Butternut Squash Soup Base
Some soup and a grilled cheese is all you need for a quick and easy dinner. This butternut squash soup base is ready-to-go and will last all year. When you’re ready to eat, open the jar, heat it, and blend!

There’s only so much butternut squash you can eat at a time when it’s fresh. But you can stock up when it’s cheap (or when the garden is full) and have soup ready all winter long. You do need to use pressure canning for this recipe, but I promise it’s not scary.
Table of Contents
Ingredients and Tools You’ll Need
We have to use a pressure canner here because the squash is low acid, and we need high enough temperatures to kill the bacteria. Do NOT use your water bath canner!
This will make 8 pints or 4 quarts and give you about 16 cups of soup. If you’d like to double or triple this recipe, you can make adjustments in the recipe card at the bottom of this post.

FREE FOR SUBSCRIBERS
Canning Binder
Subscribe (free!) to my newsletter to receive this PDF + dozens of others in my printable library. You’ll also get emails you’ll truly love, with a weekly meal and so much more.
Equipment
- Pressure canner
- Mason jars
Ingredients
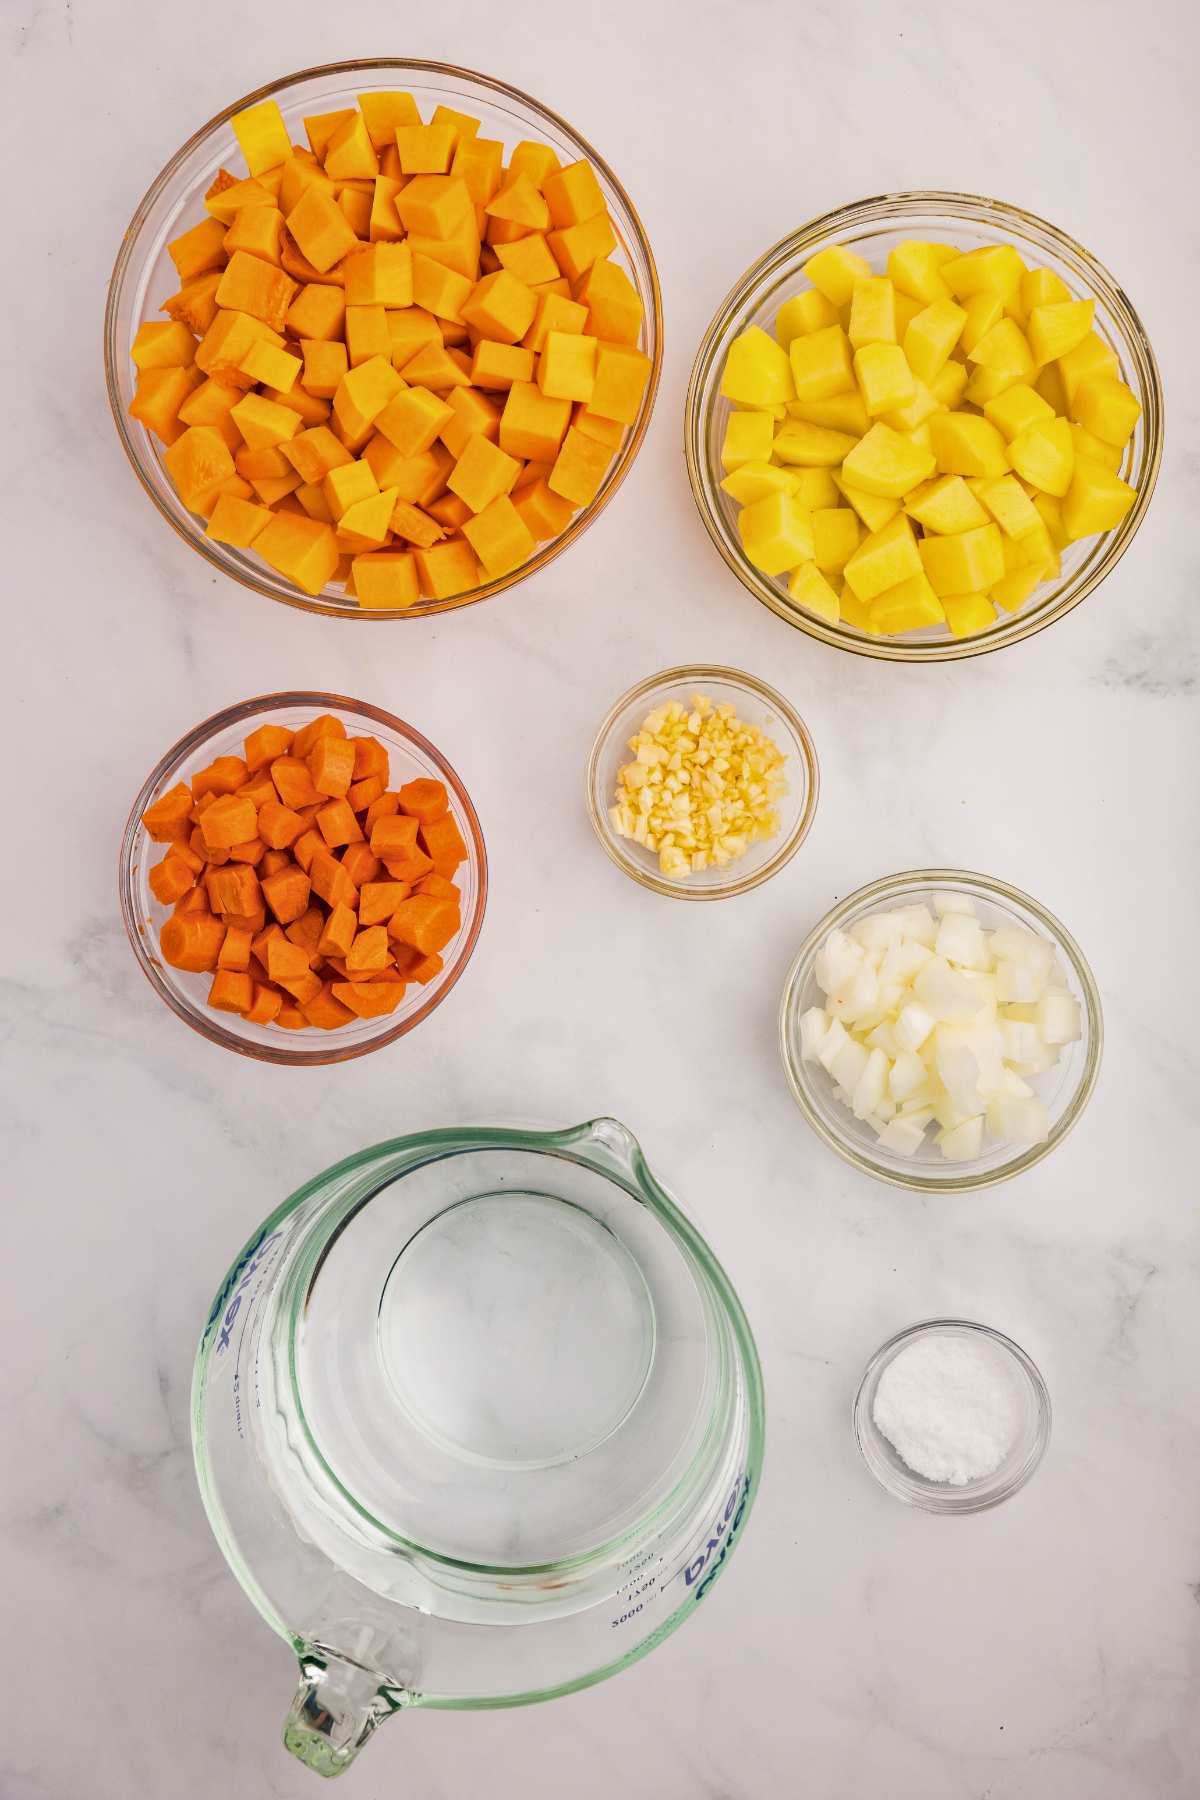
- 6 cups butternut squash, peeled, cored, and cut into 1-inch cubes (about 1 medium squash)
- 6 cups Yukon gold potatoes, peeled and cubed (these ones hold up best for canning)
- 1 cup carrots, peeled and chopped
- 1 medium onion chopped
- 6 cloves garlic, finely chopped
- 4 teaspoons Canning salt
How to Can Butternut Squash Soup
If you live above sea level, you must adjust the pressure when processing. This article can help guide you.
Step One: Prep Your Jars
First things first – get your jars ready. Wash them with hot soapy water and stick them in your pressure canner with about 3 inches of water. Fill the jars halfway so they don’t float around. Put the lid on but don’t lock it yet, and turn the heat to medium. Toss your rings and lids in a saucepan with water and bring to a simmer.

Step Two: Cook The Veggies
Now for the fun part – prep all your veggies. I peel and cube everything into 1-inch pieces. They don’t have to be perfect little cubes. Close enough works just fine.

Bring a big pot of water to a boil and dump in your squash and potatoes first. Let them cook for 3 minutes, then add everything else – carrots, onions, garlic. Give it a stir.

As it cooks, scrape off that weird yellow foam. It’s totally normal but looks gross, so off it goes.

Step Three: Fill Your Jars
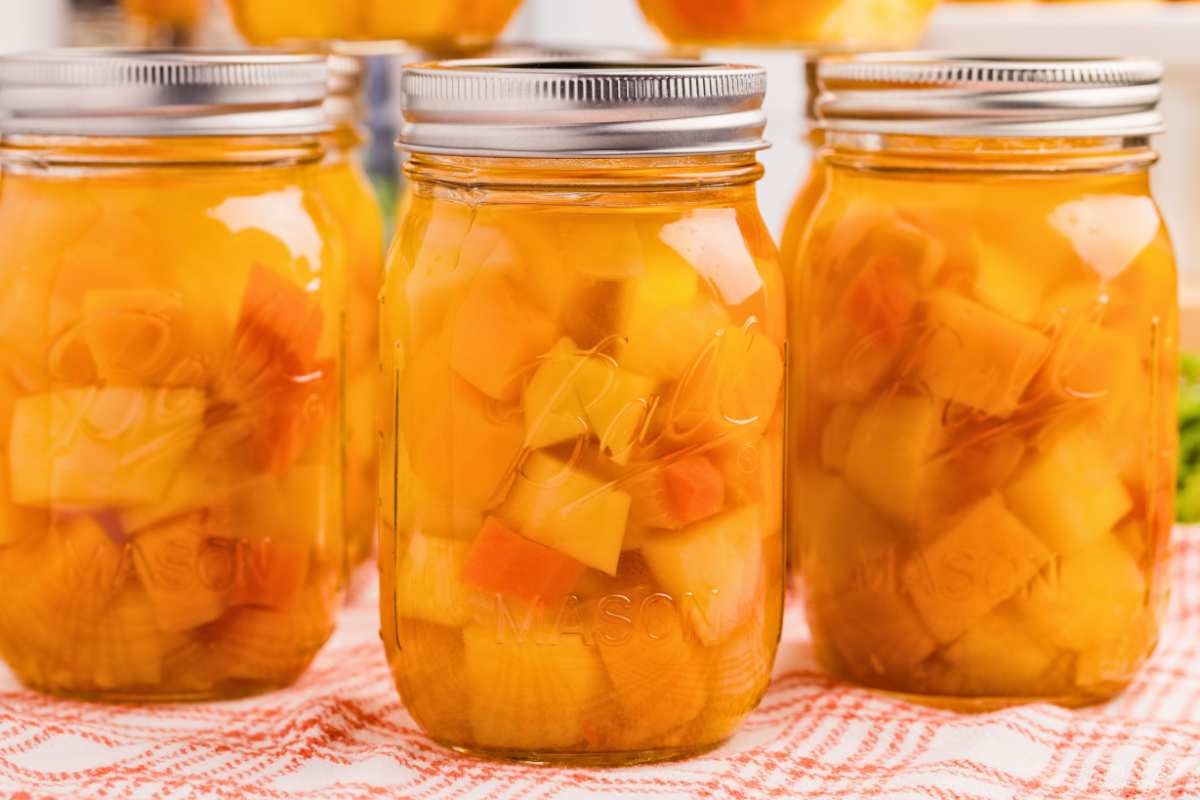
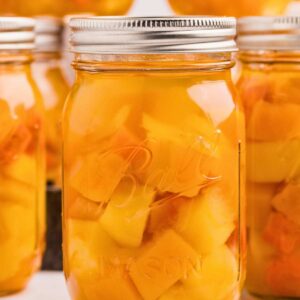
Pull them out of the canner (they’ll be HOT, so be careful), and use your canning funnel. Ladle that hot soup base in, leaving 1 inch of headspace at the top.

Add ½ teaspoon of canning salt to each pint jar.

Step Four: Debubble And Wipe
Use your debubbler tool to get rid of air bubbles – this step matters more than you think. Top off with hot water if needed, keeping that 1-inch headspace. Wipe the rims clean (any little bit of food will mess up your seal).

Step Five: Process
Put your lids and rings on fingertip-tight – not gorilla-tight! – and back into the canner they go. Add water according to your canner’s instructions, plus a splash of white vinegar to keep the jars from getting cloudy.

Lock that lid and crank the heat to medium. Once it’s venting steam steadily, wait 10 minutes, then add your 10-pound weight (or set dial to 10 pounds). When it hits pressure, start your timer: 75 minutes for pints, 90 for quarts.
Important: If your pressure drops, stop the timer, get it back up to pressure, then restart. No shortcuts here.
Step Six: Cool
When time’s up, turn off the heat and let it cool down naturally. Don’t rush this part! Once the pressure gauge reads zero, remove the weight and wait another 10 minutes before opening. Tilt that lid away from your face when you open it – hot steam is no joke.

Remove them from the canner and let them cool for 12-24 hours, then check the seals by pressing the center of each lid. If it stays down, you’re golden. If it pops back up, that jar goes in the fridge to use within 3 days.
Step Seven: Make Soup When You’re Ready
This is just the base, remember! Pour a jar into a saucepan, bring to a boil, then simmer. Blend with an immersion blender until smooth (or use your regular blender). Taste and add salt and pepper. A splash of cream makes it extra lovely, and it’s perfect with crusty bread.

Storing & Serving
Once your jars have cooled completely and you’ve checked the seals, remove the rings and store the jars in a cool, dark, and dry place, like a pantry, for 12-18 months.
When you’re ready to eat, heat it up in a pot and blend it with an immersion blender. Make sure to add some liquid like vegetable stock or chicken bone broth.
I like to top the bowl with a tablespoon or so of cream. Add a pinch of black pepper, thyme, parsley, or rosemary.
Pair it with a grilled cheese using some bread machine French bread or any of these Dutch oven bread recipes.
Why You Need To Pressure Can
Butternut squash is a low-acid food, and water bath canning is not enough to destroy the harmful bacteria that can survive in low-acid environments. Using a pressure canner is essential for safety.
Along these same lines, pumpkins and other winter squashes need to be pressure canned.
Pay Attention To The Dial Gauge
If you notice the pressure dropping, check the heat source to make sure it’s still at the correct temperature. You may also need to adjust the weight or dial on your canner. If the pressure continues to drop, it’s best to stop the timer, bring the canner back up to pressure, and then restart the timer for the remaining processing time.
What To Do If Your Jars Don’t Seal During Pressure Canning
It happens sometimes. There could be a few reasons why your jars didn’t seal:
- Improper headspace: Make sure you leave the correct amount of headspace (1 inch) in the jars.
- Dirty rims: Even a tiny bit of food residue on the jar rims can prevent a proper seal. Wipe them carefully with a clean, damp cloth before placing the lids.
- Old or damaged lids: Lids can lose their sealing ability over time or become damaged. Always use new lids for canning.
More Pressure Canning Recipes To Try
Now that you’re (hopefully) a little more comfortable, you can stock your pantry with so many more things.
- You can make pressure canned beef stew to have another delicious soup in your pantry ready to go.
- This tomato soup is completely ready out of the jar (no blending after you open).
- When you don’t know what to make for dinner, grab a jar of spaghetti sauce and some pasta. Done.
- Start pressure canning potatoes. They are a household staple.
Printable Recipe
Butternut Squash Soup Base
Equipment
- Mason jars
Ingredients
- 6 cups butternut squash peeled, seeded, and cut into 1-inch cubes (about 1 medium squash)
- 6 cups Yukon gold potatoes peeled and cubed
- 1 cup carrots peeled and chopped
- 1 medium onion chopped
- 6 cloves garlic finely chopped
- 4 teaspoons Canning salt
Save This Recipe
You'll join my email list which you will love. And if you don't, unsubscribe in one click. ❤️
Instructions
- Prep jars. Wash your jars with hot, soapy water and place them in the pressure canner. Fill the canner with about three inches of water. Fill the jars halfway with water so they stay anchored to the bottom of the canner. Place the lid on without locking it and set the heat to medium. Place your rings and lids into a saucepan with water, place over low heat, and bring to a simmer.
- Cook squash and potatoes. Bring a large pot of water to a boil. Place the peeled and cubed butternut squash and potatoes in the pot to cook for 3 minutes.
- Add rest of veggies. Next, add the carrots, onions, and garlic. Stir to combine.
- Scrape film off. As the veggies cook, scrap off the yellow film that gathers on the top.
- Fill jars. Remove the jars from the pressure canner and place the canning funnel on one of the jars. Using a ladle, ladle the hot soup base into the hot jars, leaving 1 inch headspace. Repeat this process until all the jars have been filled.
- Add canning salt. Top each jar with ½ teaspoon of canning salt for pints, or 1 teaspoon of canning salt for quarts.
- Debubble and wipe rims. Using a debubbler, remove any bubbles that may be in the jars. Top off with hot water, maintaining a 1-inch headspace. Wipe the rims with a damp towel.
- Prepare for canning. Place the rims and rings on top of the jars. Tighten the rings so they are fingertip-tight. Transfer the jars to the pressure canner. Adjust the water so there is enough water based on your pressure canner manufacturer's instructions. Add a splash of white vinegar to the canner to prevent cloudy jars. Secure the lid to the pressure canner and place over medium heat.
- Process. Once the canner is venting steam consistently, set the timer for 10 minutes. After 10 minutes, add 10 pounds of weight to your weighted canner or set the dial to 10 pounds for a dial canner, adjusting for altitude as needed. Once the canner comes to pressure, set a timer for 75 minutes for pint jars or 90 minutes for quarts. Make sure your canner maintains its pressure for the full time. If your canner goes below its desired pressure, stop the timer, bring the canner back up to pressure, then start your timer again.
- Cool. Once the timer goes off, remove the canner from the heat and allow the canner to reduce its pressure naturally. Once it reads 0 pounds of pressure, remove the weight or adjust the dial to 0 and allow more steam to vent. Once the steam has fully vented, wait 10 more minutes. Remove the lid, tilting it away from your face, and let the jars sit for 5 minutes. Transfer the jars to a heat-safe area and let them cool for 12-24 hours.
- Check seals and store. After 24 hours, check for a proper seal by pressing the center of the lid. If it is down and doesn’t pop back up, it is good. If it pops back up, refrigerate and use within 3 days. Once a proper seal has been confirmed, remove the rings and store the jars in a cool dark place for 12-18 months or per your lid manufacturer’s recommendations.
- Make soup when ready. This is only a soup base. The USDA only recommends preserving winter squash as cubes (not a fully blended soup). To make the soup, add the contents of the jar into a saucepan and bring to a boil. Once boiling, reduce to a simmer. Using an immersion blender, blend until smooth (you can also transfer this to your blender and blend for 30-45 seconds). Take a taste test and add salt and pepper as needed. You can top it with some heavy cream and herbs! This soup goes really well with some crusty bread.
Nutrition