How to Pressure Can Potatoes
Canning potatoes is a smart way to fill your pantry with ingredients ready for soups, casseroles, or a side dish anytime. If you want to save money, cut food waste, or enjoy having homemade pantry items, these canned potatoes will become your favorite for easy and tasty meals throughout the year. It’s also great for using up a lot of potatoes or buying them cheap.
You’ll end up with soft, slightly salty potatoes perfect for any dish you want. With just a few basic items and some time, you’ll end up with jars of ready-to-eat potatoes whenever needed. It’s convenient to pick a jar from your pantry, knowing you’re moments away from a filling, homemade dish. It’s definitely one of the most practical pressure-canning recipes.
Pressure Canned Potatoes Recipe
Equipment
- Canning jars (pint or quart), lids, and bands
- Large pot (for boiling potatoes)
- Jar lifter
- Canning funnel
- Bubble remover tool (or non-metallic spatula)
- Clean cloths or paper towels
- Potato peeler and knife
- Cutting board
- Pressure canner (adjust pressure for altitude if needed)
Ingredients
- 10 pounds potatoes (choose a variety that will hold its shape well when diced, like Yukon Gold)
- Fresh water for boiling and canning
- Canning salt (optional, 1/2 teaspoon per pint or 1 teaspoon per quart)
Save This Recipe
You'll join my email list which you will love. And if you don't, unsubscribe in one click. ❤️
Instructions
- Prepare your jars and canner. Wash your canning jars, lids, and bands in hot, soapy water and rinse well. Keep the jars hot until needed by placing them in a simmering water bath or a heated dishwasher. Then, prepare the pressure canner per the manufacturer’s instructions, filling it with 2-3 inches of water. Start heating on low—this preheating step helps reduce the time it takes for your canner to reach pressure later.

- Prep the Potatoes. Wash the potatoes thoroughly to remove dirt. Then, peel the potatoes if desired (peeling is recommended for the best results). Next, cut the potatoes into even, bite-sized pieces to make sure uniform cooking and canning. Place the cut potatoes into a large bowl of cold water to prevent browning while cutting the rest.

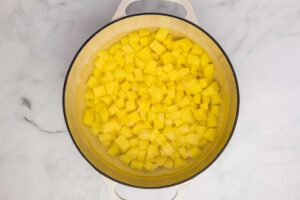
- Blanch the potatoes. Drain the potatoes from the cold water and transfer them to a large pot. Then, cover the potatoes with fresh water and bring the pot to a boil. Boil for 2 minutes—this blanching step makes sure the potatoes are heated through and ready for safe preservation.

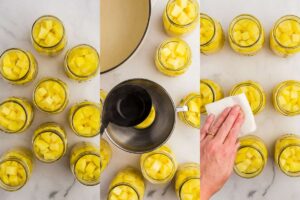
- Fill the jars. Pack the hot potatoes into your prepared hot jars using a slotted spoon, leaving 1 inch of headspace at the top. If you're using salt, add ½ teaspoon per pint or 1 teaspoon per quart at this stage. Then, ladle boiling water over the potatoes, maintaining the 1-inch headspace. Next, use a bubble remover tool or a non-metallic spatula to gently slide between the potatoes and the jar wall to release any trapped air bubbles. Adjust the headspace if necessary.

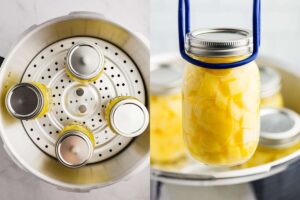
- Place the lids and process the jars. Wipe the rim of each jar with a clean, damp cloth or paper towel to make sure a proper seal. Then, place the lids on the jars, then screw the bands on until they are fingertip-tight (don’t overtighten). Place the filled jars on the rack in your preheated pressure canner, making sure the jars are not touching each other. Lock the canner lid in place. Turn the heat to medium-high and allow the canner to vent steam for 10 minutes before placing the weight or closing the vent to bring the canner up to pressure.

- Process the jars. For pint jars, process for 35 minutes at 10 pounds of pressure. For quart jars, process for 40 minutes at 10 pounds of pressure.Note: Adjust the pressure for your altitude according to your pressure canner manual guidelines.After processing, turn off the heat and let the canner depressurize naturally. Do not attempt to speed up this process.

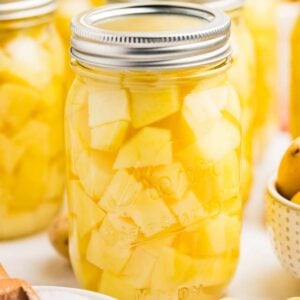
- Cool and store the jars. Once the pressure has returned to zero, carefully unlock the canner and remove the lid. Use a jar lifter to remove the jars from the canner, placing them on a towel or cooling rack. Make sure there is space between each jar. Allow the jars to cool undisturbed for 12-24 hours. Do not tighten the bands or check the seals until the jars are completely cool.

Notes
Nutrition
This method has been a great solution for using up those extra potatoes that are about to go bad or start sprouting, making them a valuable resource in the kitchen. And for anyone who hasn’t tried canning before, there’s no need to be intimidated—it’s not as difficult as it might seem! Once you start, you’ll love how it makes preparing meals easier and adds a personal touch to your cooking.
A Newsletter you’ll love
Daily recipes from the farmhouse, Sunday meal plans, seasonal ideas, straight from my kitchen to your inbox.
I promise to keep your email address safe. Unsubscribe at any time
Looking for a delicious way to use your canned potatoes? Try this easy Crockpot Cheesy Bacon Ranch Potatoes recipe—the perfect comfort food pairs perfectly with your homemade canned potatoes!

I hope it brings you as much joy as it does for me.
Key Ingredients and Tools
Here’s what you need for your recipe to make sure it all goes smoothly and your potatoes come out just right:

- Yukon Gold Potatoes: These potatoes are good because they keep their shape when you can and taste great when cooked. Any waxy potato, like red potatoes or fingerlings, will do the job if you’re out of Yukon Gold potatoes. They stay firm when you can them. Just try to avoid potatoes like Russets since they can become too soft.
- Pressure Canner: You’ll need a pressure canner to safely can low-acid foods like potatoes. This differs from just boiling them because it gets hot enough to kill harmful bacteria and ensures your jars can be stored for a long time.
- Canning Jars: Get some glass jars in pint or quart sizes with lids and bands made for canning. They’re tough enough for the heat and pressure from canning, and you can use them again, which saves money.
- Bubble Remover Tool: This tool is useful for removing air bubbles in your jars before you seal them. If you don’t have one, a plastic spatula can work too. Removing the bubbles is important so the jars seal properly and the food stays safe.
- Canning Salt: Use a simple salt without any added stuff like iodine or anti-caking agents that can make the brine cloudy or change the taste. You can use kosher salt if you don’t have canning salt. Just make sure it has no extra stuff like iodine or agents that stop it from clumping.
- Jar Lifter: A jar lifter is important for taking hot jars out of the canner without getting burned. It usually has a rubber grip to help hold the jars tightly, making the whole process safer.
All these tools and ingredients will help make sure your canning goes well. They might seem minor things, but they’re key for successfully preserving food at home.
Troubleshooting and Help
Absolutely! Potatoes are a low-acid food, so they must be canned in a pressure canner to reach the high temperatures required for safe preservation. A water bath canner won’t cut it for this one, but don’t worry—the pressure canner is easy to use once you get the hang of it!
Sweet potatoes are a little different but can be pressure-canned, too! Just make sure to follow a recipe specifically for sweet potatoes, as the cooking times and prep might vary.
Peeling is recommended because the skins can get tough during canning, but you can leave them on if you don’t mind the texture. Just make sure to scrub them well!
Yes, blanching (2 minutes) helps the potatoes heat evenly and prevents spoilage. It also ensures they won’t be undercooked after canning, so don’t skip this step!
Absolutely! Just adjust the processing time—quart jars must be processed for 40 minutes, while pint jars only need 35 minutes.
No worries! If a jar doesn’t seal, you can reprocess it within 24 hours or pop it in the fridge and use it within a few days. It happens sometimes—double-check your lids and rim cleanliness next time.
Yes, you can add things like garlic, rosemary, or thyme to give the potatoes extra flavor! Just be mindful not to overcrowd the jar with extras, and remember that the main focus is making sure the potatoes are safely preserved. If you enjoy pressure canning, don’t stop at potatoes! You can also learn how to pressure can green beans to stock your pantry with even more homemade staples.
Removing air bubbles helps prevent issues with sealing and ensures the potatoes are properly submerged in liquid. It’s a small step, but it makes a big difference in the quality and safety of your canned potatoes.
You don’t need to sterilize the jars if you’re pressure canning since the high heat will take care of that. Just make sure your jars are clean, and keep them hot before you fill them so they don’t crack when the hot potatoes and water are added.
The boiling point of water changes at higher altitudes, which means you’ll need to adjust the pressure to make sure the potatoes are safely processed. Most pressure canner manuals include a guide for altitude adjustments, so check that and follow the instructions.
All you need are the right tools and patience, and you’ll have a stash of potatoes ready to use in various recipes whenever you need them. The most important thing is to carefully follow the instructions and make sure your equipment works well. Whether you’re cooking up a big stew in the winter or need a quick side dish for a summer barbecue, these canned potatoes will be useful all year.

Love,


