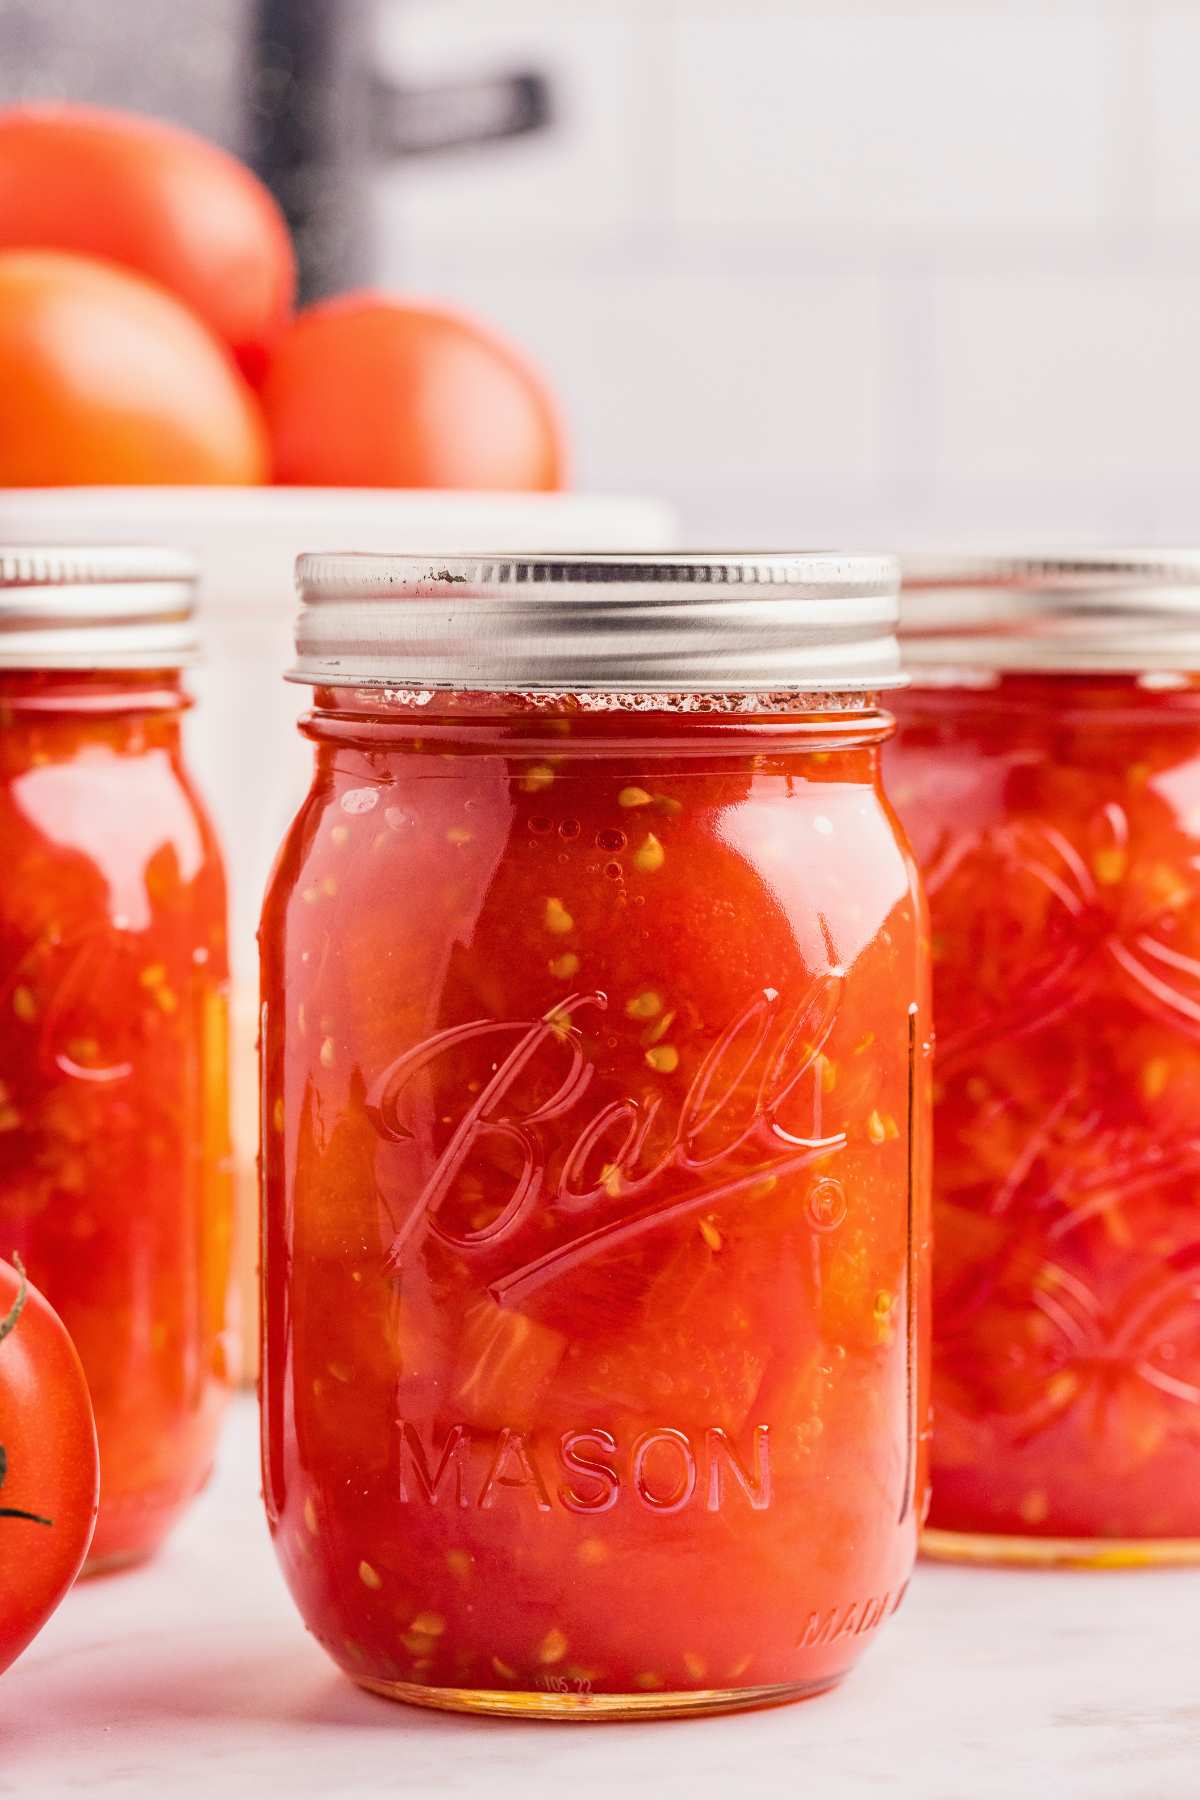
Every August, I carve out one weekend to can tomatoes, and this is the recipe I come back to every time. It’s simple, safe, and the results taste like summer in a jar. If you’ve never water bath canned before, don’t worry—I’ll walk you through it. These home-canned diced tomatoes make the best winter soups and stews, and you’ll be so glad you stocked up.
Once I learned how to time my canning with the seasons, canning became much easier. Roma tomatoes are cheapest and most flavorful in late summer, usually August through September. Buy them by the flat directly from farmers for the best price (often half what you’d pay at the grocery store).
There are many other tomato varieties great for canning if you’d like to grow your own.
Table of Contents
Ingredients and Tools You’ll Need
Roma tomatoes are best because their meaty texture holds up during processing, and they have less water content than other varieties. The bottled lemon juice is essential for safety, not just flavor. And sorry, but regular table salt won’t work here.

FREE FOR SUBSCRIBERS
Canning Binder
Subscribe (free!) to my newsletter to receive this PDF + dozens of others in my printable library. You’ll also get emails you’ll truly love, with a weekly meal and so much more.
Heart’s Content Farmhouse is a participant in the Amazon Services LLC Associates Program, an affiliate advertising program designed to provide a means for sites to earn advertising fees by advertising and linking to Amazon.com. This means that when you click on certain links on this site and make a purchase, I may earn a small commission at no additional cost to you. I only recommend products I genuinely believe in and would use in my own kitchen. As an Amazon Associate, I earn from qualifying purchases.
If you’d like to double or triple this recipe, you can make adjustments in the recipe card at the bottom of this post.
Equipment
- 6 pint jars + rings and lids
- 1 Water Bath Canner
- Large pot
- large bowl
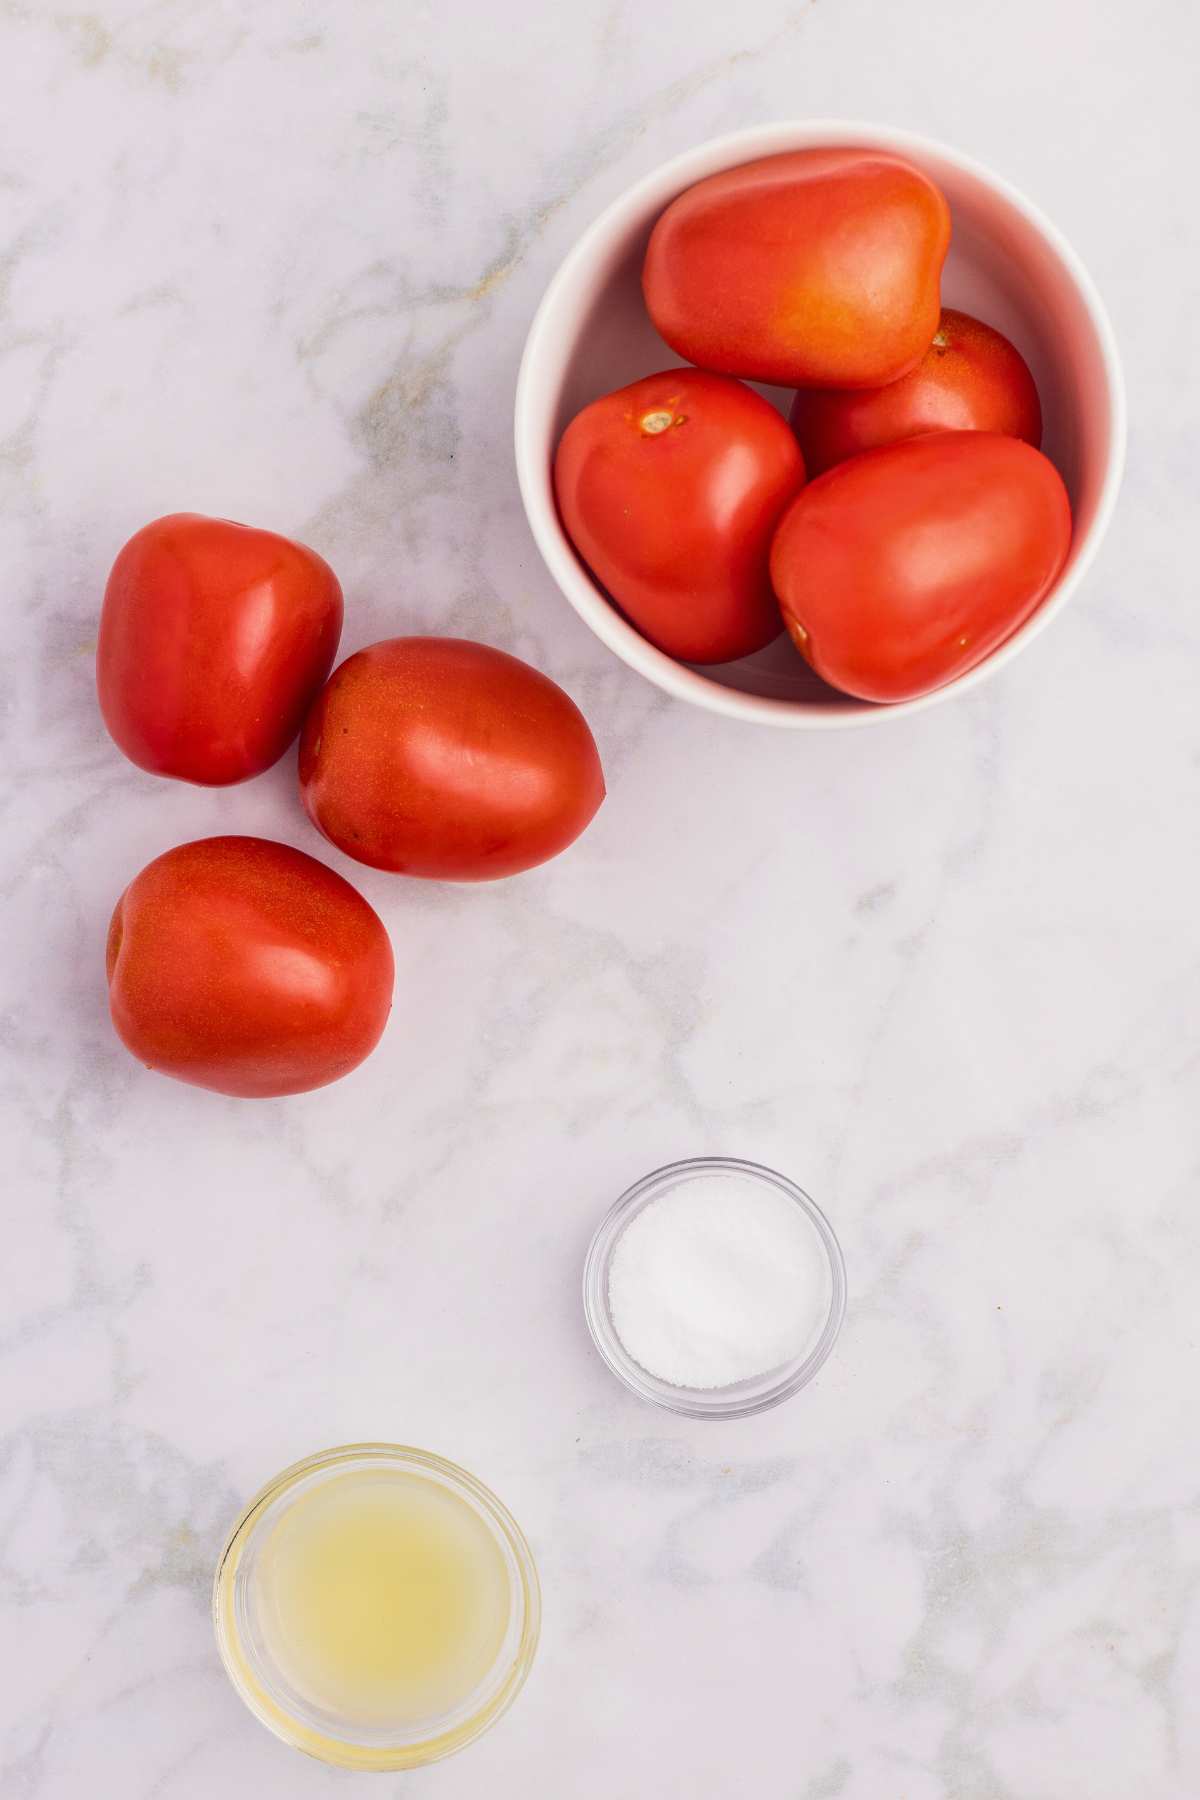
Ingredients
- 7 pounds Roma tomatoes, about 33 tomatoes
- 6 tablespoons bottled lemon juice
- 3 teaspoons canning salt (regular table salt will make it cloudy)
- 4 cups water + more for cleaning, removing skins, and processing
How to Make this Diced Tomatoes Canning recipe
Always adjust the processing time if you live at a higher altitude. You can check this chart for altitudes and processing times.
Step One: Prep Jars
Wash mason jars with hot, soapy water and place in a waterbath canner. Fill with water until jars are fully submerged. Cover with lid, place over medium heat, and simmer. Wash rings and lids in hot, soapy water and set aside.
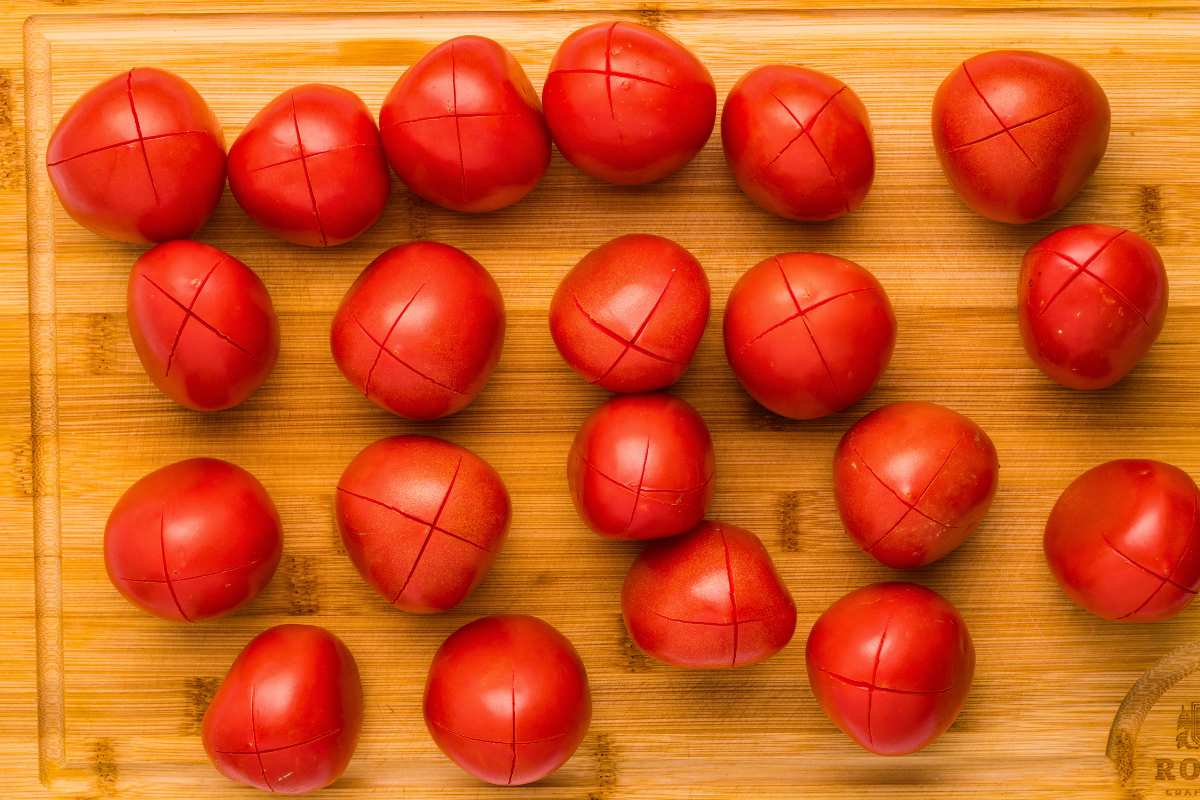
Step Two: Score
Boil a large pot of water. While the water is boiling, gently score the bottom of the tomatoes with an X.
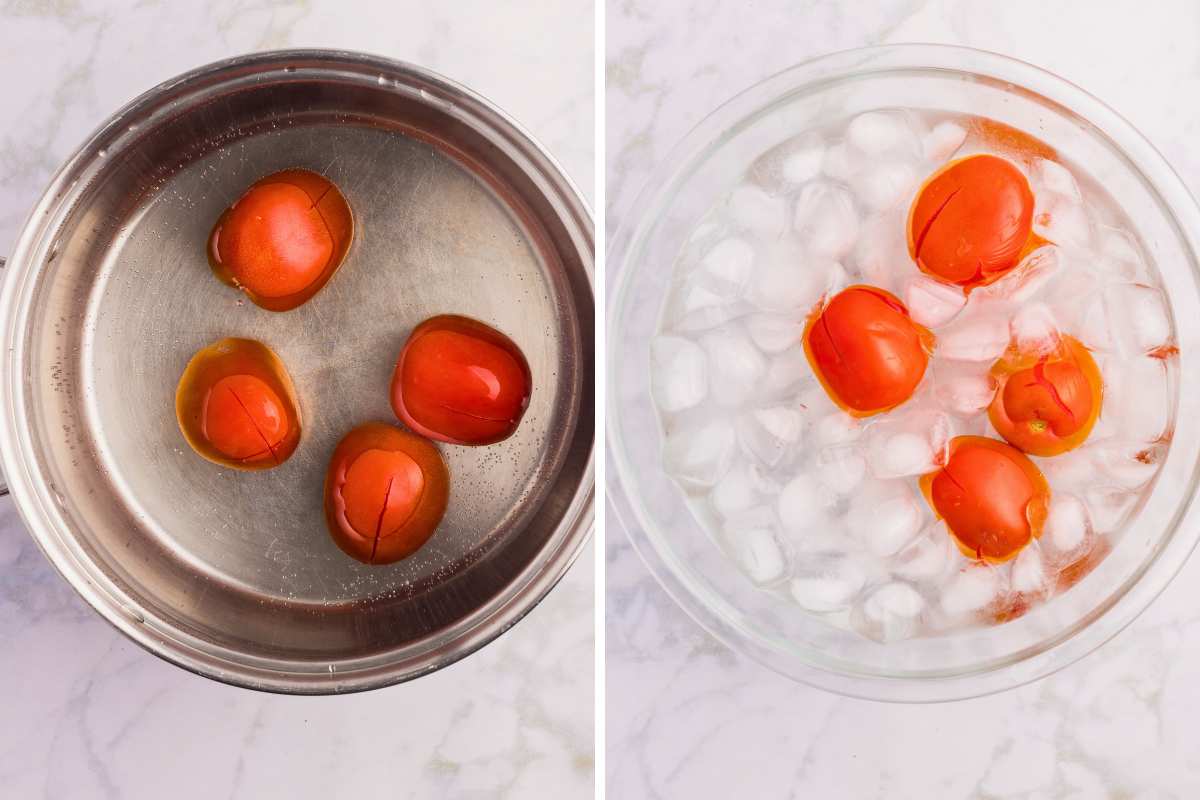
Step three: prep ice-bath
Fill a large mixing bowl with ice about halfway, then fill with water until it is ¾ of the way full.
Step four: Boil, ice, and remove skins
Once water is boiled, place 5-6 tomatoes in at a time, working in batches. Boil for 30-90 seconds or until the skin starts to pull away from the tomato. Move to the prepared ice water bath. Peel the skins off the tomatoes. Repeat this process. (Don’t skip removing the skins. This is important for texture and heat distribution.)
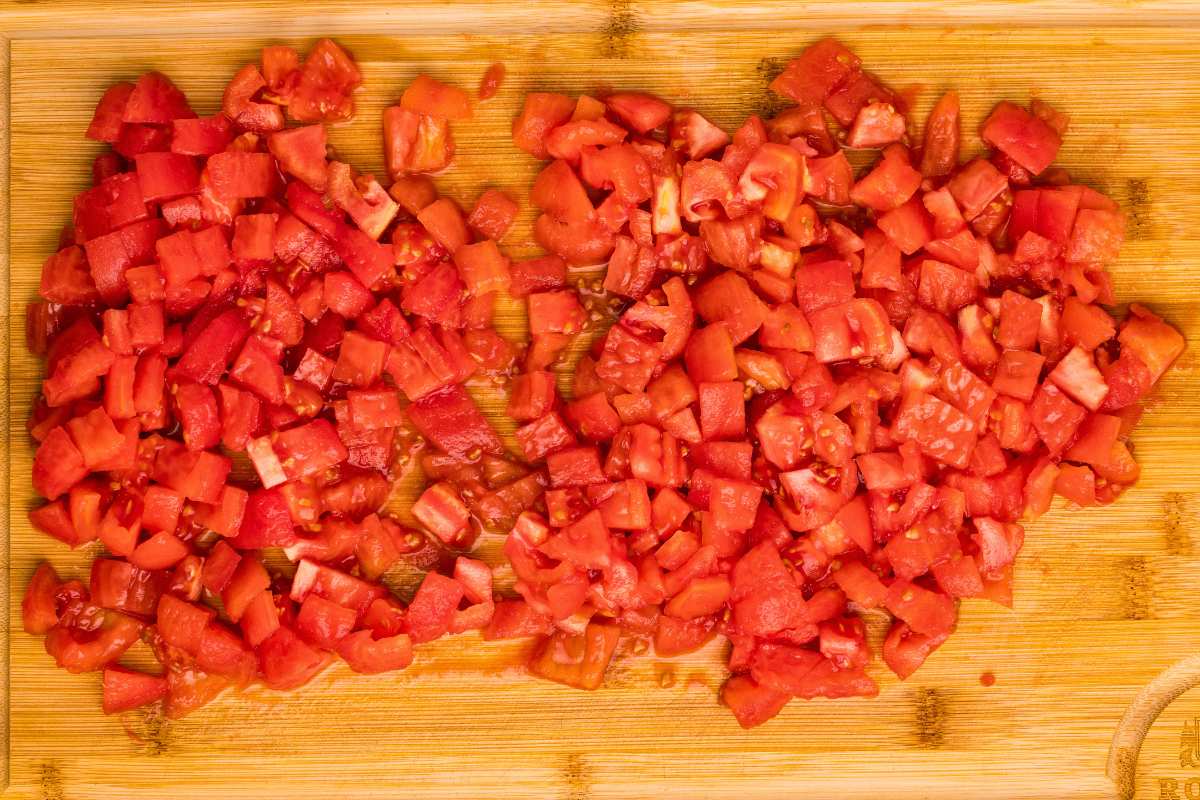
Step Five: Dice
Remove the core, slice the tomatoes in half, then dice them. You will want about 16 cups of diced tomatoes.
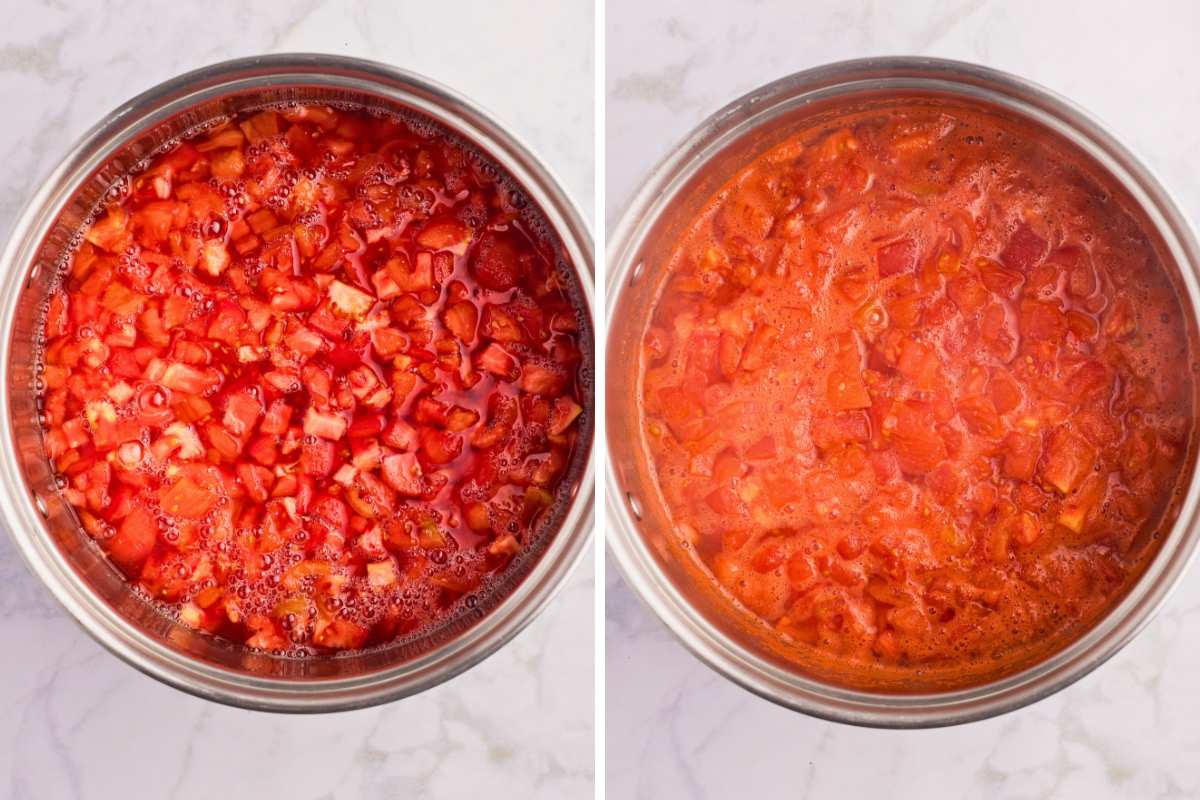
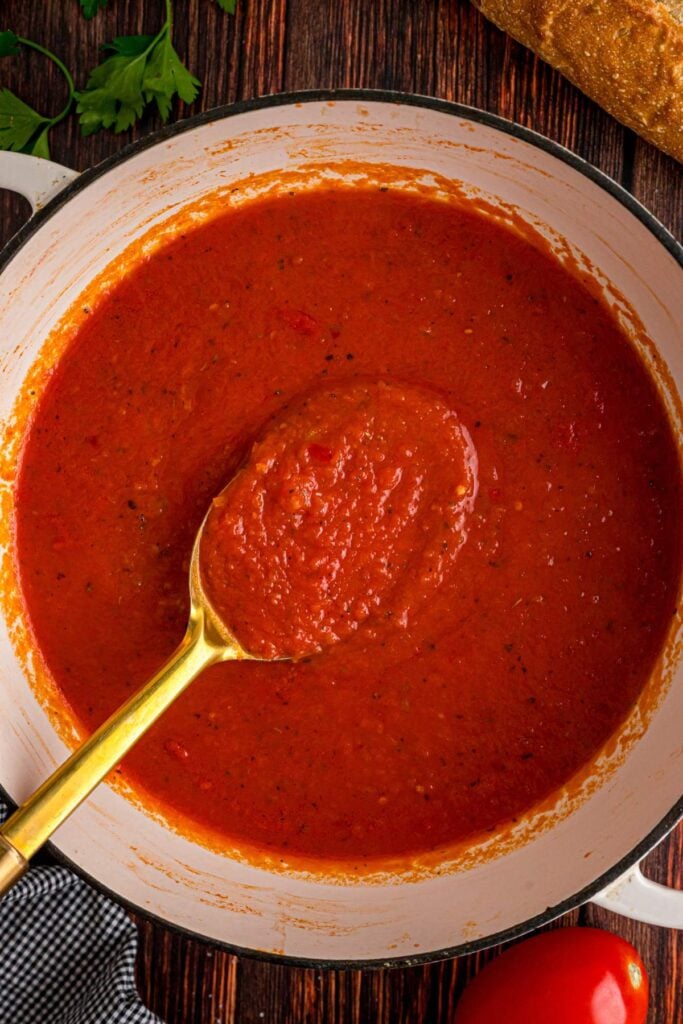
Step Six: Boil
Place diced tomatoes in a large stainless steel pot. Add 4 cups of water. Boil over medium heat for 5 minutes, stirring constantly so they don’t stick to the bottom or boil over. Remove from the heat.
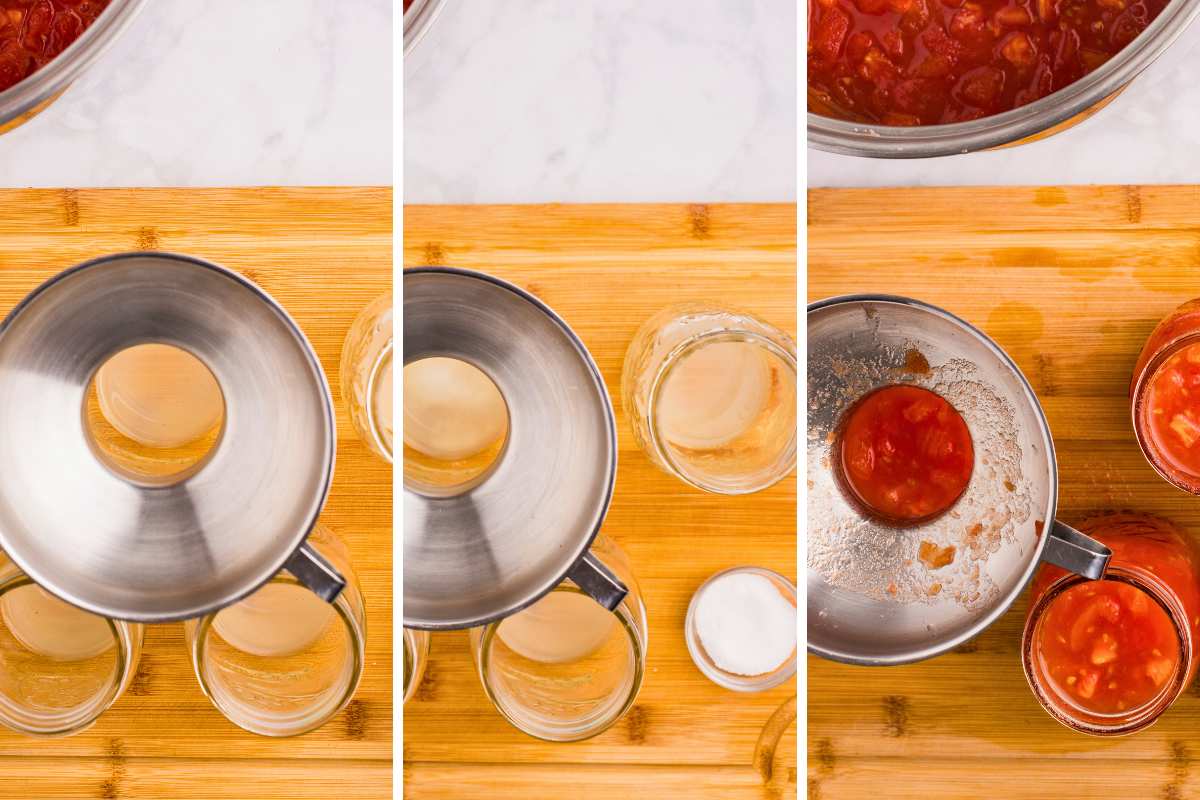
Step Seven: Fill jars
Remove the jars from the waterbath canner. Add 1 tablespoon of lemon juice and ½ teaspoon of canning salt to each jar. Ladle the hot diced tomatoes into the jars, leaving ½ inch of headspace in each jar.
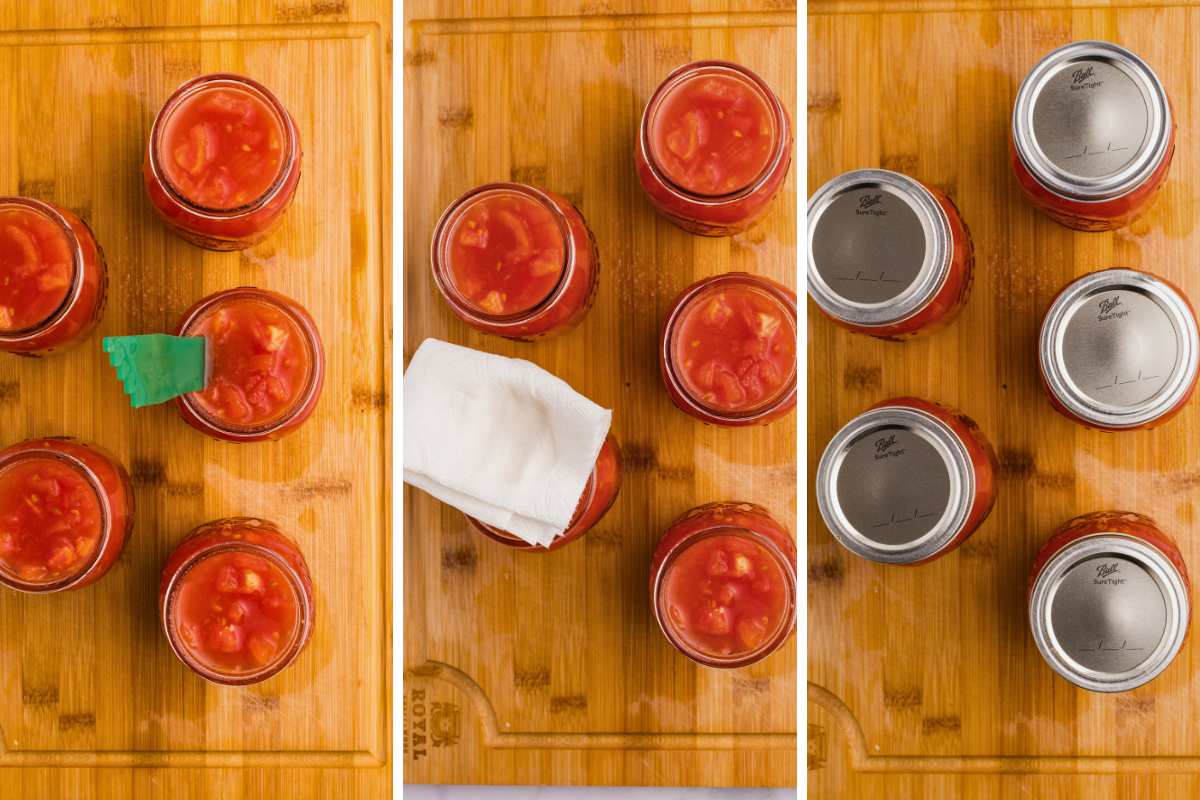
Step Eight: Debubble, wipe, and fasten
Use a debubbler to remove any air bubbles. Add more tomatoes to maintain a ½ inch headspace. Wipe the rims with a clean, damp towel. Place the clean lids and rings on the jars. Tighten the rings so they are fingertip-tight.
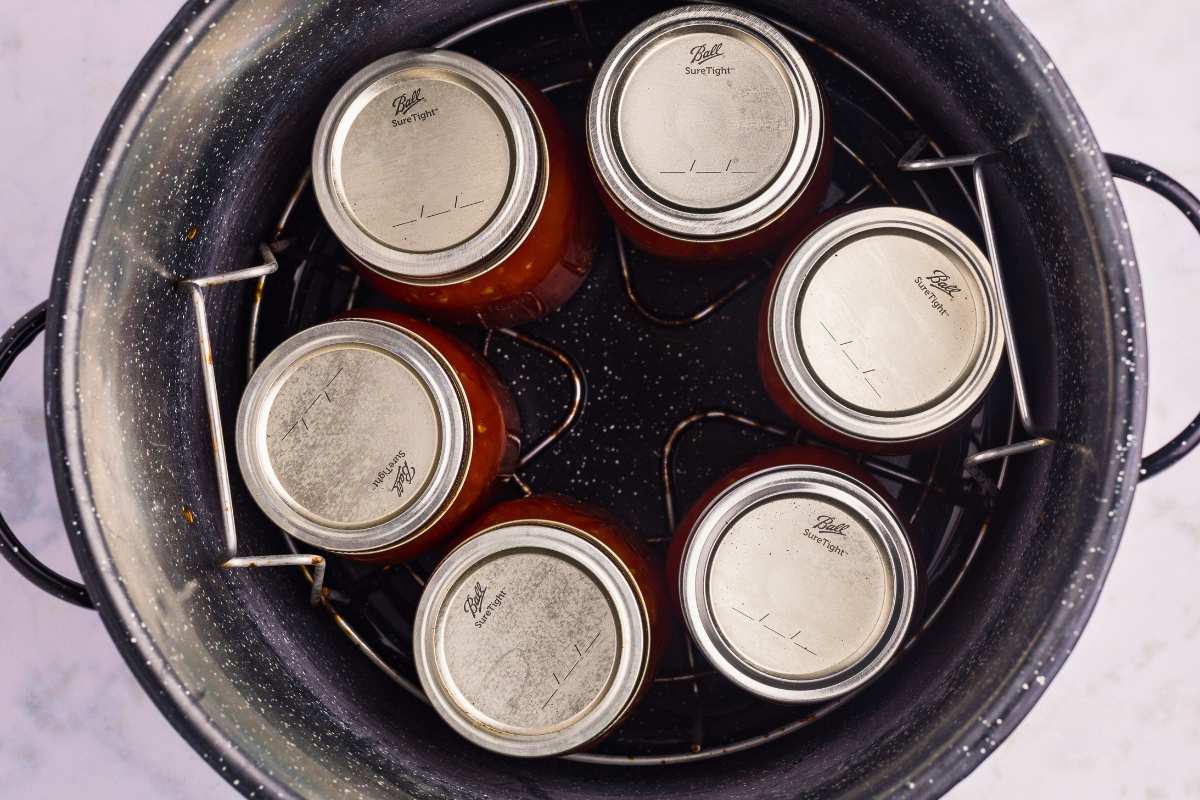
Step Nine: Process
Place filled jars in the waterbath canner. Fully submerge them in water with at least 1 inch of water above the jars. Add a splash of white vinegar (optional to prevent build-up from forming on the outside of the jars). Bring the water to a boil. Once boiling, set a timer for 40 minutes for pint jars (45 minutes for quart jars), adjusting for altitude.
Step Ten: Cool
After 40 minutes, remove the canner from the heat and remove the lid. Let the jars sit for 5 minutes. Remove the jars from the canner and place them in a heat-safe area. Cool for 12-24 hours.
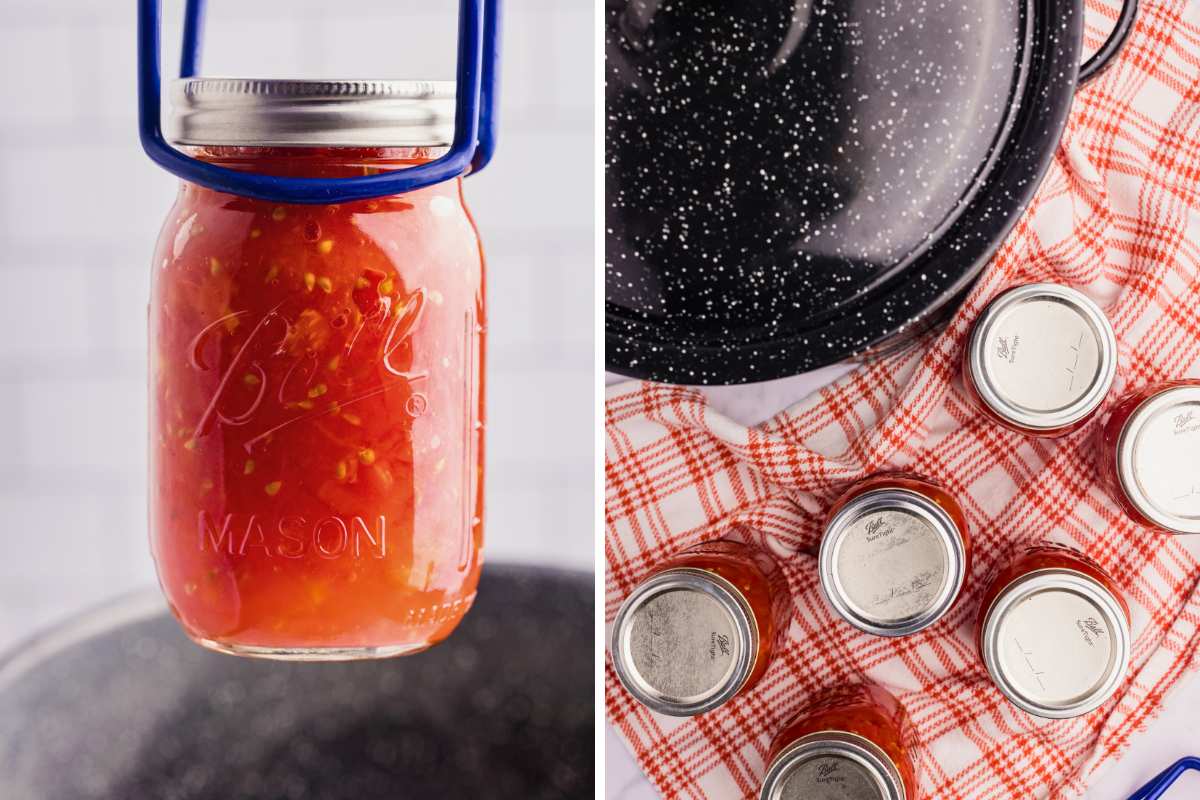
Step Eleven: Check seals and store
Once completely cooled, check the jars for a proper seal. If a proper seal has been confirmed, label the jars and store them in a cool, dark place for up to 18 months or per your lids manufacturer’s recommendations. If a proper seal has not been made, refrigerate immediately and use within 3 days.
Storage instructions
Properly sealed jars keep for up to 18 months in a cool, dark place. Always check the seal before using – the lid should be firmly in place with no flex when pressed.
Jars that don’t seal properly should go straight to the refrigerator and be used within 3 days.

Printable Recipe
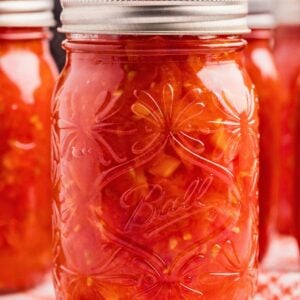
Diced Tomatoes for Canning
Equipment
- 6 pint jars + rings and lids
- Large pot
- large bowl
Ingredients
- 7 pounds Roma tomatoes about 33 tomatoes
- 6 tablespoons bottled lemon juice
- 3 teaspoons canning salt
- 4 cups water + more for cleaning, removing skins, and processing
Save This Recipe
You'll join my email list which you will love. And if you don't, unsubscribe in one click. ❤️
Instructions
- Prep jars. Wash mason jars with hot, soapy water and place in waterbath canner. Fill with water until jars are fully submerged. Cover with lid, place over medium heat, and simmer. Wash rings and lids in hot, soapy water and set aside.
- Score. Boil a large pot of water. While the water is boiling, gently score the bottom of the tomatoes with an X.
- Prep ice-bath. Fill a large mixing bowl with ice about halfway, then fill with water until it is ¾ way full.
- Boil, ice, and remove skins. Once water is boiled, place 5-6 tomatoes in at a time, working in batches. Boil for 30-90 seconds or until the skin starts to pull away from the tomato. Move to the prepared ice water bath. Peel the skins off the tomatoes. Repeat this process. (Don’t skip removing the skins. This is important for texture and heat distribution)
- Dice. Remove the core, slice the tomatoes in half, then dice them. You will want about 16 cups of diced tomatoes.
- Boil. Place diced tomatoes in a large stainless steel pot. Add 4 cups of water. Boil over medium heat for 5 minutes, stirring constantly so they don’t stick to the bottom or boil over. Remove from the heat.
- Fill jars. Remove the jars from the waterbath canner. Add 1 tablespoon of lemon juice and ½ teaspoon of canning salt in each jar. Ladle the hot diced tomatoes into the jars, leaving ½ inch of headspace in each jar.
- Debubble, wipe, and fasten. Use a debubbler to remove any air bubbles. Add more tomatoes to maintain a ½ inch headspace. Wipe the rims with a clean, damp towel. Place the clean lids and rings on the jars. Tighten the rings so they are fingertip-tight.
- Process. Place filled jars in the waterbath canner. Fully submerge them in water with at least 1 inch of water above the jars. Add a splash of white vinegar (optional to prevent build-up from forming on the outside of the jars). Bring the water to a boil. Once boiling, set a timer for 40 minutes for pint jars (45 minutes for quart jars), adjusting for altitude.
- Cool. After 40 minutes, remove the canner from the heat and remove the lid. Let the jars sit for 5 minutes. Remove the jars from the canner and place in a heat-safe area. Cool for 12-24 hours.
- Check seals and store. Once completely cooled, check the jars for a proper seal. If a proper seal has been confirmed, label the jars and store them in a cool, dark place for up to 18 months or per your lids manufacturer’s recommendations. If a proper seal has not been made, refrigerate immediately and use within 3 days.
Notes
Nutrition


Could I do this with frozen tomatoes?
I would not.., it would be safe but the texture changes quite a bit as they freeze.
I don’t know how it only takes 20 minutes to score, boil, remove skins and core and chop tomatoes in 20 minutes! I must be getting old! 😉
lol jen. yes that might be a bit optimistic!