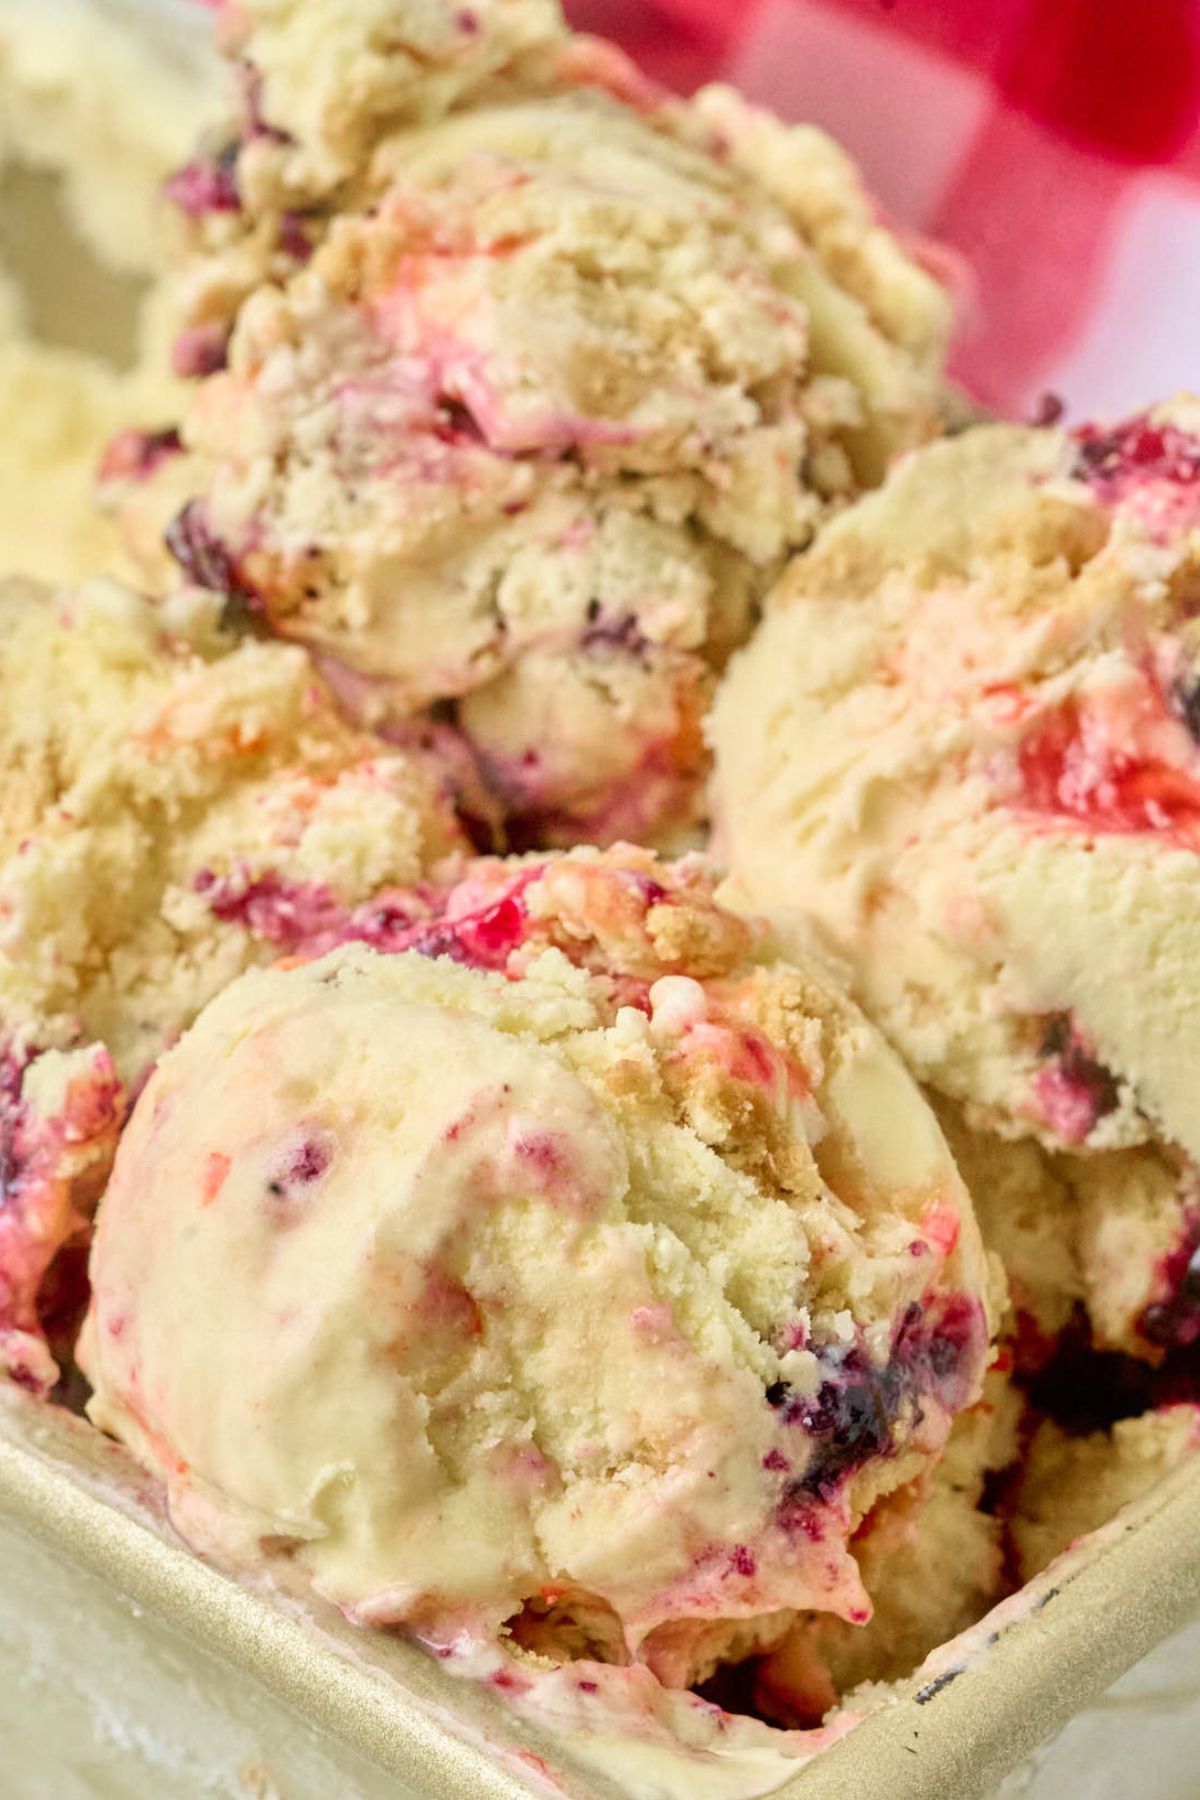
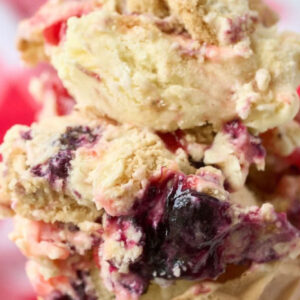
I created this recipe after trying a Golden Oreo ice cream at our local ice cream shop and thinking it was just the right base for something…more. And in the summer, a berry swirl is the just the thing. The blueberry and strawberry jam are sweet and fruity, but best of all, they’re red, white, and blue.
Making ice cream at home isn’t hard, but there are a few things I’ve learned that make all the difference .
First (and this is huge!) make sure your ice cream maker bowl is completely frozen for at least 24 hours before you start. I learned this the hard way when my first batch never set up properly.
And don’t rush the custard base. I know it’s tempting to skip the chilling step, or the straining step, but they’re in there for a reason.
Get Access to
All my Free planners, Printables, binders and more
Get a copy of this frugal recipe binder with lots of crockpot favorites, pasta dishes, casseroles, and more inside the subscriber library. Plus SO much more.
And when you’re adding those berry swirls, resist the urge to over-mix: you want distinct ribbons of color, not purple ice cream!
Table of Contents
Ingredients and Tools You’ll Need
I really really want you to buy an ice cream maker. But you don’t need a complicated one. Mine is a super-basic model that basically just spins around. I have to freeze the container for 24 hours before using it and it doesn’t do anything fancy. But trying to make real ice cream without one is annoying.
Heart’s Content Farmhouse is a participant in the Amazon Services LLC Associates Program, an affiliate advertising program designed to provide a means for sites to earn advertising fees by advertising and linking to Amazon.com. This means that when you click on certain links on this site and make a purchase, I may earn a small commission at no additional cost to you. I only recommend products I genuinely believe in and would use in my own kitchen. As an Amazon Associate, I earn from qualifying purchases.
This recipe makes about 1 quart, maybe slightly over if you really load up the mix-ins. If you’d like to double or triple it, you can make adjustments in the recipe card at the bottom of this post. But first check your machine’s capacity!
Equipment
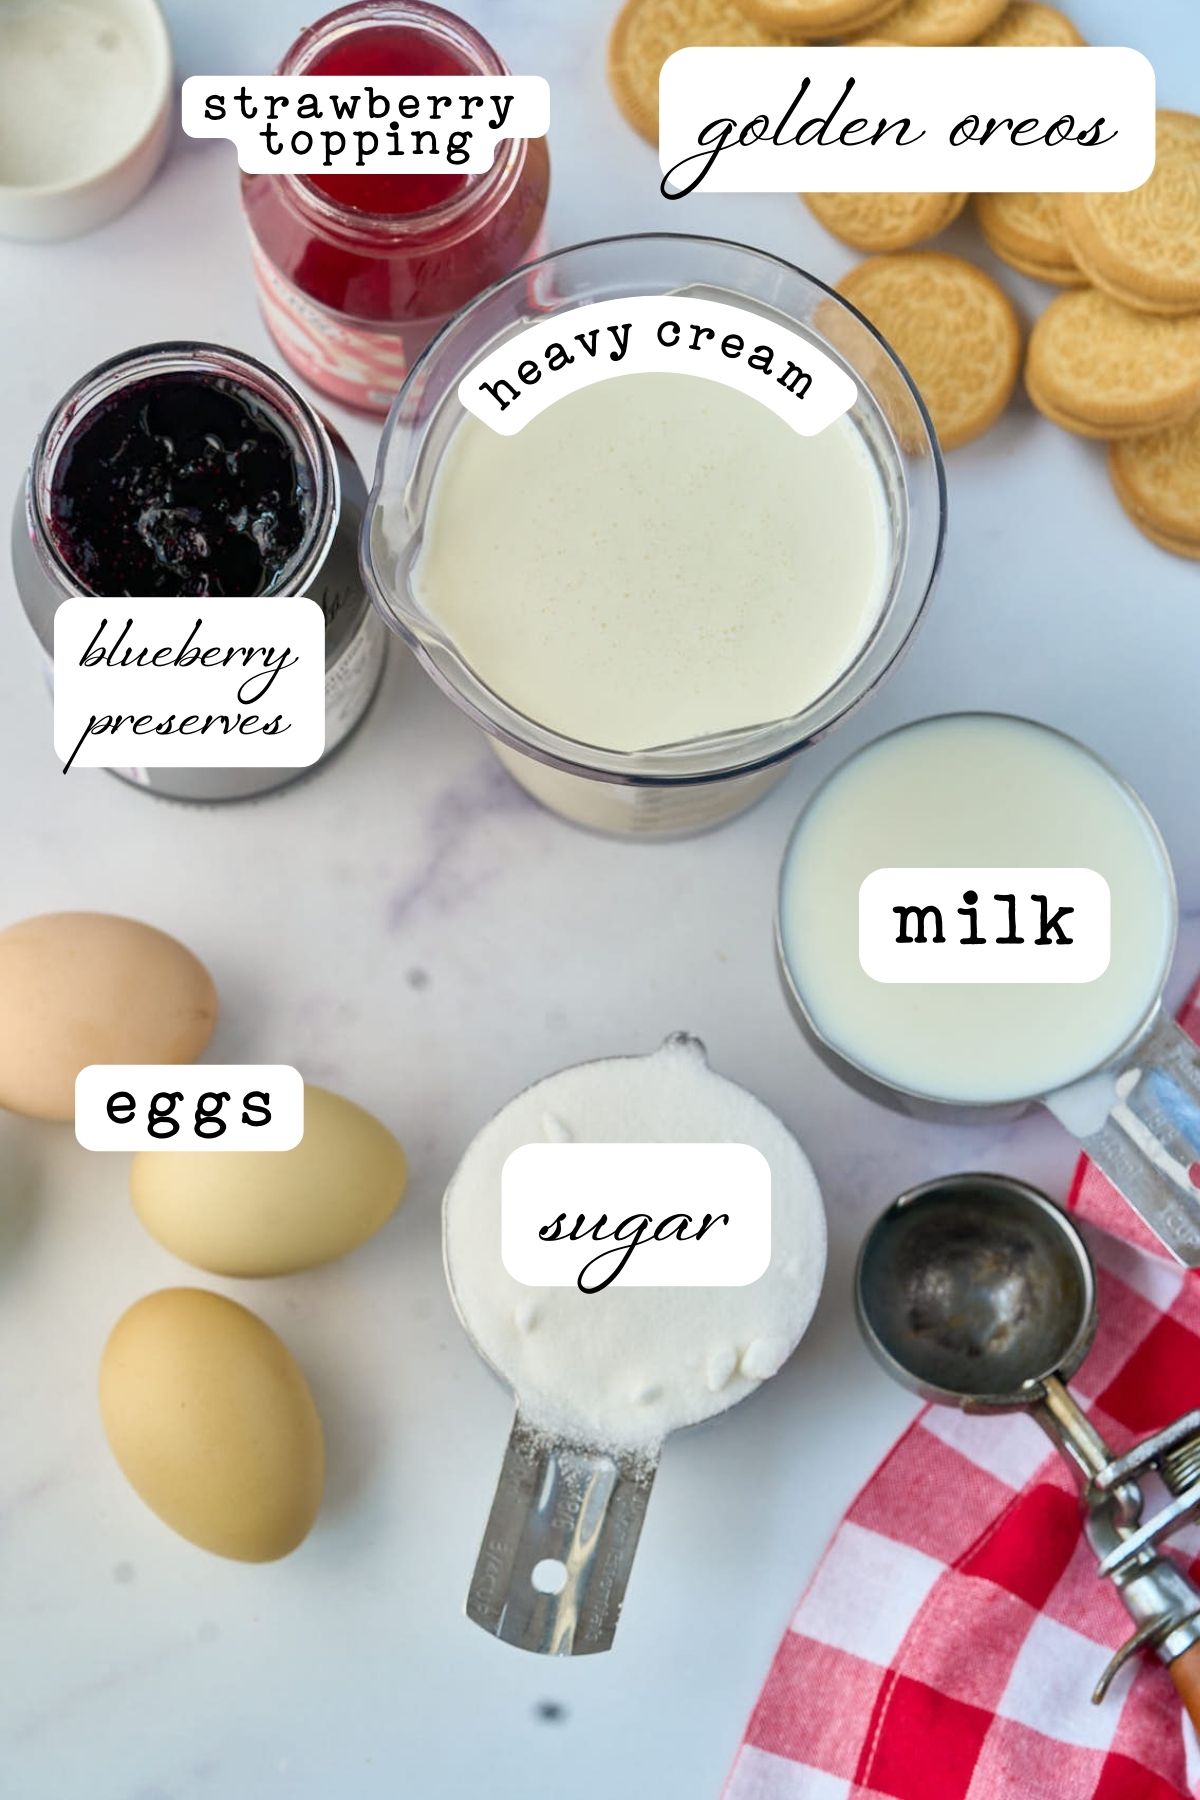
Ingredients
- 1½ cups whole milk (can substitute coconut milk)
- 1½ cups heavy cream (can substitute coconut cream)
- ¾ cup granulated sugar
- 4 egg yolks
- pinch salt
- 15 Golden Oreos (or any vanilla-flavored cookie)
- ⅓ cup blueberry jam or blueberry preserves
- ⅓ cup strawberry ice cream topping
- 1 vanilla bean
Step by Step
I know you have to keep returning this to the freezer, and it seems annoying. But if you add the swirls while the ice cream is super melty, you’ll just have a purple mess. This is fun to make. Really! Okay, maybe not the first part, but adding cookies and swirls is definitely fun.
Step One: Heat Milk And Cream
Kick things off by gently warming up your milk, cream, ½ cup of sugar, and vanilla in a saucepan. You’re looking for that sweet spot where it’s steamy but not boiling.

Step Two: Beat Eggs And Sugar
While that’s happening, grab your egg yolks and the remaining ¼ cup of sugar. Mix them until they turn a light, sunny yellow.
Step Three: Temper Eggs
Now comes the fancy part. It’s called tempering, and it’s not as scary as it sounds. Just gradually mix half of the warm milk mixture into the egg yolks, a few tablespoons at a time, whisking constantly, then return everything to the saucepan. Easy, right?

Step Four: Cook and strain
Keep stirring your mixture over medium heat until it slightly thickens. Think rich, luscious custard. Remember, boiling is a no-go.

Strain your soon-to-be ice cream base through a cheesecloth or strainer, and then pop it into the fridge. You’ll want to let it chill until it’s super cold – at least 4 hours.
Step Five: churn
Now the fun part – turning your custard into ice cream. Pour your mixture into an ice cream maker and let it do its magic. Just before it’s done, toss in your crushed Oreos. After it reaches a soft-serve consistency, put it into a loaf pan and freeze briefly.

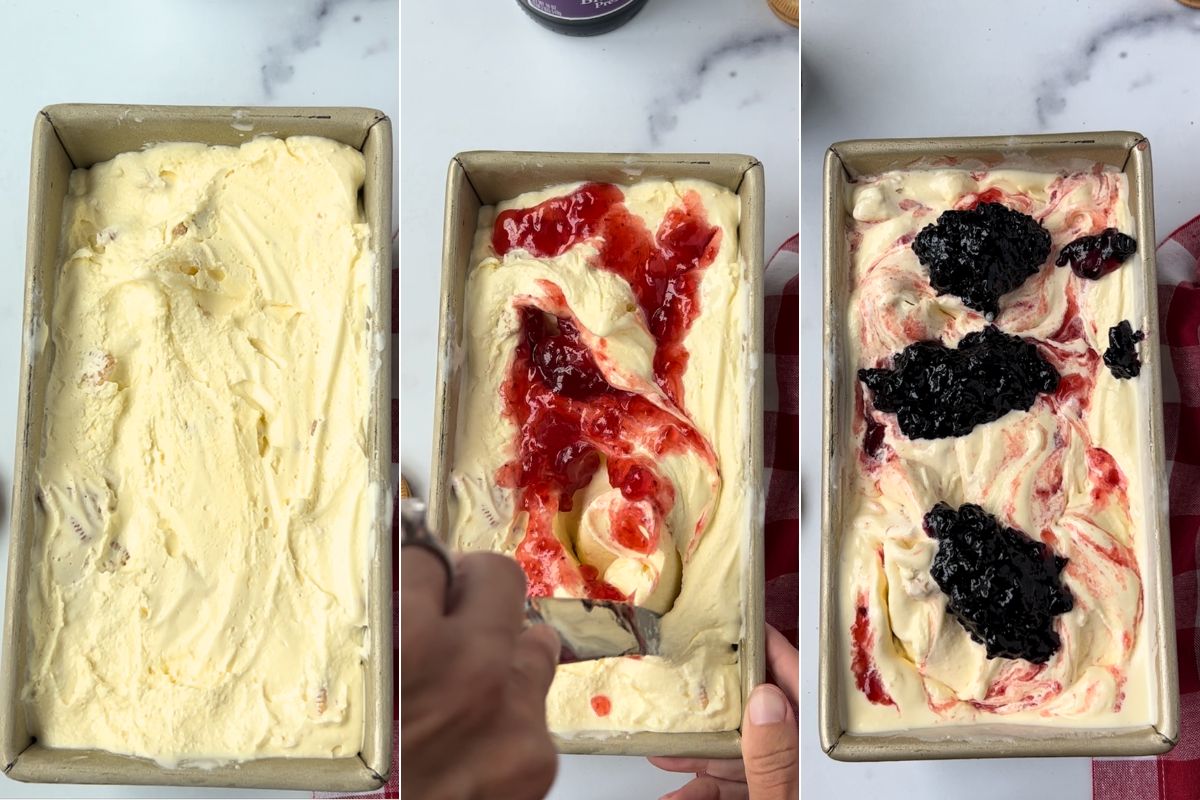
Step Six: Add Your Berry Swirls
Drizzle the blueberry and strawberry toppings over the ice cream, and gently stir them in to create beautiful swirls. Then back into the freezer it goes (about 2 hours), until it’s firm and scoopable.
Storage Instructions
For freezing, you can use a Tupperware-type container with a tightly fitting lid, or press plastic wrap on top.
While it is safe to eat for 2 months or so, I always think it tastes best if you eat it within a week. You have new flavors to try anyway, right? Right.

Questions? I’m here to help!
You either added the hot milk too fast to the eggs or let the mixture get too hot. Keep it under 185°F and add the milk slowly while whisking constantly.
It should coat the back of a spoon and when you run your finger across it, the line stays put. Don’t worry if it seems thin – it thickens more as it cools.
Nope! The ice cream needs to firm up in the freezer first, or you’ll just get a purple mess instead of pretty swirls.
Let it sit at room temperature for 5-10 minutes before scooping. Homemade ice cream freezes harder than store-bought because it doesn’t have all those stabilizers.
More real-churned Ice Cream Recipes
Don’t let your ice cream maker go to waste!
- When it’s 100 degrees in July, you’ll be so glad to have this salted caramel vanilla ice cream in your freezer.
- Homemade chocolate chip ice cream is a great, simple recipe that the kids will love.
- This vanilla caramel fudge ice cream is rich and creamy and the perfect treat.
- Don’t just leave the ice cream making to the summer! Try this candy cane ice cream during the holiday season.
Printable Recipe
4th of July Ice Cream
Equipment
Ingredients
- 1½ cups whole milk (can substitute coconut milk)
- 1½ cups heavy cream (can substitute coconut cream)
- ¾ cup granulated sugar
- 4 egg yolks
- pinch salt
- 15 Golden Oreos (or any vanilla flavored cookie)
- ⅓ cup blueberry jam or preserves
- ⅓ cup strawberry ice cream topping
- 1 vanilla bean
Save This Recipe
You'll join my email list which you will love. And if you don't, unsubscribe in one click. ❤️
Instructions
- Heat milk and cream. Combine the milk, cream, ½ cup of sugar, and the scraped vanilla bean seeds with the bean pod in a saucepan. Then, heat over medium heat until the mixture is warm and steaming or reaches about 170°F. Be careful not to let it boil.
- Beat eggs and sugar. While the milk mixture is heating, beat the egg yolks with the remaining ¼ cup of sugar until they are light yellow and thickened, indicating they are well combined.
- Temper eggs. To temper the eggs and prevent them from curdling, gradually add half of the warm milk mixture to the egg yolks, a few tablespoons at a time, whisking constantly. Once half of the milk mixture has been added, gradually pour the tempered egg mixture back into the saucepan with the remaining milk and cream.
- Heat. Return the saucepan to medium heat and stir constantly until the mixture reaches 185°F. The custard should coat the back of a spoon at this stage. Remove from heat and stir in a pinch of salt.
- Strain. Set a fine-mesh sieve or cheesecloth over a bowl and pour the custard through to remove any egg solids and the vanilla pod. This will make a smooth ice cream base.
- Chill. Transfer the strained custard to the refrigerator and chill thoroughly, ideally for 4 to 24 hours.
- Churn and add cookies. Put the cold custard in your ice cream maker and spin it according to the manufacturer's instructions until it becomes smooth and creamy. Gently crush the Golden Oreos and mix them into the churned custard. After it reaches a soft-serve consistency, put it into a loaf pan and freeze briefly.
- Add fruit swirls. Pour the blueberry preserves and strawberry topping over the top of the ice cream. Using a butter knife or a spatula, delicately create a marbled effect by gently swirling the toppings into the ice cream. Make sure to move the knife vertically and horizontally to create a distinct swirl pattern. Be careful not to mix the toppings too much to keep the fruit flavor swirls separate and distinct.
- Freeze. Cover the pan with plastic wrap and freeze for at least 2 hours or until the ice cream is firm and scoopable.
Notes
Nutrition


