Rotisserie Style Chicken
Inside: how to make chicken just like the grocery store rotisserie chicken, but better. Serve for Sunday dinner, shred leftovers for chicken salad, then save the bones for stock.
What You’ll Need
For the brine
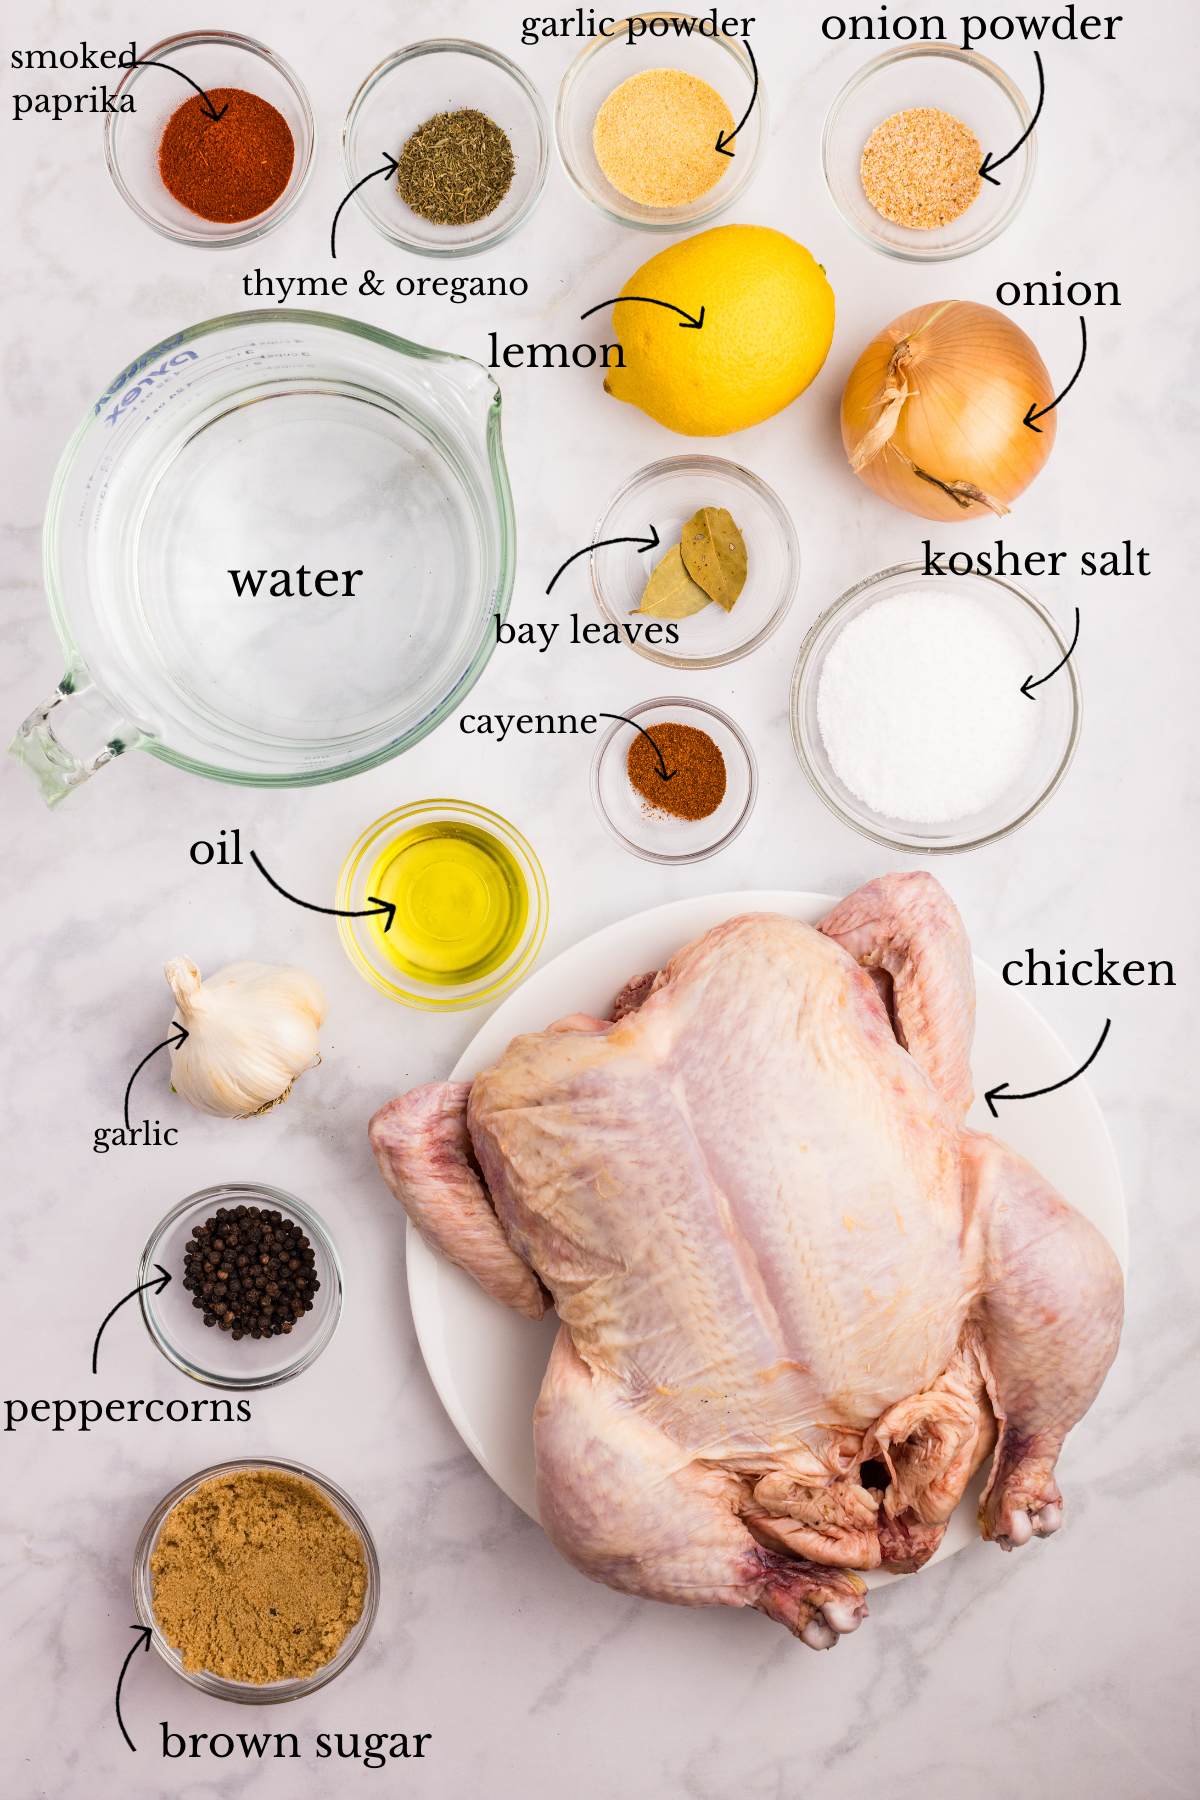
- 8 cups water
- ⅓ cup kosher salt
- ¼ cup brown sugar
- 4 cloves garlic, smashed
- 1 tablespoon black peppercorns
- 2 teaspoons smoked paprika
- 1 teaspoon onion powder
- 1 teaspoon dried thyme
- 2 bay leaves
- 1 lemon, sliced
- 1 (4-pound whole chicken). A 5-pound bird works too, just plan on closer to 2 hours of roasting.
For the seasoning blend
- 1 tablespoon smoked paprika. (Don’t skip or swap for regular paprika! Crucial for the right flavor!)
- 2 teaspoons garlic powder
- 2 teaspoons onion powder
- 1 teaspoon dried thyme
- 1 teaspoon dried oregano
- 1 teaspoon kosher salt
- ½ teaspoon black pepper
- ¼ teaspoon cayenne pepper (optional)
For roasting
- 2 tablespoons olive oil
- 1 onion, quartered
- 1 lemon, chopped
- 4 cloves garlic
Equipment You’ll Need
- Large pot or brining bag. Whatever holds the chicken fully submerged in brine — a stockpot or a gallon zip-top bag both work.
- Roasting pan with rack. A 9×13 with a cooling rack set inside is fine. The rack is what matters: it lets the hot air circulate underneath like a rotisserie.
- Kitchen twine
- Instant-read thermometer. The only way to actually know the chicken is done. Cooking time varies too much to trust the clock.
Two chickens at once works great if you have the oven space. Use two separate pans with cooling racks rather than crowding them into one. They need air around them to crisp up. Keep them on the same rack if you can, and rotate the pans halfway through. Add about 15 minutes to the total cook time and check both with a thermometer, because they won’t necessarily finish at the same moment. The brine recipe doubles cleanly, but you’ll need a much bigger container or two brining bags.
Instructions
Make the brine
Combine 2 cups of water with the salt and brown sugar in a large pot and heat just until they dissolve. You’re not making a soup here. As soon as the grains disappear, kill the heat.
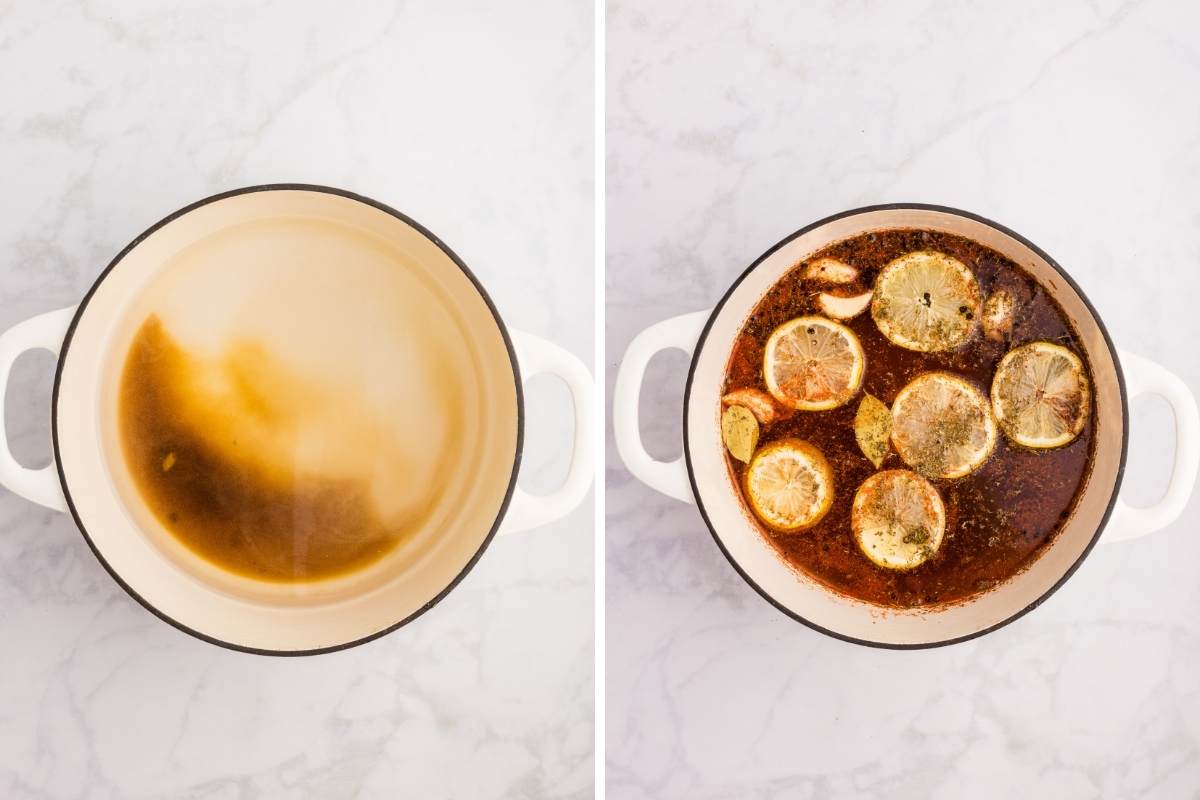
Off the heat, stir in the garlic, peppercorns, smoked paprika, onion powder, thyme, bay leaves, and lemon slices. Pour in the remaining 6 cups of cold water and let the whole thing cool completely.

Brine the chicken
Settle the chicken into a large container or a brining bag and pour the cooled brine over the top. The whole bird needs to be submerged, so if the liquid doesn’t quite cover it, top it off with cold water until it does.
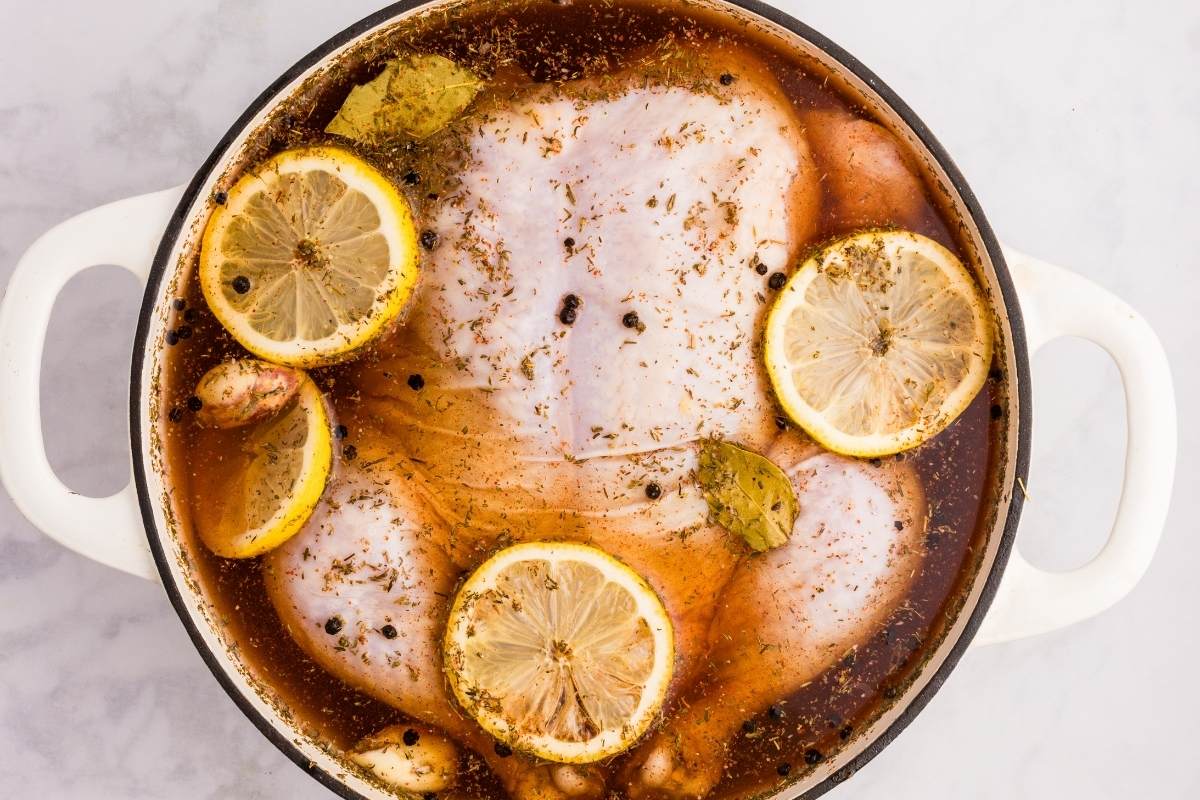
Refrigerate for 8 to 24 hours. Don’t go past 24. The texture gets weirdly soft and the meat tips into too-salty territory. Even just overnight makes a real difference, so don’t stress if you can’t go the full day.
Dry the chicken
Pull the chicken out of the brine and pat it very dry with paper towels. Get into the wings, the legs, all the folds. Wet skin will never crisp, no matter how hot your oven is.
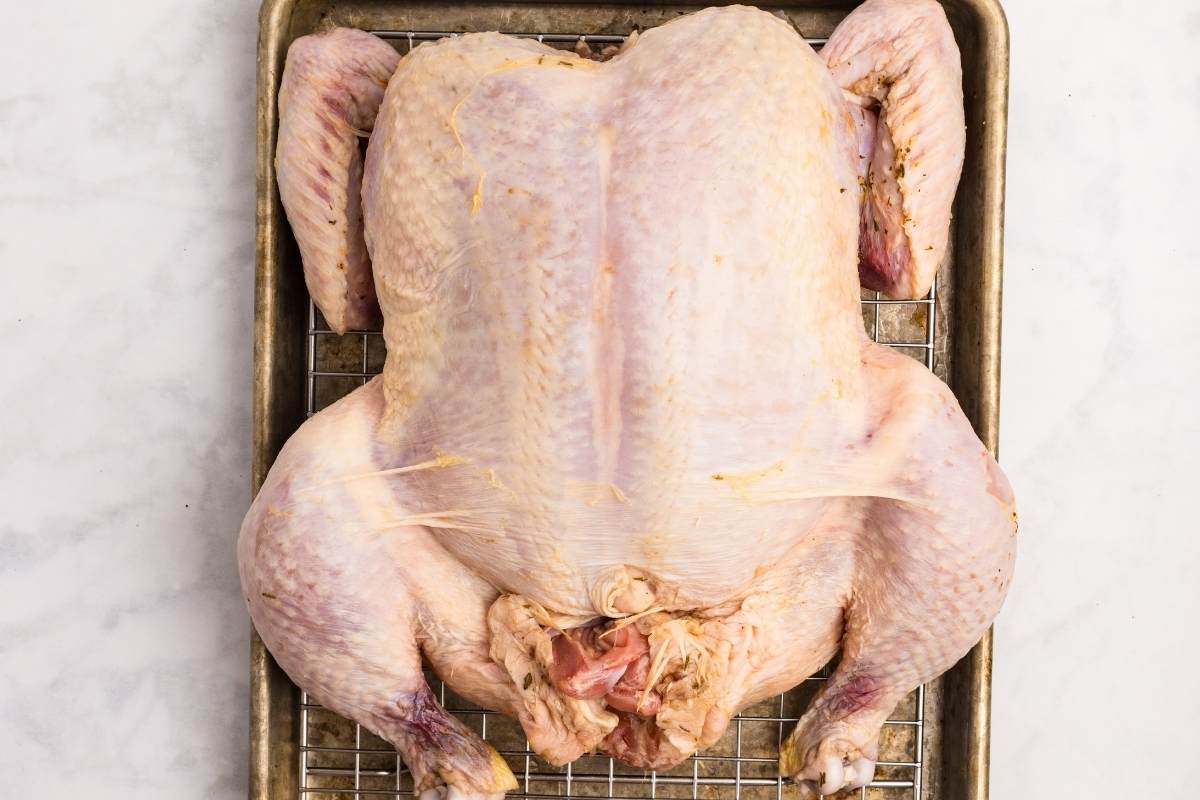
If you have time, set the chicken on a plate and let it sit uncovered in the fridge for 1 to 4 hours. This is the single biggest thing you can do for crispy skin. The surface dries out and roasts almost like it’s been air-fried. Skip it if you must, but plan for it if you can.
Mix the seasoning blend
In a small bowl, stir together the smoked paprika, garlic powder, onion powder, thyme, oregano, kosher salt, black pepper, and cayenne if you’re using it.
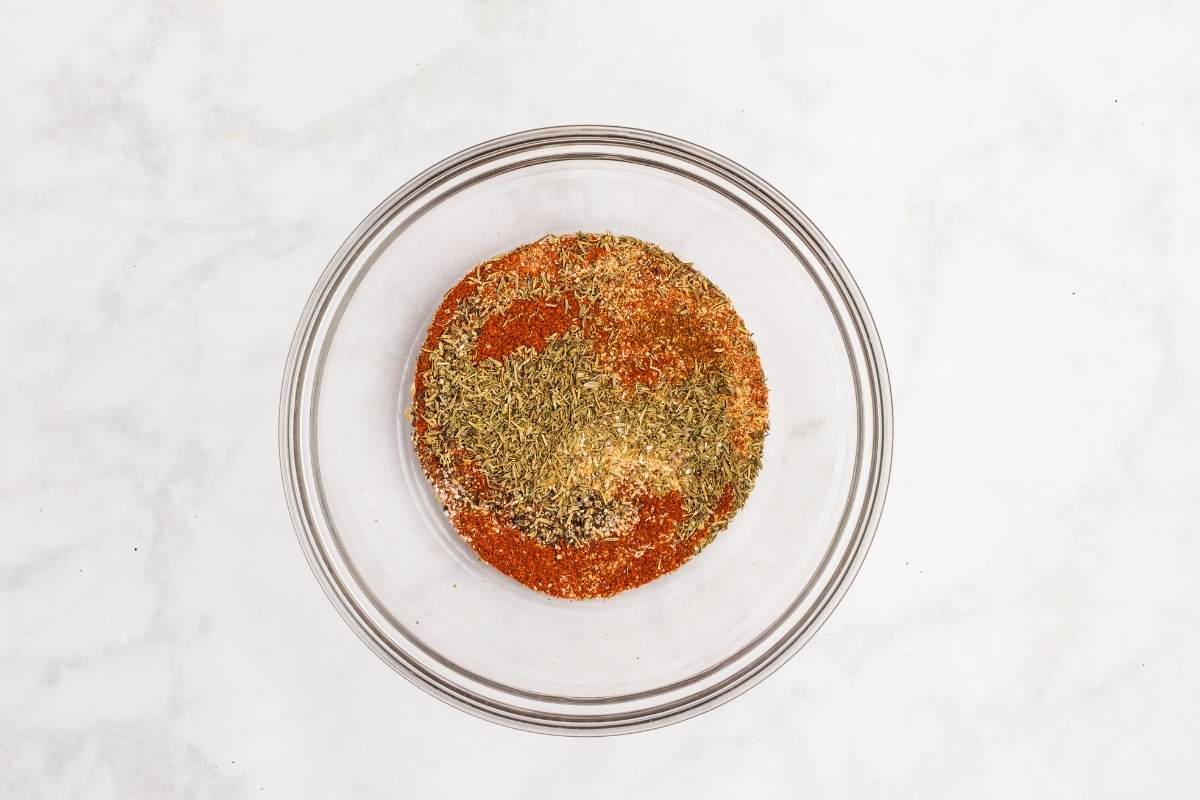
Give it a quick whisk with a fork so everything’s evenly distributed before it hits the bird.
This is a GREAT all-purpose chicken seasoning, so you might want to quadruple it and keep it pre-mixed.
Season and stuff the chicken
Heat the oven to 425°F and set a cooling rack inside a 9×13 pan or a roasting pan. The rack is non-negotiable. It lets hot air circulate underneath the bird, which is what gets you that rotisserie-style all-over crisp.
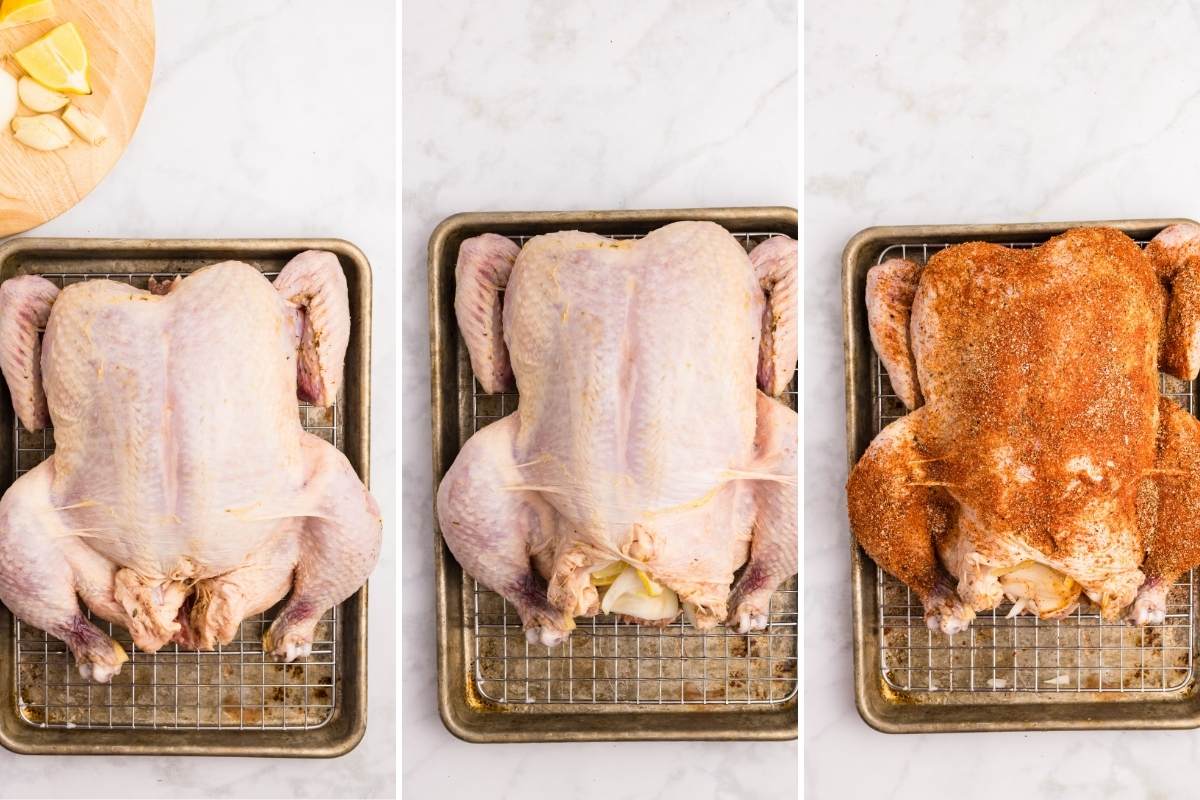
Rub the chicken all over with the olive oil, then sprinkle the seasoning blend evenly over the whole thing. Don’t forget the underside, the wings, and the legs. Stuff the cavity with the quartered onion, chopped lemon, and garlic cloves, tie the legs together with kitchen twine, and tuck the wing tips underneath so they don’t burn.
Set the chicken breast-side up on the rack.
Roast the chicken
Roast at 425°F for 20 minutes. This is the blast of heat that sets the skin. Then drop the temperature to 375°F and keep roasting for another 70 to 90 minutes.
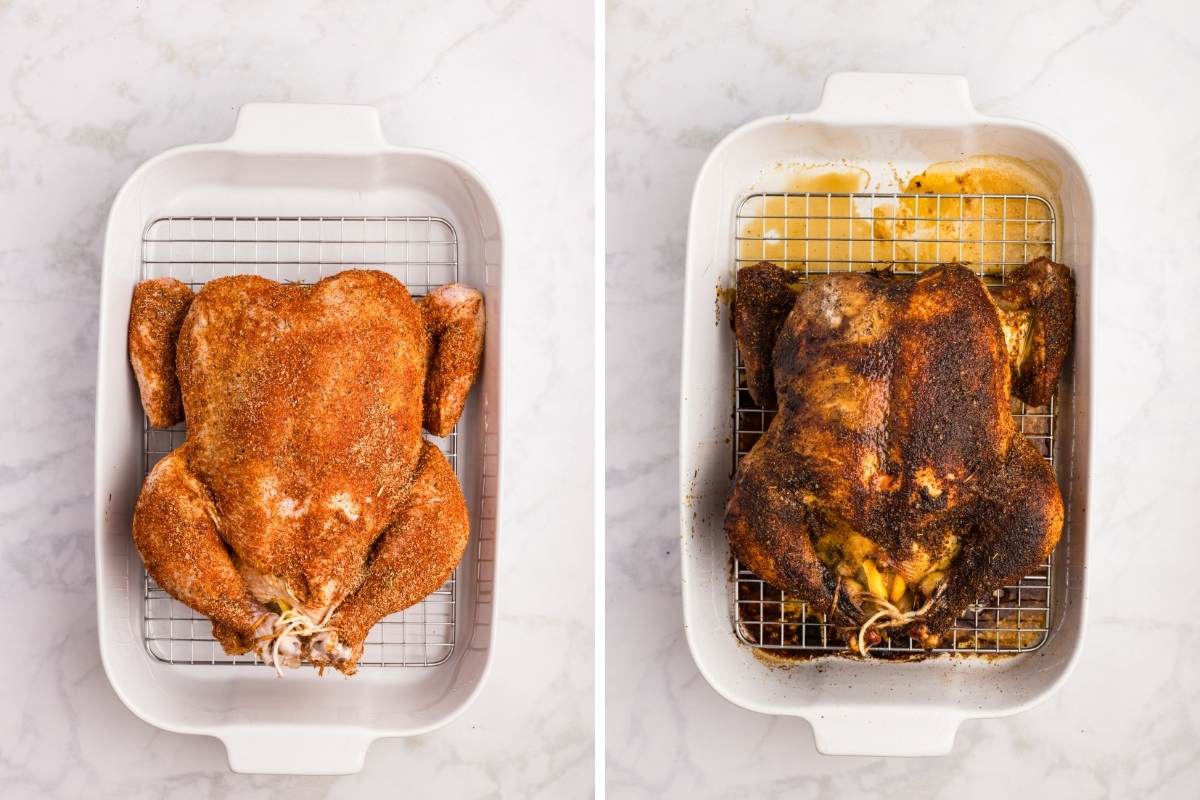
You’re done when the thickest part of the thigh hits 175°F and the breast hits 165°F. Watch the thermometer, not the clock — a 4-pound bird usually lands around 90 minutes total, but a 5-pounder can push closer to 2 hours. If the skin is browning faster than the inside is cooking, tent it loosely with foil for the last stretch.
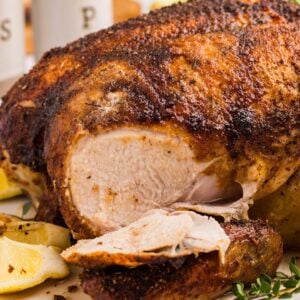
Rest before carving
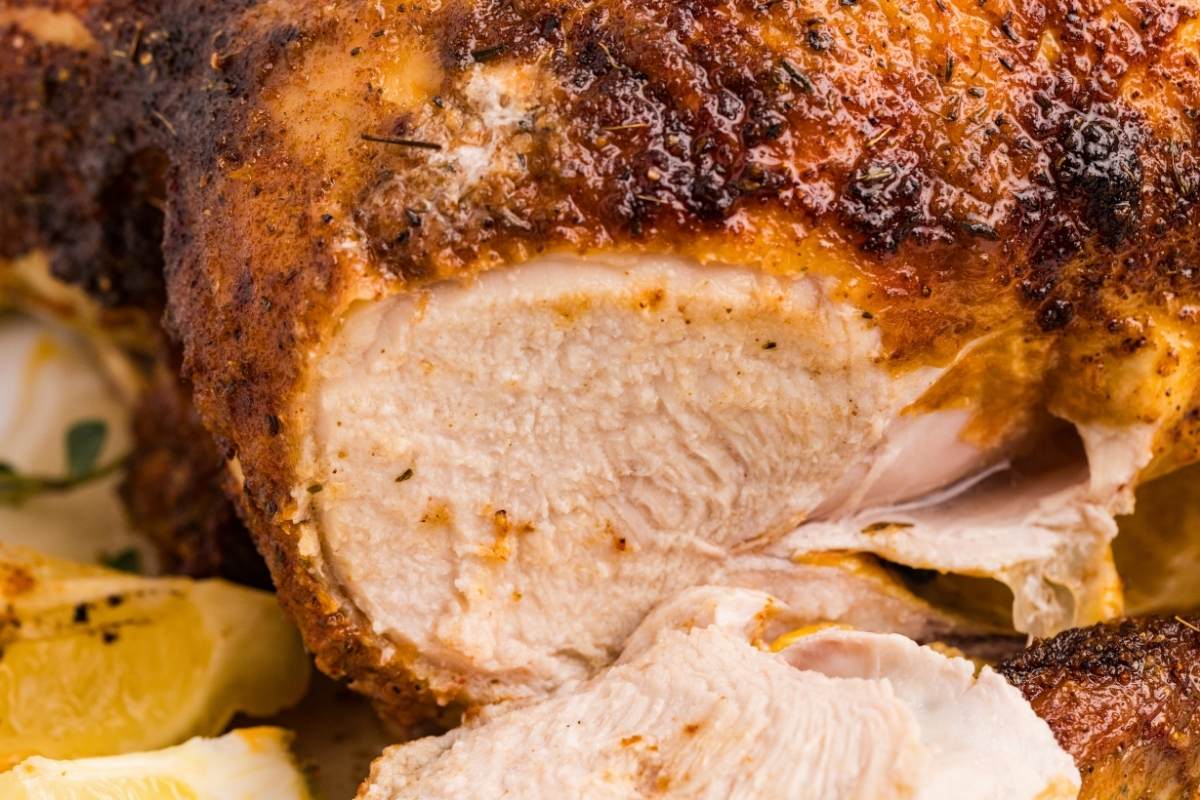
Let the chicken rest for a full 15 minutes before you cut into it. I know the smell is unreasonable and you want to dig in, but if you carve too early, all the juice you just spent 24 hours brining into the meat is going to run out onto the cutting board.
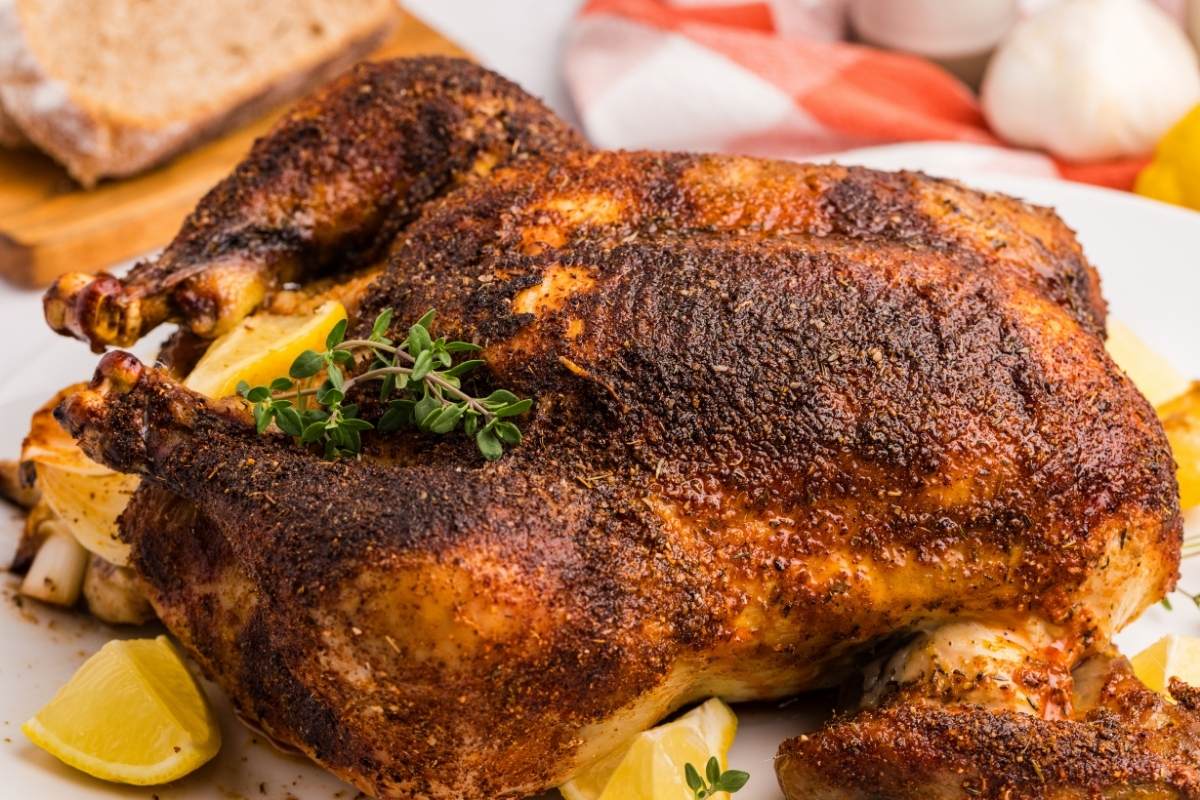
Carve, serve, and try not to eat half of it standing at the counter.
Storage Instructions
Pull the meat off the bones while it’s still a little warm. It comes off easier, and you’ll get more usable chicken. Store the shredded or sliced meat in an airtight container in the fridge for up to 4 days.
For longer storage, freeze the picked meat in a freezer bag or freezer-safe container for up to 3 months. I like to freeze in 2-cup portions so I can pull out exactly what I need for soup or a quick dinner. Thaw overnight in the fridge.
Reheat gently in the microwave, a skillet, or a 300-degree oven with a splash of chicken broth poured over the top — this is the difference between leftover chicken that’s dry and sad and leftover chicken that tastes like you just made it. Don’t skip the broth.
How We Eat It All Week
- Slice the breast for sandwiches with mayo and a slab of tomato.
- Shred the leftovers for chicken salad with celery, grapes, and a little Dijon.
- Pull the meat off the bones for chicken and dumplings or chicken noodle soup.
- Use the carcass to make stock. Don’t skip this, it’s the whole point of cooking a whole bird.
- Pile shredded chicken into quesadillas with a lot of cheese and pickled jalapeños.
- Toss with buffalo sauce and stuff into wraps with blue cheese and lettuce.
- Chop and add to a big green salad with whatever vinaigrette is in the fridge.
- Layer into a chicken pot pie with frozen peas and carrots.
Questions and Troubleshooting
Do I really need to brine?
No, but yes. The chicken will still be good without it, but brining is what makes it taste like an actual rotisserie chicken instead of just a roasted one. Even 4-6 hours helps if you’re short on time.
Can I skip the fridge-drying step?
You can, but the skin won’t get as crispy. If you only have 30 minutes, that’s better than nothing — pat it very dry and leave it uncovered on a rack in the fridge.
My chicken is bigger than 4 pounds. What do I do?
Add roughly 15 minutes per extra pound and use your thermometer, not the clock. A 5-pound bird is closer to 2 hours total. Thigh at 175°F, breast at 165°F — that’s what matters.
Why is my skin browning too fast?
Tent it loosely with foil for the last 20-30 minutes of roasting. This happens sometimes with smaller birds or hotter ovens. The chicken is still cooking underneath, don’t worry.
Can I brine longer than 24 hours if life gets in the way?
I really wouldn’t. The texture gets mushy and the meat gets too salty. If you need more time, pull the chicken out of the brine, pat it dry, and let it sit uncovered in the fridge until you’re ready to roast.
Do I have to rinse the chicken after brining?
Not strictly, but I do. It gets rid of the peppercorns and herb bits stuck to the skin. Just pat it very dry afterward. Wet skin won’t crisp.
Can I use table salt instead of kosher salt in the brine?
No, please don’t. Table salt is much denser by volume and your chicken will be way too salty. Stick with kosher.
Homemade Rotisserie Chicken
Equipment
- Large pot
- Large container or brining bag
- Roasting pan or 9×13 baking dish
- cooling rack
- Kitchen twine
- Instant-read thermometer
Ingredients
For the brine
- 8 cups water divided
- ⅓ cup kosher salt
- ¼ cup brown sugar
- 4 cloves garlic smashed
- 1 tablespoon black peppercorns
- 2 teaspoons smoked paprika
- 1 teaspoon onion powder
- 1 teaspoon dried thyme
- 2 bay leaves
- 1 lemon sliced
- 1 whole chicken about 4 pounds
For the seasoning blend
- 1 tablespoon smoked paprika
- 2 teaspoons garlic powder
- 2 teaspoons onion powder
- 1 teaspoon dried thyme
- 1 teaspoon dried oregano
- 1 teaspoon kosher salt
- ½ teaspoon black pepper
- ¼ teaspoon cayenne pepper optional
For roasting
- 2 tablespoons olive oil
- 1 onion quartered
- 1 lemon chopped
- 4 cloves garlic
Save This Recipe
You'll join my email list which you will love. And if you don't, unsubscribe in one click. ❤️
Instructions
Brine the chicken
- Dissolve the salt and sugar. In a large pot, combine 2 cups of water with the kosher salt and brown sugar. Heat over medium just until the salt and sugar dissolve.
- Add the aromatics. Remove the pot from the heat and stir in the garlic, peppercorns, smoked paprika, onion powder, thyme, bay leaves, and lemon slices.
- Cool the brine. Pour in the remaining 6 cups of cold water and let the brine cool completely before using.
- Submerge the chicken. Place the chicken in a large container or brining bag and pour the cooled brine over the top. Add additional water if needed so the chicken is fully submerged.
- Refrigerate overnight. Cover and refrigerate for 8 to 24 hours. Don’t go past 24 hours or the texture starts to get weird.
- Dry the chicken. Remove the chicken from the brine and pat it very dry with paper towels. If you have time, let it sit uncovered on a rack in the refrigerator for 1 to 4 hours for crispier skin.
Season and roast
- Mix the seasoning. In a small bowl, combine the smoked paprika, garlic powder, onion powder, dried thyme, dried oregano, kosher salt, black pepper, and cayenne.
- Preheat the oven. Heat the oven to 425°F. Place a cooling rack inside a 9×13 pan or roasting pan and set aside.
- Oil the chicken. Rub the chicken all over with the olive oil so the seasoning has something to stick to.
- Season the chicken. Sprinkle the seasoning mixture evenly over the entire chicken, including the wings and legs.
- Stuff the cavity. Tuck the quartered onion, chopped lemon, and garlic cloves into the cavity of the chicken.
- Truss the chicken. Tie the legs together with kitchen twine and tuck the wing tips underneath the body.
- Position in the pan. Place the chicken breast side up on the rack in the prepared pan.
- Roast hot first. Roast at 425°F for 20 minutes to get the skin going.
- Lower and finish. Reduce the oven to 375°F and continue roasting for 70 to 90 minutes, until the thickest part of the thigh reaches 175°F and the breast reaches 165°F. If the skin browns too quickly, tent loosely with foil.
- Rest before carving. Let the chicken rest for 15 minutes before carving so the juices settle.
Notes