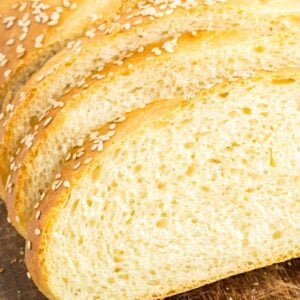
Soft Italian Bread
This soft Italian bread has everything you love about bakery bread—soft, tender, and perfect for pairing with any meal. Whether you’re enjoying it with pasta or using it for a sandwich, this loaf will surely win everyone over with its light, fluffy texture and beautiful golden crust.
Baking bread at home is quite satisfying, and this recipe is a great and simple way to start making your own bread. My recipe is easy to follow and explains each step carefully to help you create a delicious loaf.
Big, Soft Italian Loaf
Ingredients
- 3 cups all-purpose flour
- 1 ¼ cups of water
- 2 tablespoons olive oil
- 2 tablespoons dry powdered milk
- 1 ¼ teaspoons salt
- 1 teaspoon sugar
- 2 teaspoons instant yeast
Save This Recipe
You'll join my email list which you will love. And if you don't, unsubscribe in one click. ❤️
Instructions
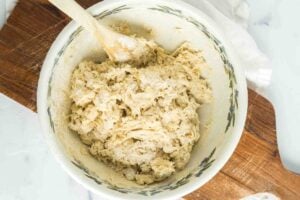
- Mix the ingredients. In a large mixing bowl or the bucket of a bread machine, combine all the dough ingredients. Mix until fully combined and the dough is smooth. If the dough is too sticky, add more flour; if it's too dry, add more water. The dough should be soft but not sticky. Allow the dough to rise in a warm place until it has doubled in size, about 1 hour.
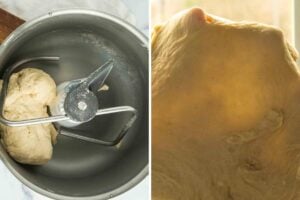
- Knead the dough. Knead the dough until it is smooth and elastic, which should take about 10 minutes with a stand mixer or 15-20 minutes by hand. If using a bread machine, let the dough cycle complete this step.

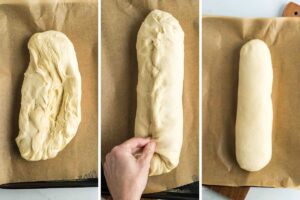
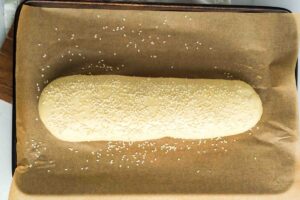
- Shape the loaf. Shape the entire batch of dough into a single large log, slightly tapered at the ends to mimic the shape of a baguette to make a uniform bake and create the classic, slightly elongated loaf shape.
- First rise. Place the shaped loaf on a baking sheet lined with parchment paper or lightly greased to prevent sticking. Cover the loaf with greased plastic wrap and let it rise in a warm place for about 1 hour or until nearly doubled in size.
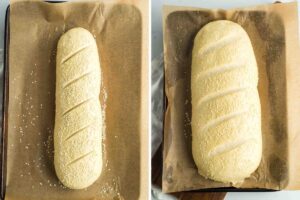
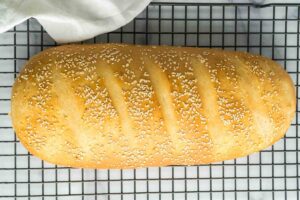
- Bake. Preheat your oven to 400°F (200°C). Once the loaf has risen, use a sharp knife to make several diagonal slashes across the top to allow the bread to expand during baking. Bake for 30-35 minutes until the loaf is golden brown and sounds hollow when tapped on the bottom.
- Cool. Remove the loaf from the oven and transfer it to a wire rack to cool before slicing to allow the interior to finish setting and prevent the crust from becoming soggy.
Notes
Nutrition
Did You Make This?
I would love it if you would leave a review!I’ve always had a soft spot for freshly baked bread, and this big, soft Italian loaf holds a special place in my heart. There’s something magical about pulling it out of the oven, golden brown, and filling the kitchen with that unbeatable aroma. It’s become a bit of a ritual in my house.
A Newsletter you’ll love
Daily recipes from the farmhouse, Sunday meal plans, seasonal ideas, straight from my kitchen to your inbox.
I promise to keep your email address safe. Unsubscribe at any time
I love to start my weekend mornings by mixing the dough and letting it rise while I sip my coffee and catch up on my reading. By lunchtime, we’re slicing into it, the perfect companion to whatever we have.
More Tips:
Kneading develops bread’s texture by forming gluten. If doing it by hand, use the heel of your hand to push the dough away, then fold it back over itself, turning it a quarter turn each time. It’s a bit of a workout, but think of it as part of the bread’s character.
The dough rises best in a warm, draft-free place. If your kitchen is chilly, turn on your oven for a minute, then turn it off and place the covered dough inside to rise.
It can be tempting to add more flour if the dough seems sticky, but try to resist the urge. A softer dough results in a fluffier bread. You can lightly oil your hands or the work surface if needed to handle the dough.
While a bread machine can make the kneading process a bit easier, you can knead the dough by hand. It will take a bit more effort and about 15-20 minutes, but it’s doable and quite satisfying.
Tapping the bottom of the loaf is a good way to know when the bread is fully baked. If it sounds hollow, it’s usually done. Also, the crust should be a nice golden brown color. An instant-read thermometer can also help; bread is typically done when the internal temperature reaches around 190°F to 200°F.

Key Ingredients and Tools
To make this loaf recipe, you’ll need a few essential tools and ingredients to help you achieve great results. Here’s what you should have ready:

- All-Purpose Flour: This is the best choice for a soft, tender loaf. You can use bread flour for a chewier texture, but the result will be different.
- Instant Yeast: This yeast works quickly and doesn’t need to be dissolved in water first, which saves time. Make sure it’s fresh for the best rise. You can also use active dry yeast instead, but dissolve it in warm water with a pinch of sugar before adding it to the dough.
- Dry Powdered Milk: Found in the baking aisle, this ingredient adds richness and tenderness to the bread. If you don’t have it, you can substitute it with regular milk and reduce the water slightly.
- Olive oil: Look for it in the oil and vinegar section. Olive oil contributes to the bread’s moist crumb and subtle flavor, adding a touch of richness.
- Bread Machine or Stand Mixer: While not necessary, these tools make kneading the dough much easier and more consistent. If you’re kneading by hand, just be prepared for a bit of a workout.
These tools and ingredients will make the process smoother and help you achieve that perfect loaf every time.
Baking this Italian loaf can be such a delightful experience, and there’s nothing quite like the satisfaction of creating your own delicious homemade bread.
Its soft texture and golden crust make it a versatile option for any occasion, whether you’re enjoying it with a comforting meal or whipping up a quick sandwich. Feel free to get creative with your loaf by experimenting with various herbs or cheeses.

Love,