Homemade Cream Biscuits (Only 4 Ingredients)
There’s something comforting about homemade biscuits fresh from the oven, and these are the absolute easiest way to get them. Just four ingredients, great flavor, great rise. They’re soft, fluffy, and perfectly buttery.

I like having these for breakfast, but they are also a great dinner side or afternoon snack with tea or coffee.
Table of Contents
Ingredients and Tools You’ll Need
You want to use cold butter to keep the biscuits flaky. Cut it into small pieces and keep it cold until you use it. This recipe uses self-rising flour that already has baking powder and salt in it. If you don’t have it, use 2 cups of all-purpose flour mixed with 3 teaspoons of baking powder and ½ teaspoon of salt. A pastry cutter makes mixing the butter easier, but you can use two knives or your hands (but work fast to not melt the butter).


This will make 12 biscuits, and they freeze great (baked or unbaked). If you’d like to double or triple this recipe, you can make adjustments in the recipe card at the bottom of this post.
Equipment
- Baking Sheet
- Pastry brush
- Mixing bowl
- Pastry blender
- Biscuit cutter (2¼ inch round)
- Parchment paper
- Rolling Pin
- Microwave-safe bowl
Ingredients
For the biscuits
- 6 tablespoons cold unsalted butter (diced)
- 2 cups self-rising flour
- 1 cup heavy cream
- 1 tablespoon sugar
For brushing on top
- 2 tablespoons butter
How to Make Cream Biscuits
Step One: Prep
Crank your oven to 425°F and throw some parchment paper on a baking sheet.
Step Two: Mix the Dry Stuff
In a bowl, mix your flour and sugar. Toss in those cold butter pieces and work them in with your hands (or a pastry cutter if you’re fancy) until it looks like chunky breadcrumbs. The butter HAS to be cold or this whole thing falls apart – don’t skip that part.

Step Three: Add the Cream
Pour in the cream and stir it around until you’ve got a slightly sticky dough. Don’t overthink it.

Step Four: Knead and Roll
Dump it onto your counter and knead it maybe 3-4 times until it looks smooth. Roll it out to about ¾ inch thick – thicker than you think you should, trust me.

Step Five: Cut and Arrange
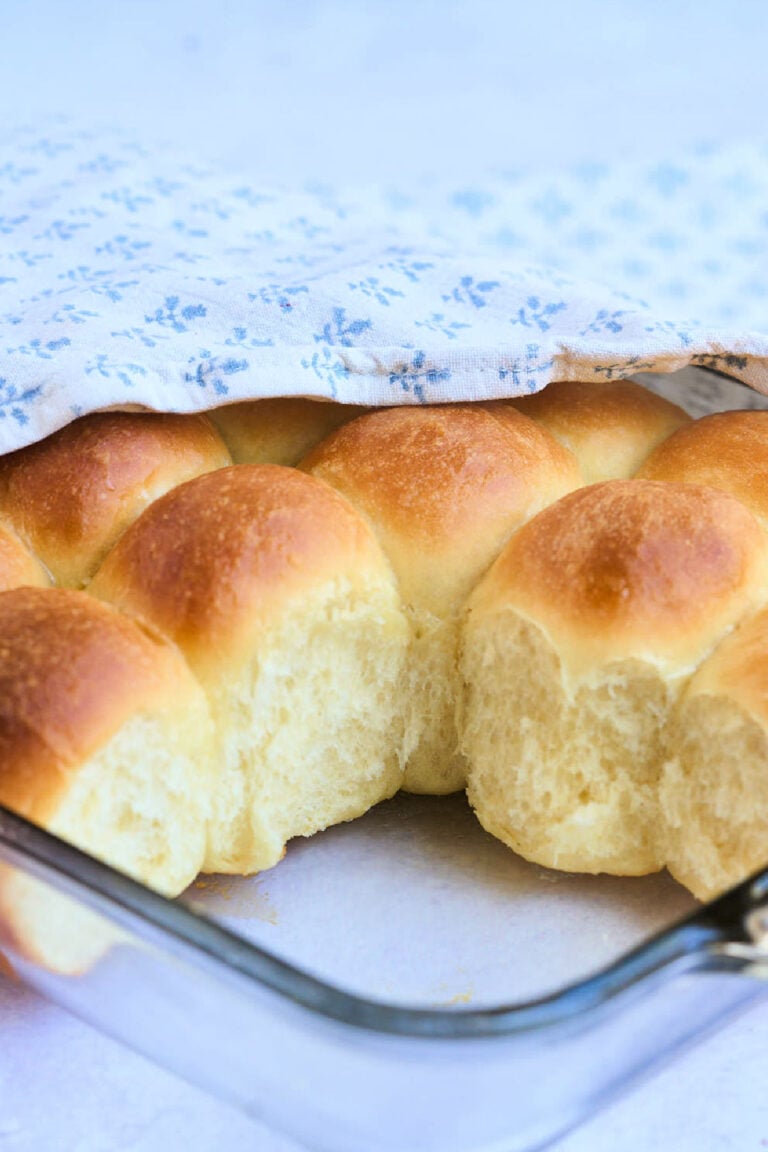
Cut straight down with a biscuit cutter (don’t twist it) and plop them on your baking sheet with the sides touching. Melt that extra butter and brush it all over the tops.

Step Six: Bake
Bake for 16 minutes until they’re golden and gorgeous.
Storage Instructions
Leftover biscuits are best stored in an airtight container at room temperature. They will last for a few days.
To freeze them, just place them in a freezer-safe container, and they will last for up to 3 months. When you’re ready to enjoy them, thaw them overnight in the fridge or reheat them in the microwave or oven at 350°F for 10 minutes.
You can also freeze the unbaked biscuits. Make the dough, cut the biscuits, and freeze them before baking. When you’re ready, bake them straight from the freezer—add a couple of extra minutes to the baking time.
What to Serve
Enjoy these for breakfast or dinner!
- Homemade berry jam is the perfect thing to spread on top!
- Serve with this baked skillet omelet and fresh fruit for a complete and delicious breakfast.
- These are a great side for fried chicken and gravy.
Questions and Troubleshooting
No problem. Cut dough into squares with a knife. I wouldn’t use a drinking glass as some people do, it’s too dull and will squish down through edges and make the finished biscuits flat.
When the biscuits touch, they help each other rise nice and tall.
Yes! Mix about ½ to 1 cup of cheese into the dry ingredients before adding the butter.

More Delicious Breakfast Recipes
- Sourdough scones are ready fast with your discard and can be made three different ways! But our favorite is with chocolate chips.
- Pecan pie croissants are more for a morning when you have more time, but they are easy and impressive.
- This strawberry buttermilk quick bread is beautiful and cheerful. Just the thing for a lovely spring morning.
- A cozy weekend is the perfect time to make buttermilk blueberry waffles. They freeze great too!
Printable Recipe

Four-Ingredient Cream Biscuits
Equipment
- Baking Sheet
- Pastry brush
- Mixing bowl
- Pastry blender
- Biscuit cutter (2¼ inch round)
- Rolling Pin
- Microwave safe bowl
Ingredients
For the biscuits
- 6 tablespoons cold unsalted butter (diced)
- 2 cups self-rising flour
- 1 cup heavy cream
- 1 tablespoon sugar
For brushing on top
- 2 tablespoons butter
Save This Recipe
You'll join my email list which you will love. And if you don't, unsubscribe in one click. ❤️
Instructions
- Prep. Preheat your oven to 425°F (220°C). Then, line a small, rimmed baking sheet with parchment paper.
- Mix. In a mixing bowl, combine the flour and sugar. Then, add the diced cold butter. Next, cut the butter into the flour using a pastry blender, two knives, or your hands until the mixture resembles coarse crumbs.
- Add the cream. Pour in the heavy cream and gently stir with a spatula until a dough forms. The dough should be slightly sticky but hold its shape.
- Knead. Turn the dough out onto a clean counter or large cutting board. Knead the dough a few times by hand until it becomes smooth.
- Roll out and cut. Using a rolling pin, roll the dough to about ¾ inch thick. Then, cut out rounds using a 2¼ inch biscuit cutter. Place the rounds on the prepared baking sheet, making sure the biscuits are touching.
- Brush with butter. Melt the 2 tablespoons of butter in the microwave. Generously brush the tops of the biscuits with the melted butter.
- Bake and serve. Bake the biscuits for 16 minutes or until golden brown and risen. Serve the biscuits warm and fresh from the oven.
Notes
Nutrition