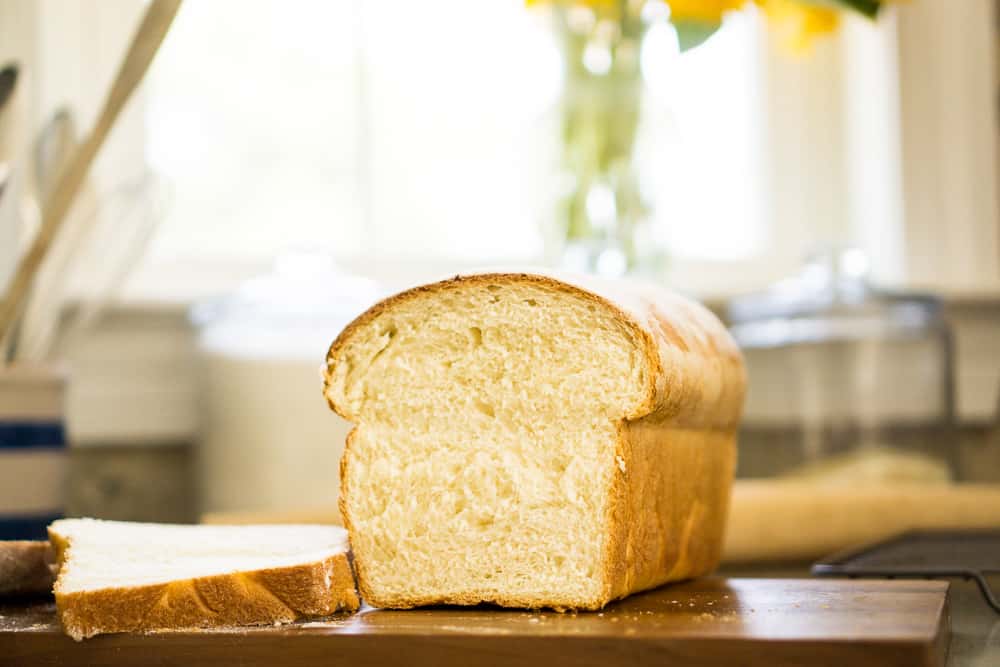
How to Knead Dough in a Stand Mixer
Inside: How to knead bread dough in a stand mixer without burning out your machine. Your Kitchenaid will need a break every few minutes but a Bosch will perfectly knead your dough in 4-5 minutes without trouble.
If you want to start baking bread at home but don’t have a bread machine, don’t worry. You can bake beautiful loaves using just your stand mixer.
Before we get into kneading dough in your stand mixer, I want to go over the two major downsides of using a stand mixer vs a bread machine. Making bread without a bread machine is certainly possible but I prefer having one.

First, kneading in a stand mixer requires just a touch more babysitting. You have to turn the machine on and off for the dough and the motor to rest, you have to check the consistency of the dough, and you have to remove it, and then use a bowl cover during the rising process.
Second, the average stand mixer (especially most home Kitchenaid brands) is not really designed to knead dough day after day. It is too hard on their motor. Bread dough is much stiffer than something a cake batter or frosting, and you knead it for much, much longer than cookie dough. So over time, kneading in the mixer will wear out the motor.
That being said, if you really dislike kneading by hand and only bake bread occasionally, it is a good option. There are a few things to keep in mind for the best results.
Mix The Ingredients Right in The Mixer Bowl
When you add the ingredients, there is no need to be fussy about the order they go in. Just put everything in the bowl, attach the dough hook, and set it on the lowest setting. You heard me! You don’t need to proof your yeast. Throw it in there! Let the machine mix for a minute or two, and then come back and see if the dough is too dry or too wet.
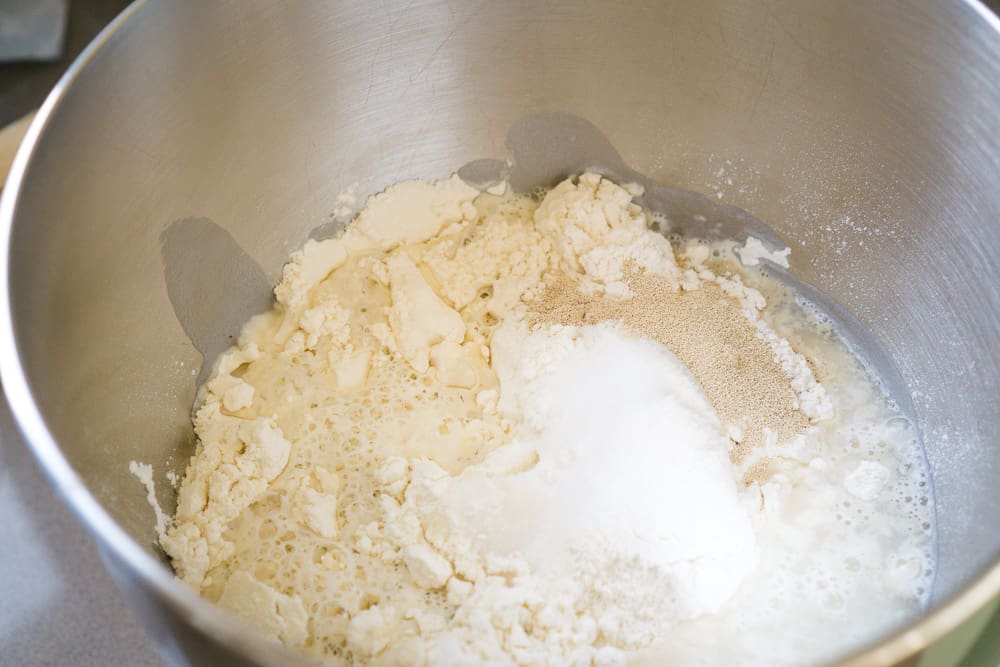
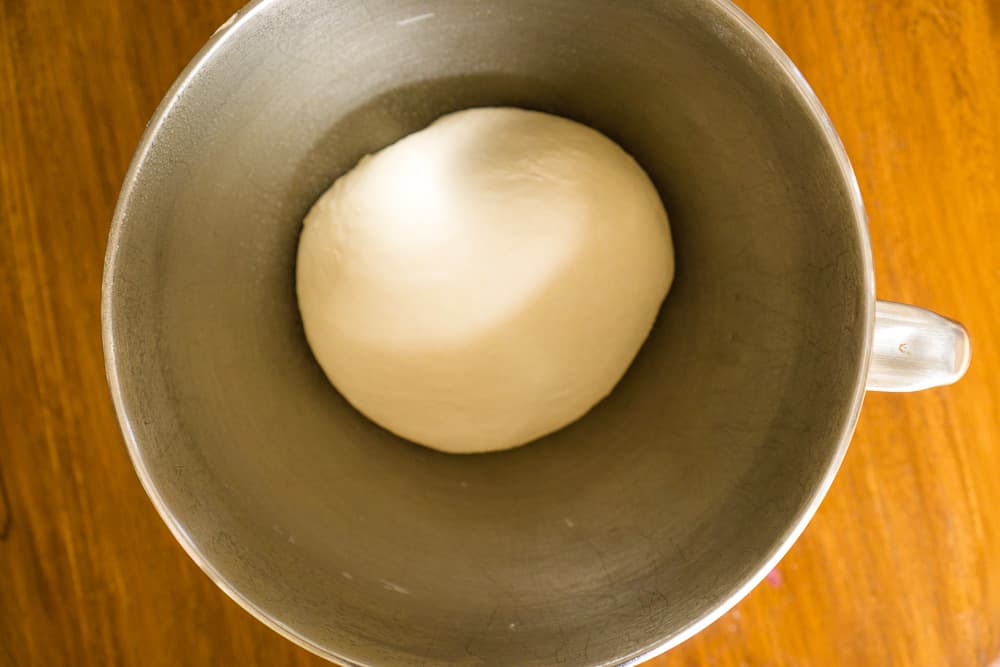
It should have formed a ball and cleared the sides of the bowl. If it hasn’t and seems like a batter or is constantly sticking to the bowl, start the mixer again and add more flour. Do this a teaspoon at a time.

If the dough is too dry, then there will be dry and crumbly bits and it will not have formed a ball. Again, you start the mixer on low and add water a teaspoon at a time.
How Long to Knead in the Stand Mixer
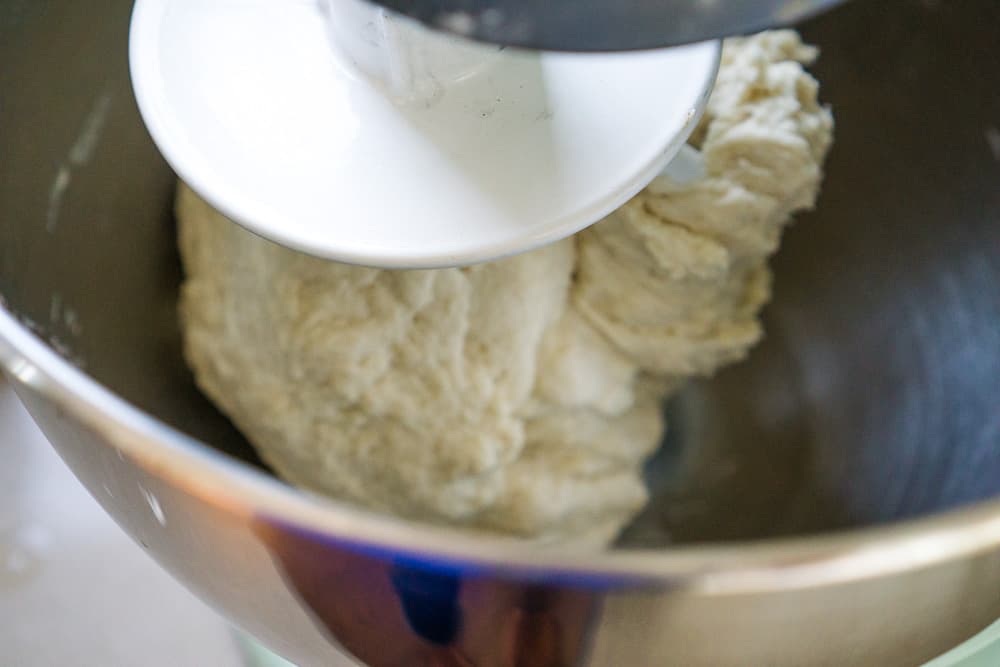
Once the dough has the right level of moisture, it’s time to knead. Keep in mind that we need to do this on the lowest setting and it will take a little bit of time. Kneading bread dough is not like mixing up a cake. We’re going to be here for a while. Set a timer and stick to it so you don’t rush the process.
Aucma Stand Mixer,6.5-QT 660W 6-Speed Tilt-Head Food Mixer, Kitchen Electric Mixer with Dough Hook, Wire Whip & Beater (6.5QT, Silver)Easy Stand Mixer Dough Recipes: Bagels, Rolls, and Sweet Treats (Your Daily Homemade Bread Book 2)Stand Mixer CWIIM 8.5Qt 660W mixers kitchen electric stand mixer 6+P Speed stand up mixer with Dough Hook, Flat Beater, Whisk, Splash Guard, for dough mixer Baking Bread Cake Cookie Salad Egg (White)No Stress Stand Mixer Bread Recipes for Beginners: Simple Ingredients Baking Guide with 10 Quick and Easy Homemade Bread Recipes Using Your Stand Mixer and its AttachmentsDanish Dough Whisk – Bread Whisk Set of 3 pieces, Bread Making Tools and Supplies, Sourdough Bread Whisk, Dutch Whisk for Dough, With Dough Scraper Bread Cutter, Bread Lame Dough Scoring Tool, BladesThe Ultimate kitchenaid Stand Mixer Recipe Book: A Complete Cookbook For Your Stand Mixer To Make Ice Cream, Bread, Smoothies, Desserts and Beyond


So let the machine knead for five minutes on the lowest setting, then turn it off and give it a five-minute rest. You may notice that the top of the stand mixer feels very warm. This is normal, and a sign that the motor needs a break. After the five-minute rest, start it back up again for another five minutes on low. Now it has been kneading for a total of five minutes. We can start checking the dough to see if it is ready.
How to Tell if Dough is Kneaded Enough
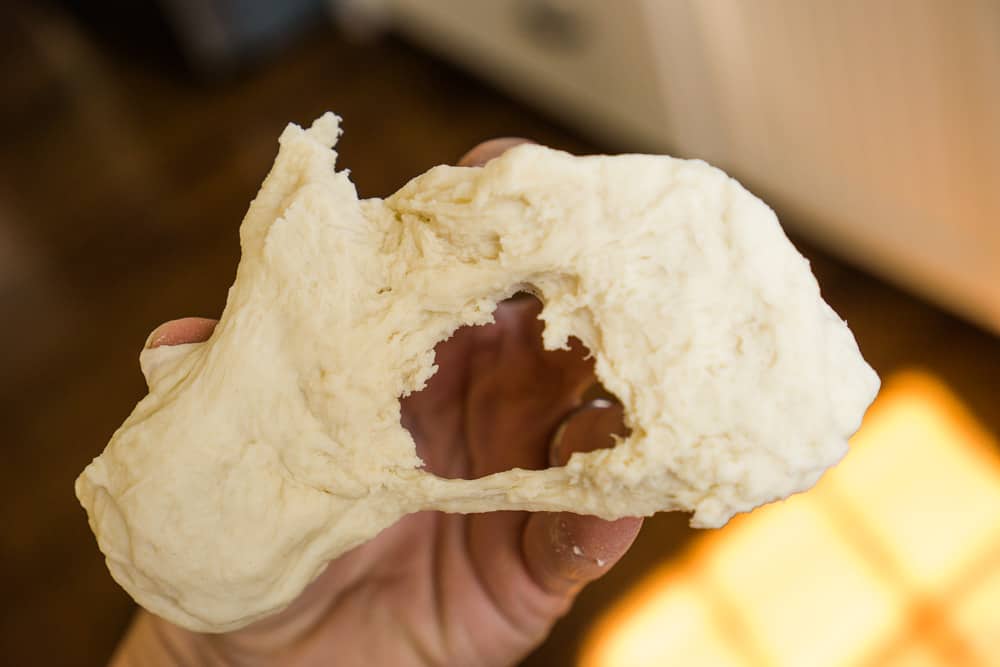
The best way to see if the bread has been kneaded adequately is to check for “windows”. These are areas in bread dough that are translucent when stretched out. To check for them, you remove a golf-ball-sized piece of dough and try to stretch it out. If it immediately tears, the gluten is not developed and it needs more kneading time. If it stretches easily into a thin layer, this is a window, and it means that the dough has been kneaded enough.
(There are exceptions to this rule of course. Very wet doughs, or doughs with a very long rise, will not always form windows and they don’t need to, because of their very long rise times. This is the principle behind some artisan bread recipes and high-hydration pizza dough.)

You can’t necessarily expect the dough to be ready after ten minutes of kneading time. Most of the time it will require a few more five-minute sessions. Just make sure you are letting the mixer rest for five minutes, then turning it on low for another five minutes,
The Dough-Rising Stage
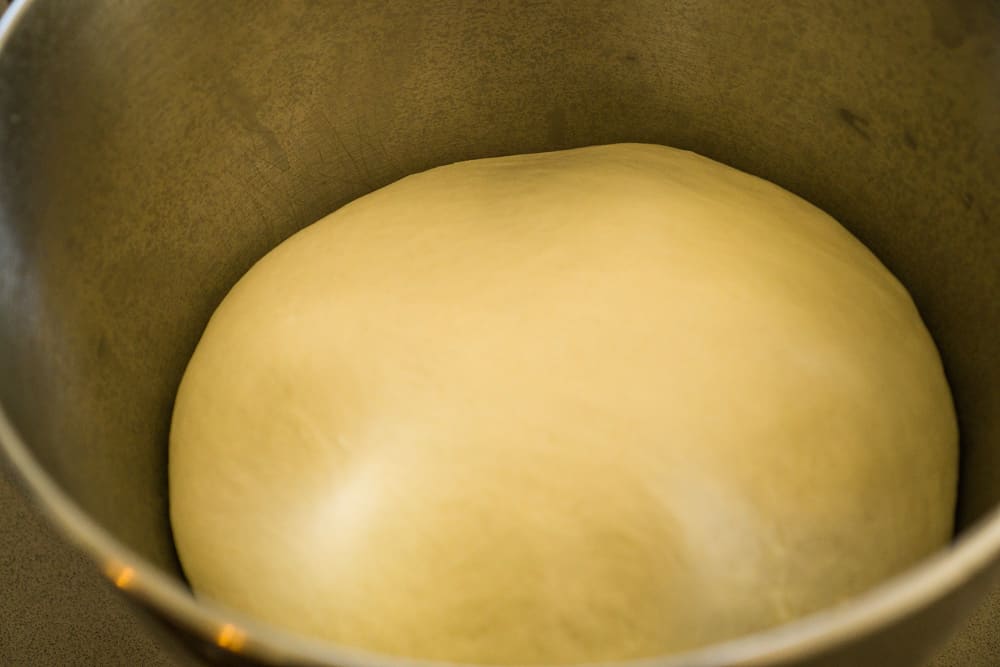
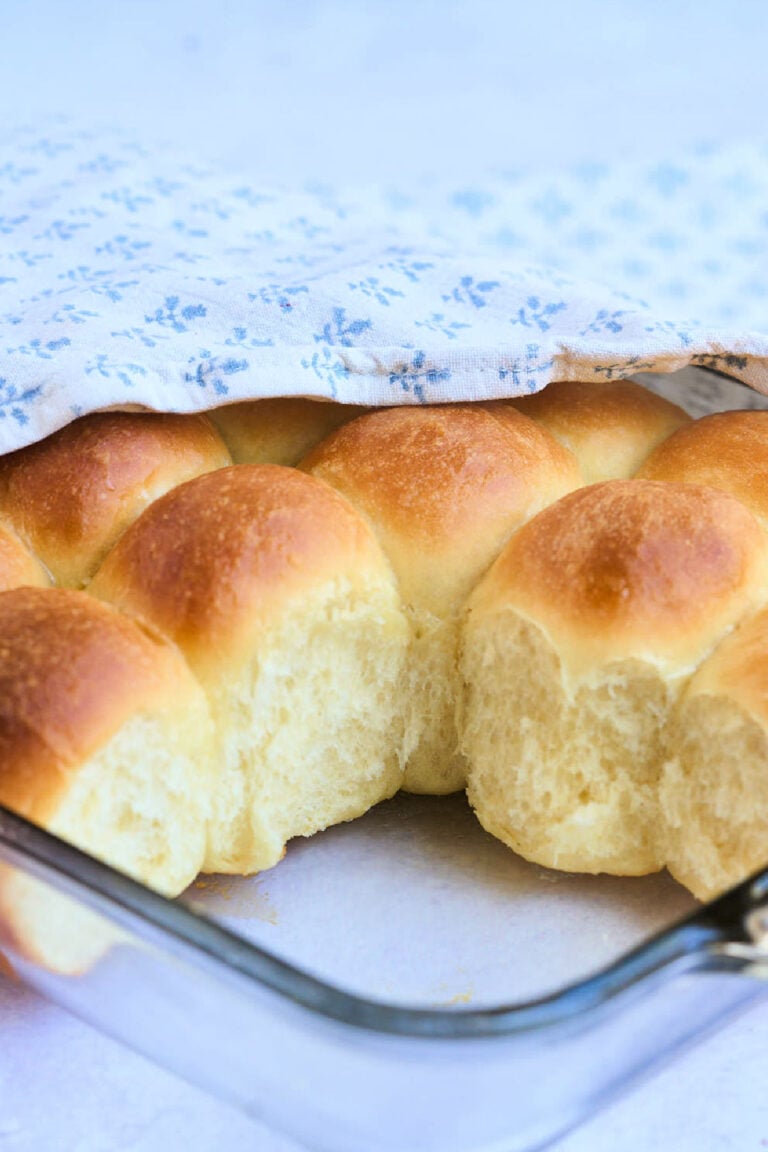
Once you have kneaded enough that you see windows, it is time to move to the bulk dough rise stage. This can be done in the same bowl that the stand mixer used. Just quickly wash it out and coat it lightly with vegetable oil. A cooking spray works best. Gently shape the dough into a ball and place it into the clean bowl. You need to cover it either with a damp tea towel or with plastic wrap and allow it to rise in a warm place until doubled in size. This can also be done overnight in the fridge.
From there, you simply proceed with the rest of the recipe such as shaping, the final rise, and baking.
Step-by-step Bread Dough in a Stand Mixer
- Add the ingredients, mix them, and check to see if the dough is too dry or too wet.
- Knead the dough on the lowest setting. Knead for five minutes, let the machine rest for five minutes, and continue this process until windows have formed in the dough.
- Shape dough into a ball and place in a clean bowl to rise until doubled in bulk.
- Proceed with the rest of the recipe to shape, proof, and bake.
You Don’t Need a Bread Machine
So don’t feel limited by the fact that you don’t have a bread machine. You can bake bread consistently using your stand mixer as long as you keep it low and give the machine a break. I made bread with only a stand mixer for years and it was fine.
That being said, a bread machine is not expensive and makes the process so simple. I never recommend baking in the machine, so a very basic model is fine. It is completely worth it just for kneading and rising. They are also readily available at yard sales and thrift shops.
Substitutions and Alternatives
- Using a hand mixer: While a hand mixer with dough hooks can be used for small batches of dough, it may not be powerful enough for larger quantities or stiffer dough. For better results, consider using a stand mixer or kneading by hand.
- Alternative kneading techniques: If you prefer not to use a stand mixer, try the French fold technique. This involves folding and stretching the dough on a work surface, which can be more gentle and effective for gluten development. Another method is the stretch and fold technique, which is particularly useful for wetter doughs.
- Different types of dough hooks: Stand mixers come with different types of dough hooks. A C-shaped hook is common and works well for most doughs. However, a spiral hook can be more effective for larger batches or denser doughs, ensuring even kneading throughout.
Troubleshooting and Help
While a food processor can mix dough, it’s not ideal for kneading yeast dough due to its metal blade. The dough can overheat, and the processor might not handle the stiffness of bread dough well. A stand mixer with a compatible dough hook, like a Kitchenaid mixer, is better suited for the kneading process.
The best way to check if your dough is kneaded enough is by performing the windowpane test. Take a small piece of dough and stretch it gently. If it forms a thin, translucent window without tearing, the gluten development is sufficient. If it tears, continue kneading.
If your dough is too sticky, you can add a little flour. Add a teaspoon at a time while the mixer is running at low speed. Conversely, if the dough is too dry, add a little water. Adjust gradually until the dough forms a smooth ball and clears the sides of the mixing bowl.


Hi
I’m new to making bread. I have a stand mixer and the whole dough clings to the kneading hook. Is this what it’s supposed to do, if so how can it be kneading as it’s just spinning around?? I guess I need photos or a video that shows what the dough is suppose to looks like at all the stages. Is there such a thing?
Claudette
hey claudette, it should form a ball that’s sort of being squished and pressed by the machine. if it doesn’t, take it off and sort of stick it on the bottom on the bowl. to be hones,t this is why I prefer a bread machine for kneading SO much easier! 🙂
I have a kitchen aid mixer when kneading dough the unlocks from the bottom and bowl flies out of the base. It’s very dangerous especially if someone is not watching. I’m disgusted when my machine. Help if anyone has a solution with my problem. I had different brand machine I didn’t experienced this problem.
that sounnds terrible! i would contact them and ask for a replacement. I use a bosch now but used a kitchenaid for years and never had that problem.
It is clear you did not read the recommendations on the KitchenAid site when it comes to kneading dough. On the KitchenAid site: “It is important to use only Speed 2, never higher or lower when kneading yeast dough.”
Was there ever a answer given to the dilemma the ladies gave about their dough initially forming a ball then softening at the bottom of the bowl? This is my biggest challenge with my kitchen aid. When I keep adding flour to reform my dough it ends up dry.
Please help!
hi karen i’ve never experienced this! i’m so sorry!
Super interesting- thanks! For some reason I thought a stand mixer was a step up from a bread machine so when my old bread machine died I didn’t replace it. Unfortunately since then my bread has been super crumbly, and I guessing it is because of under kneading the dough. I have heard that over working the dough can also cause crumbly loaves and some bread machines can have that result. But I kneaded for longer today and waited until I got windows. (~three 5 min kneads). The loaf was less crumbly without me adding any gluten which is great progress.
I have never made bread before. My daughter gave me a recipe for Challah bread.
I made it in a stand mixer. The taste was very good, but the texture is a little coarse. When I make it again, should I knead it more in the mixer?
Yes definitely!!! 🙂
i have found it faster if i take a store bought bread and soak it in water then when soggy put it in the mixer to blend and it forms like a dough so then i remove it and pour it into a form and bake in the oven and so thereby in essence i have made bread but avoided the hassle of making the dough from scratch measuring flour wateer etc since i used a bread that was already professionally made and they already put whatever ingredients were necessary i don’t have to go to the trouble as they say work smart not hard
Or you could eat the store bought bread as they say work smart not hard
WT actual F, you are joking, Right?
This is very interesting. I have a KitchenAid. In their instructions for Kneading it states, “Kneading in a mixer for 2 minutes is very efficient and is equivalent to kneading 10-12 minutes by hand.
It will be necessary to adjust the kneading times in your favorite recipes, to avoid over kneading.” I have not necessarily held to 2 minutes, but found much less time has worked well for most bread recipes.
I agree, these times are way off, or they are meant for much lower powered mixers. Kneeding for 10+ minutes in a kitchenaid will lead to a crust like a motorcycle helmet and a dry, rubbery texture underneath.
Thank you. I wanted to try a brioche type of bread and was stressing out because if the long kneading time. My mixer can’t handle it. Never thought uh can just ‘stop and go’ every 5 mins!
glad it was helpful Katy!
I sent you an email, but just in case…
I have a situation… when I’ve kneaded dough in my mixer, this has happened to me: first the dough forms a ball (like after one or two minutes), and then it starts to stick to the bowl and look wetter. What I’ve done up to now is take it out of the bowl and knead by hand adding more flour. The hand kneading I do is normally no higher than 10 minutes. So far, I haven’t made a bread loaf I have loved; they have turned out dense. I thought that the dough looking wet again after quickly forming a ball meant I was overworking it. After reading your article, I see that’s not the case. Could it be my bread loaves are turning dense because I didn’t knead enough, and the dough just needed a little more flour to form a ball in the mixer? The window thingy does help, but I’ve been afraid to knead the dough in the mixer because of what happened before. Can you give me words of advice, or tell me why the dough looks wet after forming a ball after 2 minutes? I’d really appreciate it.
Hi Adriana, just sent you an email :). But yes, just add a little flour to the mixer and kneading in there
I have had the same problem. Starts to form a ball then it seems to turn moist and sticky again after a little while. Thats when I have added flour but know that it’s not going to be as light. Or my dough rolls up on the hook and have to stop it and scrape off hook and mix again. Sure would like for you to share that email with the test of us or repeat your thoughts here.
I’m having the same problem… the dough clings to the hook then seems to get very loose and wet and pools at the bottom of the mixing bowl. I add a TBSP of flour and it clings to the hook again but then it loosens up again and the dough pools at the bottom of the mixer. I add flour and it just keeps repeating. I don’t know if I’m over mixing. After adding flour 3 times, I generally stop and knead by hand. The baked bread comes out ok but I don’t know why this happens. Thanks for any suggestions!
I always combine my ingredients on 2 (but not a kitchen aid brand mixer) with the hook. Then I stop the mixer and make sure all the flour is getting in there. You can even fold the extras in my hand like a pouch, just get it in the ball. Once it forms a craggy ball I turn my mixer up to 4 and keep scraping the sides and bottom of the mixer bowl and helping the mix up.
Do not be fast to add addition flour and water. Wait as long as possible to make that choice. Use the window pane test often to check ur knead. If you check your bread like this, it will not matter what speed or how long you do your kneed at.
My dough does the exact same thing. Pulls away from the edges after 2-3 mins. Then sticks to the sides if I continue to keep kneading. What should I do?
I use a stand mixer each time I make any bread. I use higher speed than listed on direction, I make it fast enough to give the dough a good work out. If you check with the window pane test, you will know when your dough is kneaded regardless of the amount of time our speed you have used.
Your blog always makes me so hungry! Delicious!!!