Simple No-Knead Bread (No Dutch Oven Needed!)
All you need are four basic ingredients to make this easy, hands-off loaf of bread. A few minutes of mixing + a long rise make this recipe foolproof. This recipe for no-knead bread needs no stand mixer, no special tools, and is shockingly easy. If you have a bowl and a spoon, you can do this.
The secret to this easy loaf of bread is the long rise at room temperature. Mix up the dough in the morning and let it sit all day before shaping and rising for one hour more. This wet dough and the long rise combine to develop proteins and gluten without kneading.
To be honest, the science of it all isn’t terribly important. All you need to know is how to make it. Let’s get started.
Ingredients and Tools You’ll Need
I highly recommend buying a one-pound block of instant yeast and storing it in a mason jar in your freezer. It will last a long time and is easier to measure out.

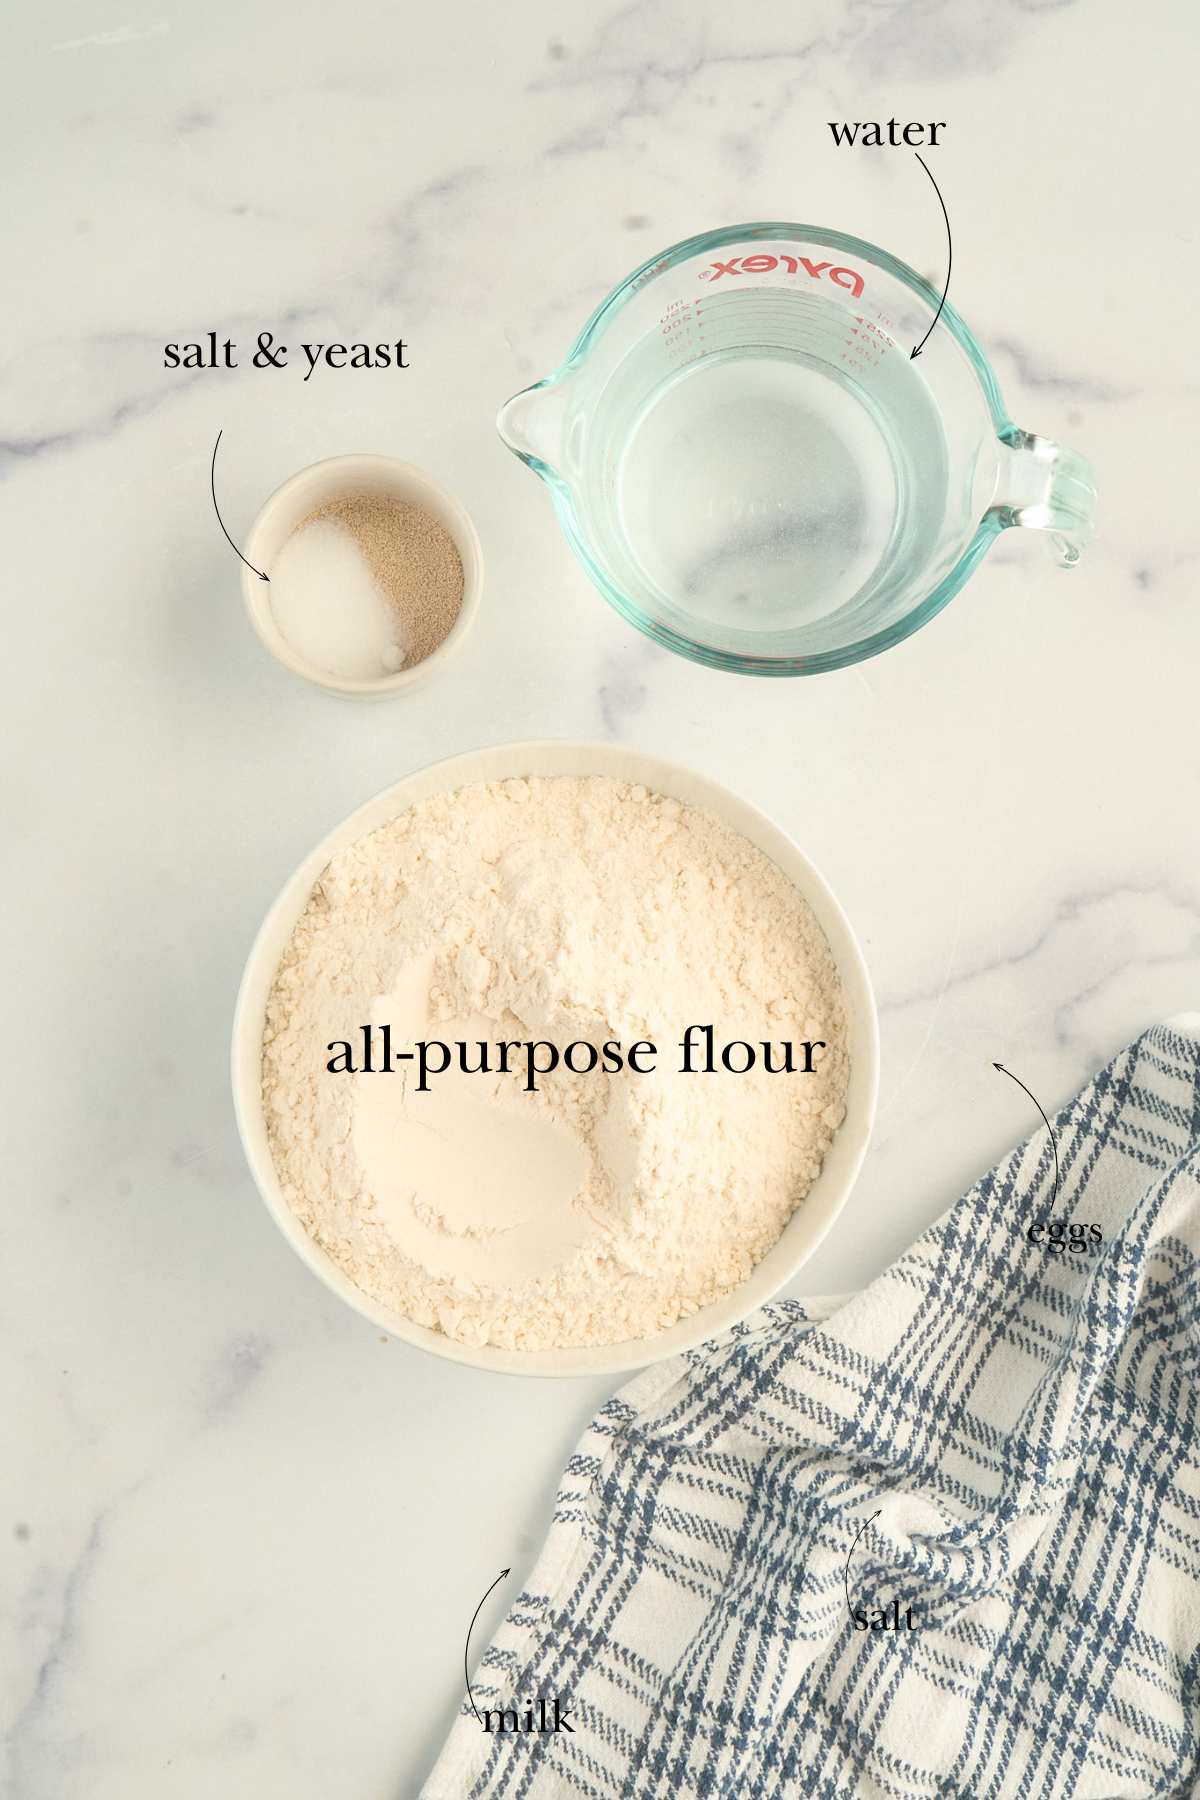
- 3 ¼ cups all-purpose flour
- 1 cup plus 3 tablespoons water (add more by the teaspoon if dough is too dry)
- 1 ½ teaspoons salt
- 1 teaspoon instant or active dry yeast
How to Make Basic No-Knead Bread
This no-knead bread uses an easy steam method, pouring water onto a hot baking sheet, to mimic a Dutch oven. If you have a Dutch oven, by all means use that!
Mix the dough
Start by stirring together the flour, salt, and yeast in a large mixing bowl. Add the water and use a rubber spatula or wooden spoon to mix until a shaggy, rough dough forms. It should look messy and sticky, but it should come together into one ball. If it feels too dry or there’s flour that won’t mix in, add a teaspoon or two of water and stir again.
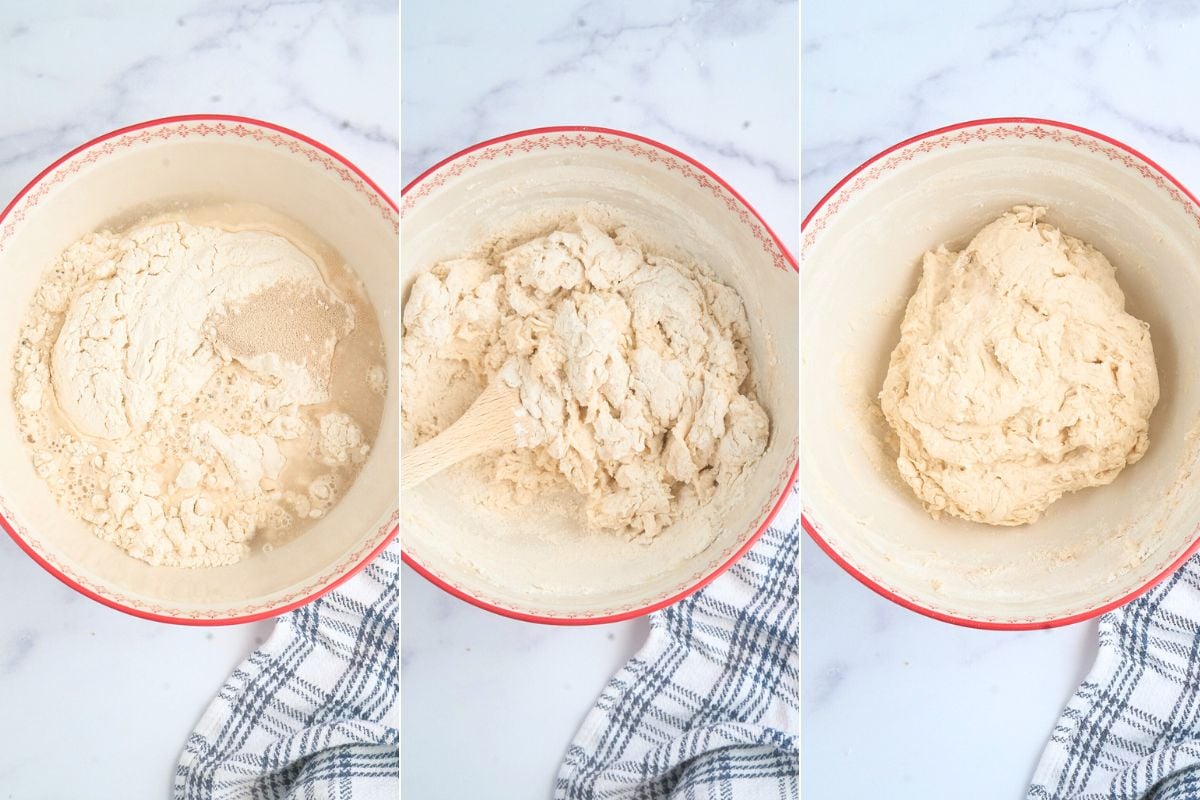
No need to knead, just make sure everything is incorporated and the dough is holding together.
Let it rise overnight
Cover the bowl tightly with plastic wrap and leave it at room temperature for about 10 to 12 hours. Overnight is perfect.
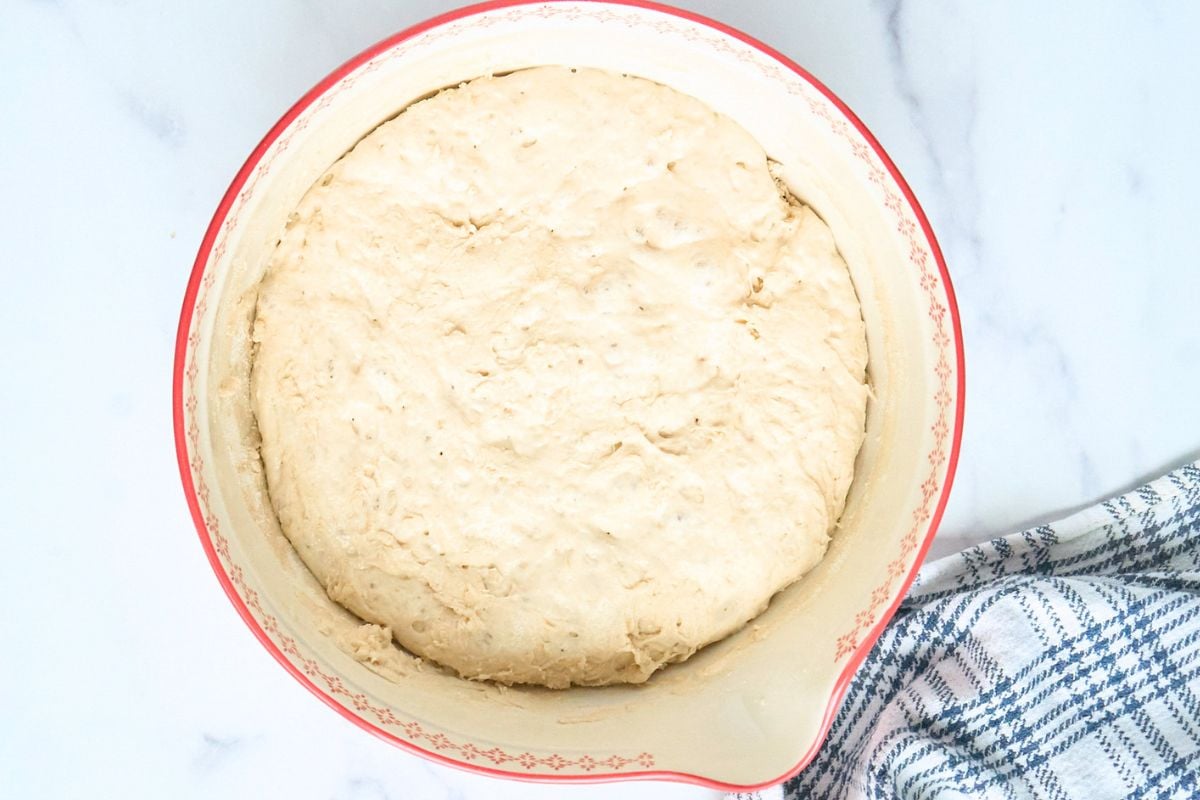
When it’s ready, the dough will be puffed up, jiggly, and full of bubbles. If you poke it gently, your finger will leave an indentation that slowly fills in. If your kitchen is chilly, give it a little more time. This slow rise is doing all the work for you.
Shape the dough
Line a baking sheet with parchment paper or spray it well with cooking spray. Gently turn the dough out onto the counter or scoop it directly from the bowl. Tuck the edges under to shape it into a rough ball, no need to overthink it.
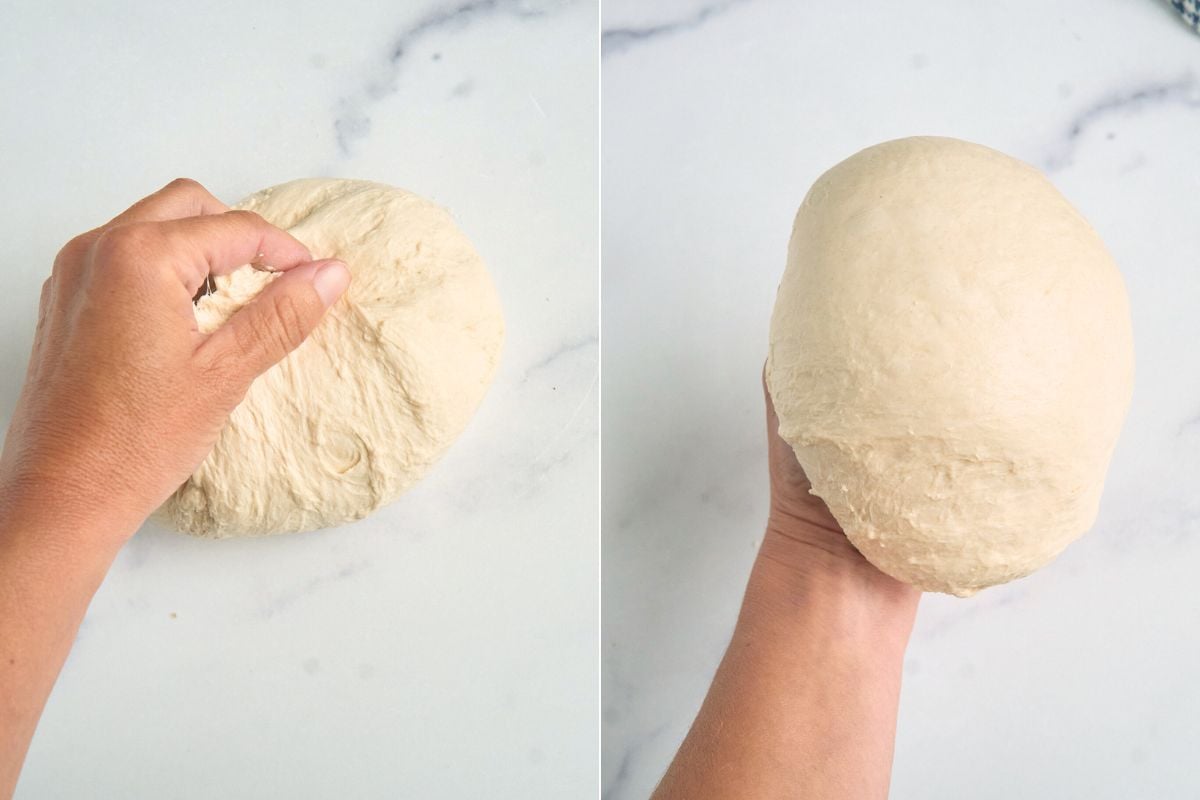
Try not to deflate it too much while shaping. Just aim for a smooth-ish top and a round shape that holds together.
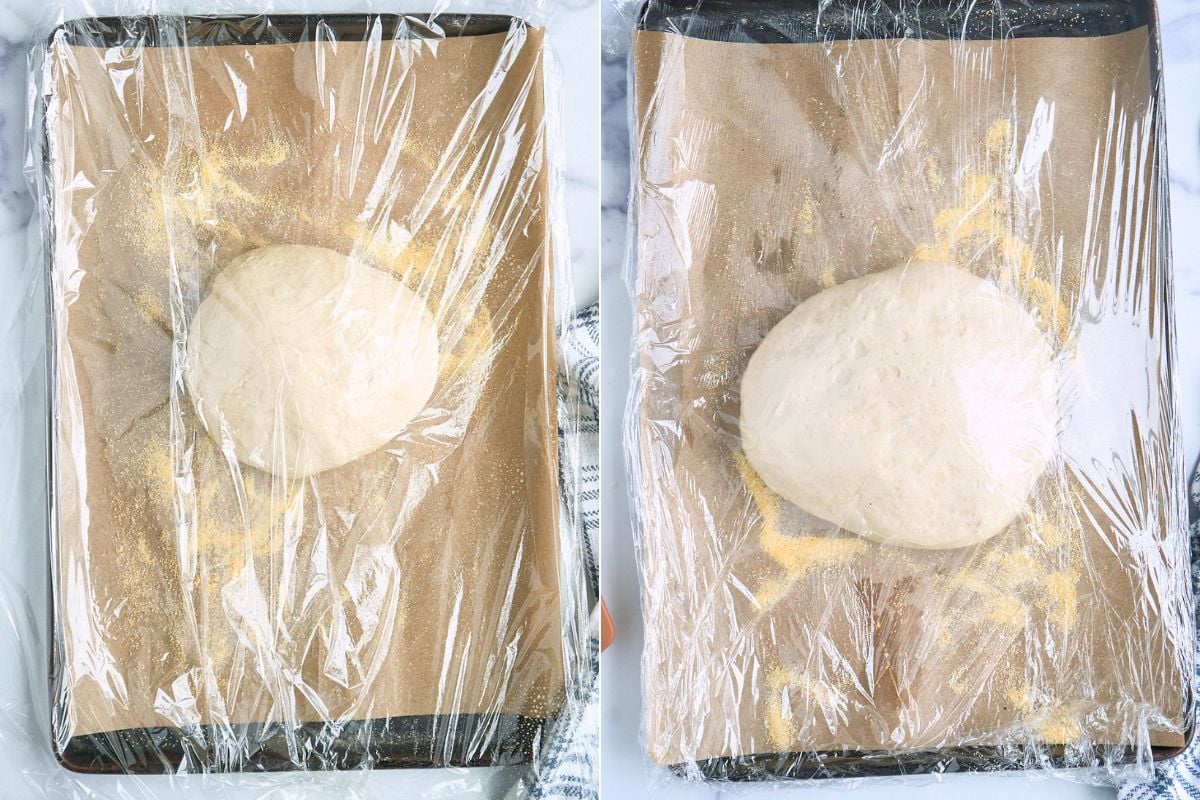
Let it proof again and prep the oven
Place the covered dough in a warm, draft-free spot for about 45 minutes. A turned-off oven with the light on or a bowl of hot water inside works well. Cover the dough loosely with plastic wrap that’s been sprayed with nonstick spray so it doesn’t stick to the surface as it rises.
The dough should look puffier and feel soft to the touch, though it doesn’t need to double in size.
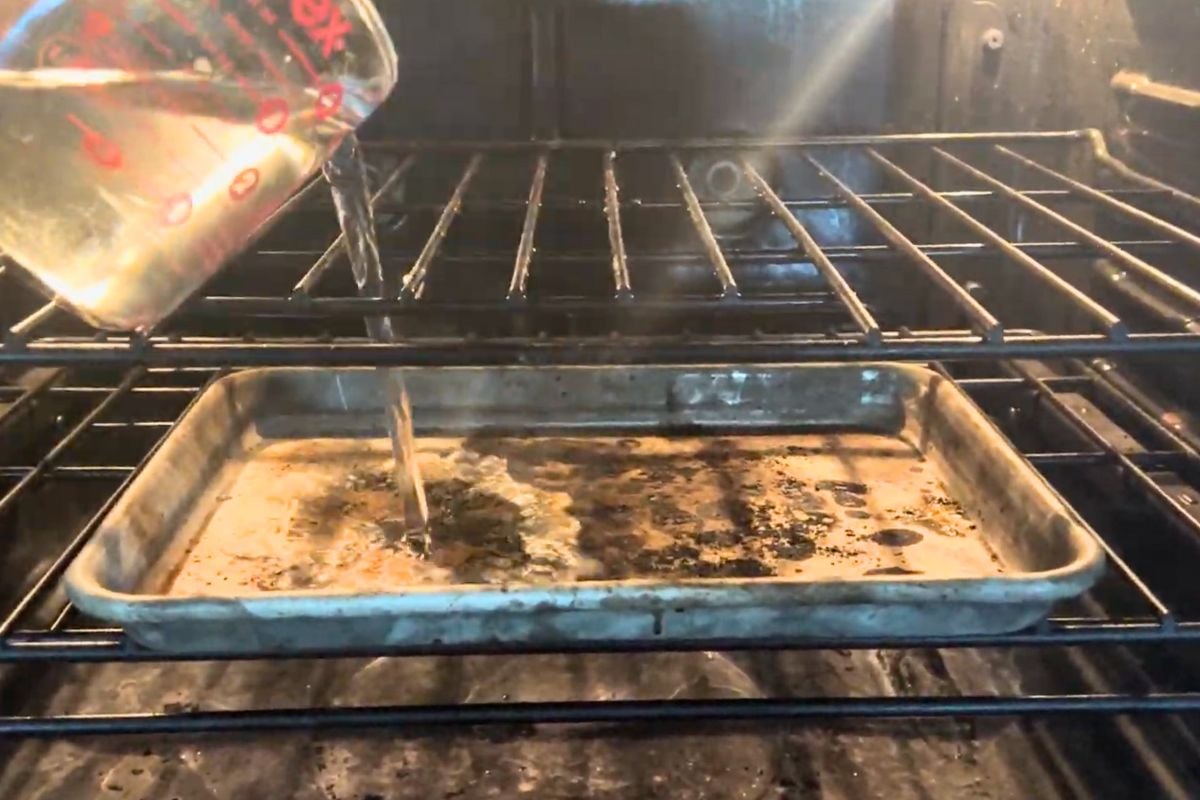
While the dough is proofing, place an empty baking sheet on the bottom rack of your oven. This will be your steam tray, and it needs to be hot before baking.
Preheat the oven to 425 degrees. (Not with the dough inside!)
Dust with. flour and score
Use a very sharp knife or bread lame to slash an X on top, about ¼ inch deep.
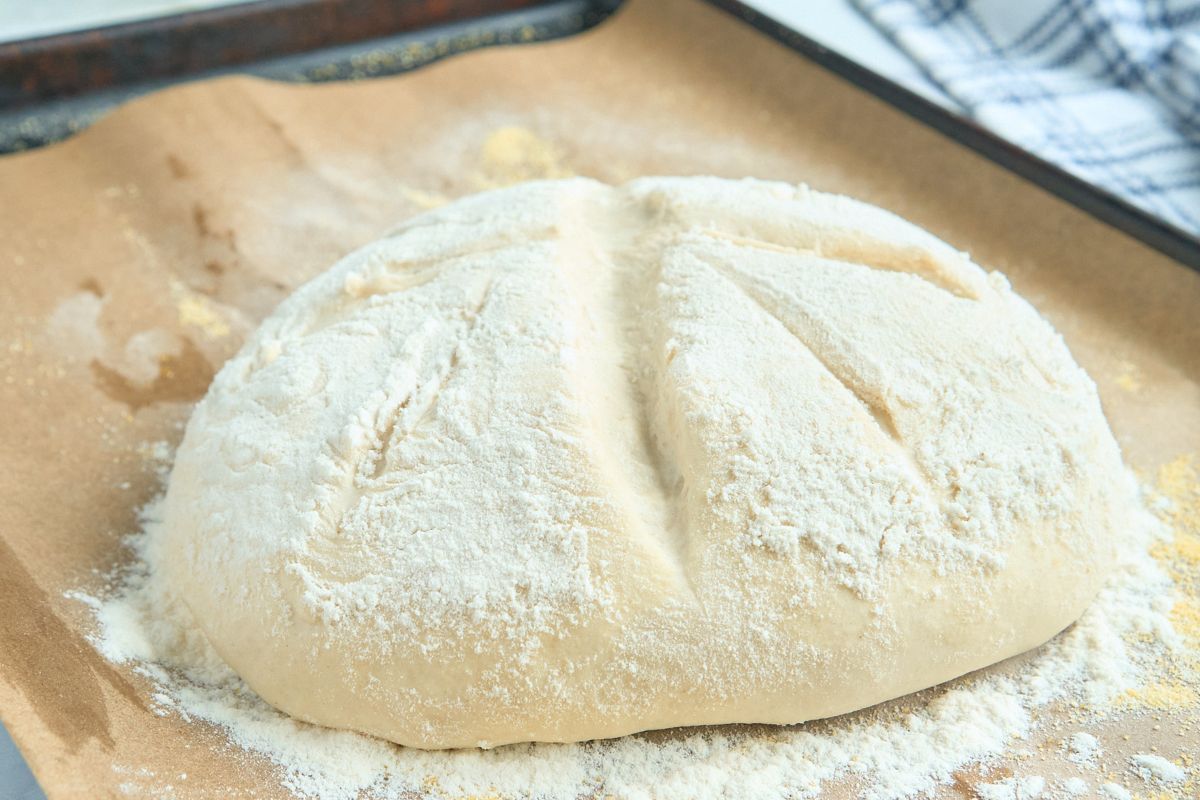
You can try a heart, zig-zag, or initial if you’re feeling creative.
Bake with steam
Carefully pour about 1 cup of hot water into the hot baking sheet in the oven. This creates steam that helps the bread rise quickly and develop a crusty exterior, similar to what you’d get using a Dutch oven. Quickly put the loaf in and shut the door.
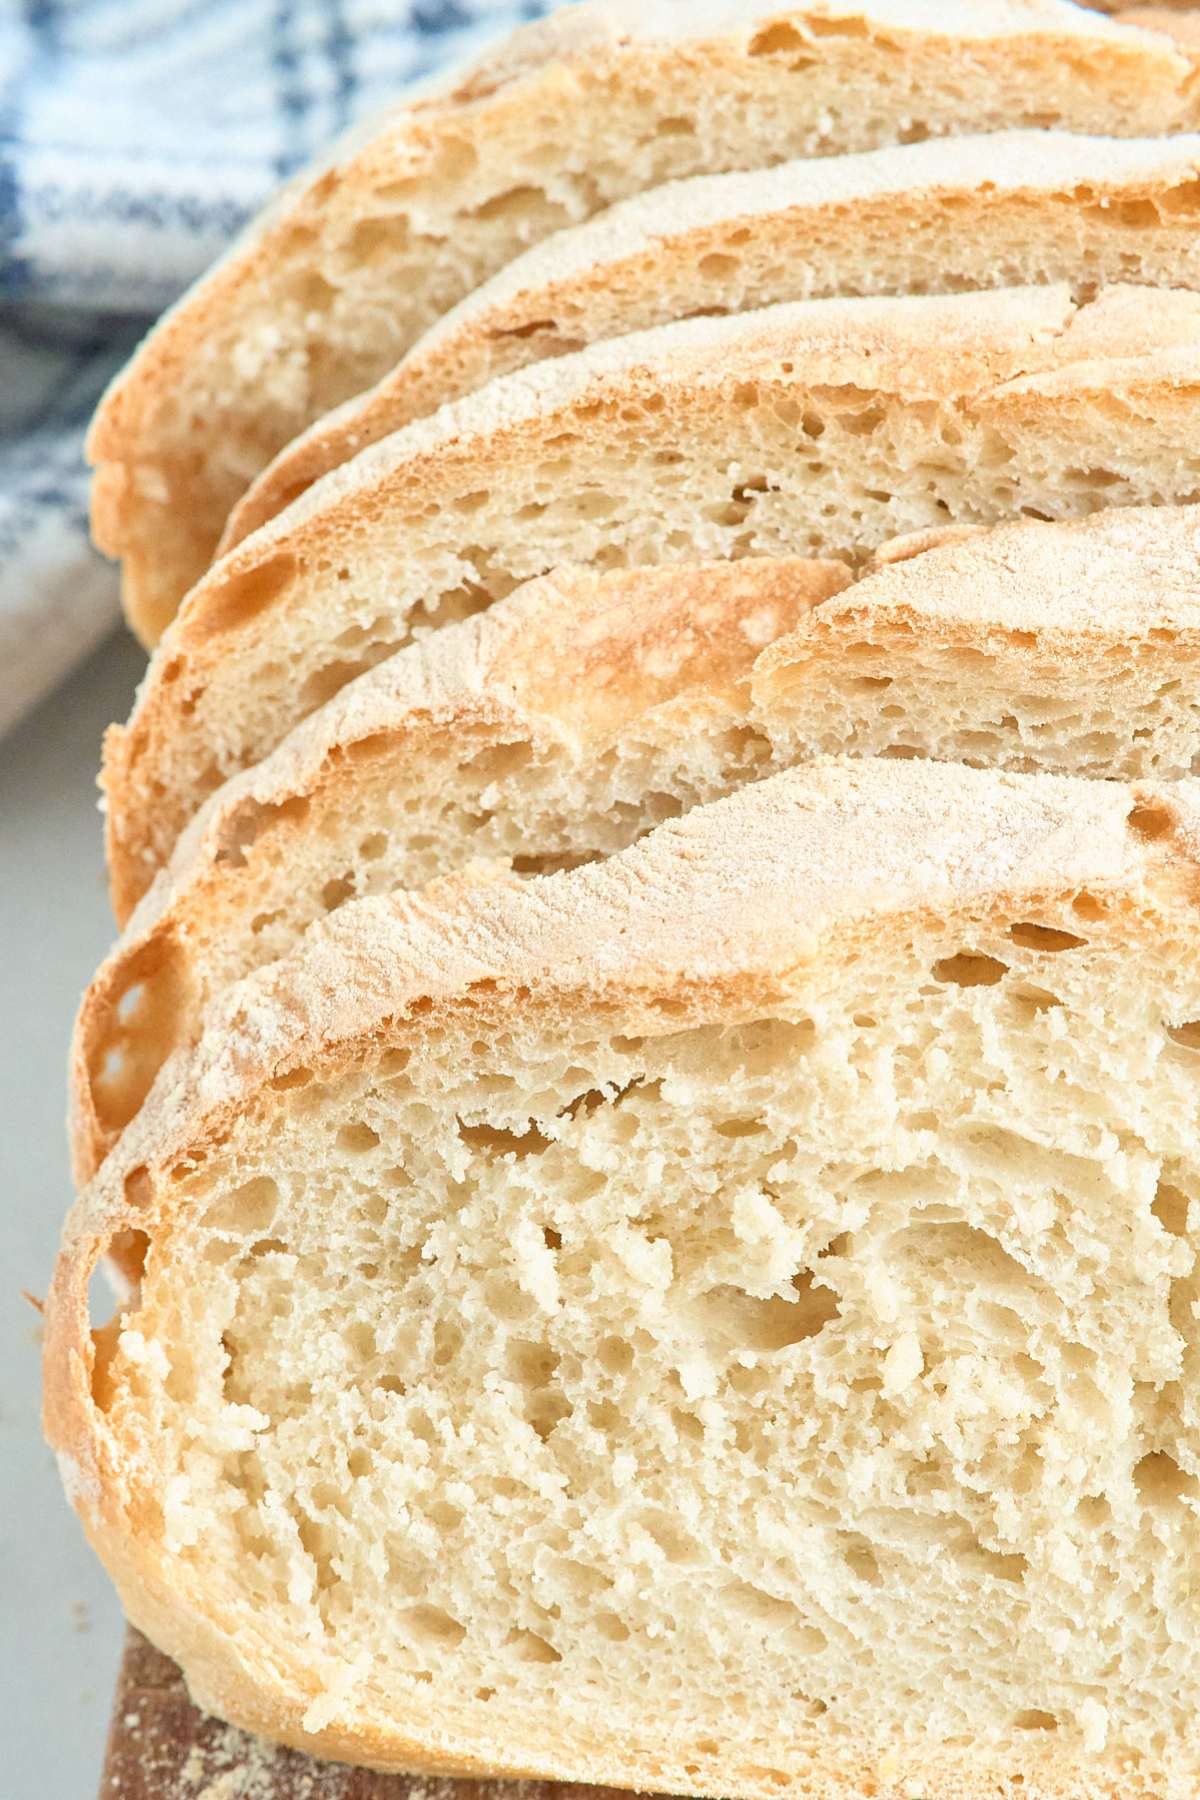
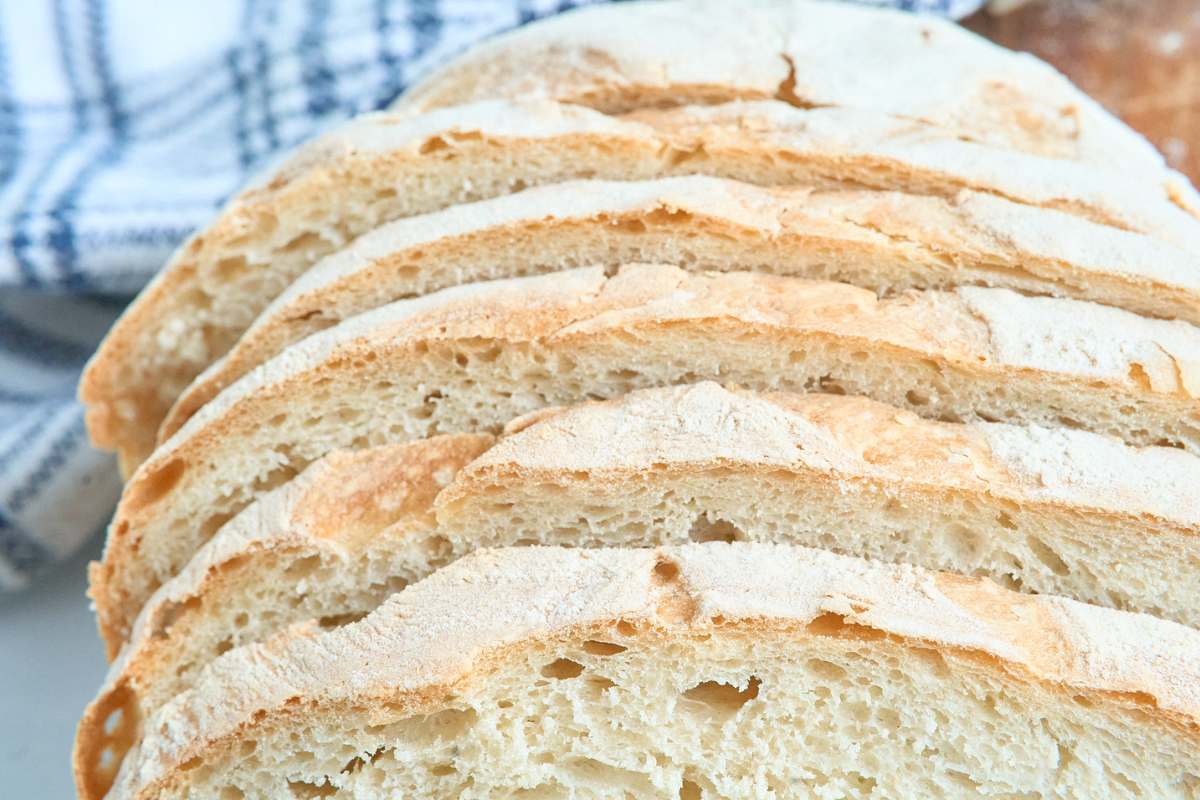
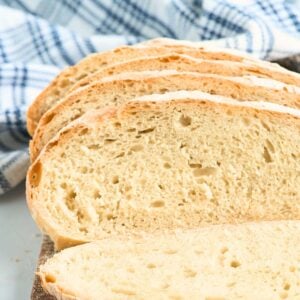
The finished loaf should be a deep golden brown, and if you tap it, it should sound hollow. If you have a thermometer, you’re looking for an internal temperature of about 200°F. If the crust starts browning too fast, you can tent it loosely with foil toward the end.
Let it cool
Transfer the baked loaf to a wire rack and let it cool for at least 15 minutes before slicing. This helps the inside finish setting and keeps the crumb from getting gummy.
Printable Recipe
Basic No-Knead Bread (No Dutch Oven!)
Equipment
- 1 Mixing bowl
- 1 Rubber spatula
- 1 Baking Sheet
- 1 Parchment paper or cooking spray
- 1 Plastic Wrap
Ingredients
- 3 ¼ cups all-purpose flour
- 1 cup + 3 tablespoons water
- 1 ½ teaspoons salt
- 1 teaspoon instant or active dry yeast
Save This Recipe
You'll join my email list which you will love. And if you don't, unsubscribe in one click. ❤️
Instructions
- Mix. Mix flour, salt, yeast, and water in a large bowl until a shaggy dough forms. Add more water if needed to bring it together.
- First Rise. Cover the bowl tightly with plastic wrap. Let rise at room temperature for 10–12 hours, until puffy and doubled.
- Shape. Line a baking sheet or spray it with cooking spray. Gently shape the dough into a ball and place it on the sheet. Slash the top with a sharp knife.
- Second Rise. Cover with greased plastic wrap and let rise in a warm place for 45 minutes, until puffy.
- Bake. Preheat the oven to 425°F. Bake the loaf for 25-35 minutes, until deep golden brown and the internal temperature reaches 200°F.
- Cool. Transfer to a wire rack and let cool at least 15 minutes before slicing.
Video
Notes
Nutrition


Loved the taste and texture. I was just gifted a Dutch oven but haven’t tried it yet. Can l use it for this bread. If so, how do l adapt and use it?
Hi Georgia,
Yes, this is absolutely perfect in a Dutch oven. I just include the tips for people who don’t have one. What you’ll want to do is skip the whole thing about the extra baking dish and pouring the water on top. Simply put a piece of parchment paper on the bottom of your Dutch oven. Bake for about 20 minutes with the lid on, and then remove the lid and bake it until it’s browned.
I just started making homemade bread, this being my first recipe. My family loves it! I was wondering, can I take this same recipe and bake it in a loaf pan?
hi debra, search my site for no-knead sandwich bread, that will be a better size. if you make this one in a loaf pan it will be a little short.
how do you shape the dough?
after 10 hours, the dough was incredibly sticky and hard to get out of the bowl
hello ed, it will be a ittle sticky, i usually lightly oil my hands to shape it.
Thanks for the recipe, I was looking for something simple to try and I like that this doesn’t require a dutch oven like a lot of no knead recipes seem to. I think I added slightly more water than I needed to because it was fairly sticky when I went to shape it and didn’t turn out as pretty, but it still baked beautifully and made a great loaf of bread.
I’m so glad Laura! Often the stickier loaves have a great texture when they’re done, even if they’re hard to work with.
Thank you so much for sharing this amazing recipe! Will surely have this again! It’s really easy to make and it tasted so delicious! Highly recommended!
htanks alyssa so happy you enjoyed it 🙂