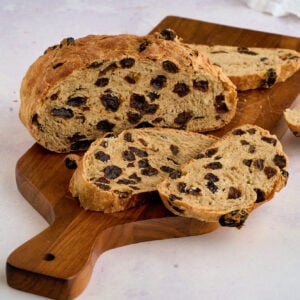
How to Make No-Knead Cinnamon Raisin Bread: Easy and Delicious Recipe
This No-Knead Cinnamon Raisin Bread is perfect for busy mornings. The sweet, cinnamon-spiced raisins make each slice a treat, especially when toasted with butter.
This recipe needs just a few minutes of hands-on time. Just mix the ingredients, let it rise overnight, and bake! You’ll love it toasted with butter in the morning.
No-Knead Cinnamon Raisin Bread
Equipment
- Mixing bowl
- Plastic Wrap
- Dutch oven (optional)
Ingredients
- 3 ¼ cups plus 2 tablespoons all-purpose flour (425 grams)
- 1 ¼ cup plus 3 tablespoons water
- 1 ¼ teaspoons salt
- 3 tablespoons sugar
- 1 teaspoon yeast (instant or active dry)
- 1 cup raisins (soaked in water)
- 1 ½ teaspoon cinnamon
Save This Recipe
You'll join my email list which you will love. And if you don't, unsubscribe in one click. ❤️
Instructions
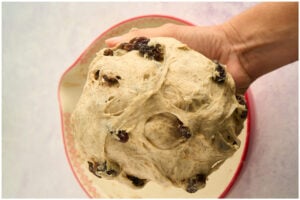
- Mix the ingredients. In a large mixing bowl, combine the flour, water, salt, sugar, cinnamon, and raisins. Then, mix everything together at once to make sure the cinnamon and raisins disperse evenly.
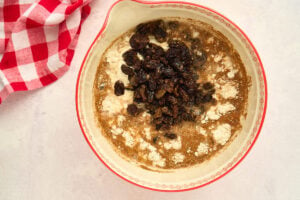
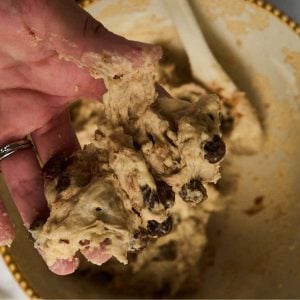
- Check the consistency of the dough. Use a rubber spatula to incorporate any dry areas of flour. The dough should form a shaggy ball. If there are any dry bits, add a few more teaspoons of water and mix again. The dough will be sticky.

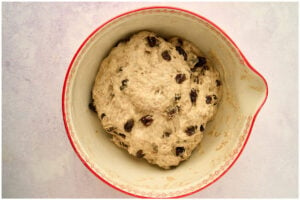
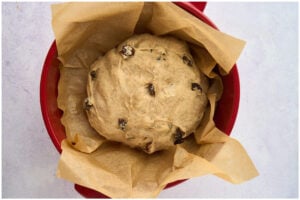
- Cover and allow to rise. Tightly cover the bowl with plastic wrap. Place it in the fridge and let it rise for 10 hours or overnight. In the morning, check if the dough has doubled in size. If not, remove it from the fridge and let it rise on the counter until it doubles.

- Shape into a ball. Line a baking sheet with parchment or spray it generously with nonstick cooking spray. Gently pick up the dough and shape it into a smooth ball by pulling from the bottom to smooth out the top. Deflate any large air bubbles that have formed. Place the dough onto the prepared baking sheet.
- Allow the dough to proof. Prepare a warm place for the second rise by briefly turning on your oven or placing a bowl of hot water inside it. Cover the dough with greased plastic wrap, ensuring it is completely covered. Let it rise in a warm place for about 45 minutes until puffy but not quite doubled in size. Towards the end of the rising time, preheat the oven to 425°F (220°C) with the rack in the center. Be sure to remove the dough first.
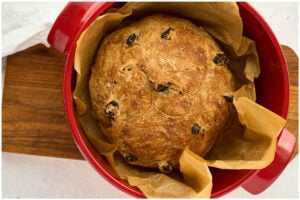
- Bake. Bake the loaf for 35-40 minutes, until deep golden brown and with an internal temperature of 200°F (93°C). Cool for an hour before slicing.
Notes
Nutrition
We absolutely love, love, LOVE this no-knead cinnamon raisin bread in our house. There’s something so comforting about the sweet cinnamon flavor and juicy raisins that makes it feel like a special treat every time I bake it. It’s one of those recipes that I keep coming back to because it’s just so easy and satisfying. Plus, it fills the kitchen with the most amazing smell, which always gets everyone excited for breakfast. Honestly, this bread is a staple in our home, especially on weekends when we want something cozy and homemade without too much fuss.


I hope you enjoy it as much as we do!
Key Ingredients and Tools
Investing in a lodge cast iron or QT Dutch oven is one of the best investments you can make for bread baking. These iron pots help create the perfect baking environment for your artisan bread.
For this recipe, a few specific tools and ingredients will make a big difference. Here are some important ones:

- Quick-Rise Yeast: This type of yeast works faster than regular yeast and can be added directly to the dough without first dissolving it in water.
- Heavy Pot with Lid: Having one will help the bread rise higher and develop a crispy crust.
- Parchment Paper: Prevents sticking and makes it easier to move the dough.
- Cinnamon: Freshly ground cinnamon provides the best flavor.
- Raisins: Soaking them before adding to the dough keeps them plump and prevents them from drawing moisture out of the bread.
These items will help you achieve the best no-knead cinnamon raisin bread results.
Here are some ingredient substitutions you can try:
- Quick-Rise Yeast: Substitute with active dry yeast, but proof it in warm water with a bit of sugar before adding.
- All-Purpose Flour: Replace with bread flour for a chewier texture.
- Whole Wheat Flour: If you’re looking for a healthier option, substitute whole wheat flour for some or all of the all-purpose flour. This will result in a denser loaf with a nuttier flavor, adding a wholesome twist to this cinnamon raisin version.
- Raisins: Use dried cranberries or chopped dried apricots for a different flavor.
- Golden Raisins or Dried Fruits: Swap out regular raisins for golden raisins or other dried fruits like chopped apricots for a different twist on this great bread recipe. The plump raisins add a burst of sweetness to every bite.
- Sugar: Honey or maple syrup can be used for a more natural sweetness.
Using these substitutions will slightly alter the recipe’s outcome, but feel free to try them and see what works best for you!
Additional Baking Tips
- For a crispier crust, try baking your loaf in a hot Dutch oven with the lid on for the first 30 minutes, then remove the lid for the remaining baking time. This technique traps steam, leading to that desirable crusty bread texture.
- When preparing to bake, make sure to place the bread on the center rack of a hot oven set to the proper oven temperature. This ensures even cooking and the best texture.
- After shaping your dough, cover it with a kitchen towel and let it rise in a warm spot. Using the oven light can help maintain a consistent temperature if your kitchen is on the cooler side.
Troubleshooting and Help
Yes, you can substitute brown sugar for regular sugar in this no-knead cinnamon raisin bread recipe. It will add a richer flavor and a slightly darker color to the bread dough. Just use the same amount as the recipe calls for.
If you don’t have a Dutch oven pot, you can use a cast iron pot or loaf pans to bake the bread. If you use a sheet pan, be sure to place a pan of water in the oven to create steam, which helps develop the crusty bread.
Using a bench scraper on a lightly floured surface is a great way to handle sticky dough. It helps to shape the dough ball without sticking to your hands. Also, using a damp towel to cover the dough during its rise can prevent it from drying out.
Give this no-knead cinnamon raisin bread a try, and enjoy a delicious, homemade treat with minimal effort. It’s perfect for breakfast or a snack; your kitchen will smell wonderful.
With a few simple steps and patience, you’ll have a delightful loaf that will become a favorite.


Easy and tasty!
Hey Vivian, Thank you so much for the kind words! I’m so glad you found it easy and tasty, that’s exactly what I was hoping for.
This recipe sounds soooo easy, will be trying it as soon as I get an answer to my questions. I do not see what step to add the yeast in and if you put the dough in a loaf pan, do you roll out and then re-roll or just take it from the bowl and fit it in the pan and let it rise the second time? Thank You Katie
hey robinn, the yeast gets added at the beginning with everything else, I’ll add that! for a loaf pan, don’t roll it flat. just gently shape it and plop it in 🙂