Truly No-Knead Sourdough Bread
Everyone knows making sourdough bread is hard, right? There’s the schedules, the weird techniques, and that hard-to-handle dough. Well, not anymore. This recipe is so hands-off and straightforward that anyone can do it! It’s truly a matter of mixing, waiting, and baking.

This bread recipe will earn a place in your rotation, whether this is your first loaf or your three hundredth.
Table of Contents
What You’ll Need
Your starter should double by four to eight hours after you feed it. If you don’t have a bubbly starter, your dough won’t rise properly and will seem dense. (Read more about how to keep your starter healthy here.)

This makes 1 loaf. If you’d like to double or triple this recipe, or use metric measurements, you can make adjustments in the recipe card at the bottom of this post.
Equipment
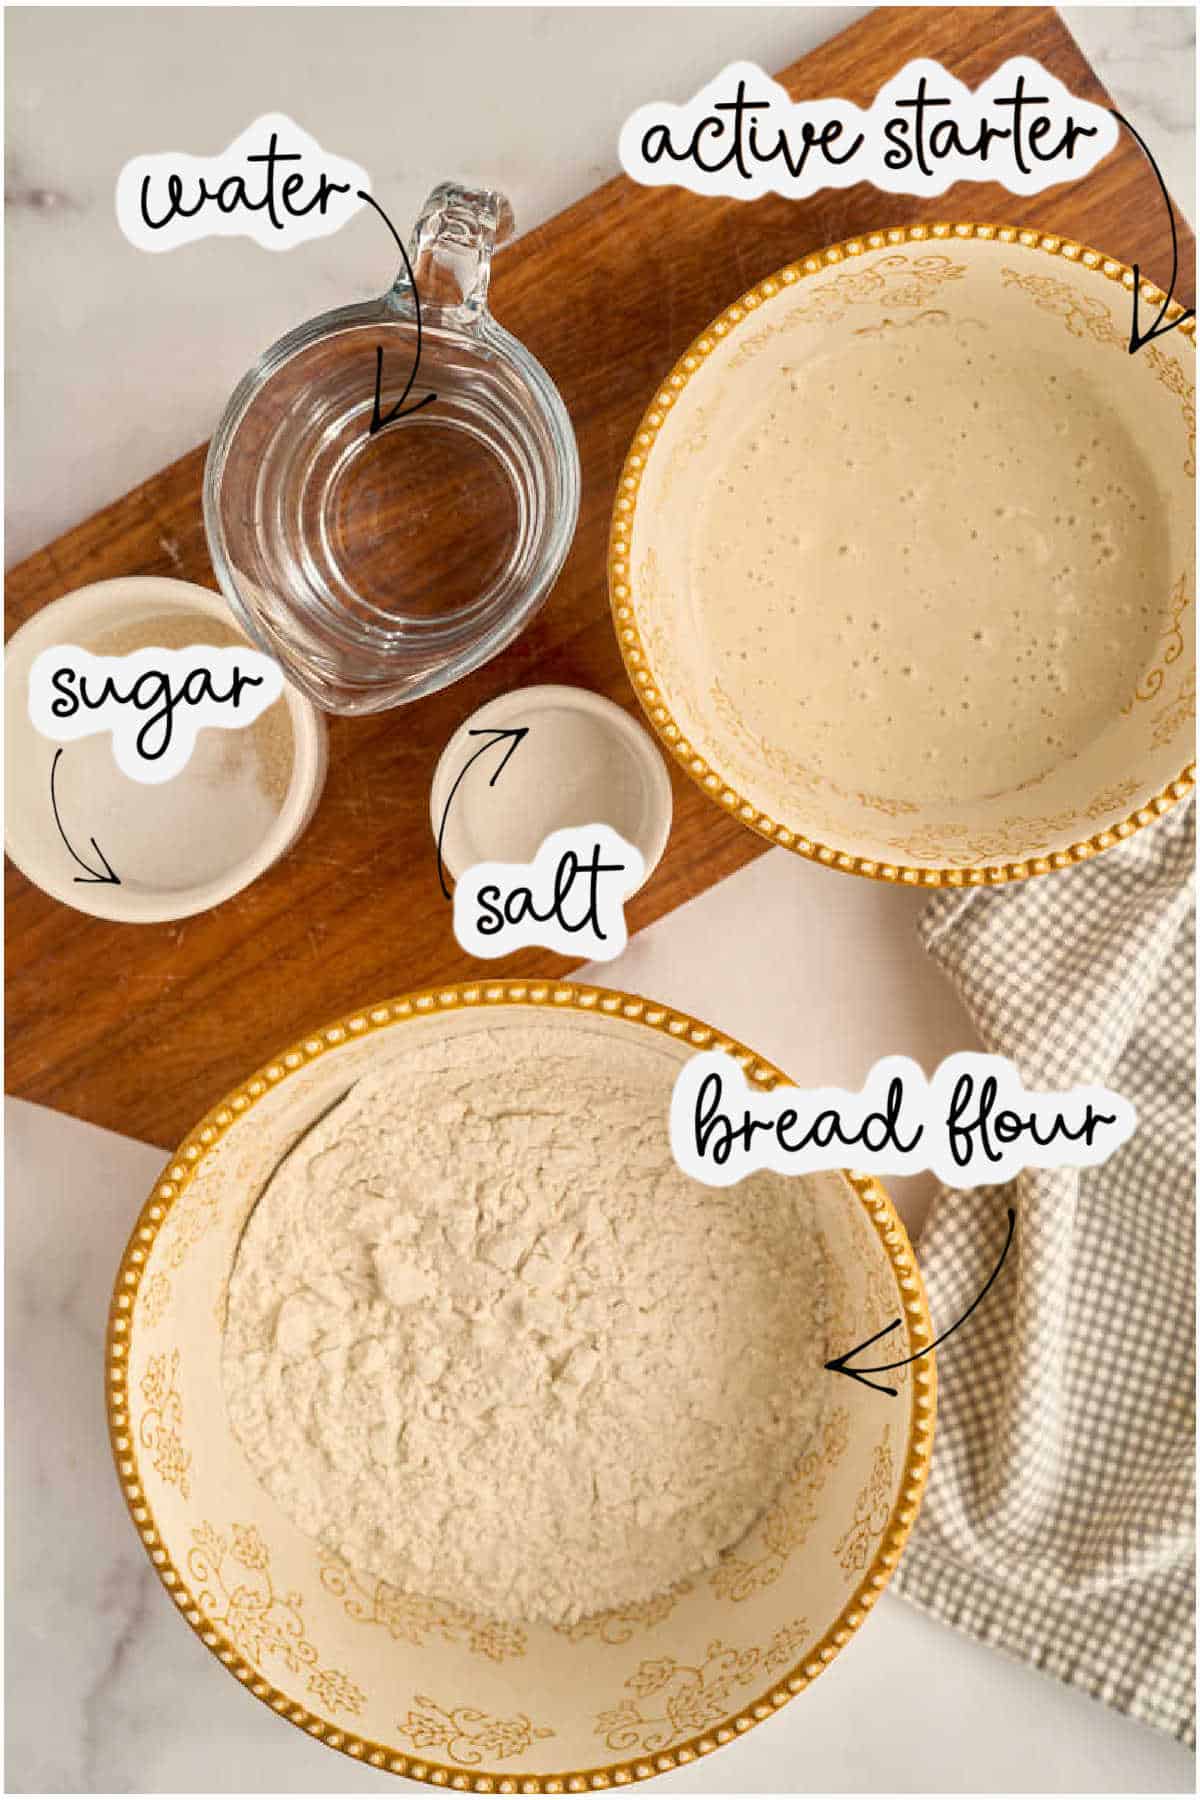
Ingredients
- 155 grams (5½ ounces)sourdough starter active and bubbly
- 425 grams (15 ounces) bread flour
- 285 grams (10 ounces) water
- 1 tablespoon sugar
- 1 ½ teaspoons salt
How to Make
This schedule is not intended to stress you out and make you think that this bread recipe is a complicated production. But I want to give you a sense of the time that this will take. It’s hands-off time, but it definitely takes a while!
For a more sour taste: Add 1/4 teaspoon of citric acid with the other ingredients. Since this dough has a long bulk ferment and a cool overnight rise, it is already on the tart side. In step one, you can add mix-ins to the bread dough, like cubed cheese, dried fruit, or nuts. These add a delicious flavor without a lot of extra work.
Day One: Morning
First, mix everything up in the morning.
First, we’re putting all the ingredients in a bowl and letting it rest to give it strength. This is a very long rest time (about 10 hours), and occasionally you will stretch it and fold it a bit (every 3 hours or so) to provide it with even more structure.

The long rise time means the dough will hang out on your counter for a while, and you’ll need to pay attention to it for a minute every now and then. So you can’t be asleep.

To stretch and fold, just stretch the dough from the outside towards the center. Repeat on all sides of the dough. See how easy the stretch and fold is? Just a few seconds of work. You’re working with sticky dough, so it might be helpful to have wet hands or spray them with nonstick cooking spray.
Day One: Evening
You’ve been stretching and folding and watching all day, and now it’s time for the next step.
This is when you’ll shape the loaf, place it in the proofing basket, and pop it in the fridge. Do not get worked up about shaping your loaf. If it looks like a ball, you did it.

And then it goes in the fridge until morning.
Day Two: Morning
Now we bake! First, you will preheat your oven with the empty Dutch oven inside. As the oven preheats, you can take the dough out of the fridge and get it ready.
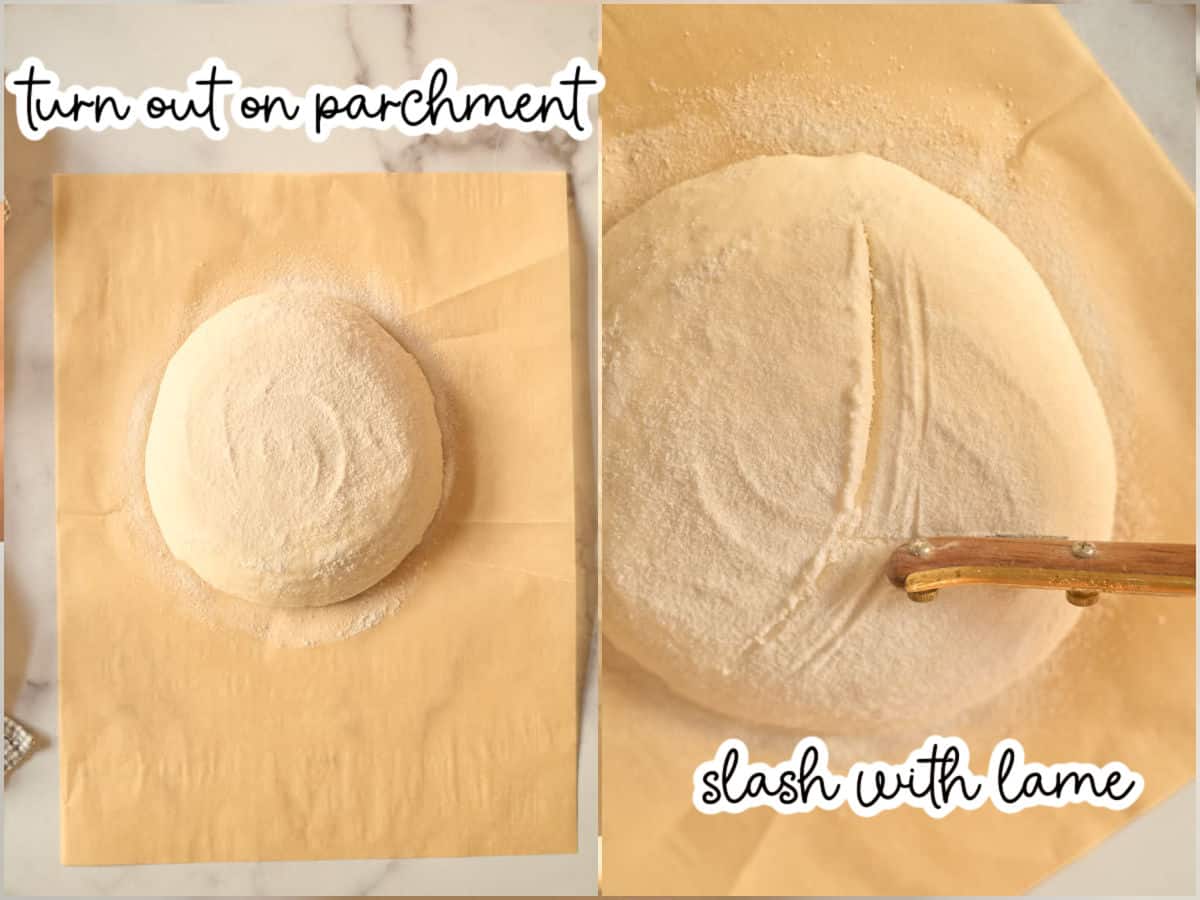
All you need to do is dump it out onto a piece of parchment, rub more flour on the top, and slash with a sharp knife or lame. You can see here how ugly my slashes are. Don’t worry; it will still be pretty once it goes in the oven.
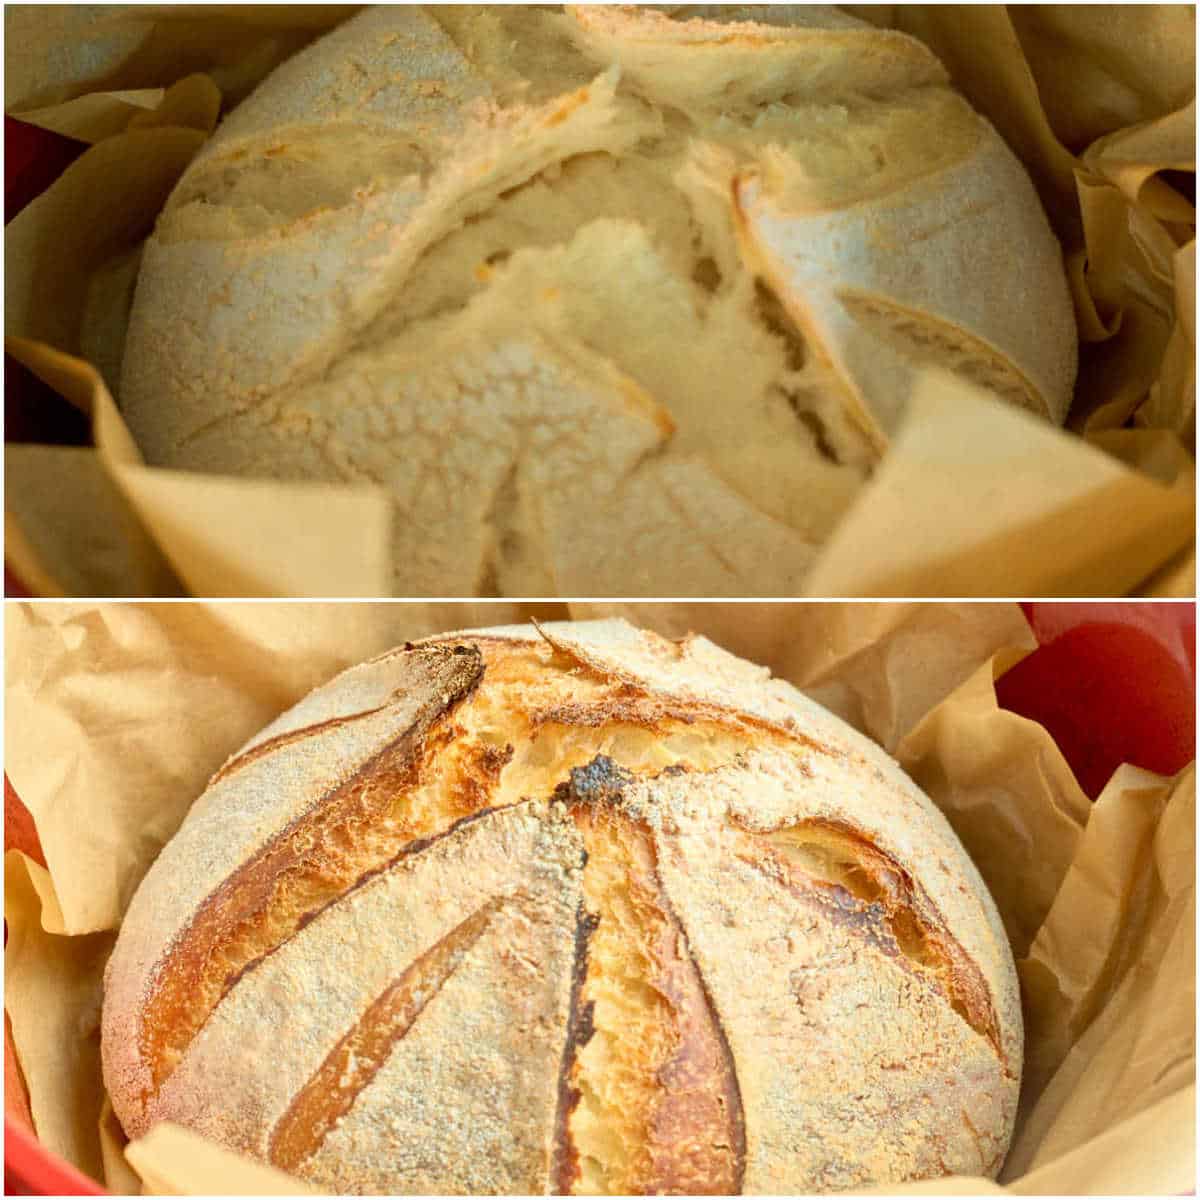
Bake for 50 minutes (30 with the lid on, during which the loaf will rise a lot, and 20 minutes with the lid off so the loaf can brown. Carefully remove the Dutch oven, and let the bread cool for at least four hours.
Day Two: Afternoon
You eat!
Sample Baker’s Schedule
| Time | Step & Notes |
|---|---|
| Day 1 (Morning) | |
| 8:00 am | Feed your starter (if needed) so it’s bubbly by mixing time. |
| 10:00 am | Mix dough: Combine starter, flour, water, sugar, and salt. Cover. |
| 1:00 pm | Stretch & fold #1: just a quick 30-second pull and tuck. |
| 4:00 pm | Stretch & fold #2: another quick pull and tuck. |
| 7:00 pm | Stretch & fold #3 (optional): if you’re around. Dough should look smoother and puffier. |
| 8:00 pm | Shape loaf: Lightly flour, tighten into a ball, place seam-side up in proofing basket. Cover and refrigerate overnight (cold proof). |
| Day 2: Morning | |
| 7:30 am | Place Dutch oven (with lid) in oven. Preheat to 450 °F. Remove dough from fridge. |
| 8:00 am | Turn dough onto parchment, dust with flour, score loaf, and load into hot Dutch oven. Bake 30 min covered. |
| 8:30 am | Remove lid, bake another 20 min uncovered for browning. |
| 8:50 am | Transfer bread to wire rack. Cool completely. |
| Day 2: Afternoon | |
| 1:00–2:00 pm | Bread is fully cooled—slice and enjoy! |
Storage Instructions
Sourdough doesn’t need to be stored in an airtight container., and you can keep it on the counter for 2-3 days, either in a bread bag or box.
It also freezes well, either sliced or as a whole loaf. After the bread has cooled completely, put it in a ziplock bag and freeze it for up to a month.
Questions and Troubleshooting
No. You can also just let it rise undisturbed, then shape the loaf and place it into a proofing basket to rise again. It will rise a bit higher with the stretch and folds but I have made this before without them and it turned out fine! This means if you miss one fold or get off schedule, it’s no big deal. This is supposed to be easy, right?
I like to use bread flour because it has higher gluten than all-purpose. If you use all-purpose, reduce the water to 5 ounces because it absorbs water differently.
You can add some whole wheat flour to your bread too, but don’t substitute all of it. Try adding 25% whole wheat flour; if you like the results, increase the proportion slightly.
The Dutch oven is optional, but I recommend it. Two reasons: by preheating the Dutch oven before you bake, you’ll create a hotter environment in the bottom of your oven. This will help the bread evenly brown. Also, the tightly sealed atmosphere traps the humidity of the loaf as it bakes, giving it an excellent oven spring. (You can simulate this by preheating a rimmed metal baking sheet in the oven and pouring a cup of water onto it before you bake.)
It’s either under proofed (and was too dense to bake through), underbaked, or most likely, just needs to cool more. Every sourdough recipe should cool completely (for at least four hours!) before slicing, or you’ll have a gummy interior.
Experienced sourdough bakers are familiar with the step in sourdough breads in which the dough has a brief rest before the salt is added. This recipe skips it. This way, you can just mix the salt in the beginning without having to knead it in late. It doesn’t make much of a difference, and it’s way easier this way.
More Easy Sourdough Recipes
- Bread machine sourdough is a totally different method but just as easy.
- Sourdough bread with jalapeno and cheddar is a family favorite that also uses a Dutch oven.
- Sourdough focaccia also has minimal hands on time. So easy for something so good.
- You don’t have to always do stretch and folds. You can make sourdough in your stand mixer instead.
Printable Recipe
No Knead Sourdough Bread
Equipment
- Lame
Ingredients
- 5½ ounces sourdough starter active and bubbly
- 15 ounces bread flour
- 10 ounces water
- 1 tablespoon sugar
- 1½ teaspoons salt
Save This Recipe
You'll join my email list which you will love. And if you don't, unsubscribe in one click. ❤️
Instructions
- Mix all ingredients. In a large mixing bowl, combine the sourdough starter, bread flour, water, sugar, and salt. You may need to use your hands or a rubber spatula to make sure all the ingredients are fully incorporated. The dough will be shaggy looking and sticky. Cover the bowl tightly with plastic wrap and allow to rest for three hours.
- Let dough rest for ten hours, stretching and folding every few hours. Stretch the dough from the outside, pulling in, to reshape the dough into a ball. Cover again and let the dough rest on the counter for three more hours. Stretch and fold again.
- Shape and cold proof overnight. Prepare a proofing basket by lining it with rice flour. Fold the dough as you have been for the stretch and folds, but this time pull it a bit tighter to form a ball. Gently place it into the proofing basket. Cover tightly with plastic wrap and allow to rest in the fridge 12 hours, or overnight.
- Remove from the fridge and score. In the morning, preheat your oven to 450℉ with an empty Dutch oven inside. Lay out a piece of parchment on the kitchen counter, sprinkle cornmeal on it, and turn the dough out into the center. Score the loaf using a lame or serrated knife in an X shape or slash down the center.
- Bake. Carefully remove the hot Dutch oven from the oven and place the parchment with the dough inside. Place the cover on top and bake the loaf at 450℉ for 50 minutes, with the lid on for 30 minutes and the lid off for 20 minutes. Remove from the Dutch oven, and place on a cooling rack for four hours, until fully cool.
Notes
Nutrition


Absolutel favorite recipe to use when making bread! Thank you so much for sharing it’s a weekly go to in my house hold
thank you so much! so glad to hear this 🙂
I’ve made dozens of sourdough loaves in the past 2 years, and this one is by far the best. A perfectly crispy, not-too-thick crust and pillows soft interior. I didn’t have enough time for the recipe as written, so I did a 1-hr autolyse + 3 stretch & folds 30-45 minutes apart, and it still turned out beautifully. Thank you!!
yay! so happy it turned out for you! thanks for letting me know 😊
I enjoyed this method and was really pleased with the results! Thank you for simplifying the process! Quick question: is the three hours of resting in steps 1 and 2 the same three hours? You repeat the instruction of covering the bowl and then resting for three hours before the first stretch and fold. I wasn’t sure if that were a repeat or if you truly meant a total of six.
Hi Amy! No it’s only supposed to be three hours, I need to fix that! So glad you enjoyed your bread!!
I have had the best luck with your recipes and the only difference I can tell is the addition of sugar.
Your jalepeno cheddar bread is the bomb!
Any thoughts on a pepperoni pizza bread boule.
Love the pepperoni boule idea! I’m going to work on that! So happy you’re enjoying the recipes! I also use a bit more starter and lower hydration than most 🙂
)
How do you make the SD starter. ..
Hi chuck! I have instructions here: https://heartscontentfarmhouse.com/sourdough-starter-recipe/ or you. can buy a small amount pretty affordably from kingarthurflour.com
I’ve followed this recipe all the way to baking… and there’s no oven temperature??
I’m so sorry! It’s 450!