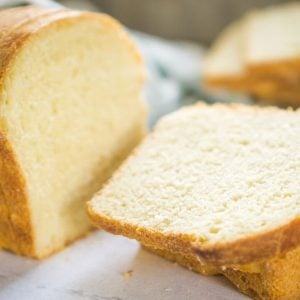
Every sourdough baker knows and loves the crusty artisan loaves, but sourdough has a different side. You can make just about any baked good with your starter; soft sandwich bread is no exception. If you want a soft, tasty bread perfect for sandwiches, this sourdough eggbread recipe might be your new favorite.
It’s rich and slightly tangy but sturdy enough to hold all your favorite fillings, making it stand out from any basic loaf. Whether layering it with deli meats, piling it high with veggies, or slathering it with butter and jam, this bread is perfect for your sandwich needs. It’s a great sourdough bread recipe to make ahead—just slice and freeze, and you’ll always have fresh, homemade bread!
Soft Sourdough Egg Bread for Sandwiches
Equipment
- Large mixing bowl
- Stand mixer (optional, but recommended for easier kneading)
- Bread machine (optional if using the dough cycle)
- Measuring cups and spoons
- Dough scraper or spatula
- Loaf pan (8×4-inch)
- Damp tea towel or kitchen towel
- Pastry brush
- Wire rack
Ingredients
- 3 ¼ cups all-purpose flour
- ¾ cup fed starter
- ½ cup milk
- 3 eggs
- 2 teaspoon salt
- 2 teaspoons sugar
- 2 tablespoons butter
- For topping
- 1 beaten egg
Save This Recipe
You'll join my email list which you will love. And if you don't, unsubscribe in one click. ❤️
Instructions
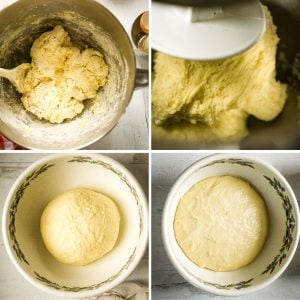
- Mix the ingredients. Combine all ingredients except the salt and butter in a large mixing bowl. Mix until a shaggy dough forms. Then, cover with a damp tea towel and rest at room temperature for 20-40 minutes.

- Knead the dough. After the rest period, add the salt and knead the dough by hand, using a stand mixer or bread machine (dough cycle), for at least 5 minutes until the dough is soft, smooth, and elastic. Then, add the butter during the last minute of kneading.
- First rise. Shape the dough into a ball and place it in a lightly oiled bowl. Then, cover it with a damp tea towel and place it in a warm spot. Allow it to rise for 3-4 hours until the dough is puffy.
- Shape the loaf. After the dough has risen, shape it into a loaf by gently folding it and placing it into a greased 8×4-inch loaf pan. The dough may be slack but will take shape during the rise.
- Second rise. Cover the pan with greased plastic wrap and allow the dough to rise for another 3-4 hours in a warm place until it rises about 1 inch over the edge of the pan.
- Preheat the oven. Preheat your oven to 350°F (177°C) toward the second rise’s end.
- Brush with egg wash. Before baking, brush the top of the loaf with the beaten egg for a glossy finish.
- Bake the bread. Bake the loaf for 45 minutes until golden brown and the internal temperature reaches 200°F (93°C).
- Cool and slice. Let the bread cool completely on a wire rack before slicing.


Notes
Nutrition
If I’m craving homemade bread that’s both soft and sturdy, I usually turn to this recipe. It has a rich, buttery taste with the perfect amount of sourdough tang, perfect for any sandwich or even just a slice with butter. The eggs make the bread super tender, yet it still holds up great with all my favorite toppings, from big meats and cheeses to fresh veggies and spreads. And the best part? It’s easy for me to make ahead and freeze, so I always have a loaf ready for sandwiches, toast, or even a weekend French toast treat.
Get a Free + Pretty PDF Recipe Book
Sourdough Sunday Newsletter

Every Sunday evening I’ll send you a sourdough recipe to make that week, straight from my kitchen to your inbox.
And as a thank you for signing up, I’ll send you this e-book with beautiful printable recipes right away. Simple!
You will not be added to any other email lists or my daily newsletter. But if you’re already on my newsletter, you’re welcome to join and receive both.
This Amish white bread is another great option for those who love a soft, fluffy loaf. It’s perfect for simple sandwiches or toast.

I hope it becomes a favorite for you, too.
Key Ingredients and Tools
To whip up this bread, you’ll need some key ingredients and tools.

- Fed, Active Sourdough Starter: This is crucial for your bread’s taste and lift. Make sure it’s lively and bubbly before you begin. If it’s not active, your bread might not rise well. If you love soft sourdough bread, you should also try this sourdough white sandwich bread, which is perfect for everyday sandwiches and toast.
- Unsalted Butter: Adds a lovely richness and makes the bread softer. Using unsalted lets you manage how much salt goes into your bread. Try margarine, a mild vegetable, or olive oil as a non-dairy alternative.
- Eggs: They’re here to make your bread tender. Warm them to room temperature before adding them for an even mix. Mix 1 tablespoon of flaxseed with 3 tablespoons of water for each egg you’re replacing for a vegan swap.
- Milk: It brings moisture and contributes to a tender crumb. Whole milk is your go-to for the most richness, but 2% or a milk alternative can work in a pinch. You can also use plant-based milk, like almond or oat, if you’re going dairy-free.
- All-Purpose Flour: The backbone of your bread, providing structure. You can swap it with bread flour for a bit more chew, but all-purpose hits the sweet spot between softness and strength.
- Instant-Read Thermometer: To be sure your bread is perfectly baked inside, check it’s reached 200°F internally.
- Pastry Brush: You’ll use this to apply an egg wash to that shiny finish. Both silicone and traditional brushes do the job.
Preparing these ingredients and tools is a big step towards making a successful bread, so gather them before you start baking!
Troubleshooting and Help
No, the sourdough starter is the heart of this recipe. It’s what gives the bread its signature flavor and rise. You must make or buy a starter if you don’t have one. But if you’re in a hurry, you could try a different bread recipe that uses commercial yeast instead. If you’re looking for ways to simplify the sourdough process without sacrificing flavor, check out this helpful guide on streamlining your sourdough bread baking. It’s full of practical tips to make your sourdough routine more efficient.
You can, but remember that whole wheat flour will make the bread denser and less soft. If you want to add whole wheat flour, try replacing half of the all-purpose flour and see how you like the texture. You might also need extra liquid since whole wheat flour absorbs more moisture.
That’s totally normal for this dough! It’s on the softer, stickier side. Try lightly oiling your hands when handling it rather than adding more flour. Adding extra flour could make the bread dense, so trust the process and let it rise properly.
Sourdough can be tricky, especially if the room is too cold. If your dough isn’t rising, try moving it to a warmer spot near a window, on top of the fridge, or inside your oven with just the light on (not the heat). Be patient—sourdough can take longer than yeast-based breads!
A great way to check is with an instant-read thermometer. You’re looking for an internal temperature of 200°F. If you don’t have one, tap the top of the loaf—if it sounds hollow, that’s a good sign it’s done!
Yes, you can add other ingredients to this recipe if you like. Some possible additions include nuts, seeds, or dried fruit.
This bread recipe is a wonderful addition to your homemade bread collection, offering the perfect balance of flavor, texture, and versatility. Whether you’re making sandwiches, toast, or even French toast, this recipe is simple enough for beginners and still pleases experienced bakers. Its soft crumb and subtle sourdough tang make it stand out from regular bread, and with simple storage and freezing options, you can always have a fresh loaf ready when needed. Try this recipe—you’ll love the homemade comfort it brings to your kitchen!


This is an amazing sourdough recipe. To me it is reminiscent of brioche buns mixed with English muffin bread. What a great way to add protein to our diet.
I love the color from the eggs. And the flavor is so yummy! Soft and sturdy at the same time. Wish the measurements were in grams for more precise baking. Thank you for creating and Sharing this!
hi Chelsea! I’m so glad! I cna actually check the grams next time I make it.
Why does it say rising time is 1 day when the directions make it seem like it’s 8-9 hours? Just need some clarification please before I make the recipe. Thank you.
I just put a day in there so you allow yourself enough time and understand it may be an overnight.
The bread collapsed once put in the oven to bake. Thoughts on why? Thank you.
Hi there! A bread collapse right as it goes into the oven usually means the dough may have over-proofed. When sourdough rises for too long, it uses up all its strength before baking, so it can’t hold its shape once it hits the heat. Another thing to check is hydration—if the dough is a bit too wet, it can spread and flatten in the oven. You might also try shaping the dough a bit tighter to give it a bit more structure. I hope your next loaf comes out perfect! Thanks for giving it a try, and let me know how it goes!
I have un-fed starter in the fridge. I’m new at sourdough, so should I pull out 1/3 cup starter, add 1/3 cup flour, & 1/3 cup water till it’s risen and bubbly and then add it to the recipe?? Thanks!
yes that’s right!
Hi
I am wondering about the egg wash, before baking, is not included in your instructions but it’s listed with the ingredients. Is it just an egg without liquid, like water or milk? Will the bread deflate when I brush it before baking? I am making it right now, it’s in the last stage of rising.
thanks
christine
yes just an egg beaten and then brushed on top. no liquid needed. it should not deflate, just be gentle. 🙂
Please add weights to the ingredients. I find that weighing ingredients works much better than US measurements with cups, teaspoons, etc. Thanks so much!
Exactly this. Relying on cups is extremely imprecise with flour
Could the first rise be done overnight in the refrigerator?
Good question. Did you get a reply? Have you tried it? I’ve used Katie’s recipes before and they’re very good (some of my “go to” recipes).
Hi Kathy! I think it would be fine, but I haven’t tried it myself. If not much has happened, it might need to sit out at room temp for awhile.
A few questions: Would you please describe the consistency of your starter when you feed it (pancake batter, cake batter, wallpaper paste, etc.). Can you use bread flour instead of AP flour? Also, I notice an egg at the end of the recipe for the topping. When do you put that on – before or after the rise?
hi rebecca- pancake batter like starter. the egg is brushed on before baking. and yes bread flour is fine, the bread will be a little heartier 🙂
Great success first time making, thank you!!!!
That’s great! Thanks for letting me know! 🙂
Do you think this could be done as a free form loaf?
hi Lauren- it’s a very loose dough and needs the structure of the loaf pan. if you wanted to try it, I would add more flour until it holds its shape
I just made this recipe for the first time today. Making one batch, I made 2 8.5 x 4.5 x 2.75 loaves.
What size pan are you using if you only make 1 loaf? Smells and looks wonderful. Can’t wait to cut it! Thanks for sharing!
Hands down favorite bread. I love it as is. I have subbed flavored olive oil and added fresh herbs. Have added homemade pesto too. Thought I killed the sourdough once, I heat the milk so I added 2 1/4 tsp yeast. It really raised with a perfect crumb.
so happy to hear its turning out well for you. 🙂
This bread looks delicious. I’m looking forward to trying it. I noticed a discrepancy in your oven temperature, though, and am wondering which one to go with. In the blog post directions it says to bake at 350F and in the recipe it says 250F. I’m guessing 350F is the correct one, but I’m new to sourdough baking and just wanted to double check. 🙂
it’s 350! thanks1 I’ll fix it 🙂 I wouldn’t recommend it for one of your first recipes though, it needs a strong starter.