Inside: Please stop proofing yeast, kneading by hand, and…adding sugar to making things foam? It’s not the 1940s anymore, although I’m sure that was a great decade. Let me teach you my method for yeast bread that will, quite literally, change your life.

In your head, you’re pulling golden, shiny loaves from the oven. Your family is praising you! You’re never going to buy store-bought bread again. You are a true hero.
But the reality of it all is…different. Your loaves are…flat? Everything’s a little dense. And your dough has never once, to your knowledge, actually doubled in size.
That’s okay. Let’s make this something that’s a regular part of your routine, not a dreamy fantasy.
Get Access to
All my Free planners, Printables, binders and more
Get a copy of this frugal recipe binder with lots of crockpot favorites, pasta dishes, casseroles, and more inside the subscriber library. Plus SO much more.

What I Want You to Get
If you really, really, really want to use your stand mixer with a dough hook, I will allow it. You’ll need to learn the windowpane test and create a warmish environment for your dough to rise. We’ll discuss that as we get into the steps.
The Bread Baking Process
For simplicity’s sake, I am assuming you have a bread machine because I told you to get one 😉. But I’ll include a note in the bottom about what to do if you’re using a mixer. This is more about coming familiar the process, not a specific recipe. For your first loaf, I recommend a simple free-form rustic bread or a very basic white sandwich loaf. The photos here from one of my most popular recipes, Italian sandwich bread.
1. Mix all ingredients together
Measure all ingredients into your bread machine pan. I have never fussed much about the order of ingredients, but some machines will recommend liquids first. It doesn’t really matter all that much. Yes, the yeast goes in there too, with everything.
If you’re using instant yeast (or even if you are), you don’t need to proof it. That weird first step in all recipes about mixing things up and letting it foam? You can skip it. Really!
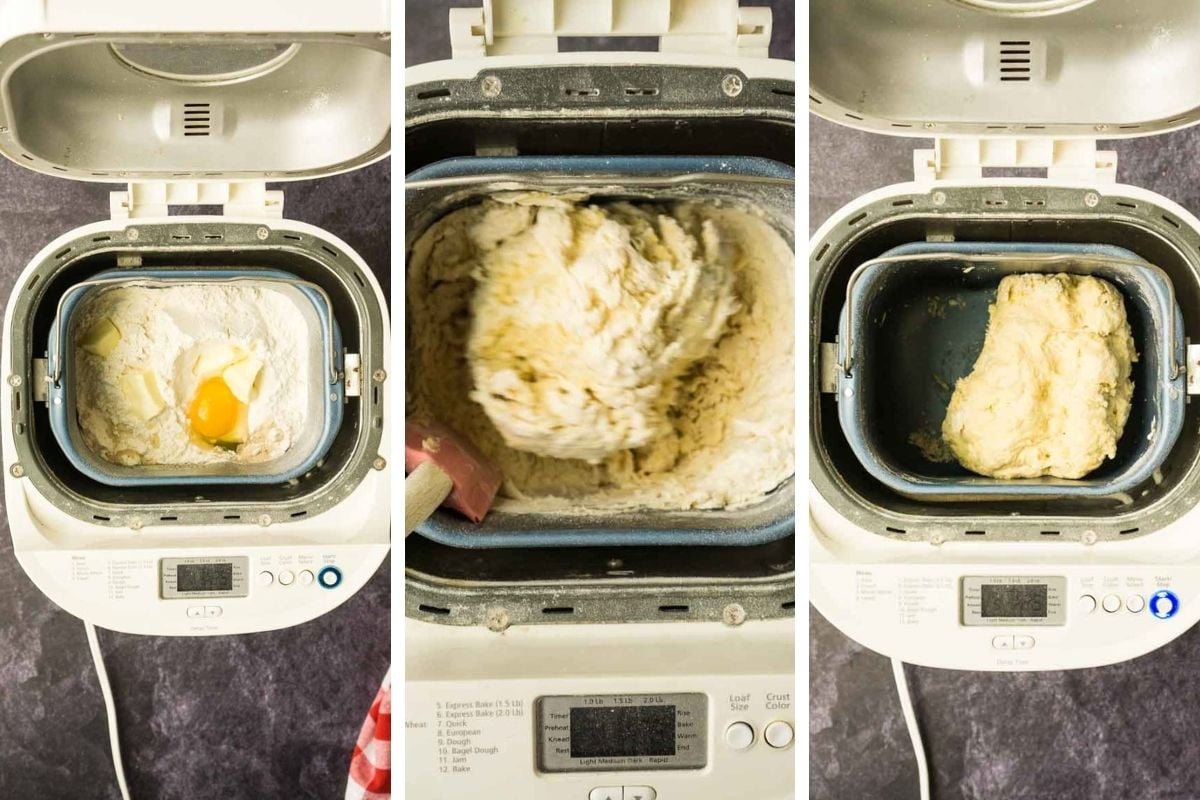
Hit the dough cycle. Now here’s the important part…stick around for the first 5 minutes. Watch your dough. It should come together into a ball that clears the sides of the pan. No dry flour hiding in the corners, but also not sticking to the sides like cake batter. Run a spatula around the edges to help everything come together if you need to.
This where I need you to use your head. If the dough is super sticky and not holding its shape, add a bit more flour, a few teaspoons at a time. If it’s stiff and the machine is straining to knead it, add a bit more water. Even if your recipe is perfect, you will often have to make adjustments like this because of differences in humidity and how flour is measured.
For my stand mixer friends:
The process for you is pretty much the same. Put everything in the bowl of the mixer and mix it up with a spatula. Once it looks right, you can put the bowl on the mixer and knead.
2. Knead the Dough
Your bread machine is going to handle all of this for you. The hardest part is over. You can go live your life while the machine does the work.
It will beep when it’s ready and the first rise will be done too. The whole cycle will be around 90 minutes, and be sure you’re around when it’s done so it doesn’t over-rise.
stand mixer:
Don’t rush it. Most people kneading their bread in a mixer will under knead it. And what usually happens is you start to think that it’s close enough after 10 minutes and you move on. But the gluten is not developed enough! And your loaves will never be soft and fluffy without gluten development.
Remember, a bread machine’s dough cycle will knead for almost 30 minutes, on and off. 10 minutes is not enough. I recommend 3-5 minutes off, 1-2 minutes to let the machine rest, then repeat.
You done when your dough passes the windowpane test. This means you take a golf-ball sized piece of dough, stretch it out, and look for translucent areas. If it won’t stretch thin like that, you haven’t kneaded long enough!
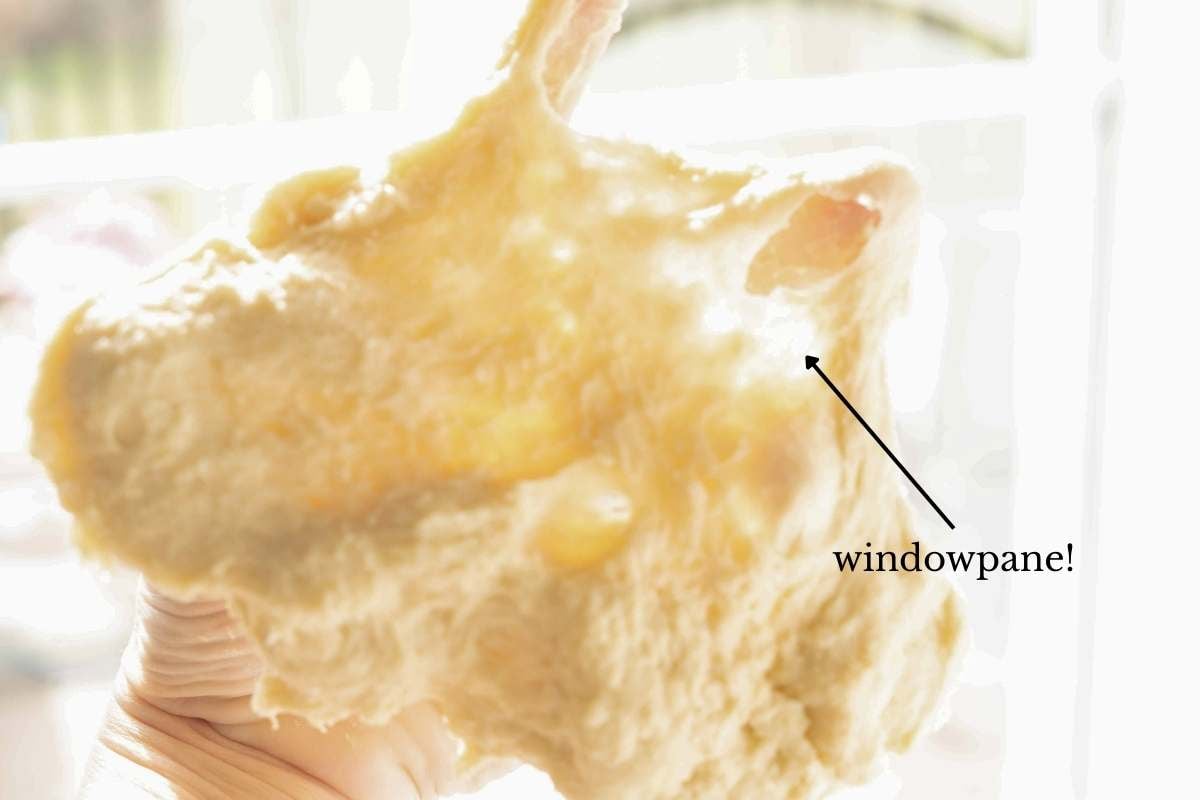
The number of minutes is not what matters, it’s all about seeing those windows.
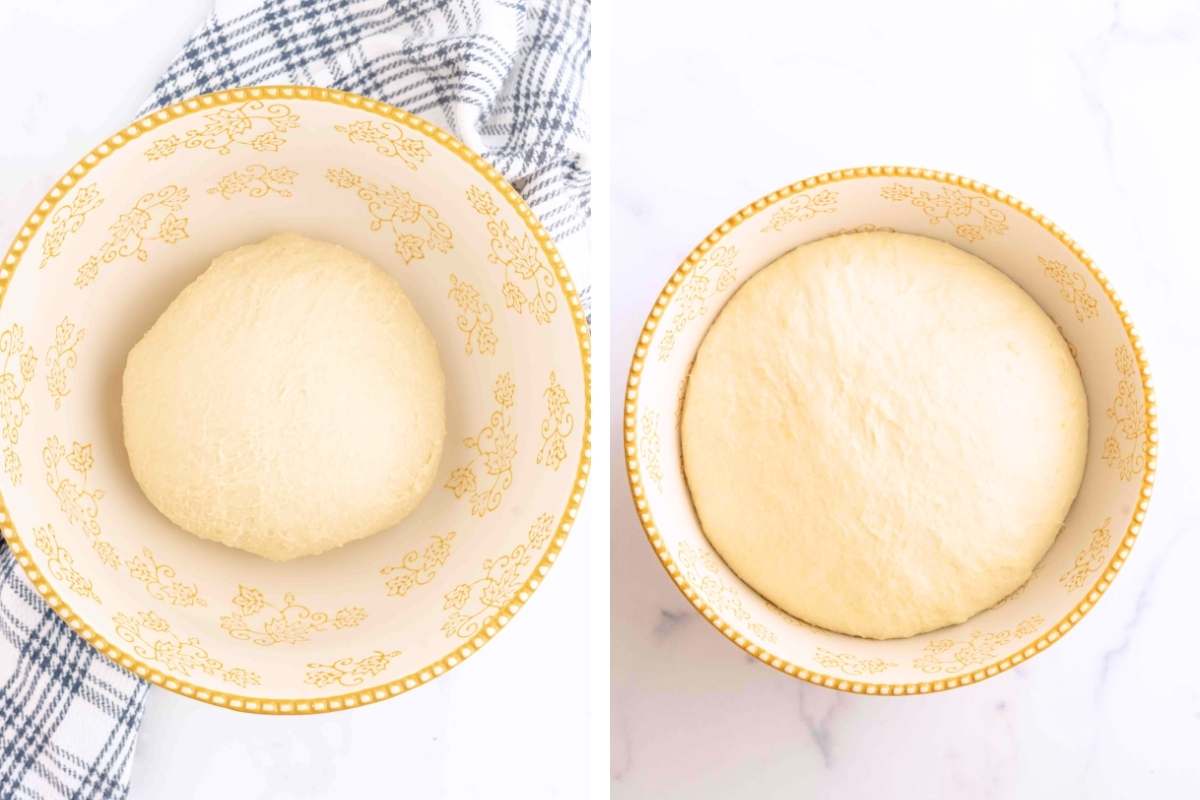
3. The First Rise (aka Bulk Rise or Bulk Fermentation)
Here’s the beautiful thing about the bread machine… it’s still doing the work for you. After kneading, it automatically switches to a warm rise cycle. Your dough is just sitting in there, getting puffy and perfect.

When your machine beeps (usually about 90 minutes total from when you started), your dough should be ready. But here’s where you need to check. Open that lid and look at it. Has it doubled in size? Poke it gently with your finger. If it springs back slowly and leaves a little dent, you’re golden. If it bounces back fast like it’s fighting you, close the lid and give it another 20-30 minutes.
Honestly? 99% of the time it’s ready when the machine says it’s ready.
stand mixer:
You need to create your own warm spot.
Here’s what I do: Turn your oven on for EXACTLY one minute, then turn it off. Meanwhile, transfer your dough to a greased bowl, cover with plastic wrap (or a damp towel if you’re feeling old-fashioned), and put it in that slightly warm oven. It should double in size in about an hour. Maybe 90 minutes if your kitchen is cold. Same poke test applies. A slow spring-back with a little dent means it’s ready.
4. Shape the Dough
Time to dump that beautiful puffy dough onto your counter. Just turn the bread machine pan upside down and let it fall out. You probably don’t even need flour on your counter unless your dough is weirdly sticky (and if you fixed it in step 1, it won’t be).
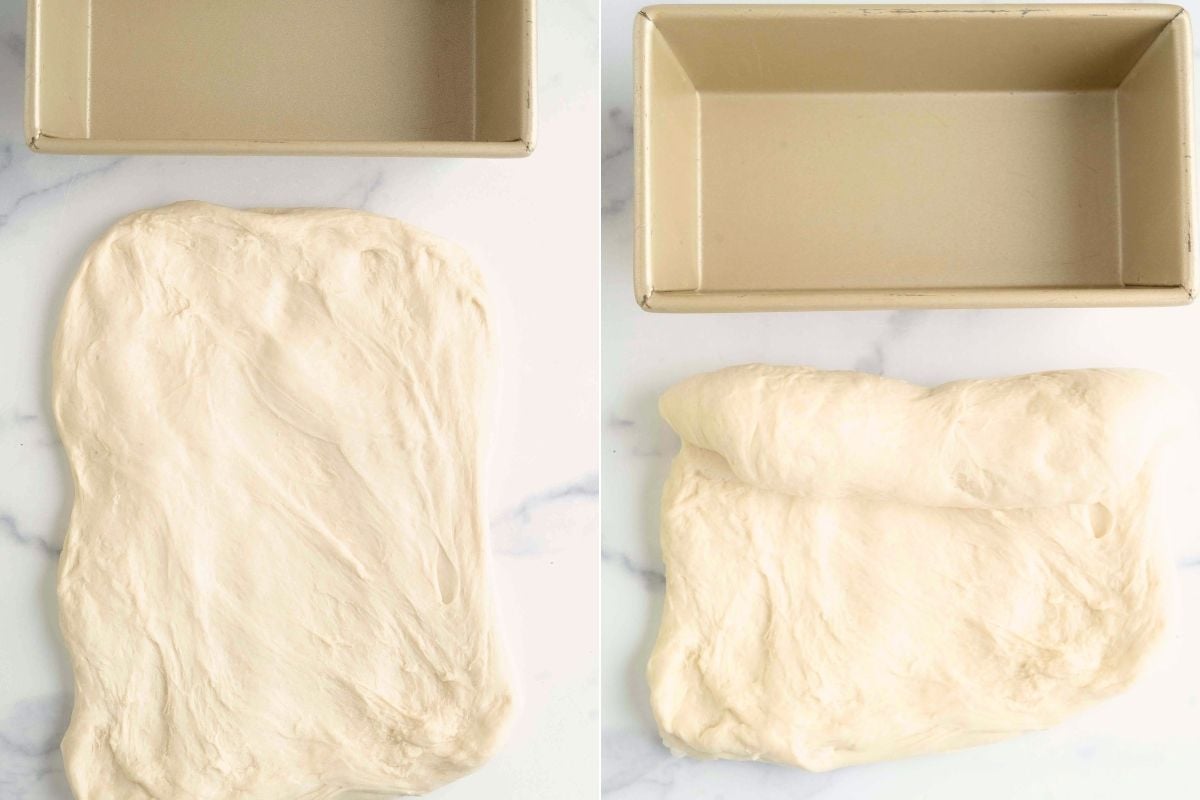
The shaping process will depend on what you’re making. Your recipe will give you more information, but the basically idea is changing a bowl-shaped dough into a bread-shaped dough.
For a sandwich loaf? You’ll stretch it out into a rectangle and roll it up (shoulders in, head down, then roll) Pinch the seam closed and plop it in your greased pan, seam side down. The whole thing takes 30 seconds. Like this:
@heartscontentfarmhouse You’re overthinking it. #breadbaking #breadtips #sandwichbread ♬ Sunshine – WIRA
For rolls? You’ll cut them up with a knife into the number you need, then pull on the bottoms to shape them. It all comes with practice.
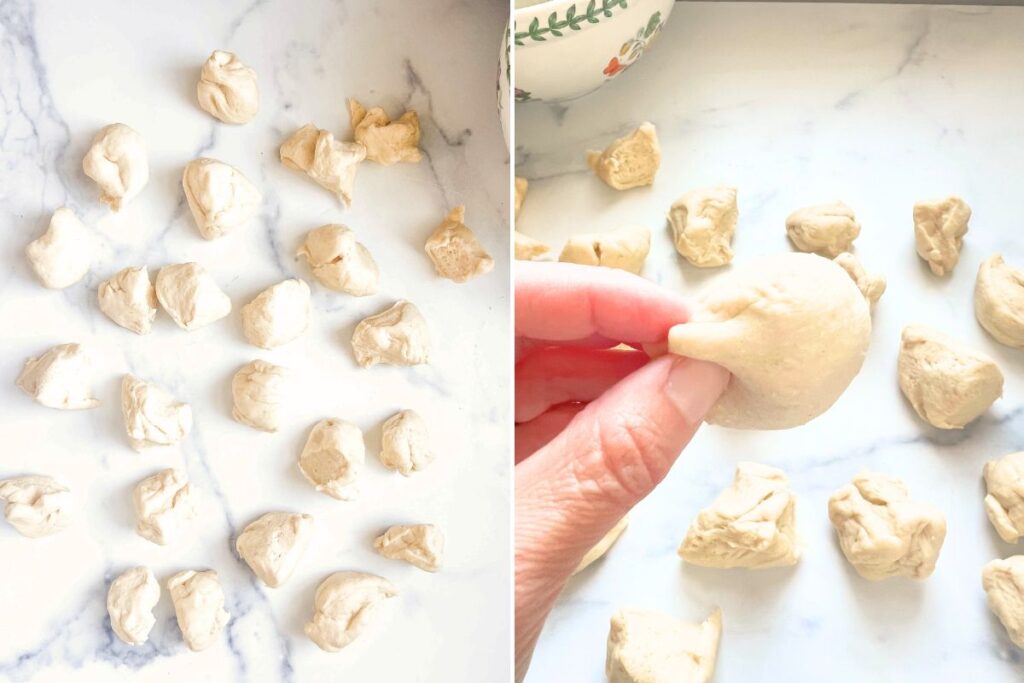
For a round artisan-style loaf? Just tuck the edges under until the top is smooth and tight. The easiest one of all.
This is not the time for perfection. It won’t matter in the end. (By which I mean, the end of the baking process. Not like… the end.)
stand mixer Friends
We have now rejoined paths and will follow the same instructions. Welcome back.
5. The Second Rise (a.k.a. The Final Proof)
Almost there. Your shaped dough needs one more rise before baking. This one’s shorter…usually 30-45 minutes. Just leave it on your counter, covered in well-greased plastic wrap. You do NOT want to be removing plastic wrap stuck to your beautiful loaf and ruining it.
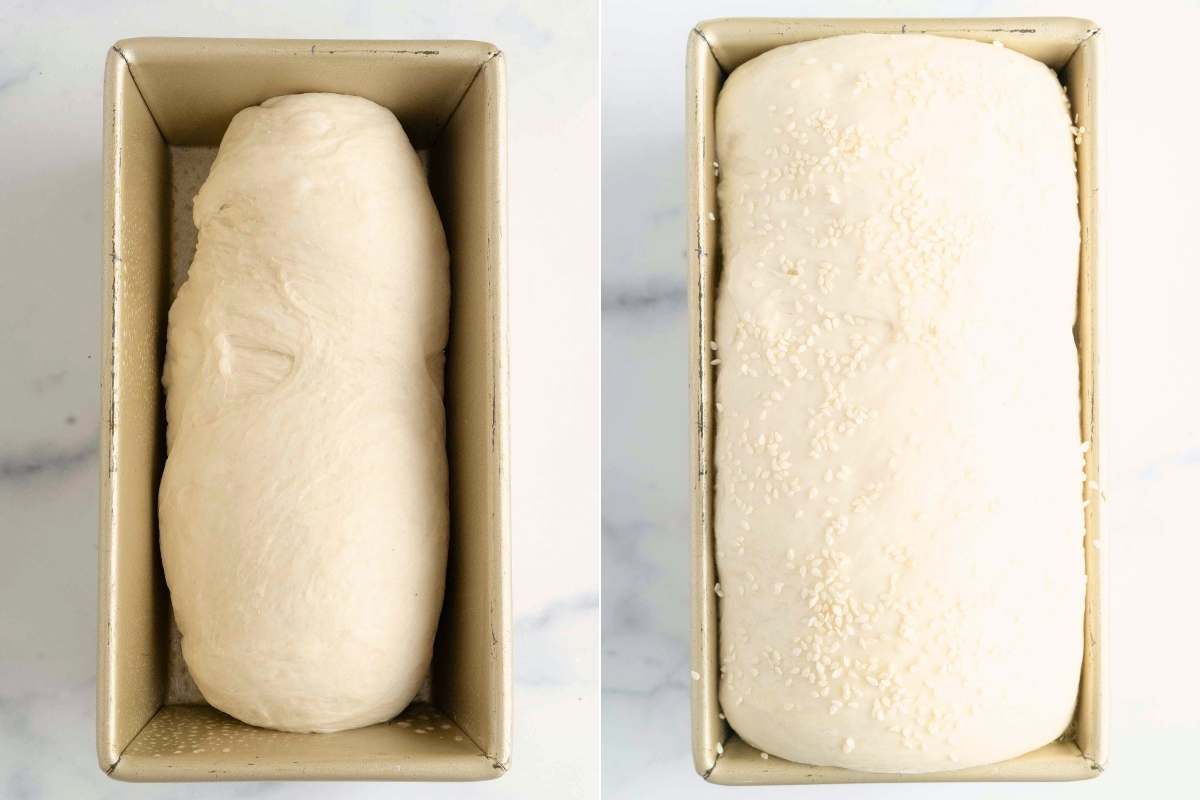
Here’s how you know it’s ready: For a loaf, it should be peeking about an inch above the rim of your pan. For rolls, they should look puffy and almost touching each other if they’re close together.
Start preheating your oven when you think you’re about 10 minutes away from ready. Because nothing’s worse than perfect dough waiting for a cold oven.
If it’s been 45 minutes and your dough looks the same? Your house is too cold. Next time, do this rise in that slightly warmed oven trick I mentioned earlier.
6. Bake
Your oven should already be hot. Most breads bake at 350°F, but follow your recipe. Middle rack is what you want, and make sure there’s room above – your loaf will rise a bit more in the oven and you don’t want it hitting the rack above.
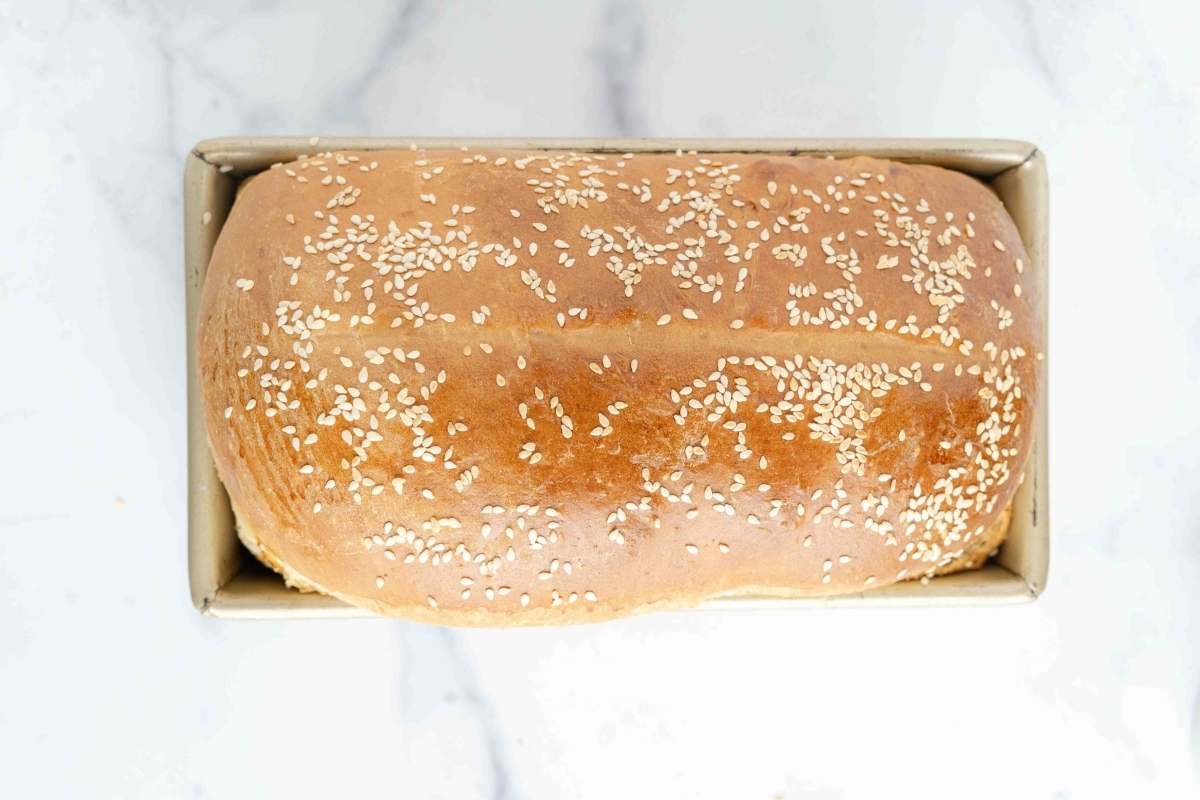
If your recipe says “30-35 minutes,” set your timer for 30. When it goes off, check it. A finished loaf will be golden brown, sound hollow when tapped (can’t check this in a loaf pan), and feel light for its size. If it’s getting too dark on top but doesn’t sound ready, loosely tent some foil over it and give it another 5 minutes.
A thermometer takes out the guesswork (200-210°F for regular bread, 190°F for enriched breads with eggs and butter), but you don’t need one. You’ll get a feel for when bread is done after a few loaves.
Once it’s done, remove it from the pan and it cool on a wire rack. Rolls can be eaten warm, but sandwich loaves are much, much better if you let them fully cool. Wait at least an hour before slicing for the neatest slices and best texture.
Questions You’re About To Ask
I know you.
It’s not my favorite. The loaves aren’t as beautiful and you won’t fall in love with the process as much. Having said, I do it sometimes. If I just need white sandwich bread for the week, it’s an acceptable way of getting it done.
You can do whatever you want. But you will change the texture, and nothing is as soft and fluffy as white flour. I always recommend a maximum of 30% wheat flour to start. If you like it, keep bumping it up.
Every ingredient serves a purpose. There are many recipes that are just flour, water, yeast, salt, so I’d look for one of those. A super-soft recipe will often call for special ingredients. Leaving them out will mean your finished product is different.
You just need to add a little flour. Your kitchen is probably slightly humid, or your brand of flour is a little different. I use the same brands and same recipes all the time, and still need to make slight adjustments. Even something like the variety of what harvested for that batch will make a difference. Use that brain and add a little more flour. 🙃
Beginner-Friendly Recipes
Now that you know the process, here are the recipes I trust you with first:
- Italian Sandwich Bread with Sesame Seeds
- Easy Round French Bread
- Super Soft Buttermilk Sandwich Bread
- Italian Sub Rolls
- Overnight Sandwich Bread {Easy, Low-Knead Method}
Why This is Worth the Trouble
I’ve been a little mean to you here, but that’s because I love you and I want to see you succeed. Homemade bread changes everything… your confidence, your grocery budget, your vision of yourself. I really mean that. Now go scrounge up a bread machine. I really mean that too.


Great article for beginners. I’ve been baking three loaves a week for years, everything by hand. I love it! Kneading is therapeutic and relaxing to me. I have a recipe for seeded wheat bread that I’ve tweaked to perfection. Bread baking is so worth the effort!
Where could I get flour that is not sprayed with glyphosate?
King Arthur organic! Actually I think their regular is not sprayed with glyphosate either. They have a VERY helpful 1-800 number you can call 🙂
Wow! This website is amazing! Some day I fully intend on baking my own bread – and this is the know how and inspiration I need. I’m 68 and do not currently have a stove🙄. Imagine no additives, and using the quality of flour you want to.
thanks Donna! 🙂
One other point about sugar, I don’t know if this relates to fresh yeast only, but sugar checks the yeast.
My father was a baker and confectioner and was his favourite saying regarding yeast, sugar and bread baking.
One regarding pastry, if the pastry had pulled away from the pan then it was short. Short of fat.