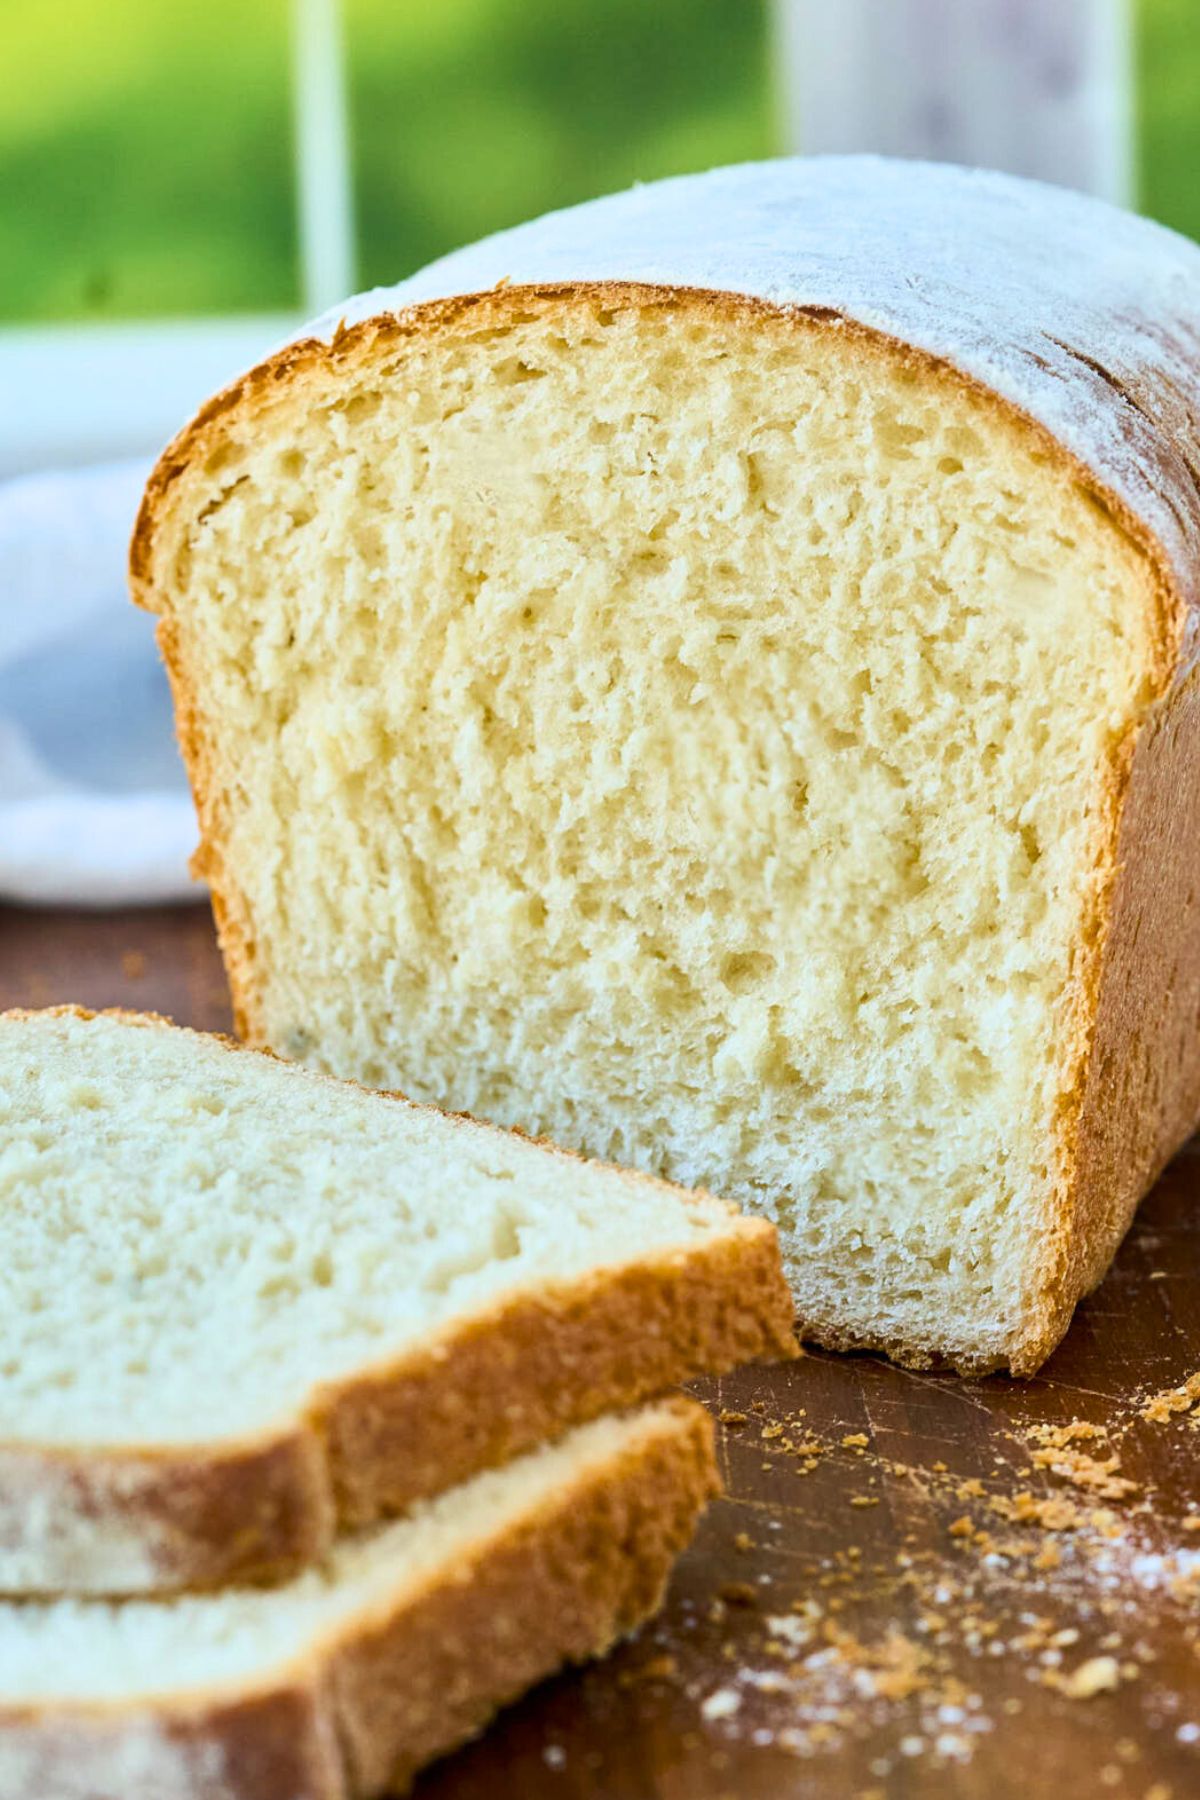
Budget Bread Recipe: A $0.60 Loaf (Beginner Friendly)
I get it… bread seems like a lot of effort just to replace something that, let’s face it, is pretty cheap at the store. But this loaf is so easy to work with and gives you such a soft and lovely loaf that you’ll never go back. If you’ve been nervous to try yeast bread, this is the one to start with. I’ll walk you through each and every step ❤️.
If you bake two loaves a week instead of buying store-brand bread at $1.99, you’ll save over $150 a year… and end up with better bread.
| Ingredient | Amount | Cost |
|---|---|---|
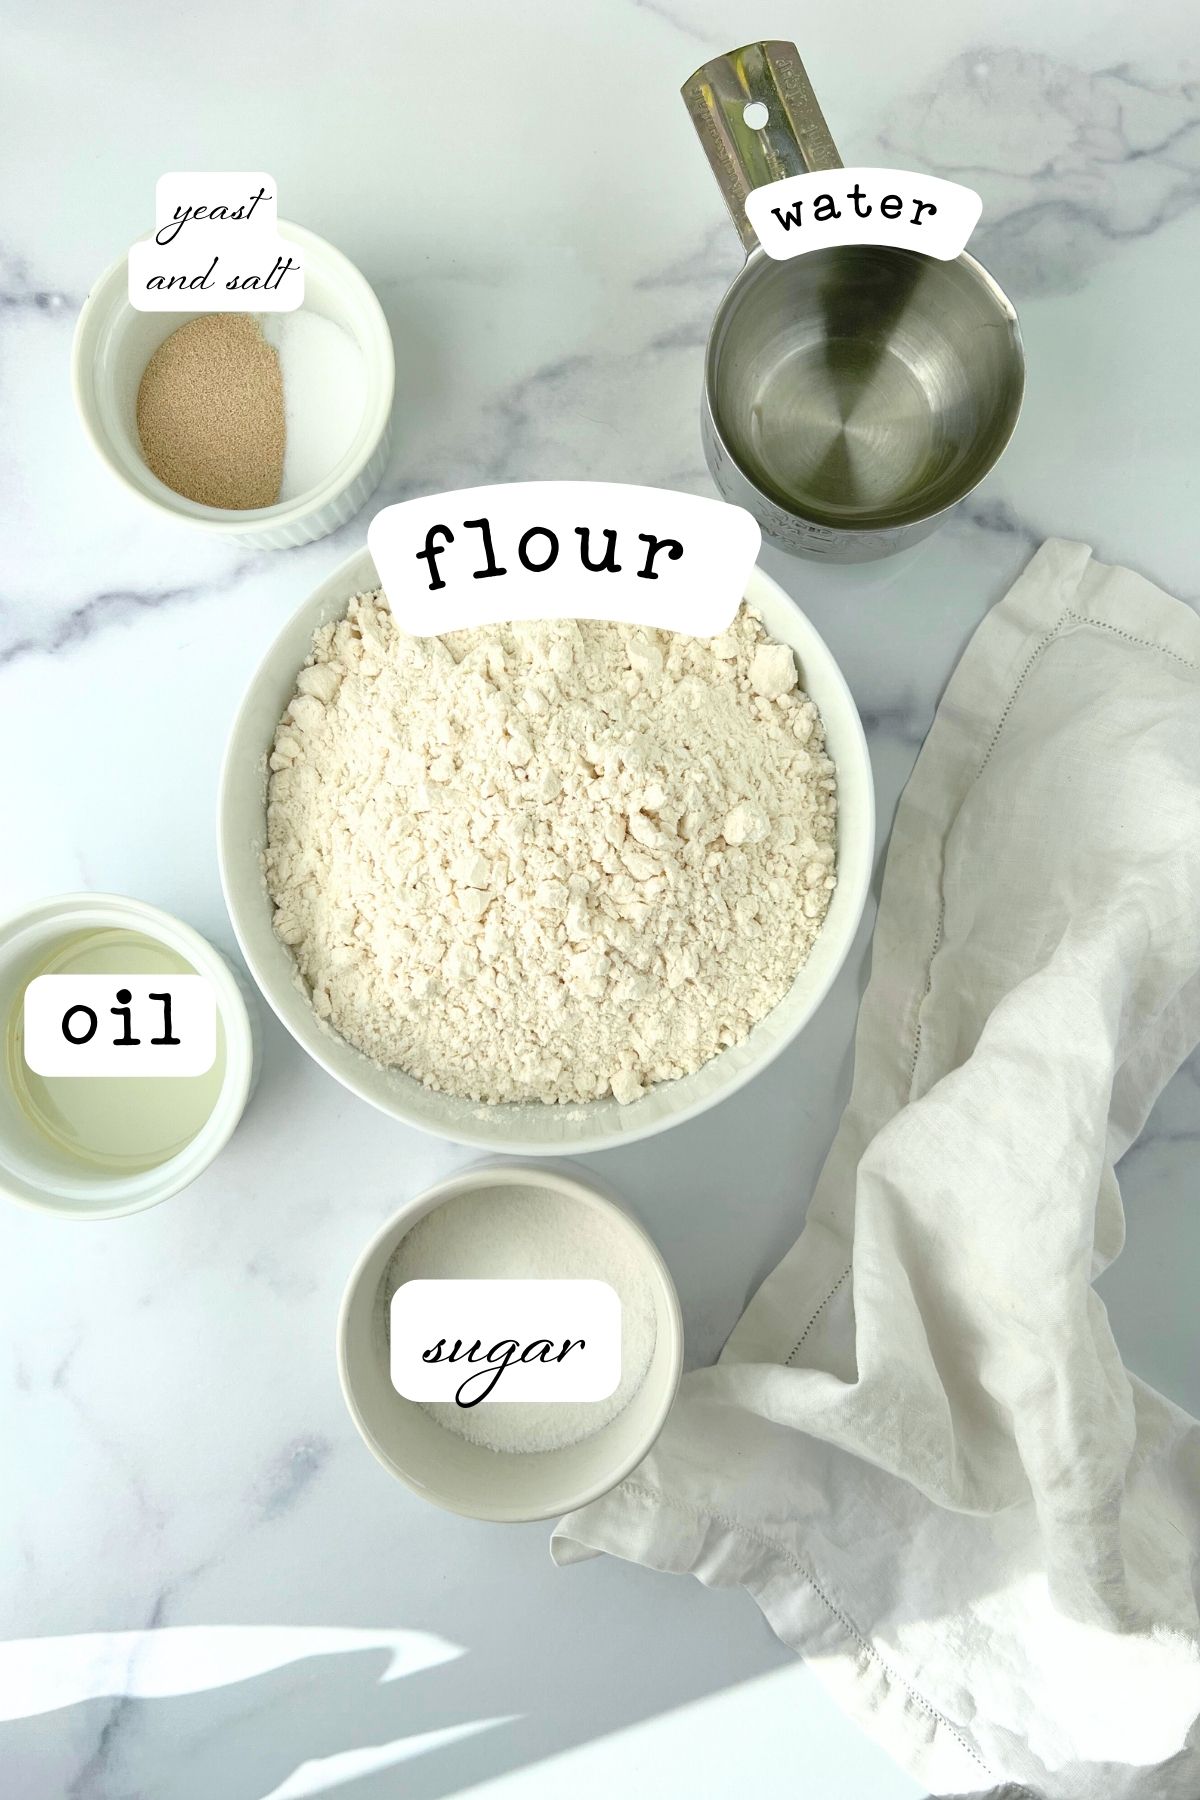
| All-purpose flour | 2¾ cups | $0.23 |
| Instant yeast | 2¼ tsp | $0.16 |
| Vegetable oil | 2 tbsp | $0.07 |
| Sugar | 3 tbsp | $0.06 |
| Salt | 1¼ tsp | $0.01 |
| Water | 1 cup | free |
| Total | ~$0.53 |
Prices based on Walmart store brand. Your local prices may vary slightly, but you’re looking at well under a dollar per loaf.

What You’ll Need
I love to have a stand mixer or bread machine for kneading, but it’s not a must. If you can borrow an old bread machine or find one at the thrift store, snatch it up. You’ll just use it for the dough cycle and it will make bread baking about 1 billion times easier!
Scaling up: you can absolutely double or triple this recipe, in fact I recommend that you do and save your extra loaf. It helps you maximize your time and the energy to run your oven. You frugal hero, you.
- 2¾ cups all-purpose flour, bread flour works too if you want a chewier loaf
- 1 cup lukewarm water
- 2 tablespoons vegetable oil, melted butter or olive oil work if that’s what you have
- 3 tablespoons sugar
- 1¼ teaspoons salt
- 2¼ teaspoons instant or active dry yeast
Instructions
Remember:
Always go by the look and feel of the dough, rather than the clock. If it looks super dry, add a bit more water as you knead. If it hasn’t risen, give it more time!
Mix the dough
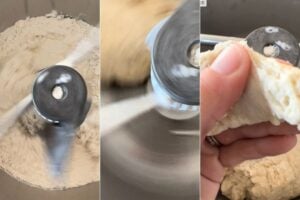
Add all your ingredients to a stand mixer fitted with the dough hook — or dump them in a big bowl if you’re going by hand. Mix until everything comes together into a shaggy dough that pulls away from the sides of the bowl. If it’s sticking to the bottom, add a little more flour a tablespoon at a time. If it seems dry and won’t come together, sprinkle in water a teaspoon at a time.
Don’t overthink this part. You’re just trying to get everything combined.
Knead until smooth
Keep the mixer running on low for about 10 minutes, or turn the dough out onto a clean surface and knead by hand for 10-15 minutes. You’re done when the dough is smooth, slightly tacky, and springs back when you poke it.
The real test is the windowpane: tear off a small piece and stretch it gently between your fingers. If you can stretch it thin enough to see light through without it tearing, you’re good. If it rips right away, keep kneading.
First rise
Shape the dough into a ball and place it in a clean bowl that you’ve wiped with a little oil. Cover with a damp tea towel or plastic wrap and set it somewhere warm. Let it rise for about an hour, until it’s puffy and roughly doubled in size.
If your kitchen runs cold, turn your oven on to its lowest setting for a minute or two, turn it off, and let the dough rise in there with the door closed. The residual warmth is perfect.
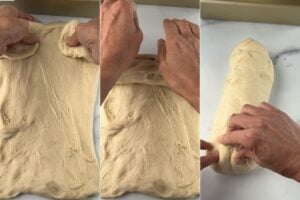
Shape the loaf
Lightly grease your loaf pan. Turn the dough out onto a clean surface — no need to flour it — and gently stretch it into a rectangle about 9 by 18 inches. The short side should match the length of your pan.
Tuck in the corners, then roll it up tightly into a log. Pinch the seam closed and place it seam-side down in the pan.
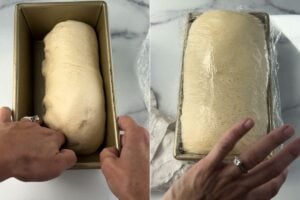
Second rise
Cover the pan loosely with greased plastic wrap and let it rise again until the dough crests about an inch above the rim of the pan. This usually takes another hour, give or take.
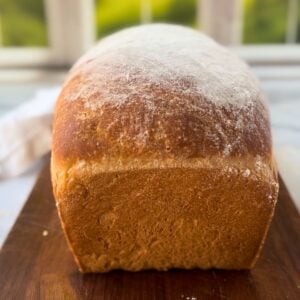
About 15 minutes before it’s ready, preheat your oven to 350°F.
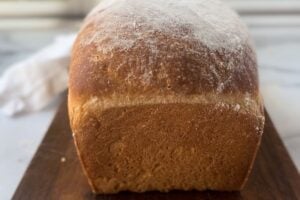
Bake
Bake for 35-40 minutes. The loaf is done when it’s golden brown and sounds hollow when you tap the bottom. If you want to be precise, an instant-read thermometer should read 195-200°F in the center.
Tip the bread out of the pan right away and let it cool completely on a wire rack before slicing. I know it’s tempting to cut into it warm, but if you do, the inside will be gummy. Give it at least 30 minutes.
Storage Instructions
To store this bread, let it cool completely first. Once it’s cool, place it in an airtight container or wrap it tightly in plastic wrap to keep it fresh. You can store it at room temperature for up to 3 days.
If you want to freeze, slice it first. Place the slices in a freezer-safe bag or wrap them in aluminum foil and then in a freezer-safe container. This way, you can take out only the slices you need. This will keep well in the freezer for up to 3 months.
The Homemade bread lifestyle
Once your bread becomes almost free, you’ll be able to cobble together meals out of nothing.
- Sandwiches (it holds up to mayo and mustard without getting soggy)
- Grilled cheese
- French toast
- Toast with butter and jam
- Garlic bread: slice thick, butter generously, sprinkle with garlic salt, and broil until golden
- Breadcrumbs: Got a few stale slices left? Pulse in the food processor.
Simple Variations
- Cinnamon swirl: After you stretch the dough into a rectangle, spread with softened butter and sprinkle generously with cinnamon sugar before rolling it up.
- Honey wheat: Swap half the all-purpose flour for whole wheat and replace the sugar with 2 tablespoons of honey. The loaf will be denser and a little heartier.
- Herb bread: Add 1-2 teaspoons of dried rosemary, thyme, or Italian seasoning to the dough. Great for sandwiches or alongside soup.
- Garlic butter top: Brush the loaf with melted butter mixed with garlic powder right when it comes out of the oven.
Troubleshooting
Yes. After the first rise, punch it down, wrap it tightly, and refrigerate for up to 24 hours. Let it come to room temperature before shaping.
It’s either a bit too dense (you needed a splash more of liquid at the mixing stage), or it just needed more time kneading or rising.
Under-kneaded or under-risen.
You have to use the “windowpane test.” Take a small piece of dough and stretch it gently between your fingers. You’re good to go if it stretches thin enough to let light through without tearing!
No problem! You can shape the dough into a round loaf and bake it on a baking sheet. It will just be rustic.
Printable Recipe
Cheap Bread Recipe
Equipment
- Plastic Wrap
Ingredients
- 2 ¾ cups all-purpose flour
- 1 cup lukewarm water
- 2 tablespoons vegetable oil
- 3 tablespoons sugar
- 1 ¼ teaspoons salt
- 2¼ teaspoons instant or active dry yeast
Save This Recipe
You'll join my email list which you will love. And if you don't, unsubscribe in one click. ❤️
Instructions
- Mix the ingredients. Add all ingredients to an electric stand mixer or a large mixing bowl. Then, combine until a dough forms that holds together and does not stick to the sides or bottom of the bowl.
- Knead the dough. Knead the dough for 10 to 15 minutes until it is smooth, soft, and reaches the windowpane stage (when you can stretch a small piece of dough thinly enough to see light through it without it tearing). If the dough feels dry after a couple of minutes of kneading, sprinkle in water a teaspoon at a time.

- The first rise. Shape the dough into a ball and place it in a clean, lightly oiled bowl. Then, cover it with a clean, damp tea towel and let it rise in a warm place for about 60 minutes until the dough is puffy and has doubled in size.
- Shape into a loaf. Lightly spray your loaf pan with nonstick cooking spray. Then, gently stretch the dough into a rectangle approximately 9 x 18 inches. The rectangle's short side should match your loaf pan's length. Tuck in the corners and roll the dough tightly into a log. Pinch the seams closed and place the loaf, seam side down, into the prepared loaf pan.
- Allow to rise again. Cover the loaf with greased plastic wrap and let it rise in a warm place until the dough rises to about 1 inch above the top of the pan. Towards the end of the rising time, preheat your oven to 350°F (175°C).
- Bake. Bake the bread at 350°F for 35-40 minutes, until the loaf sounds hollow when tapped on the bottom. For the best results, use an instant-read thermometer to check the internal temperature of the bread; it should reach 195-200°F. Remove the bread from the pan and allow it to cool completely on a wire rack before slicing.

Notes
Nutrition


Super simple and delicious
I plan to make this dough in my bread machine. Can you tell us what size loaf pan you used? I’m guessing the 8×4 and not the 9×5? TIA!
8 x 4 yes!
Thank you for this recipe! This was basically my first time making regular bread and I’m so happy with how it came out! I had tried sourdough from a starter back when everyone was doing that, but found the process complicated to keep up with and didn’t do it for very long. I recently stopped working to be at home full time and have been enjoying your blog a lot during this transition. I appreciate the articles on shifting your mindset on homemaking and being frugal. I am viewing it as a fun challenge to make one income living work well for us, and one goal I had is to learn to make my own bread. With school lunches, we go through a lot of sandwiches. This recipe felt very doable, especially with using very basic ingredients. I bought a jar of instant yeast at your suggestion, so I can just scoop some out. I love that this bread can be used for both sandwiches and for serving at dinner since it tastes so fresh – and I feel a sense of pride putting it on the table. Now I know I can make sandwich bread at home, I will definitely be doing it more regularly.
gretchen! you are the best! good for you trying something new and i’m so glad your bread was a success. welcome to your new adventure and i hope to continue to help you ❤️
Would it be possible to replace the water with milk in this recipe?
yes, absolutely. i used water for budget purposes but milk is great. maybe a slightly longer rise, but not much 🙂
Help please. I’m missing something. I just made this recipe 6x. First rise always surprises me (20 minutes in kitchen 68°F)… Tested 2nd rise 6 ways…from 1/4 inch above rim to 5/8 above. All 6 same results – fall flat the second they hit the oven. Confident in measurements – all on gram scale. I’ll do ANYTHING to get a loaf like your photo. Advice please? Thank you!!!!
John Robert
John Robert I’m so sorry I just saw this. If it’s rising fast and falling flat, I’d say the dough is too wet and you need a little more flour. I don’t develop my recipes in grams so that could be the issue. Good luck!!!!
Also I’m assuming you’re using instant yeast not rapid rise, which is different.
What size loaf pan please?
Can I adjust it for my Wilton 6.4 x 9.7 x 3.6 inches
(https://www.amazon.com/gp/aw/d/B00K721YY2?psc=1&ref=ppx_pop_mob_b_asin_title)
I can’t wait to try this. I cook bread for charity every week
Thanks so much.
Hey John, looks like your pan is a tad larger than average? I would personally try to triple the recipe and divide it into 2 loaves. Or multiply each ingredient by 1.5. You can double or triple on the bottom of the recipe card.
Thank you
Any thoughts on doing this in a bread machine?
it will be just fine in there!