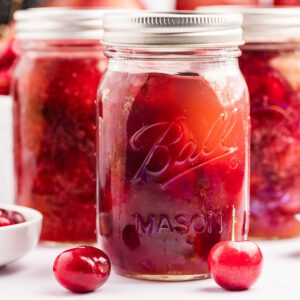
Not many of us have a cherry tree, but we can all go to the farmer’s market when cherries are at their best prices and are the most delicious they’ll ever be. This recipe will give you enough cherry pie filling for 7 beautiful pies, but we like it as ice cream topping even more. Of all the canning recipes I make, this one is the one I get most excited about pulling off the shelves.

Oh, make sure you wear an apron. The cherries make an absolute mess.
Table of Contents
Ingredients and Tools You’ll Need
You can use either sweet or tart cherries, or even a combo of the two. But get yourself a cherry pitter to make your life easier (and less messy).

Heart’s Content Farmhouse is a participant in the Amazon Services LLC Associates Program, an affiliate advertising program designed to provide a means for sites to earn advertising fees by advertising and linking to Amazon.com. This means that when you click on certain links on this site and make a purchase, I may earn a small commission at no additional cost to you. I only recommend products I genuinely believe in and would use in my own kitchen. As an Amazon Associate, I earn from qualifying purchases.

FREE FOR SUBSCRIBERS
Canning Binder
Subscribe (free!) to my newsletter to receive this PDF + dozens of others in my printable library. You’ll also get emails you’ll truly love, with a weekly meal and so much more.
If you’d like to double or triple this recipe, you can make adjustments in the recipe card at the bottom of this post.
Equipment
- Water Bath Canner
- Large pot
- Cherry pitter
Ingredients
- 6 quarts cherries, sweet or tart
- 7 cups sugar
- 1 ⅓ cup clear jel (for thicker pie filling)
- 9 ⅓ cups water
- ½ cup lemon juice
- 1 tablespoon vanilla extract
- 1 tablespoon almond extract
- ½ cup tart cherry juice (optional for color)
How to Make Cherry Pie Filling
Step One: Prep For Canning
Fill your water bath canner with water and simmer on the stovetop. Wash your jars with hot, soapy water. Transfer them to the water bath canner and simmer until the pie filling is ready. Place the lids and rings in a saucepan and simmer (do not boil).
Step Two: Prep Cherries
Bring a large pot of water to a boil. Destem and remove the pits from the cherries. Working in batches, blanch the cherries in the boiling water for 3 minutes and transfer them to a large bowl. Set aside.

Step Three: Start Syrup
In a large pot, add the sugar and clear jel. Stir to combine. Add the water.

Step Four: Cook To Thicken
Place over medium heat and allow it to thicken, stirring constantly. Continue until the mixture becomes bubbly. This process takes about 8 minutes.

Step Five: Add Juices And Flavoring
Add in the lemon juice, vanilla extract, almond extract, and cherry juice (if using). Stir to combine. Allow the mixture to start bubbling again, stirring constantly. This takes about 2-3 minutes.

Step Six: Add Cherries
Remove the mixture from the heat and fold in the blanched cherries.

Step Seven: Fill Jars
Using a canning funnel, ladle the cherry pie filling into the prepared jars, leaving a 1 ¼ inch head space.

Step Eight: Clean Rims And Screw-On Lids
Clean the rims of the jars using a moist, clean towel. Add the lid and rings, tightening the rings until they’re fingertip-tight.
Step Nine: Process Jars
Transfer the jars to the water bath canner, making sure the jars are fully submerged in water. Bring the water to a boil. Once boiling, set the timer and process quart jars for 35 minutes and pint jars for 30 minutes.

Step Ten: Rest
Turn off the heat, remove the lid, and allow it to sit in the water for 10 minutes.
Step Eleven: Cool And Check The Seals
Remove the jars from the water bath canner and transfer them to a cooling rack or heat-resistant spot for 12-24 hours. After 24 hours, check the lids for a proper seal. Once a proper seal has been confirmed, remove the rings and store the jars in a cool, dark place for up to 18 months or per your lids manufacturer’s recommendations.

Storing and Using Your Cherry Pie Filling
Once your jars are properly sealed and cooled, store them in a cool, dark place. They will last up to 18 months.
There are lots of ways to use this!
- Use it as a filling with my favorite pie crust for a classic dessert.
- Serve it over old-fashioned vanilla ice cream.
- Top a cheesecake with it.
- Bake this cobbler and use cherry instead of blackberry filling.
- Make some thumbprint cookies and fill them with this filling.

More Pie Filling Recipes
- When apples are in season, make some classic apple pie filling.
- This lemon pie filling doesn’t need any canning!
- Every summer, I have wild blackberries that grow like crazy. Making blackberry pie filling is one way to use them up.
- Blueberry pie filling is sweet and another family favorite.
Printable Recipe

Cherry Pie Filling
Equipment
- Large pot
- Cherry pitter
Ingredients
- 6 quarts cherries sweet or tart
- 7 cups sugar
- 1 ⅓ cup clear jel (for thicker pie filling)
- 9 ⅓ cups water
- ½ cup lemon juice
- 1 tablespoon vanilla extract
- 1 tablespoon almond extract
- ½ cup tart cherry juice (optional for color)
Save This Recipe
You'll join my email list which you will love. And if you don't, unsubscribe in one click. ❤️
Instructions
- Prep for canning. Fill your water bath canner with water and simmer on the stovetop. Wash your jars with hot, soapy water. Transfer them to the water bath canner and simmer until the pie filling is ready. Place the lids and rings in a saucepan and simmer (do not boil).
- Prep cherries. Bring a large pot of water to a boil. Destem and remove the pits from the cherries. Working in batches, blanch the cherries in the boiling water for 3 minutes and transfer them to a large bowl. Set aside.
- Start syrup. In a large pot, add the sugar and clear jel. Stir to combine. Add the water.
- Cook to thicken. Place over medium heat and allow it to thicken, stirring constantly. Continue until the mixture becomes bubbly. This process takes about 8 minutes.
- Add juices and flavoring. Add in the lemon juice, vanilla extract, almond extract, and cherry juice (if using). Stir to combine. Allow the mixture to start bubbling again, stirring constantly. This takes about 2-3 minutes.
- Add cherries. Remove the mixture from the heat and fold in the blanched cherries.
- Fill jars. Using a canning funnel, ladle the cherry pie filling into the prepared jars, leaving a 1 ¼ inch head space.
- Clean rims and screw-on lids. Clean the rims of the jars using a moist, clean towel. Add the lid and rings, tightening the rings until they’re fingertip-tight.
- Process jars. Transfer the jars to the water bath canner, making sure the jars are fully submerged in water. Bring the water to a boil. Once boiling, set the timer and process quart jars for 35 minutes and pint jars for 30 minutes.
- Rest. Turn off the heat, remove the lid, and allow it to sit in the water for 10 minutes.
- Cool and check the seals. Remove the jars from the water bath canner and transfer them to a cooling rack or heat-resistant spot for 12-24 hours. After 24 hours, check the lids for a proper seal. Once a proper seal has been confirmed, remove the rings and store the jars in a cool dark place for up to 18 months or per your lids manufacturer's recommendations.
Notes
Nutrition


More to Explore
Hot Pepper Jelly Glazed Wings
Simple Homemade Marinara
How to Make Garlic Powder in a Dehydrator
Homemade Spiced Apple Rings (For Canning)