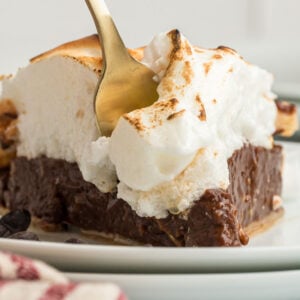
Grandma’s Chocolate Meringue Pie Recipe
This a classic dessert with beautiful presentation: a rich chocolate custard base with a soft meringue topping, all golden on top. It’s worth all work for a special occasion.

This is not that hard to make. But everyone seems to go crazy over it and everyone will ask you how you made this. One tip: spread the meringue to the crust to seal in the filling so the pie stays fresh and looks great until the last piece.
Table of Contents
Ingredients and Tools You’ll Need
You can’t substitute the cornstarch here since it will help thicken the chocolate filling to a custard-like texture. And don’t use low fat milk on me. But you can use milk chocolate chips instead of dark if you want. We’re also using a prepared pie crust already made from the store to make our lives easier. But if you would like to make your own, I have a sourdough pie crust recipe you might like.

Don’t try this without a hand mixer. Making meringue by hand takes forever!

This makes one pie with eight servings. If you’d like to double or triple this recipe, it’s simplest to just make 2 or pies. You can make adjustments in the recipe card at the bottom of this post.
Equipment
- Pie plate
- Electric Mixer
- small mixing bowl
- Medium saucepan
- Whisk
- Wooden spoon or silicone spatula
Ingredients
Chocolate Filling
- ⅓ cup cornstarch (1.5 ounces)
- 2 cups whole milk
- 3 egg yolks
- 1 egg
- ½ cup granulated sugar (4 ounces)
- 2 tablespoons salted butter
- 1 teaspoon vanilla
- ¾ cup dark chocolate chips (4 ounces) (milk chocolate is fine too)
For the Meringue
- ¼ teaspoon cream of tartar
- ⅓ cup plus 1 tablespoon granulated sugar (3 ounces)
Assembly
- 1 prepared pie crust (9 inches)
How to Make Chocolate Pie with Meringue
If you can, try to make the meringue on a dry day. Humidity can make it take longer to reach stiff peaks or make it become sticky after baking.
Step One: Get Your Crust Ready
Heat the oven to 450°F. Roll out your pie crust in a 9-inch pie plate and press it down good into the edges. Poke holes all over the bottom with a fork so it doesn’t puff up weird when you bake it.
Step Two: Make the Custard Base
In a small bowl, whisk the cornstarch with 4 tablespoons of the milk until it’s smooth – no lumps. Add your egg yolks and the whole egg, whisk it all together, then set it aside.

In a medium saucepan, put the rest of the milk and the 1/2 cup sugar. Heat it up on medium-high, stirring now and then, until it starts boiling. Once it’s boiling, take it off the heat.
Step Three: Temper Your Eggs.
This part is important – you need to slowly add about 1/4 cup of that hot milk to your egg mixture, whisking like crazy the whole time. This warms up the eggs without cooking them. Then pour that whole mixture back into the saucepan with the rest of the hot milk.
Step Four: Finish the Custard
Put the pan back on medium-high heat and stir constantly until it gets thick like pudding – takes about 5 minutes. Take it off the heat and stir in the butter and vanilla until everything’s smooth. Add the chocolate chips and keep stirring until they’re completely melted.

Step Five: Fill Your Pie
Pour this warm chocolate custard right into your pie crust and spread it around evenly. Let it cool a bit while you make the meringue.
Step Six: Make the Meringue
In a clean bowl (this matters – any grease will mess up your meringue), beat the egg whites and cream of tartar with an electric mixer on medium speed until you get soft peaks. Then slowly add the sugar bit by bit, and crank the mixer to high. Keep beating until it’s shiny and holds stiff peaks. Don’t go overboard here or it’ll get watery.

Step Seven: Top and Bake
Make sure your oven is still at 450°F. Spread the meringue over the chocolate filling with a spatula, making sure it touches the crust edges all around – this keeps it from shrinking. Bake for 3-5 minutes, watching it closely so it doesn’t burn. You want it golden brown.

Step Eight: Cool It Down
Let the pie sit at room temperature for at least 2 hours before you cut into it. I know it’s tempting, but the filling needs time to set properly.
Storing & Serving
The best way to store the pie is to keep it in the fridge. This will prevent the meringue from becoming soft and soggy and will help the custard stay firm. It will keep for up to five days, tightly covered.
This is the perfect dessert for Christmas dinner along with these holiday favorites.
- Cast iron skillet green beans are made with bacon, so even picky kids might like it!
- White cheddar scalloped potatoes are cheesy and easy – the perfect side dish.
- Old fashioned yeast rolls are fluffy, buttery, and melt in your mouth. You won’t be disapppointed.
Questions and Troubleshooting
You’ll want the meringue to form stiff, glossy peaks. A quick way to check is to lift the beaters—if the meringue stands up straight with a little curl at the top, you’re there! Be careful not to overbeat it, as that can cause the meringue to weep (release liquid) later.
Spread it all the way to the crust’s edge, making sure it touches and seals against it. This will help prevent gaps and keep everything in place as it cools.
You might have cooked it too quickly or at too high a heat. Stir constantly and cook it over medium heat to avoid scorching. If lumps form, you can pass the filling through a fine mesh strainer to smooth it out before pouring it into the crust.

More Pies You’ll Love
You can’t go wrong with a classic pie for dessert.
- Lemon meringue pie is bright and fresh.
- Blackberry raspberry pie is a favorite we come back to every summer.
- This key lime pie is the real deal (straight from a beachfront chef).
- A peach apple pie will satisfy your craving for fall when it’s still summer.
Printable Recipe
Grandma’s Chocolate Meringue Pie
Equipment
- Pie plate
- Electric Mixer
- small mixing bowl
- Medium saucepan
- Whisk
- Wooden spoon or silicone spatula
Ingredients
Chocolate Filling
- ⅓ cup cornstarch (1.5 ounces)
- 2 cups whole milk
- 3 egg yolks
- 1 egg
- ½ cup granulated sugar (4 ounces)
- 2 tablespoons salted butter
- 1 teaspoon vanilla
- ¾ cup dark chocolate chips (4 ounces) (milk chocolate is fine too)
For the Meringue
- ¼ teaspoon cream of tartar
- ⅓ cup plus 1 tablespoon granulated sugar (3 ounces)
Assembly
- 1 prepared pie crust (9 inches)
Save This Recipe
You'll join my email list which you will love. And if you don't, unsubscribe in one click. ❤️
Instructions
- Prep the pie shell. Preheat the oven to 450℉. Then, roll out your pie crust into a 9-inch pie plate, pressing it firmly into the edges. Prick the base with a fork to prevent bubbling while baking. Set aside.
- Prepare the custard base. Whisk together the cornstarch and 4 tablespoons of milk in a small bowl until smooth. Then, add the egg yolks and whole egg, whisking until well combined. Set aside. Next, in a medium saucepan, combine the remaining milk and granulated sugar. Bring this mixture to a gentle boil over medium-high heat, stirring occasionally. Once it reaches a boil, remove from the heat.
- Temper the eggs. Slowly pour about ¼ cup of the hot milk into the cornstarch-egg mixture, whisking constantly to prevent curdling. Then, pour the tempered egg mixture into the saucepan with the remaining hot milk.
- Cook the custard and add the chocolate. Return the pan to medium-high heat and cook, stirring constantly, until the mixture thickens to a custard-like consistency, about 5 minutes. Then, remove from heat and stir in the butter and vanilla extract until melted and smooth. Next, add the chocolate chips and stir until fully melted and incorporated.
- Fill the pie shell. Pour the warm chocolate custard filling immediately into the prepared pie shell, spreading it evenly. Set aside to cool it slightly while you prepare the meringue.
- Make the meringue. In a clean, medium-sized bowl, add the egg whites and cream of tartar. Using a handheld electric mixer on medium speed, beat the egg whites until soft peaks form. Then, slowly add the granulated sugar a little at a time, and increase the mixer speed to high. Continue beating until the meringue is glossy and holds stiff peaks. (Avoid overmixing, as this can cause the meringue to release liquid.)
- Top and bake the pie. Preheat the oven to 450℉ if it has cooled. Use a rubber spatula to spread the meringue over the chocolate filling, ensuring it touches and seals the edges of the crust to prevent shrinking. Place the pie in the oven and bake for 3-5 minutes, watching closely to prevent burning. The meringue should turn a light golden brown.
- Cool and serve. Remove the pie from the oven and let it cool at room temperature for at least 2 hours before slicing. This helps the filling set fully. Enjoy your slice!
Notes
Nutrition