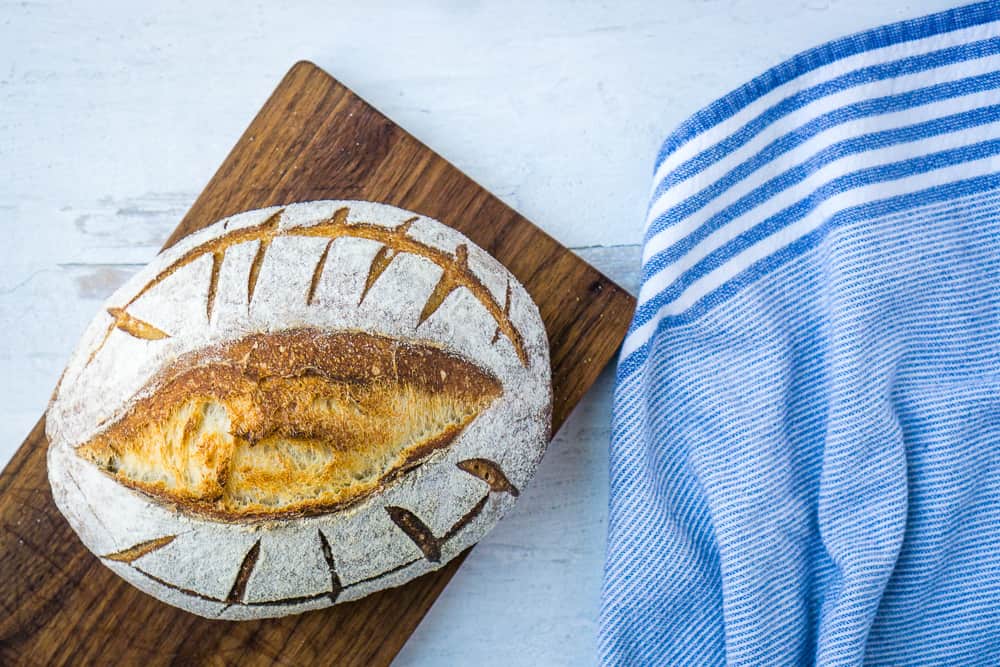
Most people love the idea of baking with sourdough because they see pictures of beautiful artisan loaves with deep crust, slashes, and all the rest. And then the reality of their bread is a flat, weird situation that is not quite what they expected. Anyone else?
It’s time to end that sadness forever. Because once you master this bread machine sourdough recipe, you’ll have a foolproof loaf you’ll be proud of every time.
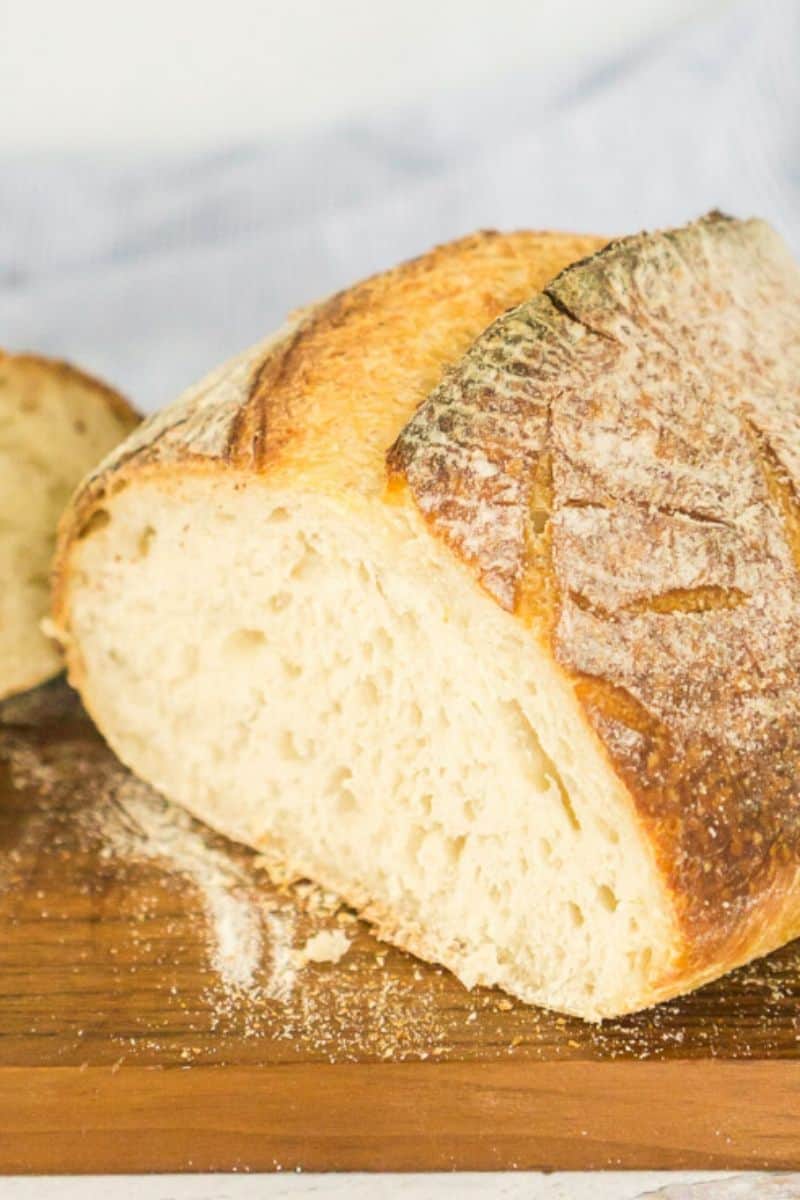
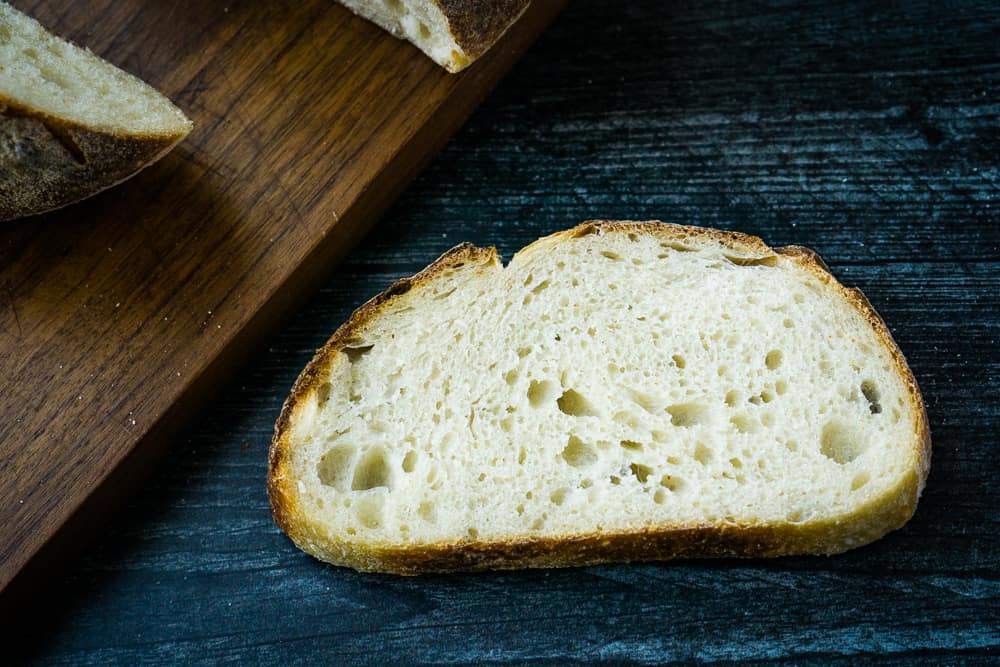
Over time, this has become my go-to for daily baking. It’s incredibly easy, especially since my bread machine handles most of the kneading. With just a few basic ingredients and letting the dough rise overnight in the fridge, I always end up with a crispy loaf on the outside and soft and chewy inside.
It’s perfect for sandwiches, toast, or even just a buttered slice. At first, the dough might seem a bit dry, but I’ve learned that’s completely normal. Resist the urge to add extra water and trust the process, and it turns out perfectly every time.
Ingredients and Tools You’ll Need
We’re using the bread machine to do the kneading, but you can also do it in a stand mixer. Make sure your starter is bubbly and active.
Get a Free + Pretty PDF Recipe Book
Sourdough Sunday Newsletter

Every Sunday evening I’ll send you a sourdough recipe to make that week, straight from my kitchen to your inbox.
And as a thank you for signing up, I’ll send you this e-book with beautiful printable recipes right away. Simple!
You will not be added to any other email lists or my daily newsletter. But if you’re already on my newsletter, you’re welcome to join and receive both.
Heart’s Content Farmhouse is a participant in the Amazon Services LLC Associates Program, an affiliate advertising program designed to provide a means for sites to earn advertising fees by advertising and linking to Amazon.com. This means that when you click on certain links on this site and make a purchase, I may earn a small commission at no additional cost to you. I only recommend products I genuinely believe in and would use in my own kitchen. As an Amazon Associate, I earn from qualifying purchases.
Equipment
- Bread machine (with a dough cycle setting) (It does the kneading for you. If you don’t have one, kneading by hand or using a mixer works, but a bread machine simplifies the process.)
- Large mixing bowl
- Measuring cups and spoons
- Damp tea towel or kitchen towel
- Baking Sheet
- Parchment paper
- Rimmed baking sheet
Ingredients
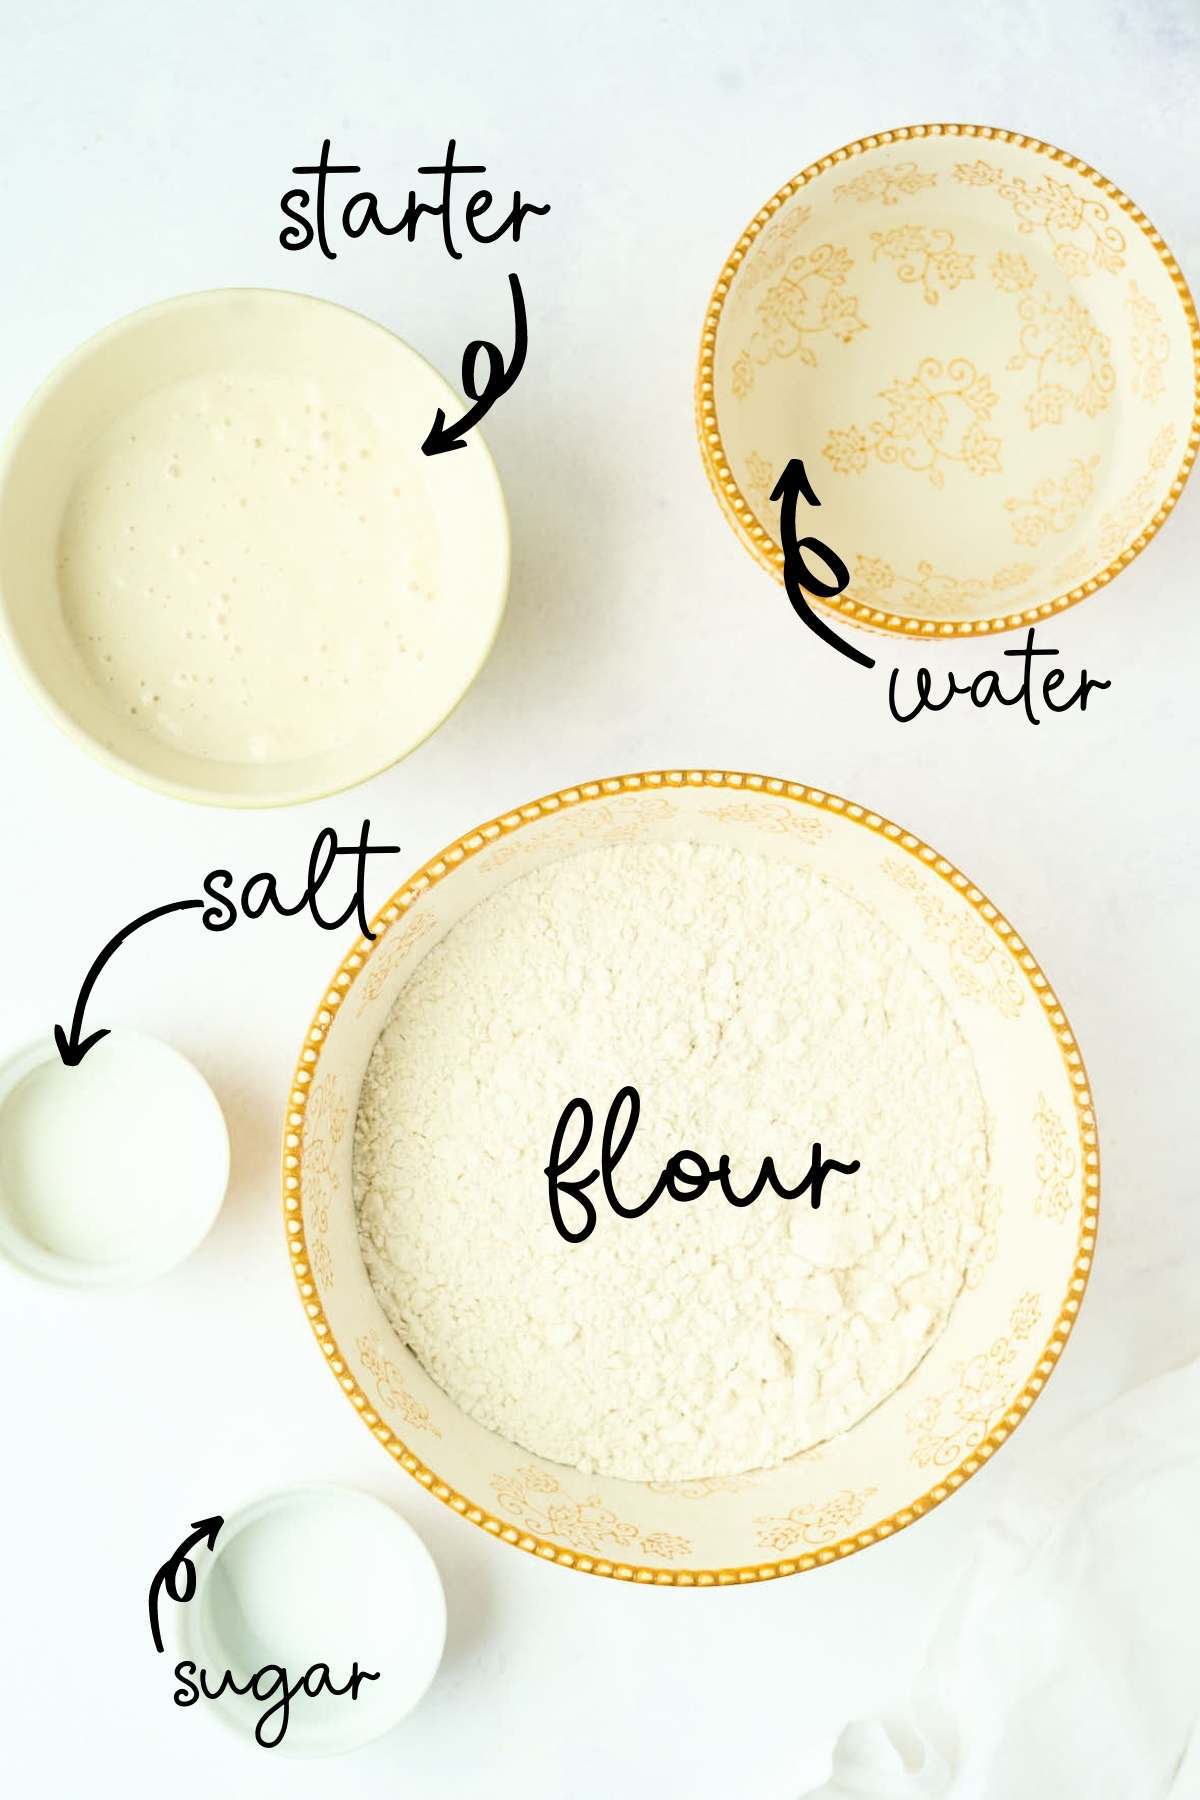
- 3 cups bread flour (15.85 ounces) (regular or wheat flour will work too, but bread flour will make your bread chewier and stronger)
- 1 cup lukewarm water (7.75 ounces)
- ¾ cup fed sourdough starter (5.65 ounces) (You can also easily make your own at home with flour and water—it takes about 5-7 days to get a strong starter going.)
- ½ tablespoon sugar
- 1 ¾ teaspoon salt
How to Make Bread Machine Sourdough
Step One: Autolyze
Combine the bread flour, sourdough starter, sugar, and water in a large mixing bowl. The dough will feel drier than typical sourdough—this is normal. Do not add more water. Use your hands to make sure all ingredients are incorporated into a cohesive ball. Cover the bowl with a damp tea towel and let the dough rest on the counter for 30 minutes. Tip: Pre-measure the salt and place it in a small container on the towel to remind yourself to add it later.

Step Two: Knead
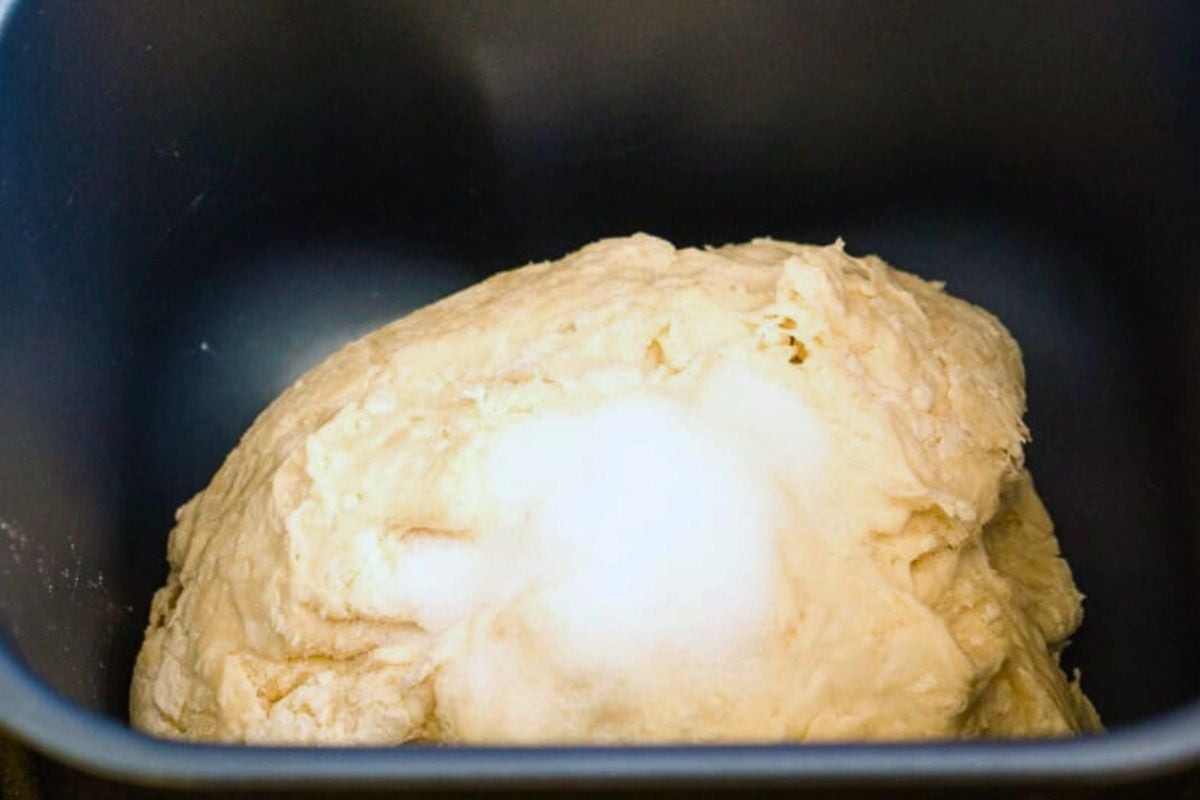
After the autolyze, transfer the dough and salt into the bread machine bucket. Then, select the “dough” cycle and press start. You don’t need to fold the dough or anything crazy like that. Just walk away.
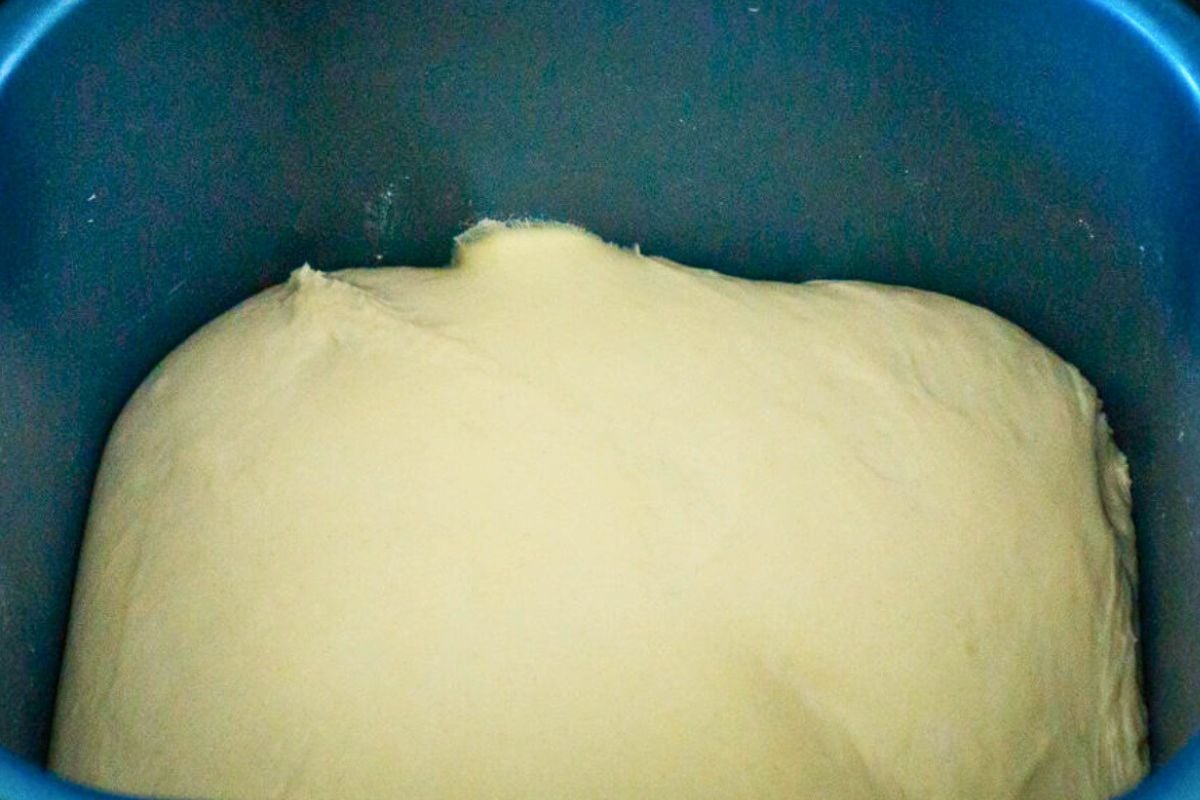
Step Three: First Rise
When the cycle ends, leave the dough in the machine to continue rising for 2-3 more hours. The dough should be noticeably puffier and soft to the touch, though it may not have doubled in size. This longer rise helps develop the flavor and texture of the bread.
Step Four: Shape The Loaf
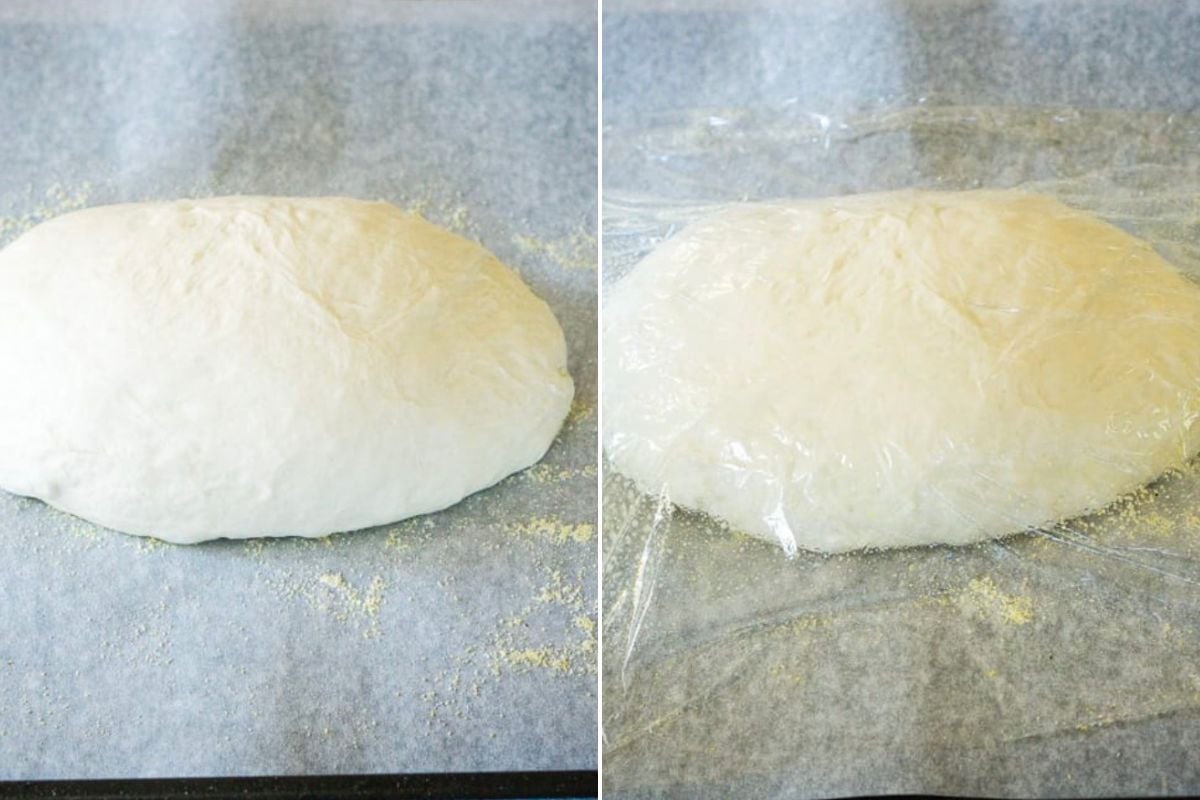
Prepare a baking sheet by lining it with parchment paper and sprinkling cornmeal over the surface. Carefully remove the dough from the bread machine and gently shape it into a round or oval loaf. The dough will be slightly sticky, but avoid using flour for shaping. Place the dough on the prepared baking sheet.
Step Five: Second Rise (Overnight Proof)
Spray a piece of plastic wrap with cooking spray and loosely cover the shaped dough. Place the covered loaf in the refrigerator to proof overnight for 8 to 16 hours.
Step Six: Prep For Baking
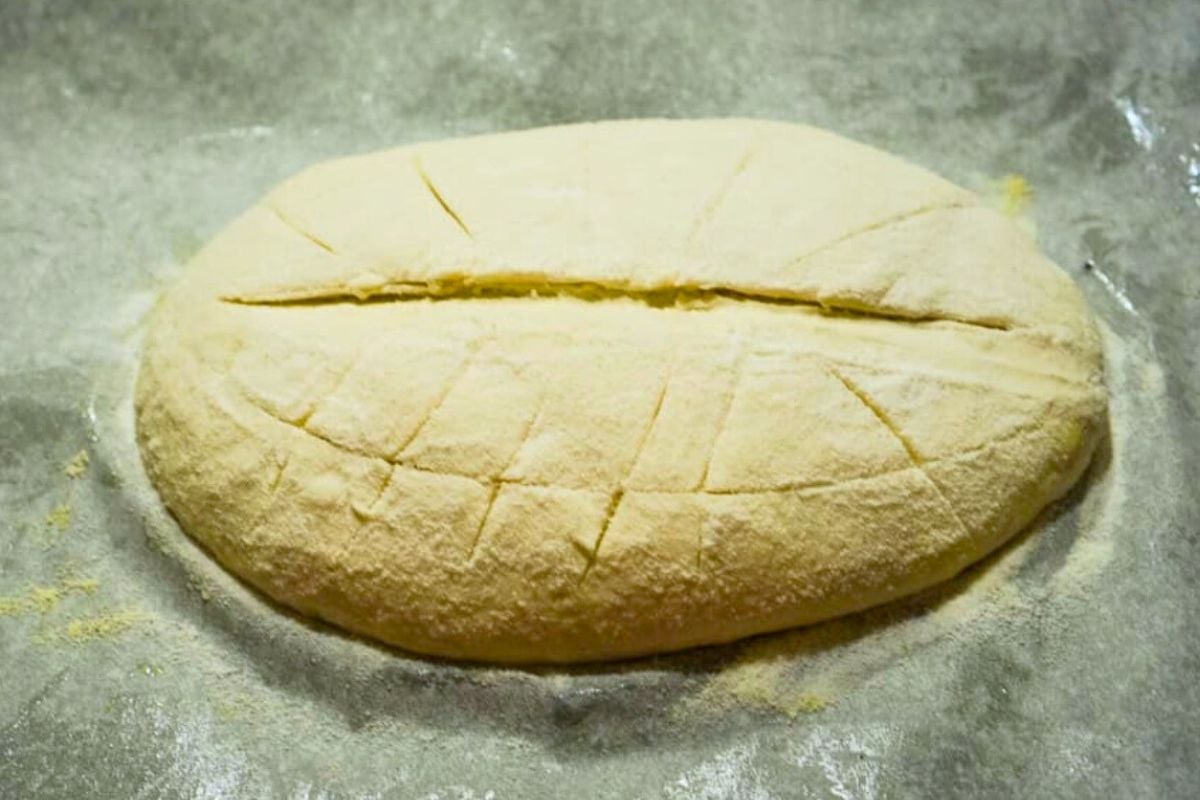
In the morning, preheat the oven to 450°F (230°C). Position two racks: one in the center of the oven and the other in the lower middle. Then, place an empty-rimmed baking sheet on the lower rack while the oven is preheating. Next, remove the loaf from the fridge. Dust it lightly with flour and use a lame or a sharp serrated knife to slash the top of the dough, allowing the loaf to expand during baking.
Step Seven: Bake With Steam
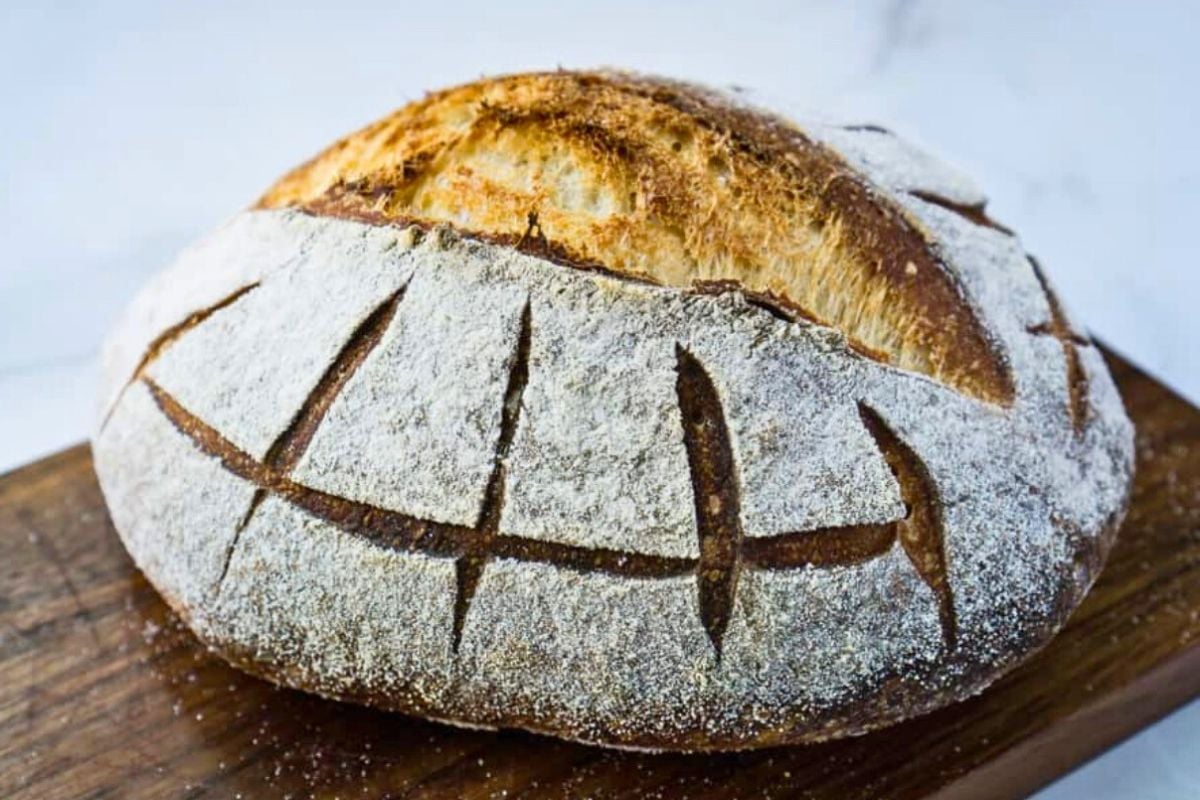
When the oven is fully preheated, carefully pour 1 cup of water into the baking sheet on the lower rack to create steam. Immediately place the loaf on the center rack and close the oven door. Bake the loaf for 45 minutes until it reaches a deep golden-brown color. Remove from the oven and allow the bread to cool on a wire rack for at least 4 hours.
Step Eight: Slice And Serve
Once the bread has fully cooled (after at least 4 hours), use a sharp, serrated knife to slice the loaf into even pieces. Enjoy fresh or toasted with your favorite toppings!
Storage Instructions
Once the bread has completely cooled, wrap it in a clean kitchen towel or place it in a paper bag. This will help keep the crust crispy while preventing the bread from drying. Avoid using plastic, as it can cause the crust to become soft. Stored this way, the bread will stay fresh for about 3 days at room temperature.
You can also freeze it. First, let the loaf cool completely. Then, slice the bread into pieces, so it’s easier to use later. Wrap the slices tightly in plastic wrap or aluminum foil and place them in a freezer-safe bag. Remove as much air as possible before sealing the bag. The bread can be stored in the freezer for up to 1 month.
Thaw the slices at room temperature or pop them straight into the toaster. You can also reheat them in the oven for a few minutes to freshen up the crust.
What to Serve with Bread Machine Sourdough Bread
This bread is great for everything from toast at breakfast to a side at dinner.
- Spread on some homemade butter or strawberry jam.
- It’s great for grilled cheese sandwiches since it doesn’t have big holes.
- Serve as a side for dinner, like with a creamy chicken noodle soup.
Questions and Troubleshooting
Check my Sourdough FAQ page to see what could have gone wrong.
The autolyze step helps improve the dough’s texture, but if you’re short on time, you can throw everything in the bread machine and still get a great loaf.
No! It’s normal for this particular recipe. Once it rests and rises, the dough will soften and be easier to work with.
Great question! The dough should look noticeably puffier, but doesn’t need to double in size. If you press it gently with a finger and it springs back slowly, it’s ready.
Yes, you can! If you’re in a rush, let the dough rise at room temperature for another 2-3 hours. The slow, overnight rise helps develop the sourdough flavor, so try it when you can.
There are a couple of reasons this could happen. If your starter wasn’t bubbly and active when you used it, that could slow the rise. Also, sourdough can be slightly slow to rise, especially in cooler kitchens. If this happens, just give it more time to puff up! If you’re having trouble with your sourdough starter and wondering if it’s still alive, don’t worry! Check out this helpful guide on how to tell if you’ve killed your sourdough starter.
Yes! Some readers have baked this in the machine. But you can’t just run a cycle from start to finish. You’ll need to remove the dough to rest in the fridge overnight, then pop it back in to bake in the morning.
You sure can. The steam and baking sheet is really a workaround for those of us who don’t have one. 😊
More Sourdough Recipes For Beginners
- My sourdough roll recipe uses the same steam technique and adds a pinch of instant yeast for a fluffy roll with a crisp crust.
- Sourdough baguettes are hand kneaded but also a similar process.
- And if you want to do all the crazy folding and buy some neat tools, here is a true artisan bread recipe you might like.
Printable Recipe

Bread Machine Sourdough
Equipment
- Bread machine (with a dough cycle setting)
- Large mixing bowl
- Measuring cups and spoons
- Damp tea towel or kitchen towel
- Baking Sheet
- Rimmed baking sheet
Ingredients
- 3 cups bread flour (15.85 ounces)
- 1 cup lukewarm water (7.75 ounces)
- ¾ cup fed sourdough starter (5.65 ounces)
- ½ tablespoon sugar
- 1 ¾ teaspoon salt
Save This Recipe
You'll join my email list which you will love. And if you don't, unsubscribe in one click. ❤️
Instructions
- Autolyze. Combine the bread flour, sourdough starter, sugar, and water in a large mixing bowl. The dough will feel drier than typical sourdough—this is normal. Do not add more water. Use your hands to make sure all ingredients are incorporated into a cohesive ball. Cover the bowl with a damp tea towel and let the dough rest on the counter for 30 minutes.Tip: Pre-measure the salt and place it in a small container on the towel to remind yourself to add it later.
- Knead. After the autolyze, transfer the dough and salt into the bread machine bucket. Then, select the “dough” cycle and press start. You don’t need to fold the dough or anything crazy like that. Just walk away.
- First rise. When the cycle ends, leave the dough in the machine to continue rising for 2-3 more hours. The dough should be noticeably puffier and soft to the touch, though it may not have doubled in size. This longer rise helps develop the flavor and texture of the bread.
- Shape the loaf. Prepare a baking sheet by lining it with parchment paper and sprinkling cornmeal over the surface. Carefully remove the dough from the bread machine and gently shape it into a round or oval loaf. The dough will be slightly sticky, but avoid using flour for shaping. Place the dough on the prepared baking sheet.
- Second Rise (overnight proof). Spray a piece of plastic wrap with cooking spray and loosely cover the shaped dough. Place the covered loaf in the refrigerator to proof overnight for 8 to 16 hours.
- Prep for baking. In the morning, preheat the oven to 450°F (230°C). Position two racks: one in the center of the oven and the other in the lower middle. Then, place an empty-rimmed baking sheet on the lower rack while the oven is preheating. Next, remove the loaf from the fridge. Dust it lightly with flour and use a lame or a sharp serrated knife to slash the top of the dough, allowing the loaf to expand during baking.
- Bake with steam. When the oven is fully preheated, carefully pour 1 cup of water into the baking sheet on the lower rack to create steam. Immediately place the loaf on the center rack and close the oven door. Bake the loaf for 45 minutes until it reaches a deep golden-brown color. Remove from the oven and allow the bread to cool on a wire rack for at least 4 hours.
- Slice and serve. Once the bread has fully cooled (after at least 4 hours), use a sharp, serrated knife to slice the loaf into even pieces. Enjoy fresh or toasted with your favorite toppings!
Video
Notes
Nutrition


I wish I could post a picture, as it looks AMAZING. Thank you so much for your easy-to-follow recipe. I largely struck out with the bread machine only process, so this was my last hope. Can’t wait to taste it. Four hours seems like an eternity…
haha I. get it! maybe you could cut after 2 hours 🙂
I managed to wait three hours, and it was delicious! Loaf two was also successful, though my ear became more of a PacMan / Audrey II from Little Shop of Horrors mouth, but I’m not complaining. Thank you!
Thanks.
My first ever attempt and it to be in bread machine as too lazy to knead.
Perfect result.
Question. Would it work without the sugar??
yes! just a slightly different flavor!
Perfect, simple, and tastes very good!
I made it even simpler.
What I just changed is that I never took the dough from the bread machine pan, from start, refrigeration, to baking.
After the dough has finished rising 2 to 3 hours after the dough cycle, I punch it down a little, carefully scrape down the sides – still in the bread machine pan – and put the pan covered in the fridge overnight.
The next morning I take the basket out, let it about 1 hour at room temperature, and then bake it in the bread machine with the ‘bake’ cycle (about 1 hour)
glad you liked it Eric! so glad that it worked well baking the bread machine!
Hey Eric, did you still mix it in a bowl first? or did you do the first part in the bread machine too?
Can I use a proofing basket (instead of parchment paper on a sheet pan) for the overnight fridge storage in this recipe?
sure, it’s just not necessary as the loaf holds its shape pretty well 🙂
I’m in New Zealand. We use Celsius. I’ve just converted 450 to 220c – for me that seems super hot and I’m scared I’m going to burn it tomorrow when I cook it. Is it supposed to be that hot? Does the steam do something to counteract it?
Also, I forgot to leave my dough in the bread machine for a few more hours and I’ve put it in the fridge already. Should I get it out for a bit and then put it back in the fridge again? Can’t wait to see how it goes?! Thanks for the amazing instructions.
yes it bakes at a high temperature and the steam does knock the temp down at the beginning. if you prefer a. softer crust, you can turn the oven. down. a bit a few minutes into the baking time.
your dough should be fine rising just in the fridge 🙂
I forgot to slash it (I’m terrible at following recipes) so it doesn’t look like much but it TASTES SO GOOD!! Thank you so much for a an easy to follow and comprehensive recipe. LEGEND. Will definitely make it again and try and remember to slash it. Haha.
Husband is eating it saying it tastes like a bought one and he is fussy as hell!!
Thanks again!!
YAY!!!!
Sorry for a newbie question, but what is “fed”starter. Mine has been brewing on my counter for eight days, do I need to do anything to it before baking with it?
it just means that it is active and bubbly and that you have given it a feeding of flour recently. before baking it, it should double in volume about 8 hours after a feeding. 8 days is still pretty young. I would try a recipe. that uses a small amount of yeast while your starter is building strength, like these rolls: https://heartscontentfarmhouse.com/crusty-sourdough-rolls/
Is there any way we can use AP flour? No bread flour in sight these days… Thanks!
I have never tried it, but I had a friend who did. you’ll need to reduce the amount of water to 3/4 cup plus 1 tablespoon because all purpose flour absorbs less. it won’t be as chewy but it should work.
In step 1 you say to let bread ball rest on counter. How long of a rest?
about 30 minutes. sorry, I need to add that to the instructions
Thank you for great instructions and a great use for Fred the Bread (my starter!). This is heaven! Writing it up for inside my cupboard, it’s that good!!
awesome Kate! glad you liked it 🙂
In lock down in Spain, no yeast available, so decided to try sourdough.
3 weeks of failure.
Then I saw your post.
Success!
Thank you. Xxx
Such a detailed guide, I would have thought the original mix was too dry and added more water.
The only thing missing in your info for beginners is how to know if the sourdough is ready.i knew about the water float test, because of all failures.
I was giving up but after trying your recipe now a convert.
Gill I’m so happy it worked for you! I will add what you mentioned about the starter. Stay safe and keep baking. 🙂 -Katie
what about whole wheat flour? I have tried it but it seems a bit damp in the middle. (need to cook longer ? need more water?)
longer bake time or longer cool time. sourdough often seems “gummy” if you slice into it too early. whole wheat is going to be a denser loaf in generally which may be why is needs a little more time to bake. try turning down the temp about 25 degrees and giving it 15-20 more minutes so it doesn’t over brown the crust 🙂
Thanks for the tips, Katie. I’ll try that. Do you have a page that describes how to maintain starter? I feel like I am using up a lot of flour feeding half a cup a day!
Thanks again for this. have you tried red fife with this recipe?
This was the most accessible recipe for a home made sourdough loaf. Most other YouTube videos and recipes were too daunting.
I use a rye starter (100% hydration) and don’t any yeast. The taste and texture was incredible despite teetering on a burned crust
Tomorrow I’m trying a shorter baking time and a slightly higher hydration. Fingers crossed!
Big thanks for your clear instructions
that’s great walter :). I’m curious to see how the higher hydration goes!
Where do I get the sourdough starter recipe? Want to use my bread machine too!
I am working on a post about one right now! but here is a good one to get you started. all purpose flour is fine! https://www.kingarthurflour.com/recipes/sourdough-starter-recipe
Does this recipe require that the active fed starter pass ‘the float test’?
Hi Andrea, yes. it needs to be a well developed and bubbly starter. (however, sometimes a starter will be very active and STILL fail the float test. a better test is whether the starter doubles in volume after 8 hours or so.) hope this helps 🙂
Followed the instructions to the letter and made a delicious loaf. I used wholemeal flour & thought it might turn out heavy. It is heavier than I imagine it would be with white flour but it’s still a nice texture with great taste and I think healthier with wholemeal.
Thank you!
that’s so great! and nice to know about the whole wheal flour, as I’m running low on bread flour!
This was my second attempt at sourdough and it turned out incredibly well. My wife said it was the best she’s ever had. I’m biased but it was crazy tasty. My first was a disaster. I’m making it again to see if I just got lucky. My problem was the dough was too wet to work with easily. It turns out that my starter is wetter than most so this time I added a little less water and it handled better. I’ll keep you posted on this one.
that’s great!! let me know how it goes 🙂
Love your easy and clear instructions! I’m on my second try because I failed to read “fed” starter right at the beginning of your recipe …. my bad :). Surprisingly, it still turned out delicious with no complaints on the home front! Just about ready to put my second try into the oven …. sure it’s going to be great. Thank you for sharing ????
Victoria it’s so great to know that it worked with unfed starter! Glad you liked the recipe 🙂
How long do you rest before adding salt and putting on the dough cycle?
20-45 minutes 🙂
This turned out great!
hooray! 🙂
Perfect loaf! It was gone in a flash. So moist and delicious. Thank you!
so happy to hear it!
I’ve been trying on and off for 4 years to get a sourdough starter going. Came across your site and now I’ve just finished my first ever sourdough loaf. At 64 years old, better late than never. My husband rated it the best bread that he has ever had in all of his 68 years, so a huge thank you for this recipe. I am now hooked on keeping my starter alive, we’ve called him Bonefish Folley after a great Bahamian fisherman who has a fun song written about him. We dance to it every Friday at our Fish Fry here on Eleuthera and it always brings a smile to my face. Just like my little starter.Google the song and it will make you smile too. Thank you once again, island living is now even better.
Thank you Sonia! Love the song and your sourdough starters name. Mine is Bert :). Glad you enjoyed the recipe
Hi Sonia, Love the name of your starter, I even looked up the song, “Bonefish Folley”. What a happy, cute song. What is a fish fry? Sounds like a fun celebration to look forward to every week. Blessings to you on your sourdough bread yummyness!!!!!!
Great bread recipe.. success on the first try with my 11y/o daughter helping!!! We love sourdough bread and will try your recipe for rolls next. Thank you!!!
Oh I’m so happy to hear it! Bet you didn’t even miss all the folding of the dough ????!