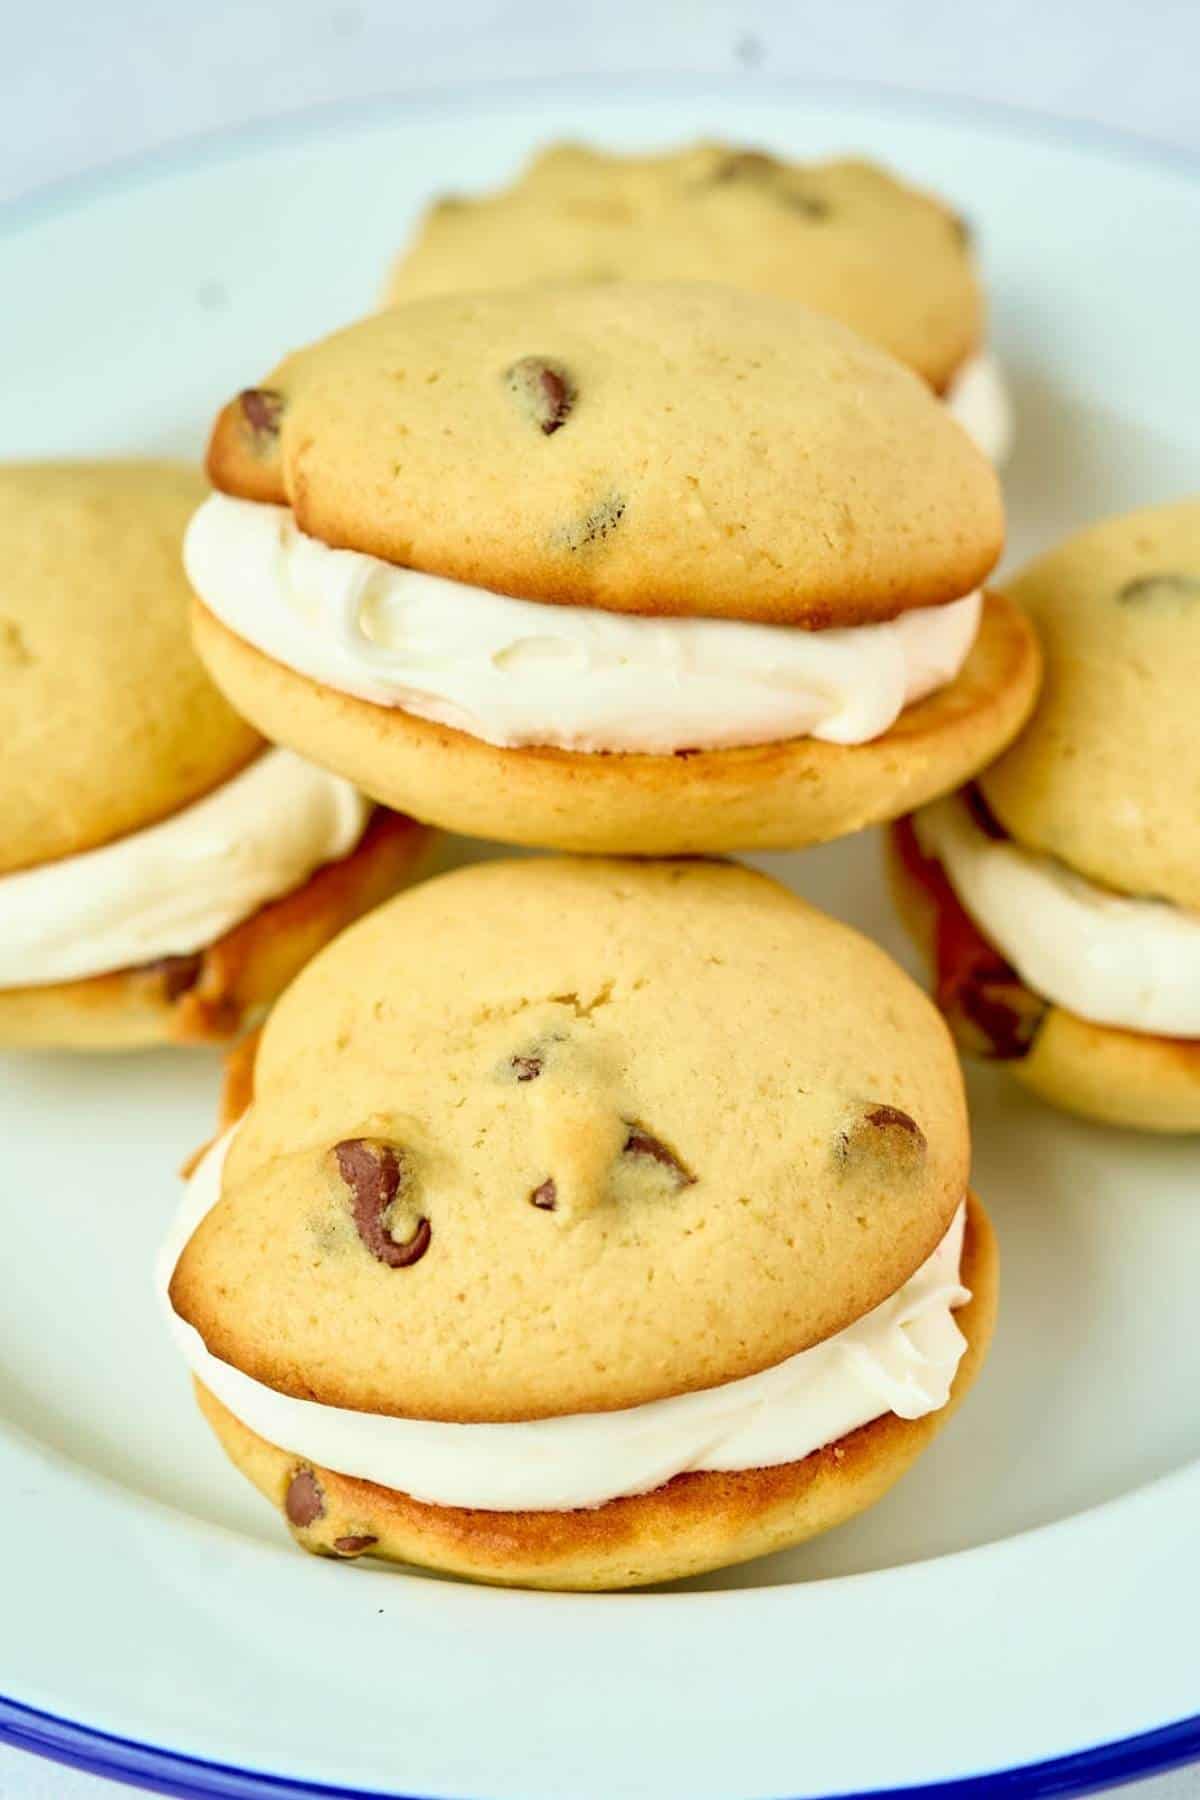
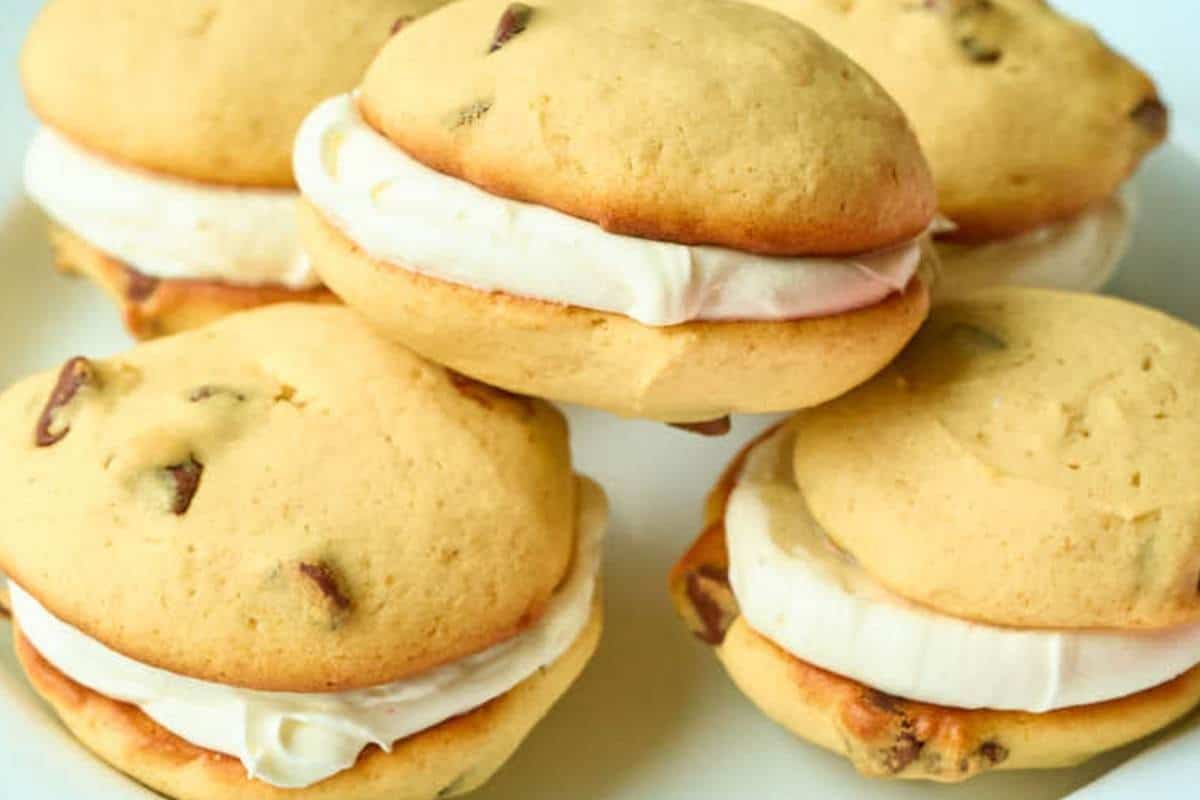
Chocolate Chip Whoopie Pies
Soft giant cookies that are like cakes. A ton of marshmallow buttercream. What’s not to like? Kids will flip for these, but so will adults. I like to make both parts ahead of time, assemble them before a party, and line the up on a narrow platter. Everyone is happy. Enjoy!

Chocolate Chip Whoopie Pies
Equipment
- Large cookie scoop
- big piping bag
Ingredients
The cakes:
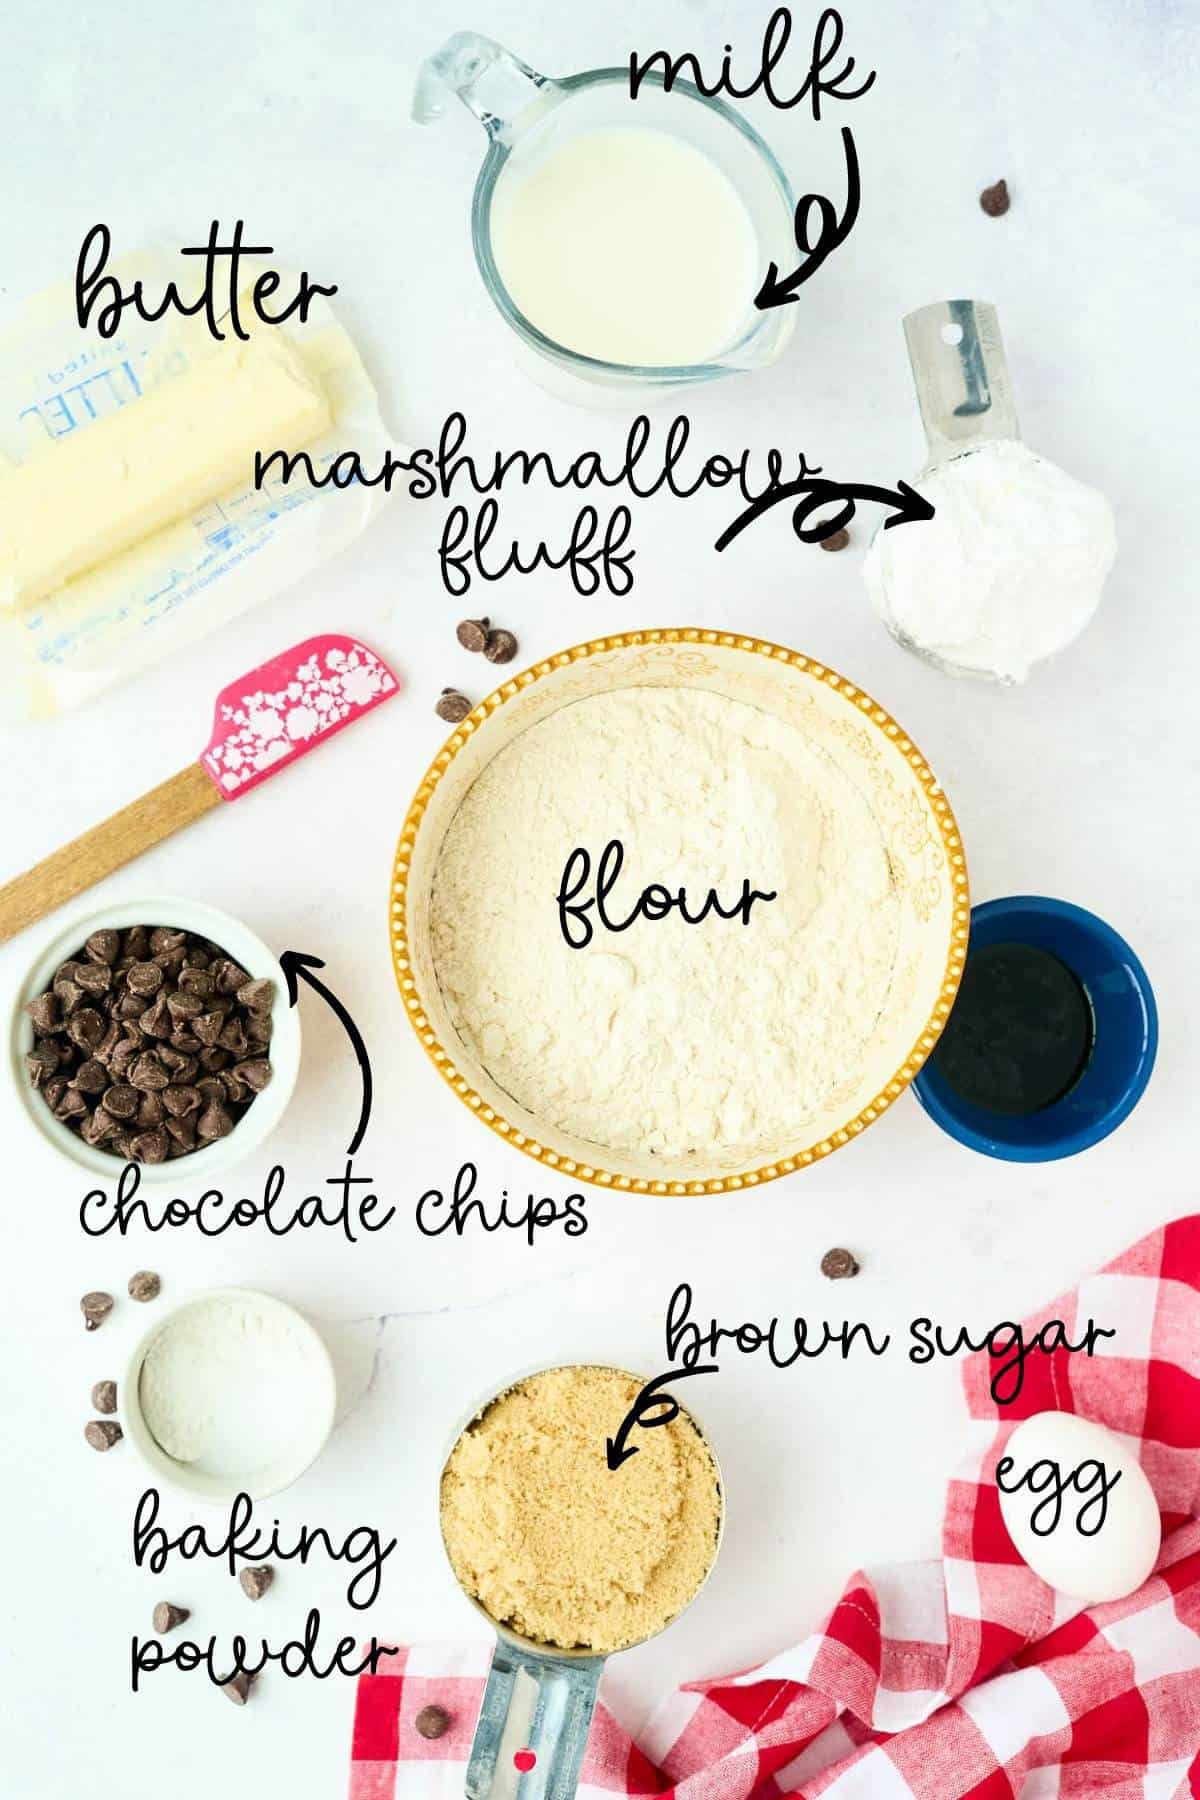
- ½ cup unsalted butter, softened
- 1 cup light brown sugar
- 1 egg
- 1 teaspoon vanilla
- 2 cups all purpose flour
- 1 teaspoon baking soda
- ½ teaspoon salt
- ¾ cup whole milk
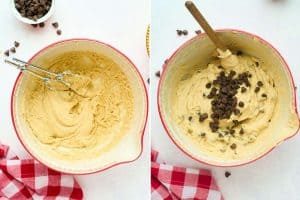
- ¾ cup chocolate chips
For the filling:
- 12 tablespoons unsalted butter, softened
- 1 cups powdered sugar
- 1 teaspoon vanilla
- ¼ teaspoon salt
- 2 cups marshmallow cream (such as Marshmallow fluff brand)
Save This Recipe
You'll join my email list which you will love. And if you don't, unsubscribe in one click. ❤️
Instructions
To make the cakes:
- Preheat the oven. Preheat the oven to 350°F with two racks positioned in the upper-middle and lower-middle positions. Then, line 2 baking sheets with parchment paper.
- Cream the butter and sugar. Cream the butter and light brown sugar at medium speed in a stand mixer until light and fluffy, for about 5 minutes. Then, beat in the egg and vanilla extract until fully incorporated, scraping down the sides of the bowl as needed.
- Combine the dry and wet ingredients. Whisk together the flour, baking soda, and salt in a large bowl. On low speed, add the dry ingredients to the butter mixture, ½ cup at a time, alternating with the milk. Begin and end with the flour mixture. Next, stir the chocolate chips by hand or at the lowest mixer speed.
- Portion the batter. Portion the batter onto the prepared baking sheets using a large cookie scoop or 3 tablespoons. Measure out the first portion, then eyeball the rest. Space them about 2 inches apart. You should have 16 cakes.
- Bake the cakes. Bake for 15-18 minutes, rotating the baking sheets halfway through. The cakes are made when a cake tester or toothpick comes out clean, but the cakes should still be soft.

- Cool the cakes. Transfer to a cooling rack and allow them to cool completely.

To make the filling
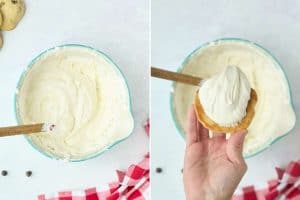
- Cream the butter and sugar. In a stand mixer, cream the butter and powdered sugar together at medium speed until light and fluffy, about 3-5 minutes. Then, mix in the vanilla extract and salt. Add the marshmallow cream and beat until smooth and fully combined.
To Assemble
- Spread the filling. Spread about ¼ cup of the filling onto the flat side of half of the cakes.
- Make the sandwiches. Place the remaining cakes on top, flat side down, to create sandwiches.

- Serve or store. Serve the whoopie pies immediately. Alternatively, refrigerate in an airtight container for up to 3 days.

Video
Notes
Nutrition
If a little one in your life asks for something different, why not try these homemade treats next time? Trust me, if you put these on a platter at a party, get ready for some excited guests!
(If you’re interested in its origins, the Farmer’s Almanac has a good article about the history of Whoopie pies. Many states claim they invented them, but Maine seems to have the most convincing argument.)

More Tips:
If you have a kitchen scale, consider weighing your ingredients for more precise measurements, especially the flour, which can easily be over-measured.
Use a piping bag to spread the filling onto the cakes for a polished finish. This makes it easier to control the amount and ensures an even filling layer in each whoopie pie.
If your filling is too soft to spread or pipe, put it in the fridge for a few minutes to firm it up before assembling your whoopie pies.
Because these cakes are meant to be soft, use a toothpick to test them. They’re done if it comes out clean or with a few moist crumbs. Overbaking can make them dry.
Keep a close eye on the cakes while they bake. They should be soft to the touch and just starting to set; overbaking will make them dry.
Key Ingredients and Tools
When making these whoopie pies, a few tools and ingredients are particularly important to ensure success. Here are some key items to keep in mind:
- Large Cookie Scoop: This tool helps you portion out even amounts of batter, ensuring all your cakes are the same size for easy sandwiching.
- Parchment Paper: Lining your baking sheets with parchment paper prevents the cakes from sticking and makes cleanup easier.
- Marshmallow Cream: This fluffy ingredient is key to the filling’s texture. If you can’t find it at your store, try making your own by whipping marshmallows with a bit of corn syrup until smooth.
- Semi-Sweet Chocolate Chips: These add the perfect balance of sweetness to the cakes. You can find them in the baking aisle, but feel free to use dark chocolate chips for a richer flavor.
These items play a big role in making your whoopie pies turn out just right, so be sure to have them on hand or find suitable alternatives!
Here are some quick substitutions you can try:
- Butter: Swap with margarine or coconut oil in equal amounts, but it may slightly change the texture.
- Whole Milk: Use any milk alternative (almond, soy, oat) for a dairy-free version, though it may affect the flavor and texture.
- Light Brown Sugar: Substitute with an equal amount of granulated sugar or coconut sugar; it may result in a slightly different flavor.
- Marshmallow Cream: Use homemade marshmallow fluff or a similar brand, but note that consistency might vary.
You might also love these Strawberry Whoopie Pies for a fruity twist or the classic Vanilla Whoopie Pies for a simple, timeless flavor.
Troubleshooting and Help
Absolutely! If you prefer milk chocolate or dark chocolate, swap them in. Just remember that milk chocolate will make the whoopie pies a bit sweeter, while dark chocolate will add a richer flavor. For something a bit different, you can try these Oatmeal Whoopie Pies.
Yes, you can definitely still make these without a stand mixer! A hand mixer works just as well, or you can even mix everything by hand with a little extra elbow grease. Just cream the butter and sugar until it’s nice and fluffy. You might also enjoy these Homemade Blueberry Hand Pies for more fun hand-held dessert ideas.
Oh no! This can happen if the batter is too warm. Next time, try chilling the batter for about 15 minutes before scooping it onto the baking sheets. It helps the cakes hold their shape better.
Yes, you can! Just wrap each whoopie pie individually in plastic wrap, then place them in an airtight container or a freezer bag. They’ll keep for about 2 months. When you’re ready to enjoy them, let them thaw in the fridge or at room temperature.
If you’re making them ahead, store the assembled whoopie pies in an airtight container in the fridge. They’ll stay fresh for up to 3 days. Just let them sit at room temperature for a few minutes before serving so the filling softens up a bit.
These are a simple, satisfying treat anyone can make at home, whether you’re making them for a special occasion or just because they will bring a smile to anyone who tries them.


I’ve made this recipe, following the instructions to a T, twice today making sure to use fresh ingredients and room temp butter and egg, etc and both times and they turned out flat both times. It needs more flour and maybe even another egg. Really not happy with how these cakes have turned out at all.
Question: for the smaller whoopie pies – how much bake time please? I would like to make the smaller version as a decoration on a cake I am making!
super cute idea! 🙂 i’d check at 12 minutes, might be a bit longer.
The cake part is great! However the frosting is far too buttery for me. I will substitute for an alternative buttercream or shortening frosting next time.
How do you get the cakes to be fluffy? Mine keep turning out so flat!
Hi Amber! Try adding a tad more flour to the batter. Then scoop them out and chill them before you bake. Also make sure your butter is soft but NOT melted. 🙂
Can I use buttercream filling?
yes!
One of my good friends birthday was coming up and when I asked what her favorite cookie was she told me “chocolate chip”. I couldn’t just make boring chocolate chip cookies so I went on a quest to find a more interesting version and found this cookie. I am so glad I did!!!! Not only did they turn out wonderfully but the directions were spot on. My only note would be that the filling was a little sweet for my taste, maybe adding a hint of cream cheese? Not sure. Either way this will be a recipe I will be making again and again!
glad you liked the recipe Allison! I agree the filling is definitely sweet! 🙂