Vanilla Whoopie Pie Recipe: Soft and Sweet
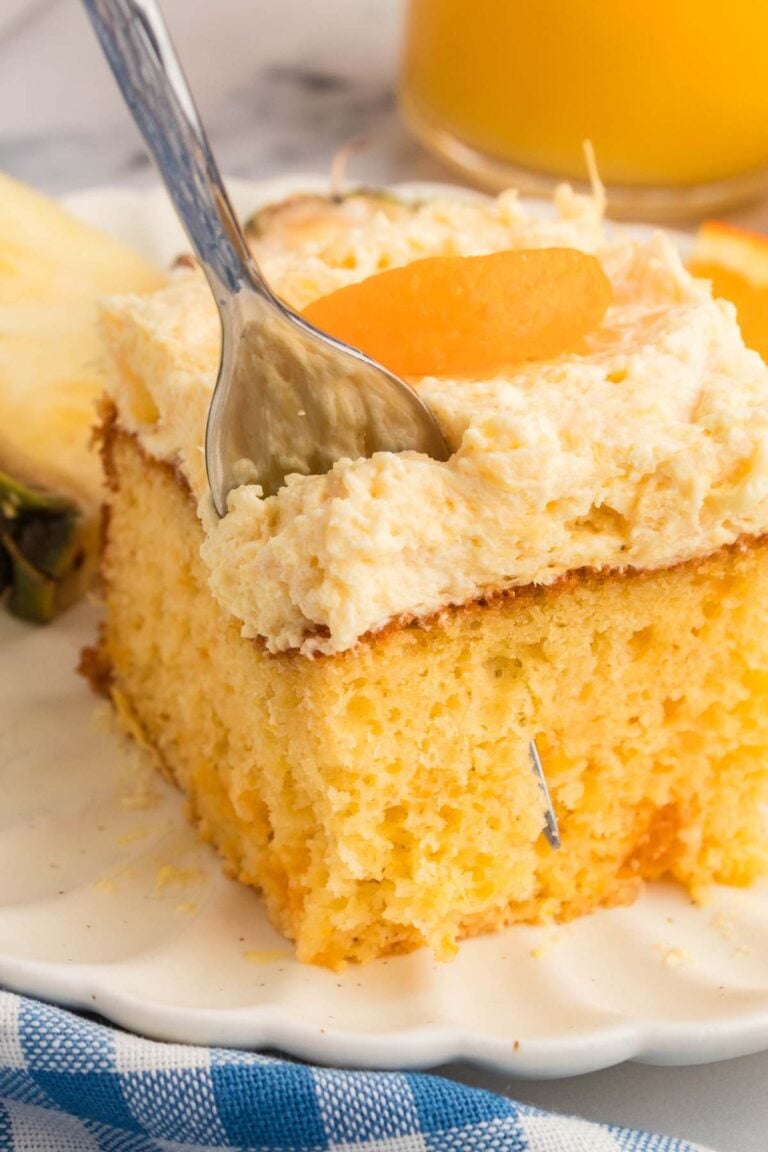
These vanilla whoopie pies feel like a little celebration in every bite. Their soft, fluffy vanilla cakes and rich marshmallow cream are perfect for any occasion, whether big or small. Whether baking for a family gathering, a bake sale, or just because I’m craving something sweet, these whoopie pies never disappoint.
They’re easy for me to make, fun to put together, and the final product always looks impressive, even though it doesn’t require much work. The best part? I don’t need special ingredients or equipment—just some basic items from my pantry and a bit of my time. After making them once, they’ve become a regular treat in my kitchen.

Vanilla Whoopie Pies from Scratch
Equipment
- Stand mixer (or hand mixer)
- Baking sheets (2 or more, depending on cake size)
- cooling rack
- Cake tester or toothpick (for checking doneness)
Ingredients
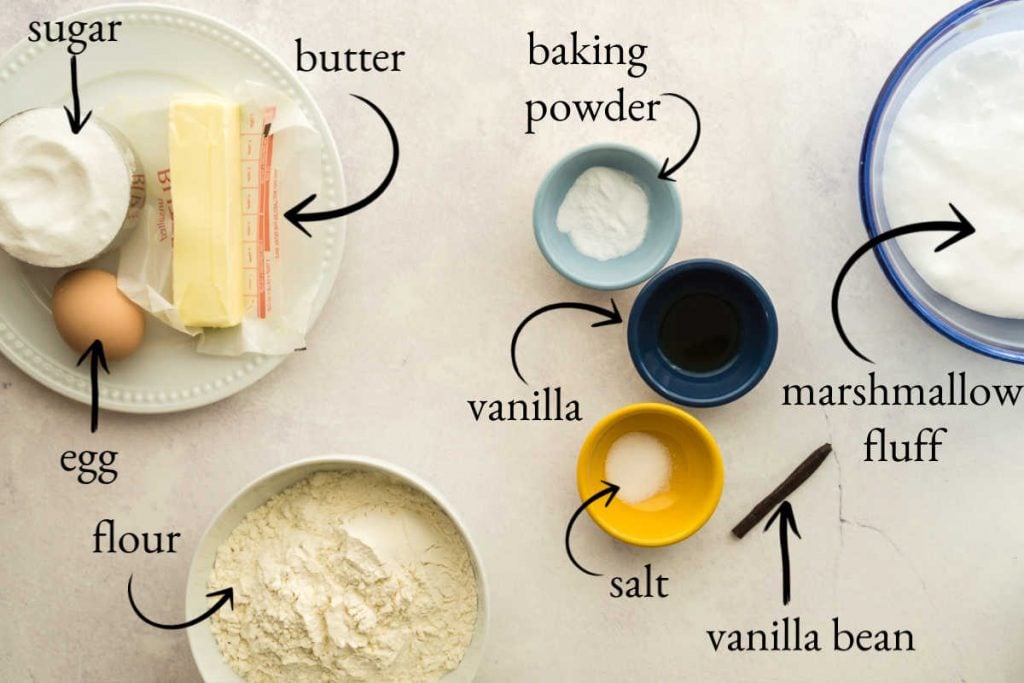
The Cakes
- ½ cup unsalted butter (1 stick)
- 1 cup granulated sugar
- 2 teaspoons vanilla
- 1 egg
- 2 cups all purpose flour
- 1 teaspoon baking soda
- ½ teaspoon salt
- ¾ cup milk (whole preferred but not essential)
The Filling
- ¾ cup unsalted butter (1 ½ sticks)
- 1 cup powdered sugar
- 1 teaspoon vanilla
- ¼ teaspoon salt
- 2 cups marshmallow cream (such as marshmallow fluff brand)
- ¼ teaspoon vanilla bean paste or inner portion of vanilla bean, scraped out
Save This Recipe
You'll join my email list which you will love. And if you don't, unsubscribe in one click. ❤️
Instructions
Make the Cakes
- Prep the oven. Preheat the oven to 350°F (175°C). Then, position the oven racks in the upper-middle and lower-middle positions. Next, line two baking sheets with parchment paper.
- Cream the butter and sugar. In a stand mixer, beat the butter and granulated sugar on medium speed until light and fluffy (about 4-5 minutes). Then, scrape down the sides of the bowl as needed.
- Add the egg and vanilla. Beat in the egg and vanilla extract until combined. Next, scrape down the bowl to make sure everything is mixed evenly.
- Combine the dry ingredients. Whisk together the flour, baking soda, and salt in a separate large bowl.
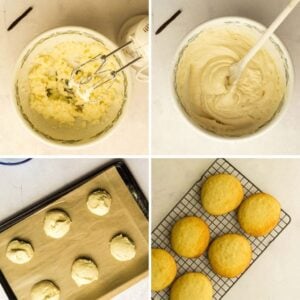
- Alternate adding the dry ingredients and milk. Reduce the mixer speed to low. Then, add the dry ingredients to the butter mixture, ½ cup at a time, alternating with the milk. Start and end with the flour mixture. Mix until just combined.
- Scoop the batter. Use a ¼ cup measuring cup to scoop the batter onto the prepared baking sheets, spacing scoops about 2 inches apart. You should have 12 large cakes. For smaller cakes, use 2 tablespoons of batter and make about 24 cakes.
- Bake the pies. Bake for 15-18 minutes for large cakes (or 10-13 minutes for smaller cakes). Rotate the baking sheets halfway through for even baking. The pies are done when a toothpick inserted into the center is clean and soft. Let the cakes cool on a cooling rack completely.
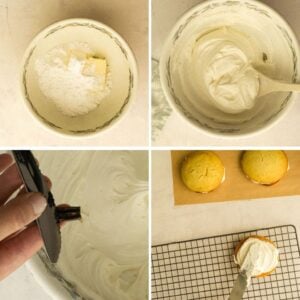
Make the Filling
- Beat the butter and sugar. In a stand mixer, beat the softened butter and powdered sugar on medium speed until light and fluffy (about 2-3 minutes).
- Add the marshmallow cream. Add the salt, vanilla extract, and marshmallow cream. Beat until smooth and fully combined.
- Incorporate the vanilla bean. Add the vanilla bean paste or seeds from the vanilla pod. Mix on low speed until evenly distributed.
Assemble the whoopie pies
- Spread the filling. Spread about ⅓ cup of filling onto half the cake's flat side. If the filling is too soft, refrigerate it to firm it up for 10-15 minutes.

- Make the sandwiches. Place the remaining cakes on top of the filled cakes, gently pressing to spread the filling to the edges.
- Serve or refrigerate. Serve immediately or refrigerate the whoopie pies for up to 3 days. If refrigerated, allow the pies to come to room temperature before serving for the best texture.
Notes
Nutrition
I absolutely love Vanilla Whoopie Pies. They’re a simple yet delicious treat that always seems to win people over, including myself. The soft, fluffy vanilla cakes with smooth marshmallows filling the middle are irresistible. They’re perfect for any occasion or even when I’m just in the mood for a sweet snack. What I appreciate the most is how easy they are to make. They don’t take much time to prepare, so I don’t have to spend my whole day in the kitchen.

If you like this classic vanilla whoopie pie, try my Chocolate Chip Whoopie Pies, too! They’re loaded with chocolate chips and a delicious marshmallow filling for the perfect twist on this classic treat.

I hope it brings you as much joy as it does for me.
Key Ingredients and Tools
Here are some key things you’ll need to make whoopie pies. They’re really important for getting the pies just right, and knowing about them can make you more sure of yourself when baking.
- Vanilla Bean Paste: This gives a strong vanilla taste with specks of vanilla bean. This can sometimes be tricky to find at regular grocery stores. It’s often located in the baking aisle near extracts, or you can find it online. If you don’t have one, just add an extra ½ teaspoon of vanilla extract.
- Marshmallow Cream (Marshmallow Fluff): This stuff makes the filling fluffy. Look for it in the baking or dessert toppings area at the store. If it’s not there, you could try making your own, but buying it is easier.
- Whole Milk: Whole milk makes the cakes taste richer. Any milk will do if you’re out of whole milk, but know that skim or low-fat options might make things less creamy.
- Parchment Paper: This keeps the cakes from sticking and helps them cook right. It’s really important for this recipe because the cakes are soft and could tear easily. You can find it in foil and plastic wrap.
- Stand Mixer: A stand mixer helps a lot with mixing the butter and sugar, making the filling nice and light. You can use a hand mixer if you don’t have one, but it might take longer.
- Unsalted Butter: If you use unsalted butter, you can decide how much salt to add. Salted butter might change the taste, so using unsalted is better.
Having these things ready means you’re ready to make your whoopie pies taste. If you’ve got them, you’re good to go on making something really tasty!
Troubleshooting and Help
If your filling is too soft or runny, it may be because the butter or marshmallow cream was too warm. Firm it up by placing it in the fridge for 10-15 minutes. If it’s still too soft, add more powdered sugar, one tablespoon at a time, until it thickens up to your liking.
Yes, you can! If you don’t have marshmallow cream, you could make a simple buttercream frosting instead. It won’t have that light marshmallow texture, but it’ll still taste great. If you enjoy the timeless taste of vanilla but want to try something more hearty, don’t miss my Oatmeal Whoopie Pies. The soft, spiced oatmeal cakes and a creamy filling make a delicious twist on the classic treat!
This could happen if the butter was too soft or the batter wasn’t chilled. Next time, try chilling the batter for 10-15 minutes before baking to help the cakes hold their shape better.
Parchment paper prevents the cakes from sticking to the baking sheet and helps them bake more evenly. The cakes are delicate, so removing them directly from the pan without parchment might cause them to break or stick.
Of course! If you like a smaller size, use a tablespoon or cookie scoop to portion the batter instead of a ¼ cup. Remember that smaller cakes will bake faster, so check them around the 10-minute mark to avoid overbaking.
Yes, absolutely! You can bake the cakes and store them in an airtight container for up to 2 days. I recommend waiting to fill them until right before serving, but you can store the assembled whoopie pies in the fridge for a day or two—just bring them to room temperature before serving.
Absolutely! While the classic vanilla marshmallow cream is always a hit, you can get creative with the fillings. Add a chocolate ganache, peanut butter frosting, or a fruity twist. If you’re a fan of fruit-flavored desserts, you might enjoy these Strawberry Whoopie Pies for a fresh and sweet variation!
Vanilla Whoopie Pies are a delicious and easy snack I can enjoy anytime. Their soft cakes and creamy filling are simple and incredibly satisfying. They’re quick to make, which is perfect for when I’m in the mood for something homemade but don’t have all day to spend in the kitchen. I also love these little treats’ versatility – I can easily mix different flavors into the filling or turn the baking process into a fun project with the kids. They’ve become a favorite in my home!


Amazing! I’ve made these whoopie pies SO many times now that my family expects it from me. I recently doubled the recipe and it worked out beautifully. Thank you for this!
thank you Samantha! I’m so glad you like them 🙂
I’ve made whoopie pies before but was looking for a vanilla recipe. This was a total FAIL!!! The dough spread SO much it covered my entire sheet pan!!! My other recipe says 3 inches in between not 2. I should have followed my other recipe
This recipe was so easy and the pies came out absolutely amazing! Highly recommend
hi nikki, you are right i got mixed up with sticks and cups there. the CUP amounts of butter are right but the stick measurements in parentheses are all messed up. i’ve corrected the recipe and added the egg. by the way, i typically only check comments once a day and you left yours last night so i’m just seeing it.
It says to beat in the egg in the instructions but there’s no egg on the ingredients list