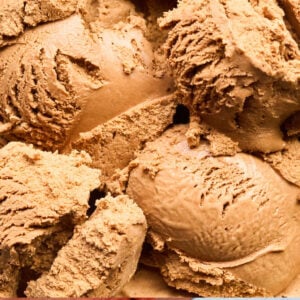
Old-Fashioned Chocolate Ice Cream (The Right Way.)
This old-fashioned chocolate ice cream is rich, creamy, and made with real ingredients: real eggs, cream, and cocoa. And yes, we’re churning. It will all be worth it.

This ice cream is full of that deep chocolate flavor you remember from childhood. So much more creamy and delicious than anything you can buy.
Table of Contents
Ingredients and Tools You’ll Need
We’re using real ingredients here. Yes, you need the eggs, and make sure your milk and cream are full-fat! And I shouldn’t have to say this, but you do need an ice cream maker.


Heart’s Content Farmhouse is a participant in the Amazon Services LLC Associates Program, an affiliate advertising program designed to provide a means for sites to earn advertising fees by advertising and linking to Amazon.com. This means that when you click on certain links on this site and make a purchase, I may earn a small commission at no additional cost to you. I only recommend products I genuinely believe in and would use in my own kitchen. As an Amazon Associate, I earn from qualifying purchases.
If you’d like to double or triple this recipe, you can make adjustments in the recipe card at the bottom of this post.
Equipment
- ice cream maker (this one is super simple, affordable, and I’ve used it for decades!)
- strainer
- saucepan
- Hand mixer
- Candy thermometer
Ingredients
- 1 ½ cups whole milk
- 1 ½ cups heavy cream
- ½ cup cocoa powder (I always use Hershey’s)
- ¾ cup granulated sugar (divided)
- 1 tablespoon vanilla extract
- 4 egg yolks
- pinch salt
How to Make Old Fashioned Chocolate Ice Cream
Before you start, check your ice cream machine’s instructions, as many require the freezer insert to be frozen for at least 24 hours before churning.
Step One: Heat The Milk And Cream
In a small saucepan over medium heat, warm the milk, cream, ½ cup of the sugar, cocoa, vanilla, and salt until steaming, about 170°F.

Step Two: Beat The Eggs And Remaining Sugar
In a separate bowl, beat the egg yolks and remaining ¼ cup of sugar until they are light yellow and form a ribbon when the beaters are lifted, about 2-3 minutes, with a hand mixer on low speed.

Step Three: Temper The Eggs
Slowly whisk half of the warm milk mixture into the beaten egg yolks, adding half a cup at a time to prevent curdling. Then, pour the egg mixture back into the saucepan with the remaining milk and cream.

Step Four: Heat The Custard
Heat the saucepan over medium heat, stirring constantly, until the custard thickens and reaches 185°F. The custard is ready when it coats the back of a spoon.

Step Five: Strain The Custard And Chill
Strain the custard through a cheesecloth or a fine-mesh strainer into a bowl. Place the bowl in the refrigerator and chill for 4-24 hours until the custard is very cold.

Step Six: Freeze Ice Cream
Freeze the chilled custard in your ice cream maker according to the manufacturer’s instructions. Once it reaches a soft-serve consistency, transfer the ice cream to a loaf pan, cover it with plastic wrap, and freeze until firm. The ice cream will stay in the freezer for up to a week.

Serving & Storing Your Old Fashioned Chocolate Ice Cream
Serve with fresh berries, warm chocolate fudge sauce, whipped cream, crushed nuts, or chocolate chip cookies.
After churning, transfer the ice cream into an airtight container. A loaf pan works well, but be sure to cover it tightly with plastic wrap or a lid to prevent ice crystals from forming.
Place the container in the freezer and allow the ice cream to firm up for at least 4-6 hours, or overnight if possible.
The ice cream will keep well in the freezer for up to one week. After that, it may start to develop ice crystals and lose some of its creamy texture.

More Ice Cream Recipes
- Try something new like this honey ice cream.
- Add another classic to your freezer with this strawberry ice cream.
- Once you master the process you can make more elaborate flavors like vanilla caramel fudge ice cream.
- Serve this patriotic red white and blue ice cream for your next 4th of July party.
Printable Recipe
Old-Fashioned Chocolate Ice Cream
Equipment
- ice cream maker (this one is super simple, affordable, and I've used it for decades!)
- strainer
- saucepan
- Hand mixer
Ingredients
- 1 ½ cups whole milk
- 1 ½ cups heavy cream
- ½ cup cocoa powder (I always use Hershey's)
- ¾ cup granulated sugar (divided)
- 1 tablespoon vanilla extract
- 4 egg yolks
- pinch salt
Save This Recipe
You'll join my email list which you will love. And if you don't, unsubscribe in one click. ❤️
Instructions
- Heat the milk and cream. In a small saucepan over medium heat, warm the milk, cream, ½ cup of the sugar, cocoa, vanilla, and salt until steaming, about 170°F.
- Beat the eggs and remaining sugar. In a separate bowl, beat the egg yolks and remaining ¼ cup of sugar until they are light yellow and form a ribbon when the beaters are lifted, about 2-3 minutes, with a hand mixer on low speed.
- Temper the eggs. Slowly whisk half of the warm milk mixture into the beaten egg yolks, adding half a cup at a time to prevent curdling. Then, pour the egg mixture back into the saucepan with the remaining milk and cream.
- Heat the custard. Heat the saucepan over medium heat, stirring constantly, until the custard thickens and reaches 185°F. The custard is ready when it coats the back of a spoon.
- Strain the custard and chill. Strain the custard through a cheesecloth or a fine-mesh strainer into a bowl. Place the bowl in the refrigerator and chill for 4-24 hours until the custard is very cold.
- Freeze ice cream. Freeze the chilled custard in your ice cream maker according to the manufacturer's instructions. Once it reaches a soft-serve consistency, transfer the ice cream to a loaf pan, cover it with plastic wrap, and freeze until firm. The ice cream will stay in the freezer for up to a week.
Notes
Nutrition


i loved this recipe!!!!
thank you Sara! Such a good classic 🙂