I love every step of making this recipe: cooking ripe pears down into the prettiest preserves, adding the warm spices, waiting for the jars to seal on my counter. You’ll love using this on toast or oatmeal all fall and winter long.

The warm spices in this make it wonderful to have on a cool fall morning. If you’re burnt out on apples, pears are a delicious fruit to switch to.
Ingredients and Tools You’ll Need
Most of these items (except for the waterbath canner) can be found at your local grocery store, and the waterbath canner can be found in many stores and online. Your pears need to be fully ripe. Otherwise, the texture and flavor will be off.

Equipment
- Water Bath Canner
- 7 half pint jars
Ingredients
- 4 cups pears, peeled (cored and chopped)
- 2 tablespoons bottled lemon juice
- 2 teaspoons ground ginger
- 1 teaspoon ground nutmeg
- 1 teaspoon vanilla powder (or 2 teaspoons vanilla extract)
- 1 package powdered pectin (1.75 oz)
- 5 cups sugar
Step-By-STep
Step One: Prep For Canning
Wash the jars with hot, soapy water. Place them in a water bath canner and fill it with water so the jars are fully submerged. Set over medium heat and allow the jars to simmer. Place the lids and rings in a saucepan over medium-low heat and simmer. Do not boil.
Step Two: Boil Pears And Flavoring
Add the pears, lemon juice, ginger, nutmeg, and vanilla powder to a large 6-8 quart pot. Place over medium-high heat and stir all the ingredients so they’re well combined.

FREE FOR SUBSCRIBERS
Canning Binder
Subscribe (free!) to my newsletter to receive this PDF + dozens of others in my printable library. You’ll also get emails you’ll truly love, with a weekly meal and so much more.
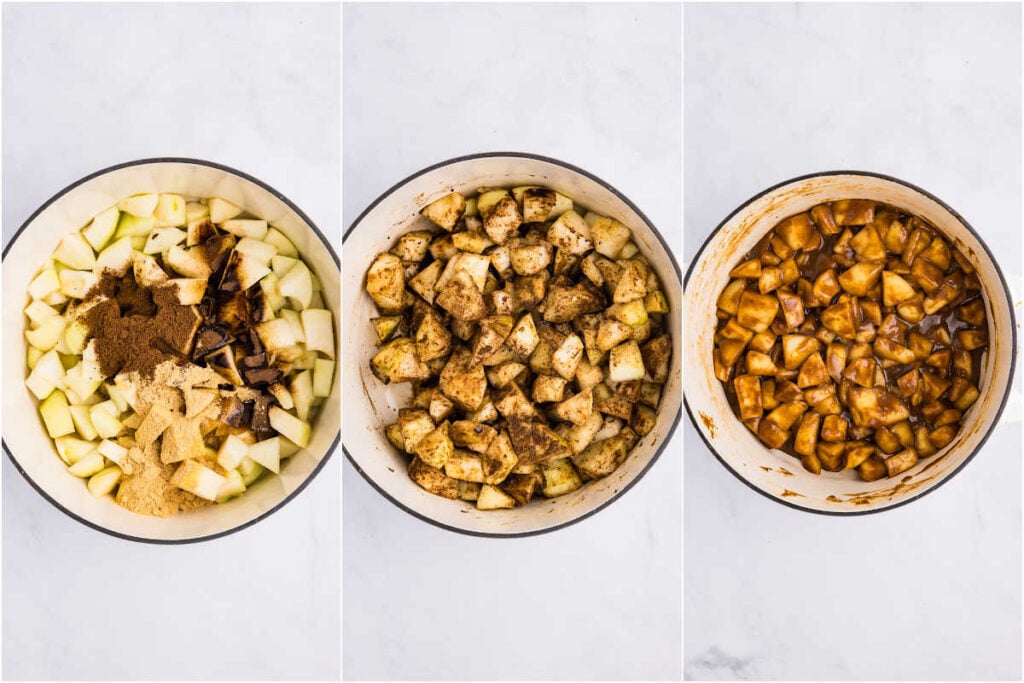
Step Three: Add Pectin
Add the pectin and stir to combine. Bring the mixture to a full rolling boil so that the mixture cannot be stirred down. *Please note that using unripe pears will not produce enough liquid for this to happen.*

Step Four: Add Sugar, Stirring Constantly
Add sugar and stir to combine. Continue to stir the mixture and bring it back to a full rolling boil. Once the mixture comes to a full rolling boil, set a timer for 1 minute, stirring constantly.

Step Five: Fill Jars
Remove from the heat. Using a canning funnel and ladle, ladle the hot pear preserves into the hot jars, allowing ½ inch headspace.

Step Six: Clean Rims And Fasten Lids
Wipe the rims with a clean, moist towel, or moisten a paper towel with some vinegar. Place the lids and rings on fingertip-tight.

Step Seven: Process For 10 Minutes
Transfer the jars to the water bath canner, making sure the jars are fully submerged with at least 1 inch of water over them. Set to high heat, cover, and bring to a boil. Once boiling, set a timer for 10 minutes. Remove the canner from the heat, remove the lid, and allow the jars to sit for 5 minutes.

Step Eight: Cool And Check Seals
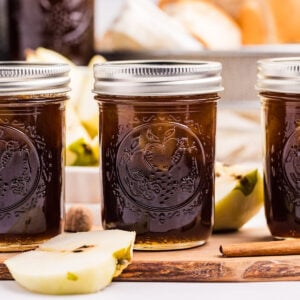
Remove the jars from the canner and transfer them to a heat-safe place. Allow them to cool for 12-24 hours. After 24 hours, check the jars for a proper seal. Once a proper seal is confirmed, you can remove the rings and store the jars in a cool, dark place for up to 18 months or per the lid’s manufacturer’s recommendations.

Serving & Storing
Once sealed, remove the rings to prevent rust and store without them. Store the sealed jars in a cool, dark place like a pantry. They will last up to 18 months or as per the lid manufacturer’s recommendations.
If you decide to freeze the preserves, use freezer-safe containers and leave a 1-inch headspace. If the jars are properly canned and sealed, you don’t need to freeze them.
Questions and Troubleshooting
You really shouldn’t. The sugar not only sweetens the preserves but also helps with the setting and preservation process. Reducing the sugar could affect their shelf life.
Yes, you can, but the process will be slightly different. Follow the instructions on the liquid pectin package for best results, as it’s added at a different stage than powdered pectin.
If your preserves are too runny, you can try re-cooking them. Bring the mixture back to a boil, add another half package of pectin, and boil for another minute. This should help them set.

More Pear Recipes
- The warm spices in this cinnamon sugar pear cobbler make it a comforting fall dessert.
- Another delicious way to preserve pears is to make them into homemade pear butter.
- Learn how to can pears to have fresh fruit in the winter.
- Cozy up on a fall evening with a glass of apple pear sangria with caramel.
Printable Recipe
Pear Preserves
Equipment
- 7 half pint jars
Ingredients
- 4 cups pears, peeled (cored and chopped)
- 2 tablespoons bottled lemon juice
- 2 teaspoons ground ginger
- 1 teaspoon ground nutmeg
- 1 teaspoon vanilla powder (or 2 teaspoons vanilla extract)
- 1 package powdered pectin (1.75 oz)
- 5 cups sugar
Save This Recipe
You'll join my email list which you will love. And if you don't, unsubscribe in one click. ❤️
Instructions
- Prep for canning. Wash the jars with hot soapy water. Place them in a water bath canner and fill it with water so the jars are fully submerged with water. Set over medium heat and allow the jars to simmer. Place the lids and rings in a saucepan over medium-low heat and simmer. Do not boil.
- Boil pears and flavoring. Add the pears, lemon juice, ginger, nutmeg, and vanilla powder to a large 6-8 quart pot. Place over medium-high heat and stir all the ingredients so they’re well combined
- Add pectin. Add the pectin and stir to combine. Bring the mixture to a full rolling boil so the mixture cannot be stirred down. *Please note using unripe pears will not produce enough liquid for this to happen.*
- Add sugar, stirring constantly. Add sugar and stir to combine. Continue to stir the mixture and bring it back to a full rolling boil. Once the mixture comes to a full rolling boil, set a timer for 1 minute stirring constantly.
- Fill jars. Remove from the heat. Using a canning funnel and ladle, ladle the hot pear preserves into the hot jars allowing ½ inch headspace.
- Clean rims and fasten lids. Wipe the rims with a clean, moist towel, or moisten a paper towel with some vinegar. Place the lids and rings on fingertip-tight.
- Process for 10 minutes. Transfer the jars to the water bath canner making sure the jars are fully submerged with at least 1 inch of water over them. Set to high heat, cover, and bring to a boil. Once boiling, set a timer for 10 minutes. Remove the canner from the heat, remove the lid, and allow the jars to sit for 5 minutes.
- Cool and check seals. Remove the jars from the canner and transfer them to a heat-safe place. Allow them to cool for 12-24 hours. After 24 hours check the jars for a proper seal. Once a proper seal is confirmed you can remove the rings and store the jars in a cool dark place for up to 18 months or per the lid’s manufacturer’s recommendations.
Notes
Nutrition

More to Explore
Baked BBQ Chicken Sliders
Super-Easy Crockpot Fried Apples
Hot Pepper Jelly Glazed Wings
Simple Homemade Marinara