Spiced Elderberry Syrup (With Canning Instructions)
I’ve been making this elderberry syrup every fall for years. It’s one of those things I like to have on hand once the weather cools down. It’s naturally sweet, gently spiced with cinnamon and ginger, and easy to water bath can for long-term storage. If you’ve ever tried elderberry syrup and found it too bitter or medicinal, this version might change your mind.

As soon as the cooler weather starts, I make this up so we have it on hand when someone gets sick, and to enjoy when no one’s sick! I can’t wait for you to try it and fall in love with it just like we have!
Table of Contents
Ingredients and Tools You’ll Need
You can find the dried elderberries at a health food store or online (I’ve provided a link below). You can also use fresh berries, but you’ll double the amount. I really recommend using a reusable tea bag for the cloves. It makes it much easier to remove them afterwards.

Heart’s Content Farmhouse is a participant in the Amazon Services LLC Associates Program, an affiliate advertising program designed to provide a means for sites to earn advertising fees by advertising and linking to Amazon.com. This means that when you click on certain links on this site and make a purchase, I may earn a small commission at no additional cost to you. I only recommend products I genuinely believe in and would use in my own kitchen. As an Amazon Associate, I earn from qualifying purchases.

If you’d like to double or triple this recipe, you can make adjustments in the recipe card at the bottom of this post.
Equipment
- 8-quart pot
- fine mesh strainer
- Water Bath Canner
- Pint jars
- lids and rings
- Funnel
- Ladle
- Jar lifter
- Lid magnet
- Towel
Ingredients
- 2 cups dried elderberries, 4 cups fresh
- 8 cups water
- 1 inch fresh ginger chopped
- 4 cups sugar
- 2 cinnamon sticks
- 1 teaspoon whole cloves
How to Make Elderberry Syrup
Step One: Simmer Berries
Add the elderberries, ginger, and water to a large pot over medium heat and bring to a boil. Make sure to stir the mixture often. Once the mixture comes to a boil, reduce the heat to low, cover, and simmer for 1 hour (30 minutes if you’re using fresh elderberries).

Step Two: Cool
Remove from heat, uncover, and let it cool for 20 minutes.
Step Three: Strain
Using a fine mesh strainer over a large mixing bowl, strain the elderberry mixture. Let all the liquid drain for 1 hour. Get rid of the solids and keep the liquid.

Step Four: Prep For Canning
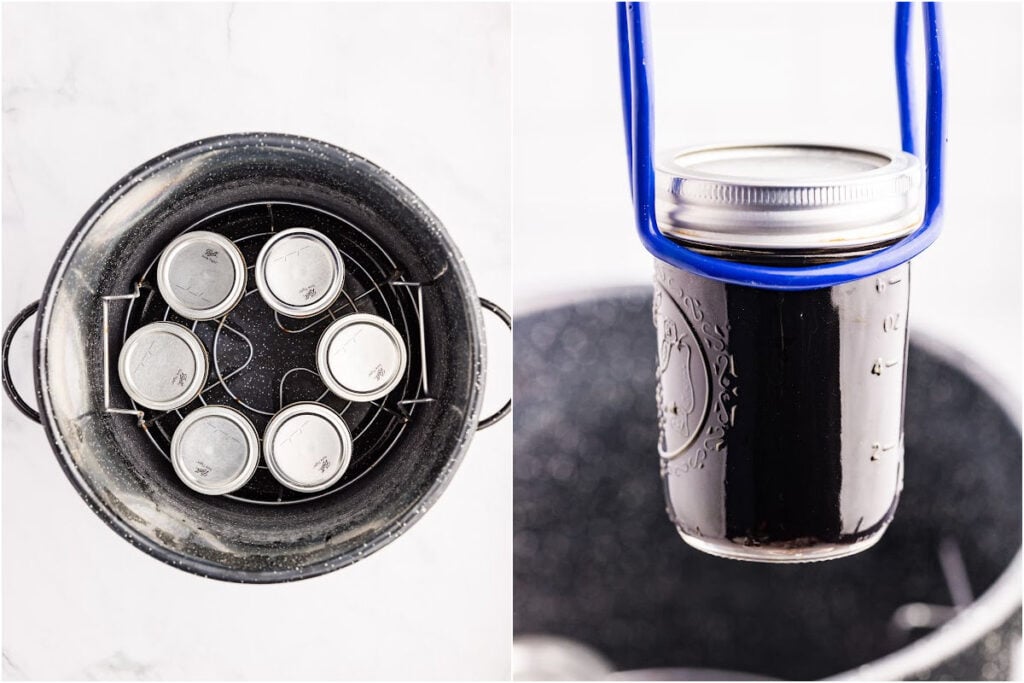
Prepare the water bath canning station by washing the half-pint jars (or quarter-pint jars) in hot, soapy water. Transfer them to the water bath canner and submerge the jars in water. Place them over high heat. Place the lids and rings in a saucepan with water and simmer over low heat. Do not boil.
Step Five: Add Sugar And Spices
Transfer the liquid to a large saucepan, add the sugar, cinnamon sticks, and whole cloves. (For easy removal of the whole cloves, add them to a reusable tea bag or a sash made from cheesecloth.)

Step Six: Boil And Stir Frequently
Set the heat to medium and bring the mixture to a boil. Once boiling, allow it to remain at a low boil for 30 minutes, stirring frequently to avoid scorching (this will cause the syrup to taste really bitter).
Step Seven: Remove Whole Spices
Remove the cinnamon sticks and cloves from the syrup and discard them.

Step Eight: Fill Jars
Remove the jars from the canner and, using a canning funnel and ladle, ladle the hot elderberry syrup into the prepared jars.

Step Nine: Wipe Rims And Fasten Lids
Wipe the jar rims with a damp cloth and place the lids and rings on. Tighten the rings until they’re fingertip-tight.

Step Ten: Process
Transfer the jars to the canner and submerge them in water, making sure that they’re covered by 2 inches. Bring to a boil. Once it comes to a full rolling boil, set the timer for 40 minutes. After processing, remove the canner from the heat, remove the lid, and set the timer for 5 minutes.
Step Eleven: Cool And Store
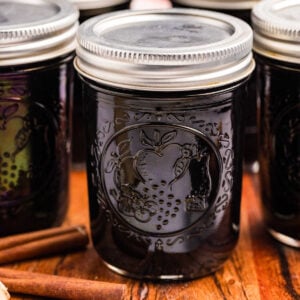
Transfer the jars to a heat-safe space and cool for 12-24 hours. After 24 hours, check the lid for a proper seal. Once a proper seal is confirmed, remove the ring and store it in a cool, dark place for up to 18 months or per the lid’s manufacturer’s recommendation.

Serving & Storing
Serve with tea, over fluffy sourdough pancakes, or even over old-fashioned vanilla ice cream.
Store the sealed jars in a cool, dark place for up to 18 months. Once opened, refrigerate and use within a few weeks.
If you don’t can the syrup, let it cool completely, then transfer it to an airtight container. Refrigerate and use within 2-3 weeks.
Questions and Troubleshooting
It’s highly recommended for safe long-term storage. If you don’t have one, you can refrigerate the syrup and use it within a few weeks.
I wouldn’t recommend it. Honey can change the pH level of the syrup, making it unsafe for water bath canning. Stick with sugar for this recipe. And don’t reduce it.
This usually happens if the syrup scorches while boiling. Make sure to stir frequently and keep an eye on the pot to prevent this.

More Syrup Recipes TO Try
Syrups are a unique way to preserve your fruit.
- I like making this strawberry syrup when I’m sick of jam.
- Raspberries go bad so quickly. Make this raspberry syrup to keep them longer.
- You know when you make applesauce and you have all these leftover peels and cores. Now you can use them for apple syrup!
- Blueberry syrup tastes amazing on waffles or French toast!
Printable Recipe
Elderberry Syrup
Equipment
- 8-quart pot
- fine mesh strainer
- Pint jars
- lids and rings
- Funnel
- Ladle
- Jar lifter
- Lid magnet
- Towel
Ingredients
- 2 cups dried elderberries 4 cups fresh
- 8 cups water
- 1 inch fresh ginger chopped
- 4 cups sugar
- 2 cinnamon sticks
- 1 teaspoon whole cloves
Save This Recipe
You'll join my email list which you will love. And if you don't, unsubscribe in one click. ❤️
Instructions
- Simmer berries. Add the elderberries, ginger, and water to a large pot over medium heat and bring to a boil. Make sure to stir the mixture often. Once the mixture comes to a boil, reduce the heat to low, cover, and simmer for 1 hour (30 minutes if you’re using fresh elderberries).
- Cool. Remove from heat, uncover, and let it cool for 20 minutes.
- Strain. Using a fine mesh strainer over a large mixing bowl, strain the elderberry mixture. Let all the liquid drain for 1 hour. Get rid of the solids and keep the liquid.
- Prep for canning. Prepare the water bath canning station by washing the half-pint jars (or quarter-pint jars) in hot, soapy water. Transfer them to the water bath canner and submerge the jars in water. Place them over high heat. Place the lids and rings in a saucepan with water and simmer over low heat. Do not boil.
- Add sugar and spices. Transfer the liquid to a large saucepan, add the sugar, cinnamon sticks, and whole cloves. (For easy removal of the whole cloves, add them to a reusable tea bag or a sash made from cheesecloth.)
- Boil and stir frequently. Set the heat to medium and bring the mixture to a boil. Once boiling, allow it to remain at a low boil for 30 minutes, stirring frequently to avoid scorching (this will cause the syrup to taste really bitter).
- Remove whole spices. Remove the cinnamon sticks and cloves from the syrup and discard them.
- Fill jars. Remove the jars from the canner and, using a canning funnel and ladle, ladle the hot elderberry syrup into the prepared jars.
- Wipe rims and fasten lids. Wipe the jar rims with a damp cloth and place the lids and rings on. Tighten the rings until they’re fingertip-tight.
- Process. Transfer the jars to the canner and submerge them in water, making sure that they’re covered by 2 inches. Bring to a boil. Once it comes to a full rolling boil, set the timer for 40 minutes. After processing remove the canner from the heat and remove the lid and set the timer for 5 minutes.
- Cool and store. Transfer the jars to a heat-safe space and cool for 12-24 hours. After 24 hours, check the lid for a proper seal. Once a proper seal is confirmed, remove the ring and store it in a cool, dark place for up to 18 months or per the lid’s manufacturer’s recommendation.
Notes
Nutrition


I love this receipe. I made it last year and again this year. But, both times I only got 4 pints. Thanks
hey connie! good to know, maybe yours ia bit thicker than mine! i am glad you like it either way
Have you ever tried elderflower syrup? You make it in May/June with the flowers. It is not medicinal so much but really good. In Germany it is a base for a drink called „Hugo‘s“ with Prosecco (bubbly if you want to water down the alcohol 😅) mint and lime. It’s a great summer drink. For kids just substitute the alcohol for bubbly water. Or you can leave out the mint and lime completely (but I prefer the extra flavors)
Hi Laura! I’ve never heard of it, but I looked it up, and the drinks made with it look so pretty. I love all of these ideas. Thank you for sharing it with me. 🙂
Can this be canned in pints? If so how long?
Yes, 35 minutes. I know it seems long!
I know fresh spices are preferred – but is there any way I could substitute ground cinnamon, cloves, or ginger? If so, approximately how much?
hi cheryl, I wouldn’t do it. they will be gritty in the final product. I would simply leave them out. the syrup will still have a fruity, sweet flavor.
Hi! Looks like a great recipe! I have ground elderberries into a powder. Can I use those instead of whole? If yes, what would be the substitution? I assume I’d use less powder than whole berries? Thanks so much!
Hi I would prefer to use honey as opposed to sugar.
Would adding lemon juice be helpful with the acidity level?
yes absolutely. the only thing to keep in mind is that as you process the syrup in the canner, the heat will destroy any benefits of the honey. i usually just add honey to the tea when i serve (i don’t find it too sweet with both sweeteners). but iit is fine to simply sub out the sugar too! 🙂
How much syrup does this recipe make?
hey nick, 6-7 pints of syrup. 🙂