Salsa Verde for Canning (With Roasted Tomatillos)
Roasting the tomatillos, onions, and garlic gives this salsa verde a deep, bold flavor that’s hard to get any other way. I tested a few versions before landing on this one, it’s safe for water bath canning and still bright and fresh with just the right kick. Whether you’re dipping chips or topping enchiladas, this salsa verde is one to keep on hand. Let me show you exactly how I make it.

This recipe makes about 3 pints, but you can easily double it if you’ve got more tomatillos to work with. I’ve included step-by-step instructions below so you can feel good about every part of the process.
Table of Contents
Ingredients and Tools You’ll Need
Tomatillos are green, husk-covered fruits essential for the salsa’s tangy flavor. Look for them in the produce section near the tomatoes.

Heart’s Content Farmhouse is a participant in the Amazon Services LLC Associates Program, an affiliate advertising program designed to provide a means for sites to earn advertising fees by advertising and linking to Amazon.com. This means that when you click on certain links on this site and make a purchase, I may earn a small commission at no additional cost to you. I only recommend products I genuinely believe in and would use in my own kitchen. As an Amazon Associate, I earn from qualifying purchases.

If you’d like to double or triple this recipe, you can make adjustments in the recipe card at the bottom of this post.
Equipment
- 3 Pint jars
- Funnel
- Water Bath Canner
- Parchment paper
- Baking Sheet
Ingredients
- 4 pounds tomatillos (cleaned and husks removed)
- 2 medium-sized onions (cut into wedges)
- 2 jalapeno peppers (remove seeds for a mider salsa)
- 6 cloves garlic (peeled)
- ½ cup lime juice (bottled)
- ¼ cup cilantro or parsley, chopped
- 1 tablespoon salt
- 1 teaspoon cumin
- 1 teaspoon black pepper
- 2 teaspoons cayenne pepper (optional)
How to Make Salsa Verde
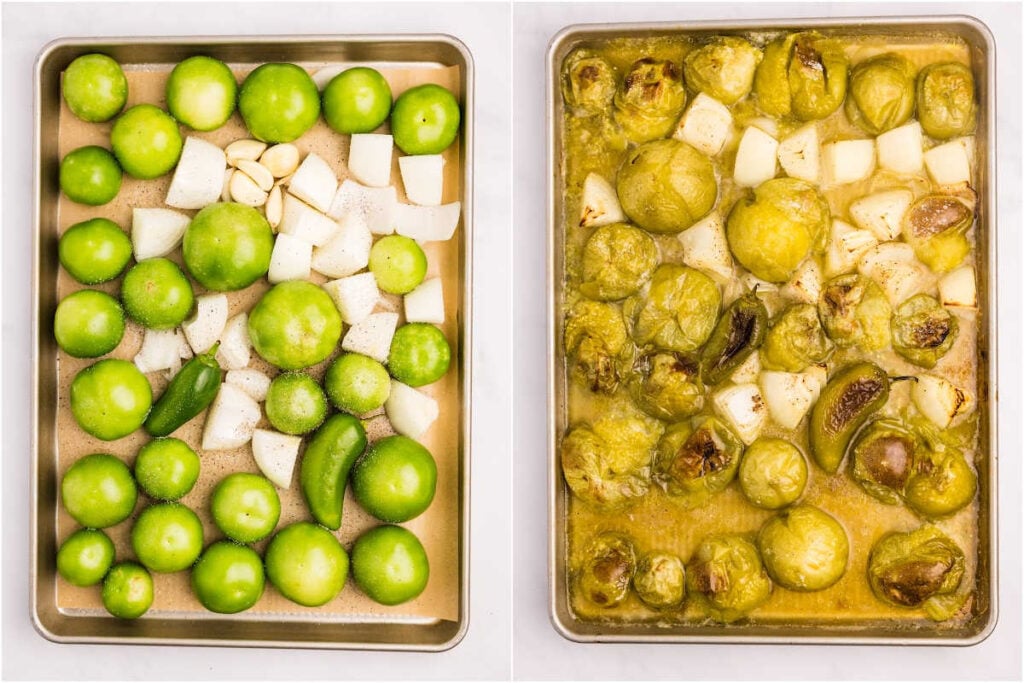
Step One: Prep For Roasting
Preheat the oven to 425℉. Line a baking sheet with a piece of parchment paper.
Step Two: Prep For Canning
Prepare jars by washing them with hot, soapy water. Place jars in the water bath canner, fill the jars and water bath canner with water, and place over high heat. Place the lids and rings in a saucepan and simmer over medium-low heat.
Step Three: Roast Veggies
Place tomatillos, onion, jalapenos, and garlic on the prepared baking sheet, and season with salt and pepper. Bake at 425℉ for 30 minutes or until the garlic has softened. Remove the garlic and then bake for 15 more minutes or until the onion, tomatillos, and peppers have slightly charred in areas. Remove the baking sheet from the oven and cool for 5 minutes.
Step Four: Puree Veggies
Once the peppers have cooled slightly, remove the stems and seeds. Place all of the roasted veggies in a food processor or high-speed blender. Working in batches, if your food processor isn’t big enough, process until the mixture is smooth.

Step Five: Make Salsa
Transfer the mixture to a saucepan and place over medium heat. Next, add the lime juice, cilantro, cumin, salt, pepper, and cayenne pepper, if using, and stir until well combined. Bring the mixture to a simmer and then remove from the heat.

Step Six: Fill Jars
Ladle the hot salsa into the hot jars, leaving a ½ inch headspace. Remove air bubbles.

Step Seven: Wipe Rims And Fasten Lids
Wipe jar rims with a clean, moist cloth. Add the lids and rings to the jars, and tighten the rings so they’re fingertip-tight.

Step Eight: Process In Canner
Transfer jars to the water bath canner. Make sure there is enough water so the jars are covered by at least 1 inch of water. Cover and bring the water to a boil. Once the water starts boiling, process for 20 minutes, adjusting for altitude. After 20 minutes, turn off the heat and remove the lid from the canner.

Step Nine: Rest In Canner Before Removing
Let the jars sit in the canner for 5 minutes. Remove the jars from the canner and place them in a heat-safe space.

Step Ten: Cool And Check Seals
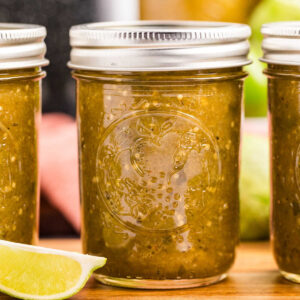
Allow the salsa to cool for 12-24 hours. Check lids for a seal after 24 hours. Once a proper seal has been confirmed, store jars in a cool, dark place for up to 18 months or per your lids manufacturer’s recommendations.

Serving & Storing Salsa Verde
Serve with tortilla chips, over shredded beef tacos, or with cast iron skillet chicken breast.
Once jars have cooled for 12-24 hours, press the center of the lids to check the seals. They shouldn’t flex up and down. Keep the sealed jars in a cool, dark place for up to 18 months.
Once opened, store the jars in the fridge.

More Salsa Recipes
- This pineapple mango salsa is a little sweet and a little spicy.
- Make Lila’s famous salsa and serve with chips for game night.
- Black bean and corn salsa uses pressure canning, but you can also store it in the fridge.
Printable Recipe
Salsa Verde for Canning
Equipment
- 3 Pint jars
- Funnel
- Baking Sheet
Ingredients
- 4 pounds tomatillos (cleaned and husks removed)
- 2 medium-sized onions (cut into wedges)
- 2 jalapeno peppers
- 6 cloves garlic (peeled)
- ½ cup lime juice (bottled)
- ¼ cup cilantro or parsley chopped
- 1 tablespoon salt
- 1 teaspoon cumin
- 1 teaspoon black pepper
- 2 teaspoons cayenne pepper (optional)
Save This Recipe
You'll join my email list which you will love. And if you don't, unsubscribe in one click. ❤️
Instructions
- Prep for roasting. Preheat the oven to 425℉. Line a baking sheet with a piece of parchment paper.
- Prep for canning. Prepare jars by washing them with hot, soapy water. Place jars in the water bath canner, fill the jars and water bath canner with water, and place over high heat. Place the lids and rings in a saucepan and simmer over medium-low heat.
- Roast veggies. Place tomatillos, onion, jalapenos, and garlic on the prepared baking sheet, and season with salt and pepper. Bake at 425℉ for 30 minutes or until the garlic has softened. Remove the garlic and then bake for 15 more minutes or until the onion, tomatillos, and peppers have slightly charred in areas. Remove the baking sheet from the oven and cool for 5 minutes.
- Puree veggies. Once the peppers have cooled slightly, remove the stems and seeds. Place all of the roasted veggies in a food processor or high-speed blender. Working in batches, if your food processor isn’t big enough, process until the mixture is smooth.
- Make salsa. Transfer the mixture to a saucepan and place over medium heat. Next, add the lime juice, cilantro, cumin, salt, pepper, and cayenne pepper, if using, and stir until well combined. Bring the mixture to a simmer and then remove from the heat.
- Fill jars. Ladle the hot salsa into the hot jars, leaving a ½ inch headspace. Remove air bubbles.
- Wipe rims and fasten lids. Wipe jar rims with a clean, moist cloth. Add the lids and rings to the jars, and tighten the rings so they’re fingertip-tight.
- Process in canner. Transfer jars to the water bath canner. Make sure there is enough water so the jars are covered by at least 1 inch of water. Cover and bring the water to a boil. Once the water starts boiling, process for 20 minutes, adjusting for altitude. After 20 minutes, turn off the heat and remove the lid from the canner.
- Rest in canner before removing. Let the jars sit in the canner for 5 minutes. Remove the jars from the canner and place them in a heat-safe space.
- Cool and check seals. Allow the salsa to cool for 12-24 hours. Check lids for a seal after 24 hours. Once a proper seal has been confirmed, store jars in a cool dark place for up to 18 months or per your lids manufacturer’s recommendations.
Notes
Nutrition


I haven’t made this yet but just printed it & will try it soon.