Classic Vanilla Fudge Recipe (From Scratch)
This classic vanilla fudge is a simple treat you’ll want to make over and over again. You don’t need fancy methods—just a saucepan, a candy thermometer, and a little patience while it cooks.
Whether you’re gifting or keeping a stash for yourself, this recipe will surely become a favorite. If you’re inspired to add even more sweet treats to your holiday spread, check out my recipes for other homemade Christmas candies.
Classic Vanilla Fudge
Equipment
- 2 quart saucepan
- Whisk
- Hand mixer
- Butter or parchment-lined dish
Ingredients
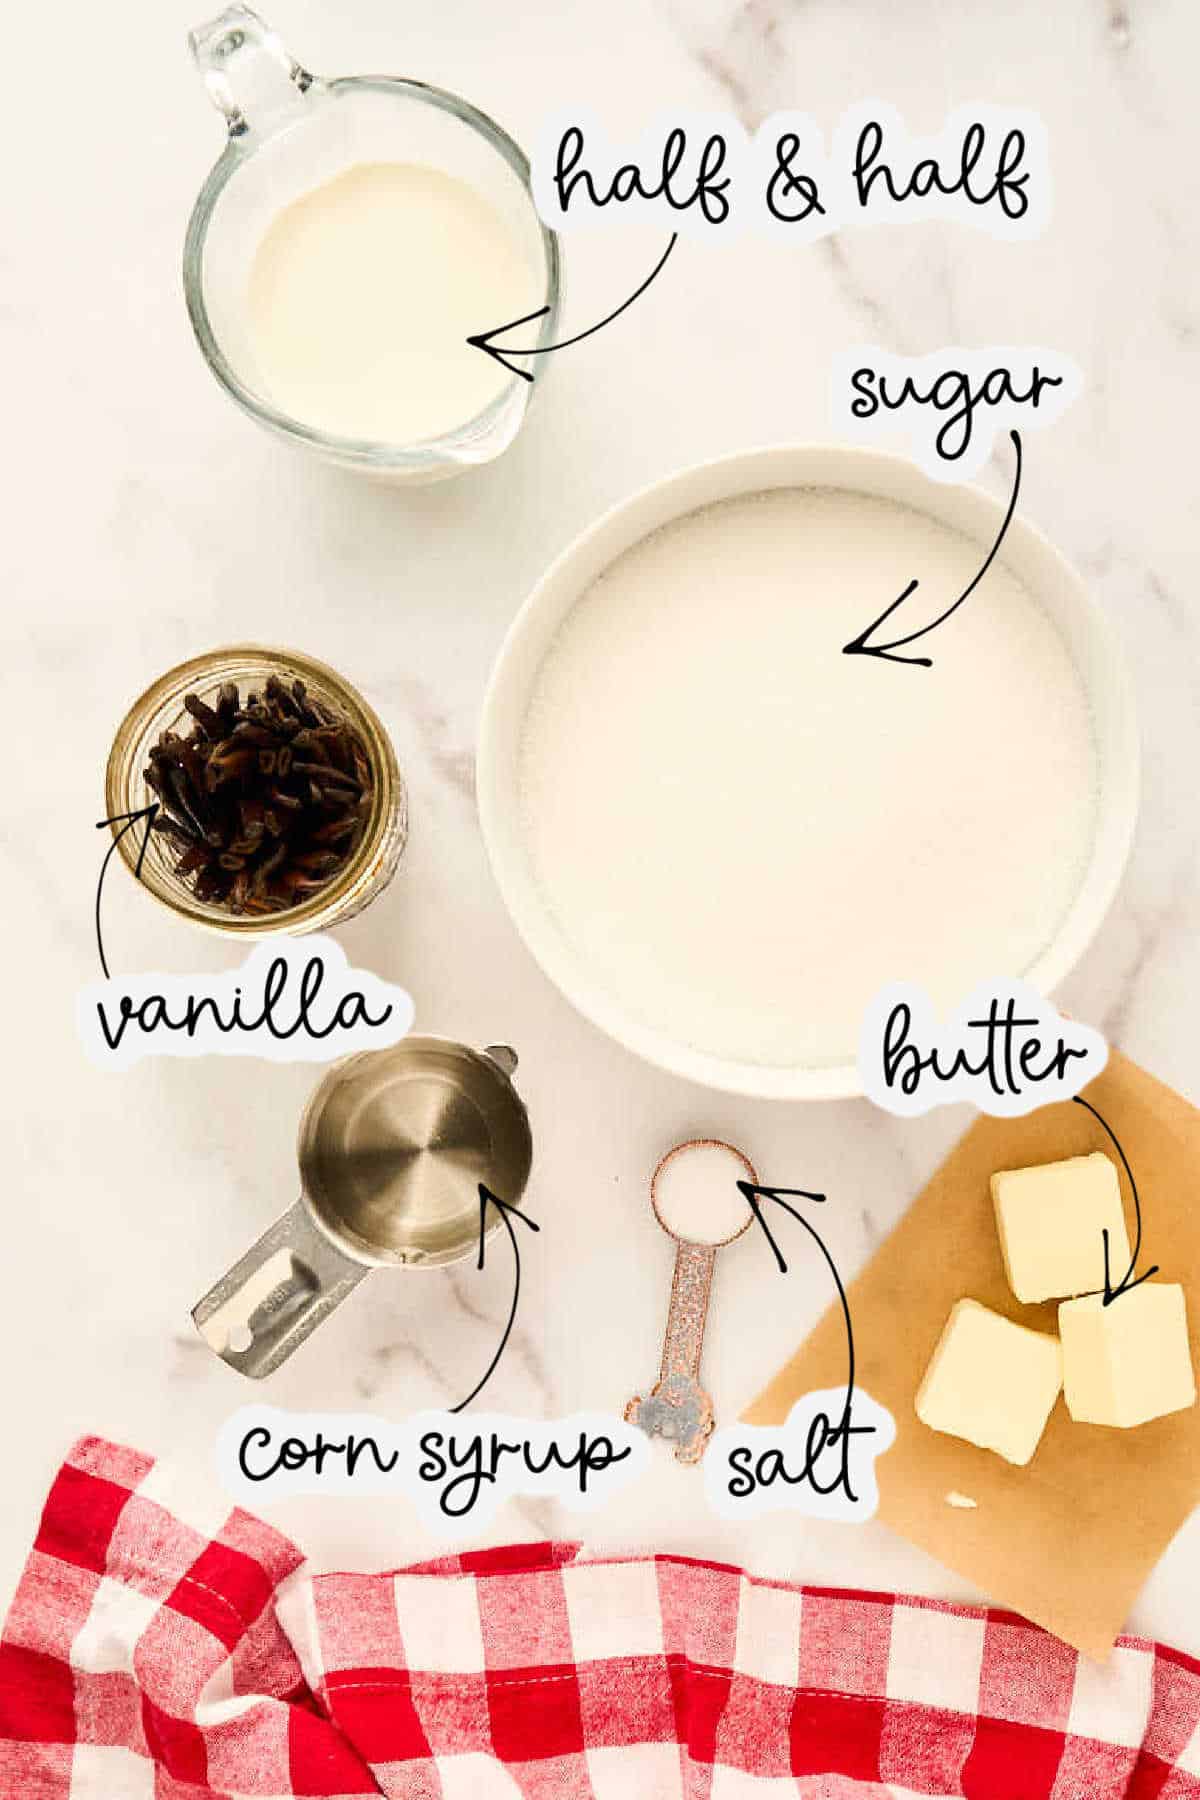
- 2¼ cups granulated sugar
- ½ teaspoon salt
- ⅔ cup half and half
- 1 tablespoon corn syrup
- 3 tablespoons butter
- 1 tablespoon vanilla extract
Save This Recipe
You'll join my email list which you will love. And if you don't, unsubscribe in one click. ❤️
Instructions
- Combine and heat. In a 2-quart saucepan, mix the sugar, salt, half and half, and corn syrup. Then, stir with a whisk until the mixture is smooth. Place the saucepan over medium-low heat and bring the mixture to a gentle boil.
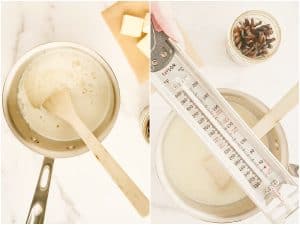
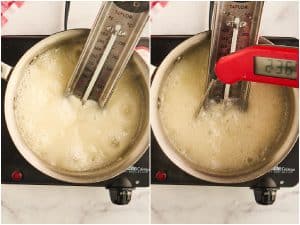
- Cook the mixture until 240°F. Attach the candy thermometer to the side of the saucepan to monitor the temperature. Let the mixture cook undisturbed (avoid stirring) until it reaches 240°F. Once it reaches this temperature, promptly remove the saucepan from the heat.

- Add the butter and vanilla – do not stir. Allow the mixture to sit until it stops bubbling. Then, add the butter and vanilla on top, but do not stir or disturb the mixture. Let it cool at room temperature for about 20 minutes. The mixture is ready when the side of the pan is warm but no longer hot to the touch.
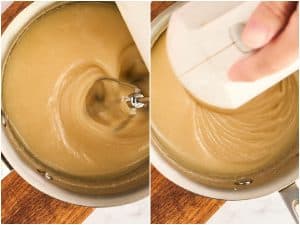
- Beat the fudge until it thickens. Using a hand mixer at medium to low speed, beat the fudge for 1-3 minutes or until it begins to thicken and lose its shine. Be careful not to overbeat, as this can make the fudge too firm to pour.
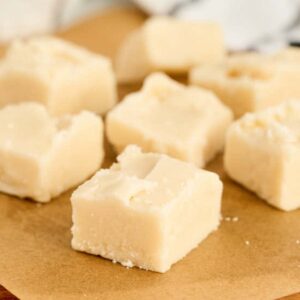
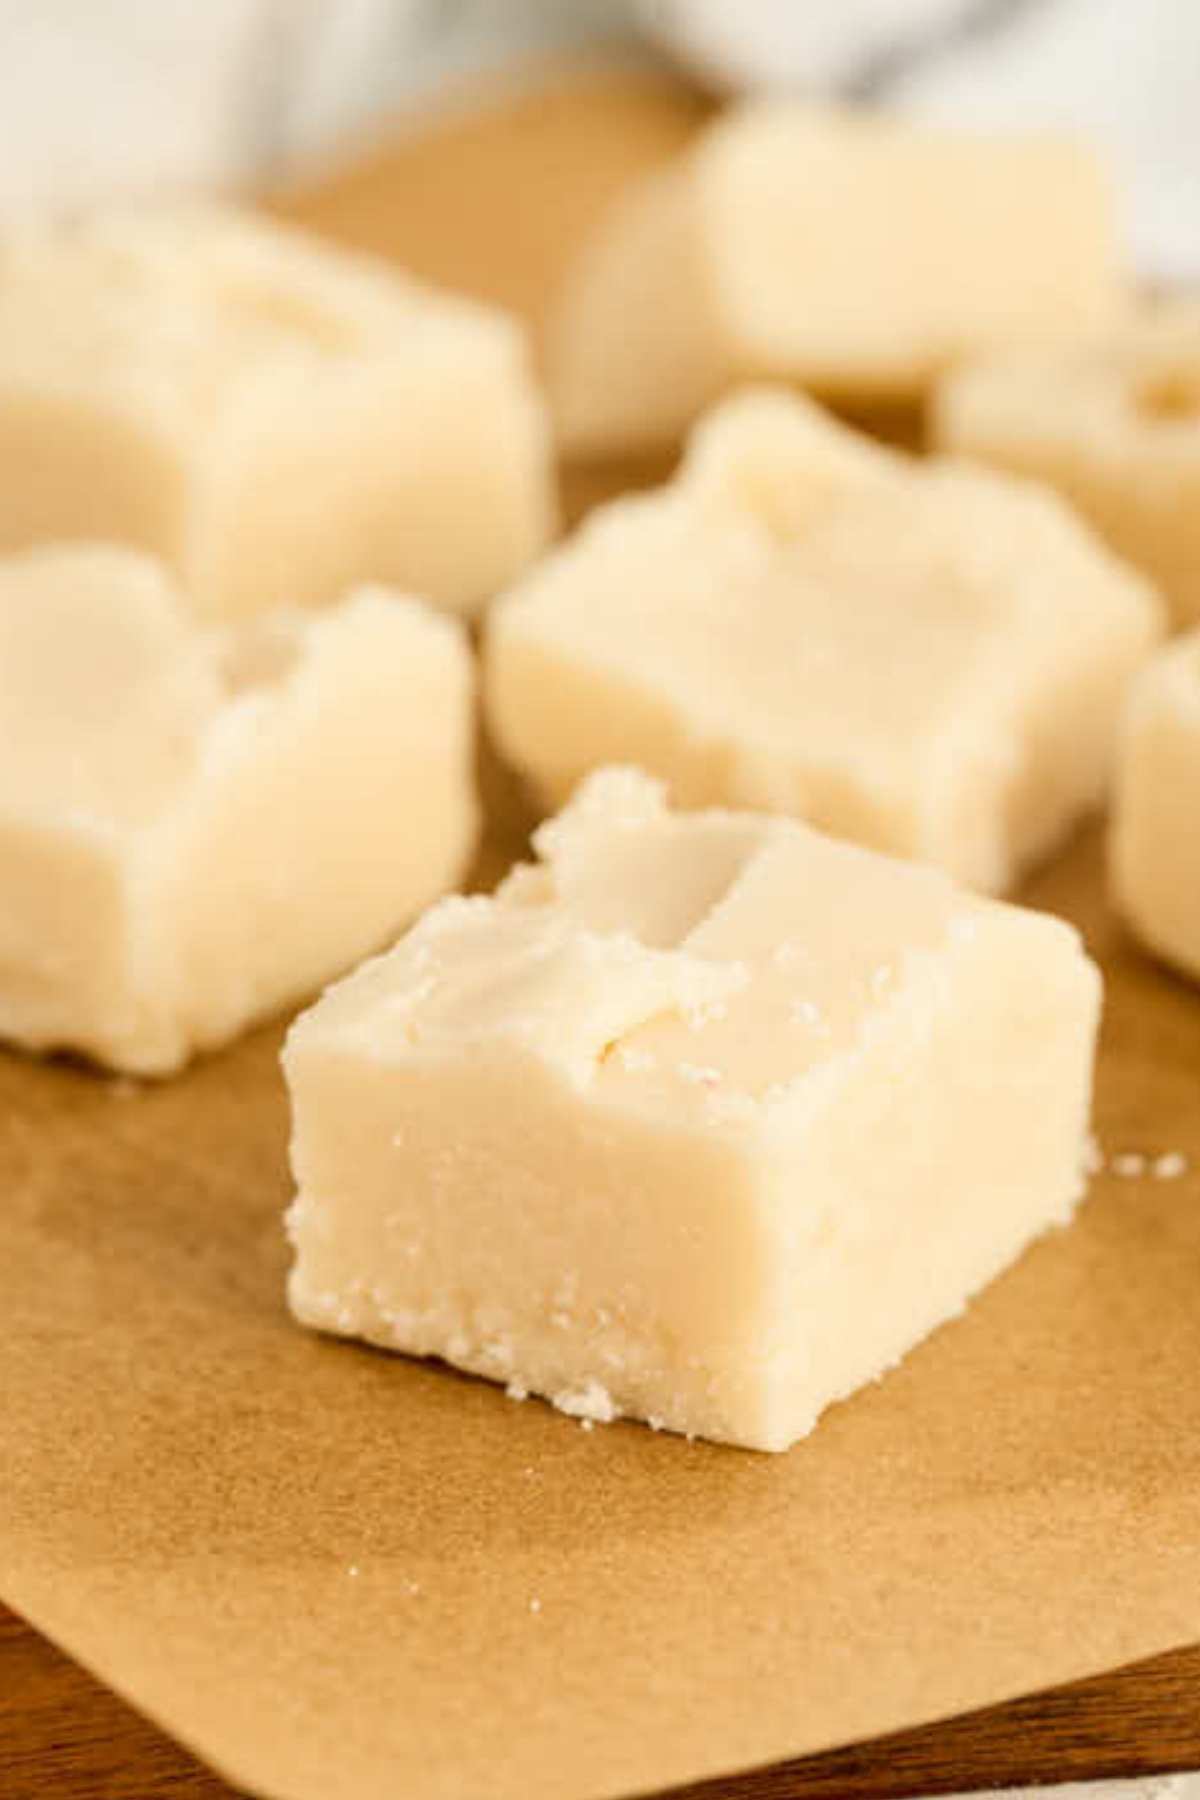
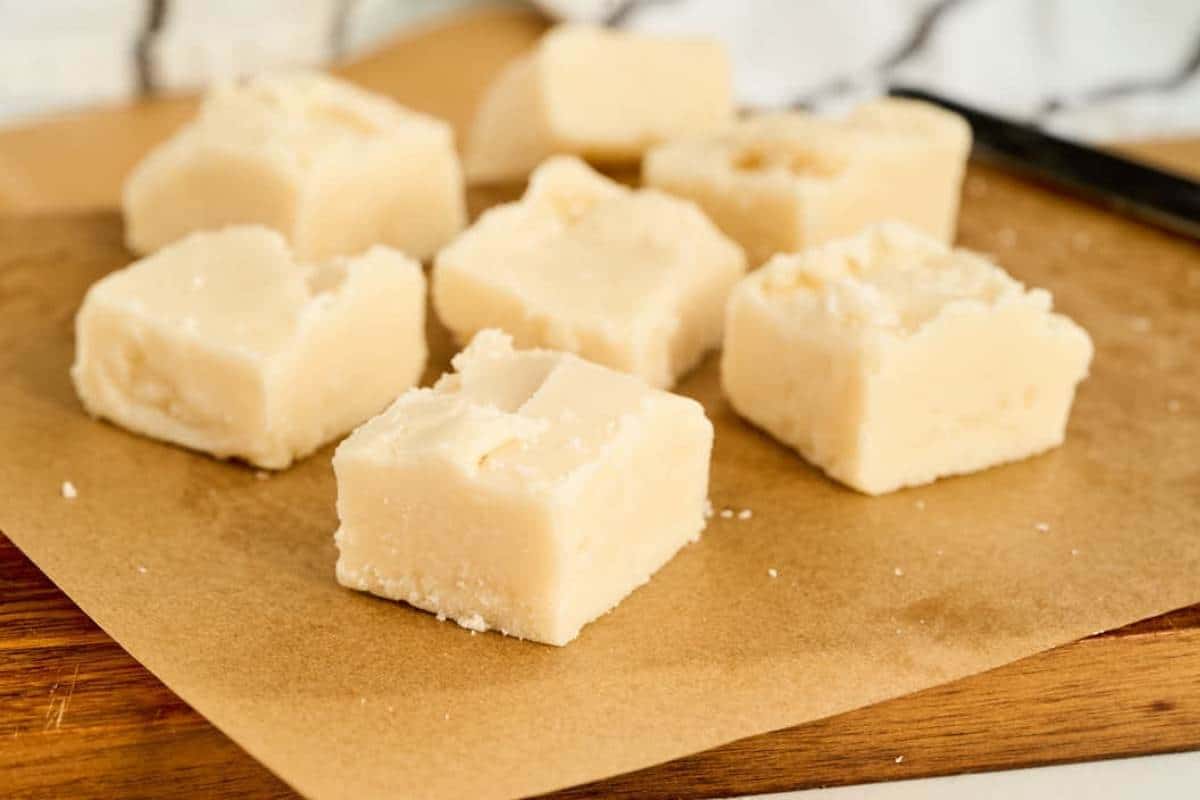
- Pour, cool, and cut. Quickly pour the fudge into a buttered dish, smoothing it out if needed. Let it set for about 20 minutes at room temperature. Once set, cut the fudge into one-inch squares and enjoy!


Notes
Nutrition
I really love this homemade fudge – that smooth, melt-in-your-mouth feel, the rich vanilla taste, and the joy of making a treat that never goes out of style. It’s perfect for sharing during holiday get-togethers, giving thoughtful gifts, or enjoying a cozy night at home.

If you want more classic fudge recipes, don’t miss my Old-Fashioned Fudge recipe, which is the chocolate version using the same stovetop method.
I hope it brings you as much joy as it does for me.
Key Ingredients and Tools
Here are some key ingredients and tools to help you get great results with this recipe.
- Candy thermometer: This tool is crucial for getting the right temperature (240°F) for the perfect fudge texture. You can find it in most large grocery stores in the baking aisle, kitchen section, or online.
- Corn syrup: This ingredient helps stop sugar from crystallizing, keeping the fudge smooth and creamy. If you don’t have corn syrup, honey can be used, but it might change the flavor slightly.
- Half-and-half: This adds a nice richness to the fudge without making it too heavy. Look for it in the dairy section, and avoid low-fat options, as they can affect the texture. You can also mix equal parts of milk and heavy cream for a similar creaminess.
- Butter: Butter gives the fudge its essential flavor and creamy texture. It’s best to use unsalted butter to avoid any unexpected saltiness in the final product. You can use margarine as a substitute if unavailable, but it might change the flavor a little.
- High-quality vanilla extract: Pure vanilla extract enhances the flavor nicely. While imitation vanilla can work in a pinch, it won’t provide the same richness.
- Heavy-bottomed saucepan: A thick, heavy-bottomed pan heats evenly, which helps prevent burning. A stainless steel pot is better than a nonstick or very light pan if you don’t have one.
With these tools and ingredients, you’ll be all set to make smooth, tasty vanilla fudge every time.
Troubleshooting and Help
If your fudge wasn’t set up as firm as you’d like, it may not have reached the right temperature. Make sure you’re heating it to exactly 240°F. Humidity can also affect fudge consistency, so it’s best to make fudge on dry days.
If your fudge turned out brittle and crumbly, it was likely overcooked or overbeaten. Be sure to remove it from heat right when it reaches 240°F, and when beating, stop as soon as it starts to thicken and lose its shine. Overbeating can cause the fudge to set too hard, so aim for a short mix until it’s smooth and pourable.
Microwave fudge recipes usually use condensed milk and chocolate, creating a quicker, less involved process. This stovetop vanilla fudge, however, has a classic, old-fashioned flavor and texture that’s worth the extra time and care. It’s creamier, richer, and closer to traditional fudge made in candy shops.
If your mixture is looking brownish, it might mean the sugar is starting to caramelize, which can give the fudge a darker color and a slight caramel flavor. Keep the heat at medium-low for classic white fudge, and watch the temperature closely. It should still be close to white if it’s a light golden shade, but a deeper brown may result in a darker fudge.
For clean, even squares, let the fudge cool completely. Use a sharp knife, and if you want really precise cuts, warm the knife under hot water, then dry it off before slicing. This helps the knife glide smoothly through the fudge without sticking.
Yes, you can double the recipe, but using a larger saucepan is important so the mixture doesn’t bubble over. Also, remember that a larger batch may take a bit longer to reach the right temperature, so be patient and watch that thermometer! Try my Peppermint Fudge Recipe for a refreshing take on this classic treat if you want to add a festive twist to your fudge-making.
Absolutely! Vanilla fudge is a great base, and you can get creative with add-ins like nuts, chocolate swirls, or even a touch of sea salt. If you’re looking for a cozy, nutty twist, check out our Maple Nut Fudge recipe—it combines the warmth of maple with crunchy nuts for a delicious treat.
I love this fudge recipe as a simple and enjoyable treat, whether sharing it with family and friends or keeping some for myself. I can create something special with just a few basic ingredients and patience—a rich, creamy fudge that offers a warm and nostalgic taste. This recipe is perfect for holiday trays and dessert tables, making an easy and thoughtful gift or a cozy homemade dessert. So try it too!


If I were to add caramel bits, how much would I put?
the best thing to do is add a cup, stir it in and see what you think. you cna always add more.
Can this recipe be make dairy free?
Hey Gina,
Yes, you can definitely make this vanilla fudge recipe dairy-free with a few simple swaps! Try using a high-quality plant-based butter (like one with a creamy texture) in place of regular butter, and substitute the evaporated milk with a dairy-free option like canned coconut milk or a creamy oat milk. Keep in mind that coconut milk might add a slight coconut flavor, but it often works well in fudge recipes for its richness. Hope this helps, and enjoy your dairy-free fudge adventure! 🍬🌱
This is the best. Creamy, smooth and a firm but soft hardness. I like to add chopped pecans at the end.
I have made this recipe two times. We all love it. Can the recipe be doubled?
Susan I know this sounds weird but every time I’ve tried it does NOT turn out. I don’t know why! If you do try, and it works, please tell me the secret!
I’ve made this twice and it’s great!
thanks abe glad you enjoyed it 🙂
Thank you.