These bread machine sandwich rolls are versatile, easy, and popular with everyone.
These rolls freeze beautifully, so you can make a batch on the weekends and have fresh homemade bread for sandwiches all week; no grocery store runs are needed.

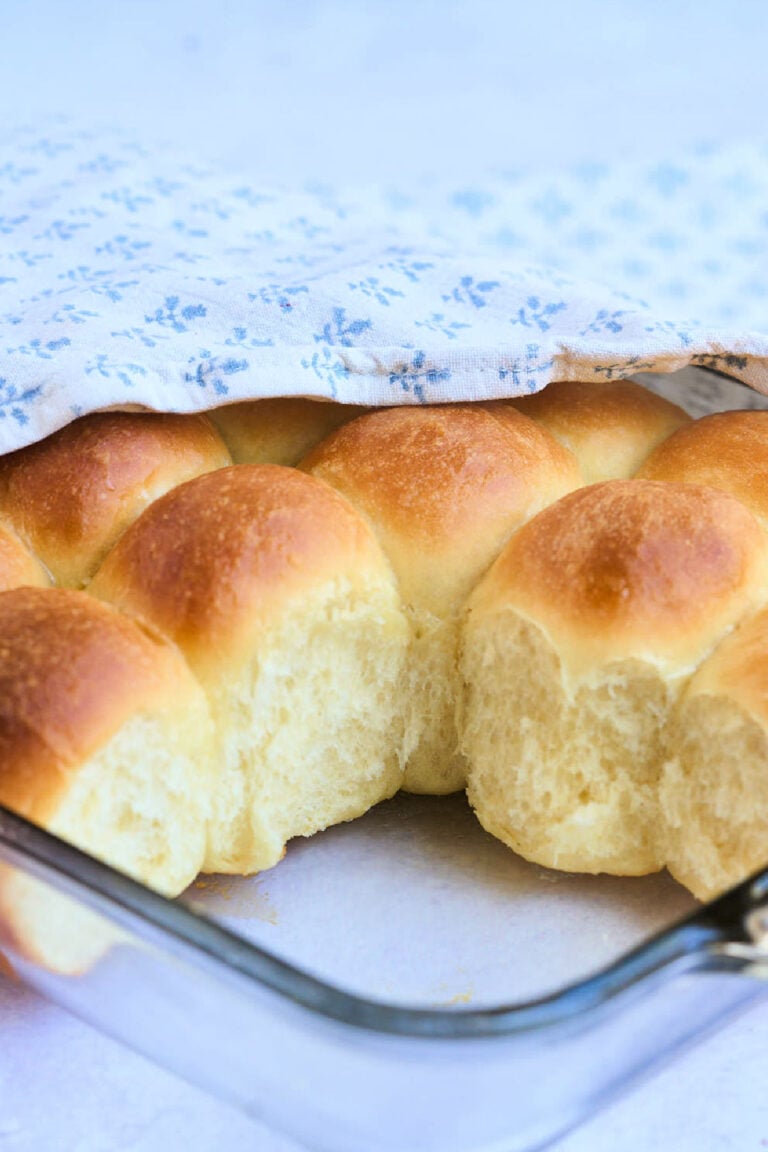
Bread Machine Sandwich Rolls
Equipment
Ingredients
- 4 cups all purpose flour
- 1 ½ cups water
- 2 teaspoons salt
- 1 teaspoon sugar
- 2 teaspoons instant yeast
- pinch cornmeal for dusting the baking sheet
Save This Recipe
You'll join my email list which you will love. And if you don't, unsubscribe in one click. ❤️
Instructions
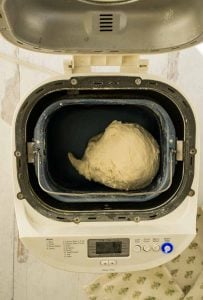
- Prepare the Dough. Add all ingredients (except the cornmeal) to the bread machine's bucket in the order recommended by the manufacturer. Then, select the DOUGH cycle and press start. Watch the dough for the first few minutes of mixing. If it is dry and crumbly, add more water; if it is too sticky, add more flour. The dough should be smooth and slightly sticky but completely clear the sides and bottom of the bread machine bucket. Allow the cycle to finish.

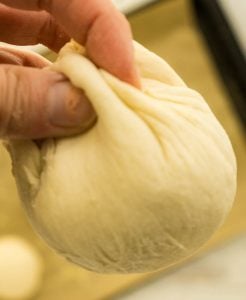
- Shape the Rolls. Prepare a baking sheet with parchment paper and dust cornmeal on top. When the machine beeps, remove the dough and cut it into 12 equal pieces. (It is easiest to divide into halves, quarters, etc.) Gently shape each piece into a roll by pulling down the bottoms of the dough to smooth out the tops. Dust flour on top of the rolls and rub it in.

- Second Rise. Cover the rolls on the prepared baking sheet with heavily greased plastic wrap. Place the baking sheet in a warm place and let the rolls rise until they are very puffy about 45 minutes. Towards the end of the rising time, preheat your oven to 425°F (220°C) with a rimmed metal baking sheet on a lower rack.

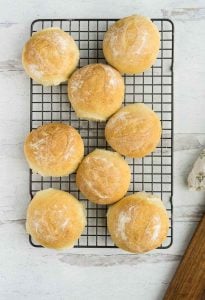
- Bake the Rolls. When the oven is hot, pour 1 cup of water on the preheated baking sheet to create steam. Immediately place the rolls inside the oven. Bake for 15-19 minutes until golden brown. Remove from the oven and cool on a wire rack.

- Serve. Serve warm as dinner rolls or slice when cool for sandwiches. Eat within 2 days or freeze.

Notes
Nutrition
More Tips:
When adding water to a hot baking sheet, avoid burns. Use a kettle or a heat-resistant measuring cup with a spout. The steam from the water helps make the crust crispy.
After baking, let the rolls cool on a wire rack to keep them from getting soggy on the bottom. Proper cooling also makes sure the rolls cook through.
Get Access to
All my Free planners, Printables, binders and more
Get a copy of this frugal recipe binder with lots of crockpot favorites, pasta dishes, casseroles, and more inside the subscriber library. Plus SO much more.
If you plan to use the rolls for sandwiches, wait until they are completely cool before slicing. Use a serrated knife to avoid flattening the rolls.
Once you feel comfortable with the basic recipe, add herbs, cheese, or garlic to the dough for extra flavor. Make sure to add these ingredients during the initial mixing stage.

About the Ingredients
Here are great ingredient alternatives you can try:
- All-purpose flour: Swap all-purpose flour with bread flour for a chewier texture or whole wheat flour for a denser, more nutritious roll.
- Water: You can use milk for a richer flavor and softer crumb instead of water.
- Sugar: Use honey or maple syrup as a natural sweetener.
- Instant yeast: Replace with active dry yeast, but proof it in warm water with a bit of sugar first.
- Cornmeal: Semolina or flour is a good alternative for dusting the baking sheet.

Remember that these substitutions will change the texture and flavor of the rolls, so feel free to experiment and find your favorite variation!

Making sandwich rolls at home with a bread machine is simple and rewarding. Follow these steps and tips to bake soft, delicious rolls that’s perfect for any meal.


I made these today and they were delicious. Thanks
Hey Angie, thanks so much for letting me know. I’m glad you liked the recipe.
Made this recipe. The instructions for shaping state to shape into 12 balls, but the image on the baking sheet show eight balls. You may want to change the verbiage to match the image on the baking sheet. Eight good sized rolls would be the right amount. Will make eight sandwich rolls the next time.
Hey Dolores, thanks for your feedback! I see what you mean, and I’ll take a look at the instructions. Glad you tried the recipe, happy baking!
Great recipe! I added one egg and 2 TBS of butter to make it a richer dough, greased a lasagna pan and made sub rolls with them! After they rose, I brushed them lightly with butter and added everything seasoning. Delicious!
thanks Ally!! I MUST try with the seasoning, great idea! 🙂
Can you leave this in the machine and bake as a loaf?
Delicious! No problems at all. This recipe is a keeper!
Love this recipe! Tried it today and it turned out great.
Question, if my dough cycle includes a Second rise, is it better get the dough out before that so the second rise happens after I shape the rolls? Thanks! 😊
Excellent, super easy, delish recipe!
Have another batch in the oven now..
Highly recommend..♥️
so glad to hear it debbie! thank you. for leaving a review!
Great recipe, I have my 3rd batch in the bread machine now. Perfect for pulled pork sliders too!
Are you suppose to pour the water on the sheet (baking pan) the rolls are on? Or do you use a separate sheet?
Never mine I got it.
Great rolls….!
Awesome! Glad you liked them!
Delicious rolls, crunchy on the outside and soft on the inside! It was just the recipe I was looking for. We enjoyed them tonight with sausage, peppers and onions. Will definitely make them again! They would be great with eggplant parm, egg salad, kielbasa and kraut, or any kind of deli meat. Easy and enjoyable to make.👍
Claudia I’m so glad you liked the recipe! I will definitely have to try with an eggplant parm sandwich that sounds delicious!
I made these rolls and they came out really great.
There is nothing like a really FRESH roll for a sandwich.
Thanks for sharing this recipe. 🙂
i’m glad you liked the rolls, Bill! I agree a nice roll makes all the difference. 🙂