Most people love the idea of baking with sourdough because they see pictures of beautiful artisan loaves with deep crust, slashes, and all the rest. And then the reality of their bread is a flat, weird situation that is not quite what they expected. Anyone else?
It’s time to end that sadness forever. Because once you master this bread machine sourdough recipe, you’ll have a foolproof loaf you’ll be proud of every time.
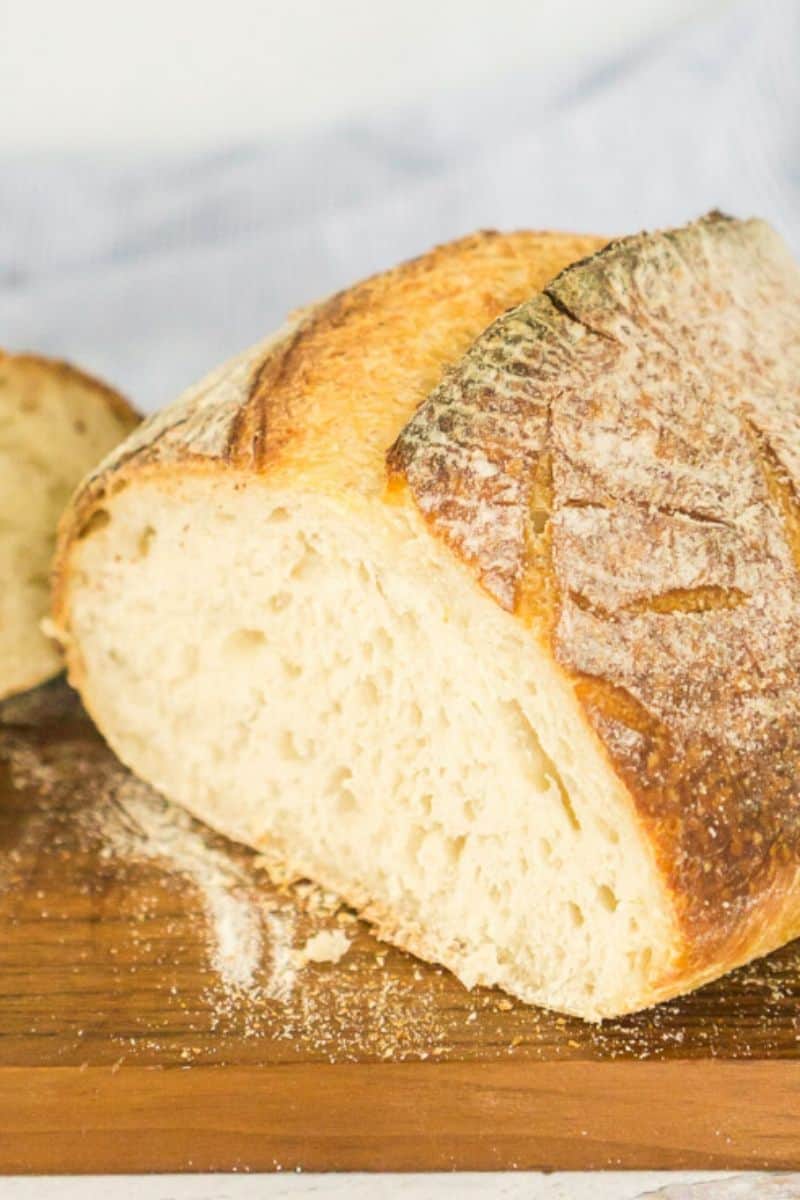
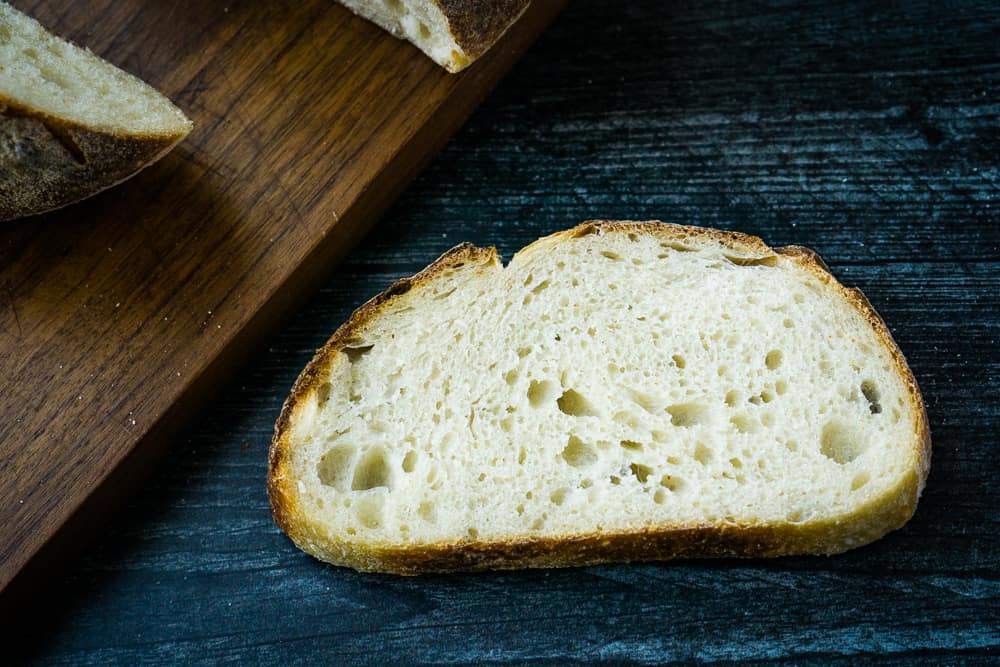
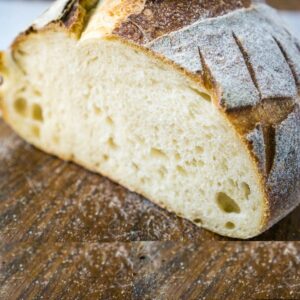
Over time, this has become my go-to for daily baking. It’s incredibly easy, especially since my bread machine handles most of the kneading. With just a few basic ingredients and letting the dough rise overnight in the fridge, I always end up with a crispy loaf on the outside and soft and chewy inside.
It’s perfect for sandwiches, toast, or even just a buttered slice. At first, the dough might seem a bit dry, but I’ve learned that’s completely normal. Resist the urge to add extra water and trust the process, and it turns out perfectly every time.
Ingredients and Tools You’ll Need
We’re using the bread machine to do the kneading, but you can also do it in a stand mixer. Make sure your starter is bubbly and active.
Get a Free + Pretty PDF Recipe Book
Sourdough Sunday Newsletter

Every Sunday evening I’ll send you a sourdough recipe to make that week, straight from my kitchen to your inbox.
And as a thank you for signing up, I’ll send you this e-book with beautiful printable recipes right away. Simple!
You will not be added to any other email lists or my daily newsletter. But if you’re already on my newsletter, you’re welcome to join and receive both.
Heart’s Content Farmhouse is a participant in the Amazon Services LLC Associates Program, an affiliate advertising program designed to provide a means for sites to earn advertising fees by advertising and linking to Amazon.com. This means that when you click on certain links on this site and make a purchase, I may earn a small commission at no additional cost to you. I only recommend products I genuinely believe in and would use in my own kitchen. As an Amazon Associate, I earn from qualifying purchases.
Equipment
- Bread machine (with a dough cycle setting) (It does the kneading for you. If you don’t have one, kneading by hand or using a mixer works, but a bread machine simplifies the process.)
- Large mixing bowl
- Measuring cups and spoons
- Damp tea towel or kitchen towel
- Baking Sheet
- Parchment paper
- Rimmed baking sheet
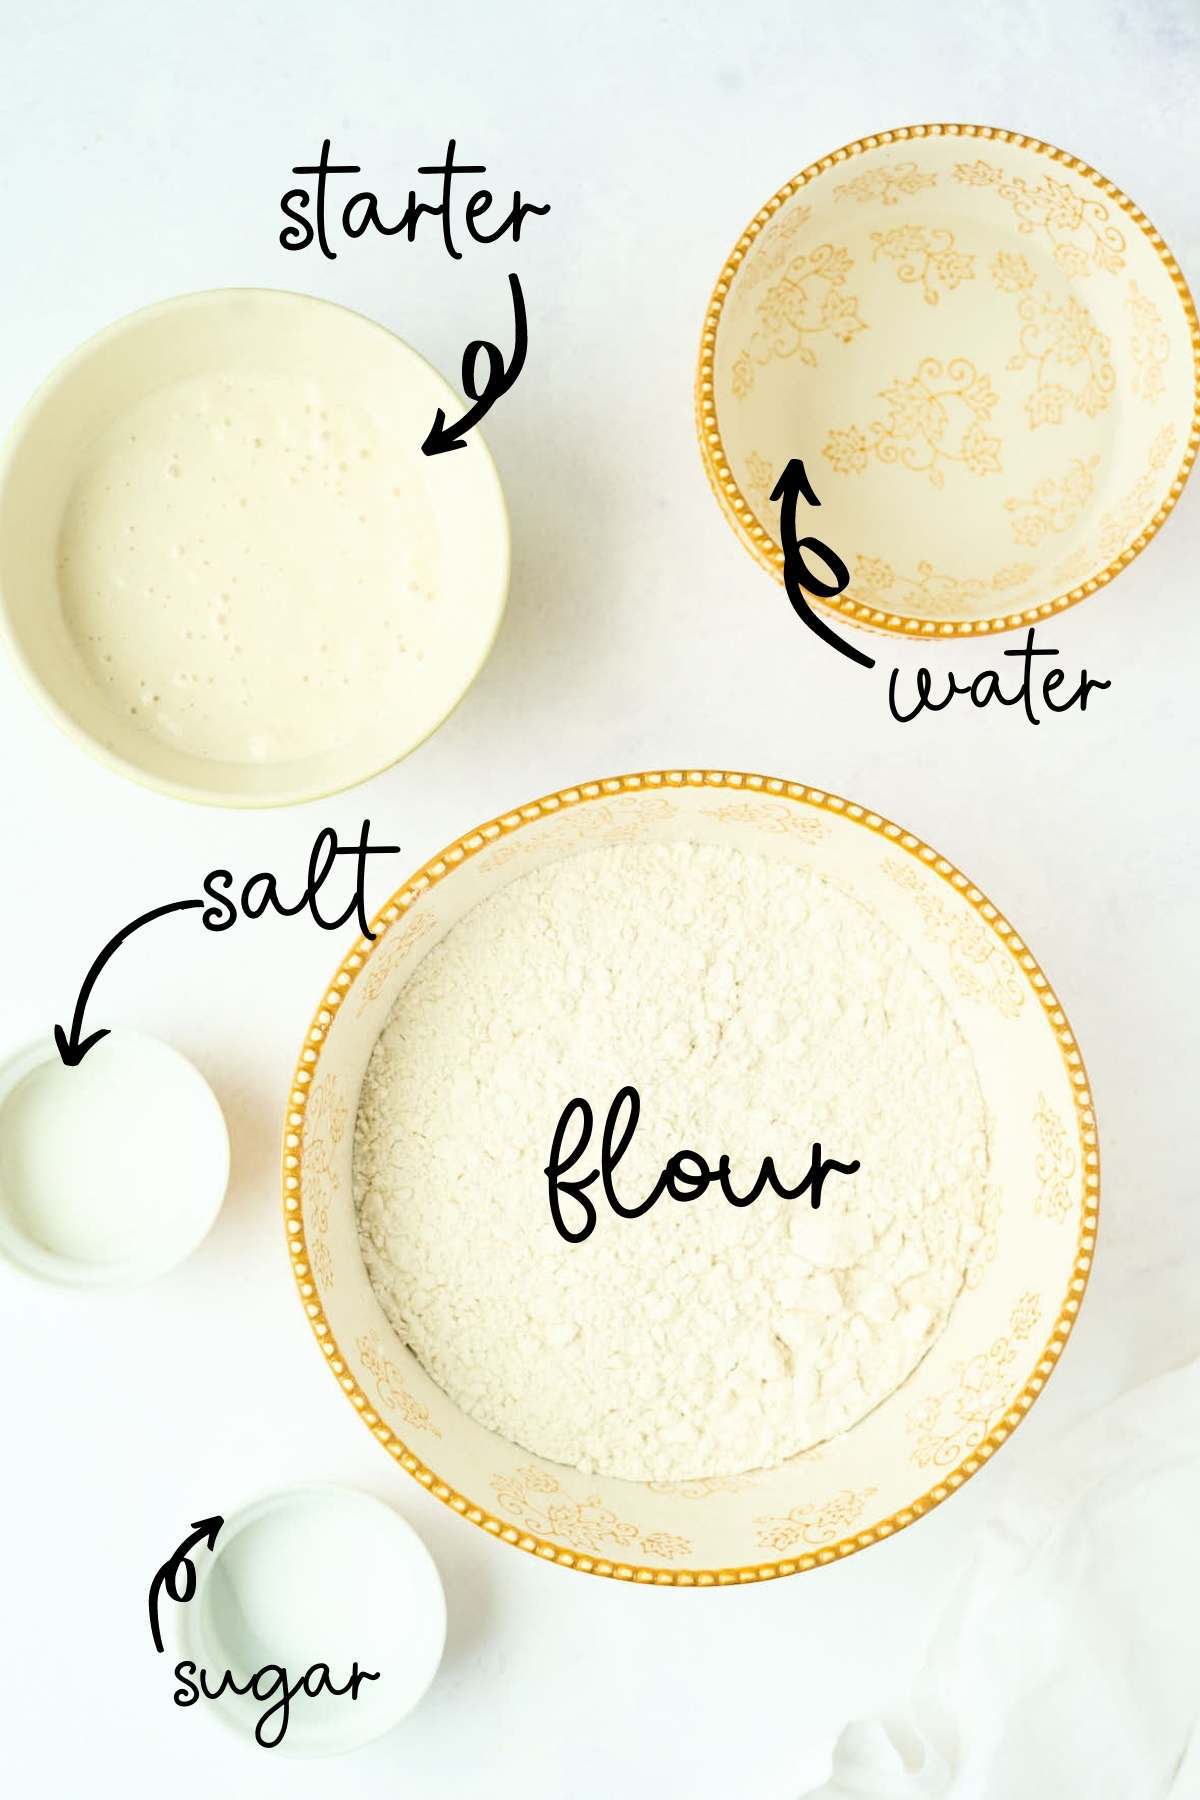
Ingredients
- 3 cups bread flour (15.85 ounces) (regular or wheat flour will work too, but bread flour will make your bread chewier and stronger)
- 1 cup lukewarm water (7.75 ounces)
- ¾ cup fed sourdough starter (5.65 ounces) (You can also easily make your own at home with flour and water—it takes about 5-7 days to get a strong starter going.)
- ½ tablespoon sugar
- 1 ¾ teaspoon salt
How to Make Bread Machine Sourdough
Step One: Autolyze
Combine the bread flour, sourdough starter, sugar, and water in a large mixing bowl. The dough will feel drier than typical sourdough—this is normal. Do not add more water. Use your hands to make sure all ingredients are incorporated into a cohesive ball. Cover the bowl with a damp tea towel and let the dough rest on the counter for 30 minutes. Tip: Pre-measure the salt and place it in a small container on the towel to remind yourself to add it later.

Step Two: Knead
After the autolyze, transfer the dough and salt into the bread machine bucket. Then, select the “dough” cycle and press start. You don’t need to fold the dough or anything crazy like that. Just walk away.
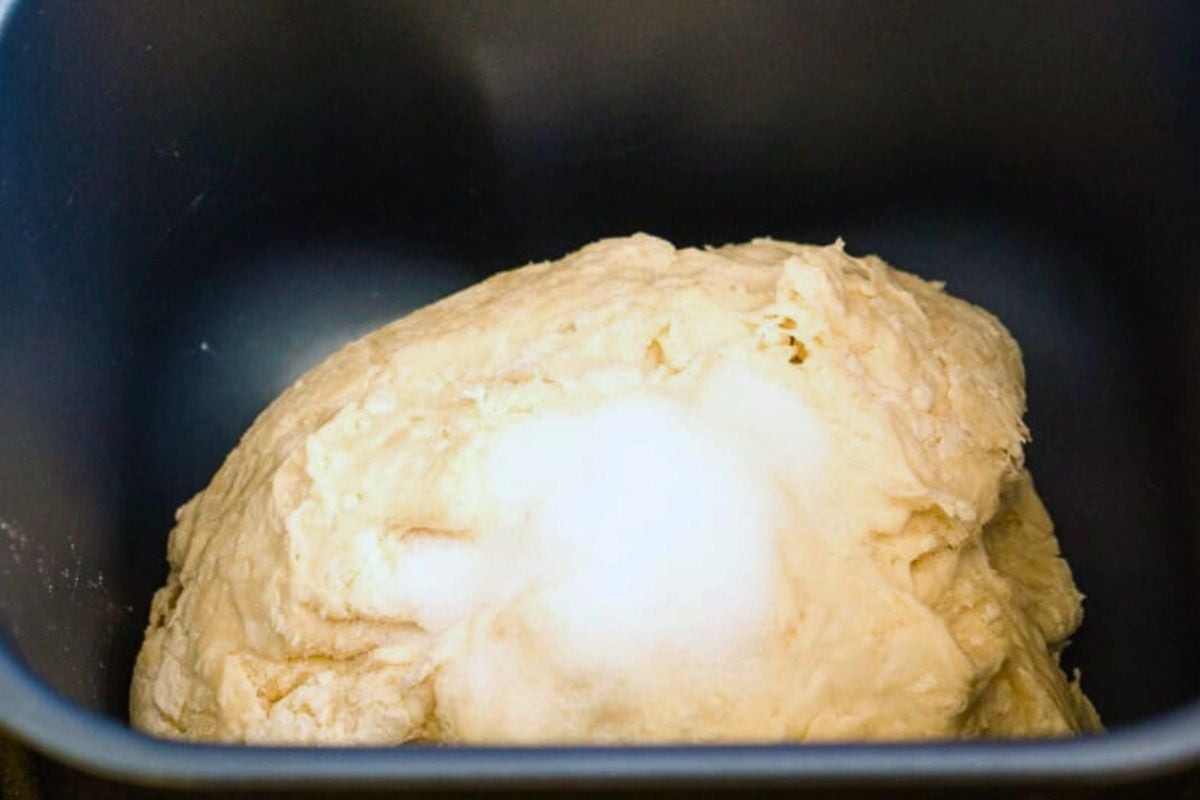
Step Three: First Rise
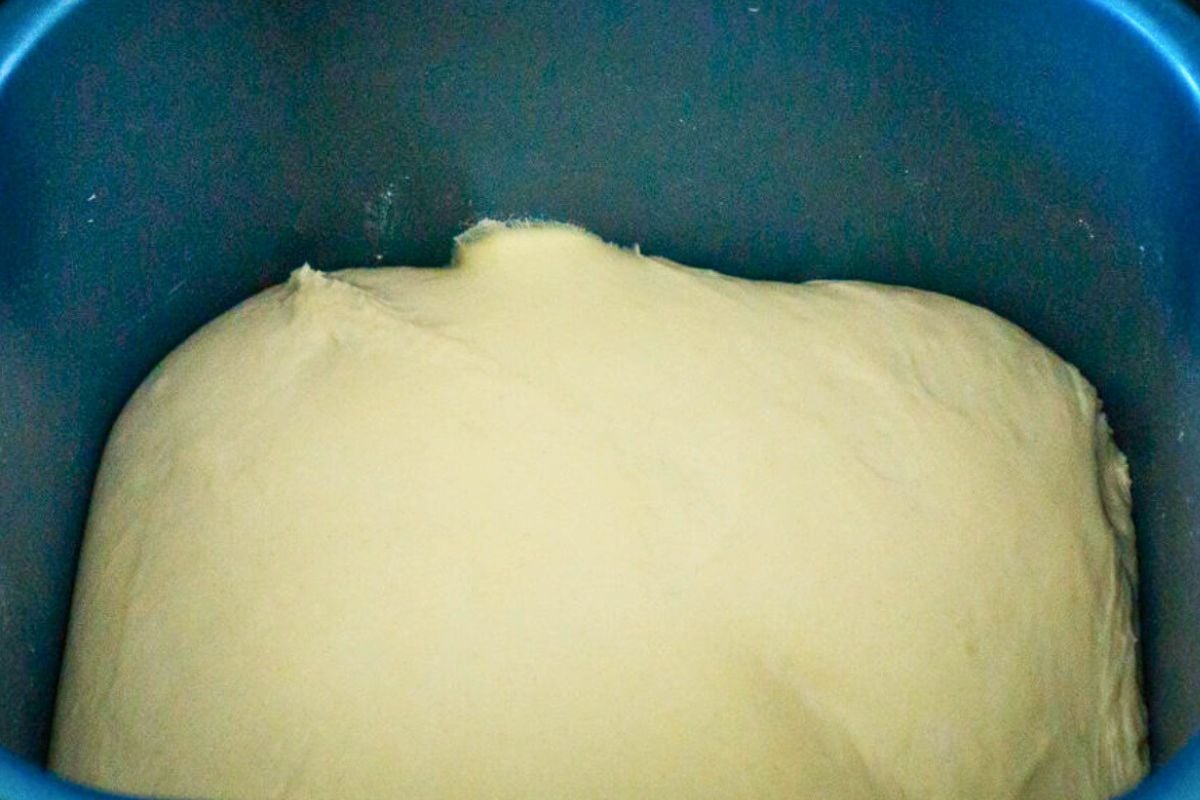
When the cycle ends, leave the dough in the machine to continue rising for 2-3 more hours. The dough should be noticeably puffier and soft to the touch, though it may not have doubled in size. This longer rise helps develop the flavor and texture of the bread.
Step Four: Shape The Loaf
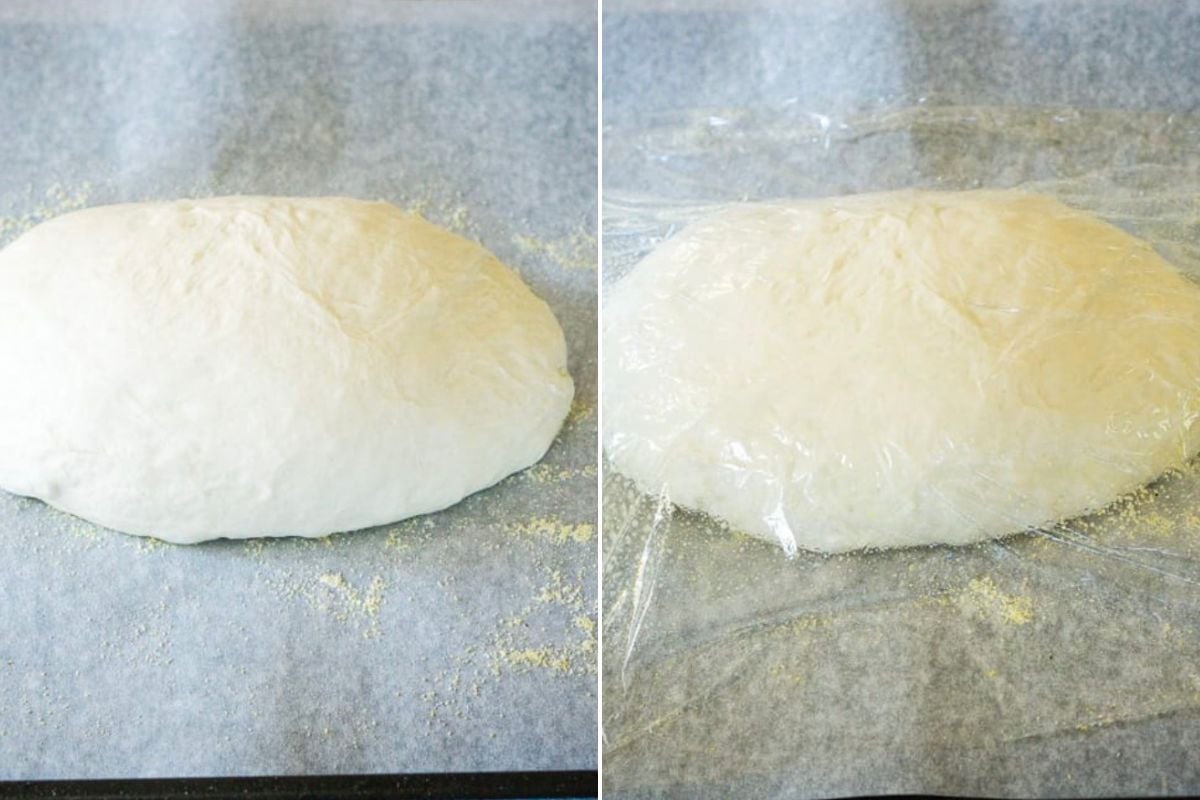
Prepare a baking sheet by lining it with parchment paper and sprinkling cornmeal over the surface. Carefully remove the dough from the bread machine and gently shape it into a round or oval loaf. The dough will be slightly sticky, but avoid using flour for shaping. Place the dough on the prepared baking sheet.
Step Five: Second Rise (Overnight Proof)
Spray a piece of plastic wrap with cooking spray and loosely cover the shaped dough. Place the covered loaf in the refrigerator to proof overnight for 8 to 16 hours.
Step Six: Prep For Baking
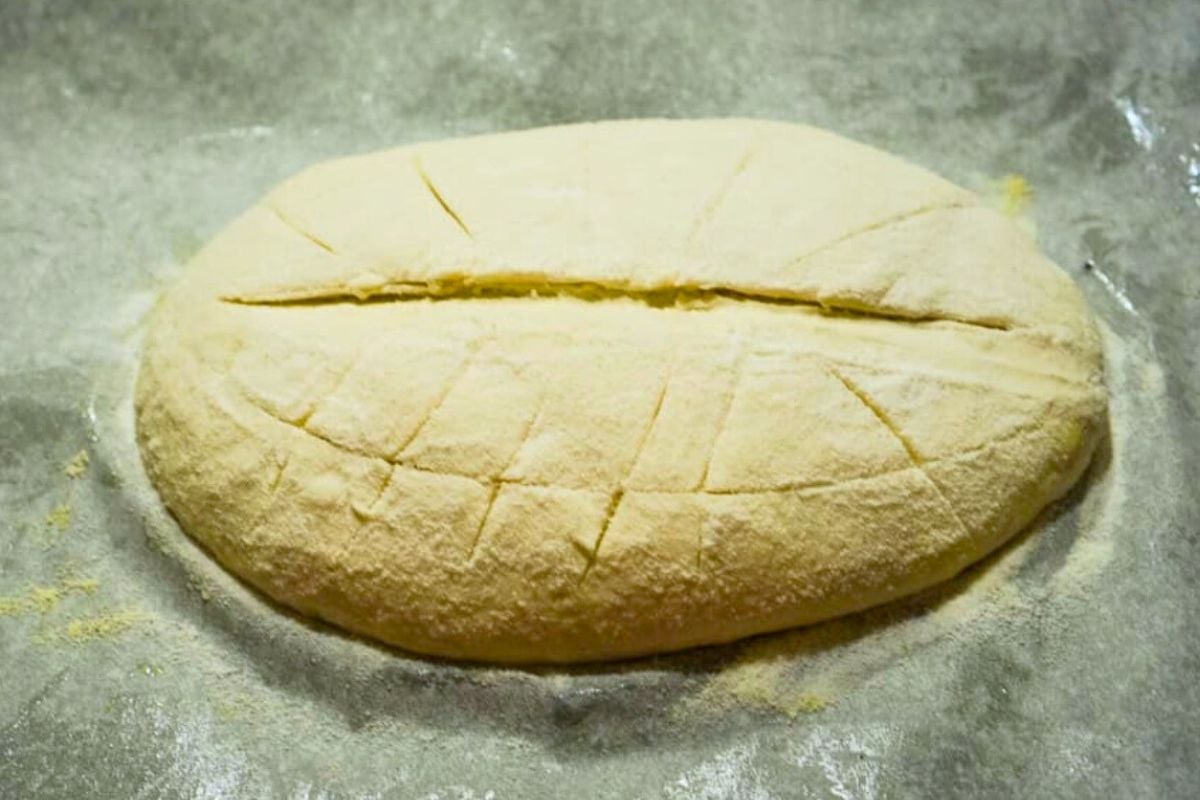
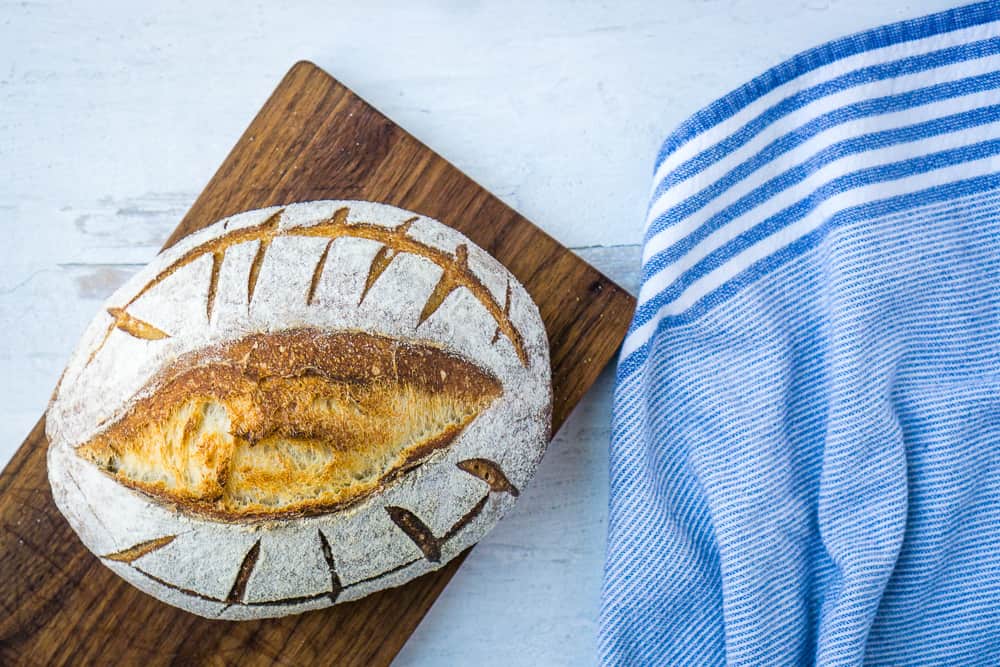
In the morning, preheat the oven to 450°F (230°C). Position two racks: one in the center of the oven and the other in the lower middle. Then, place an empty-rimmed baking sheet on the lower rack while the oven is preheating. Next, remove the loaf from the fridge. Dust it lightly with flour and use a lame or a sharp serrated knife to slash the top of the dough, allowing the loaf to expand during baking.
Step Seven: Bake With Steam
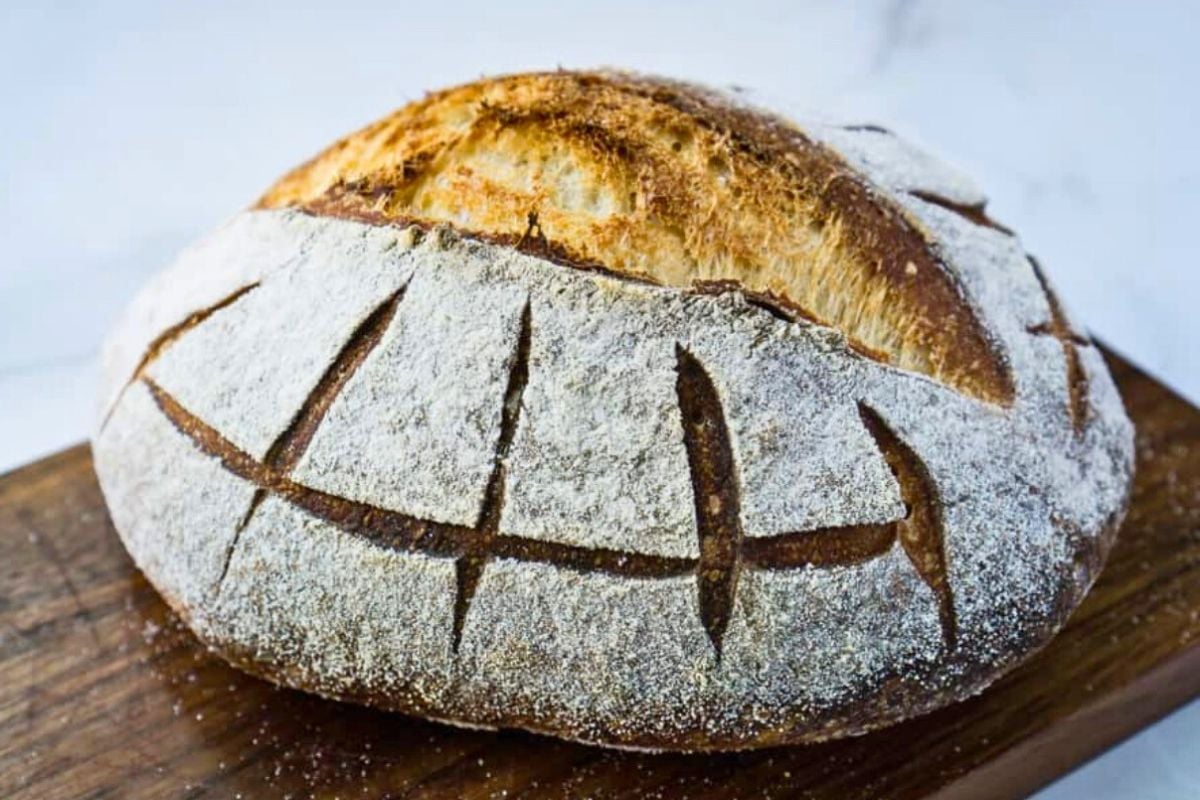
When the oven is fully preheated, carefully pour 1 cup of water into the baking sheet on the lower rack to create steam. Immediately place the loaf on the center rack and close the oven door. Bake the loaf for 45 minutes until it reaches a deep golden-brown color. Remove from the oven and allow the bread to cool on a wire rack for at least 4 hours.
Step Eight: Slice And Serve
Once the bread has fully cooled (after at least 4 hours), use a sharp, serrated knife to slice the loaf into even pieces. Enjoy fresh or toasted with your favorite toppings!
Storage Instructions
Once the bread has completely cooled, wrap it in a clean kitchen towel or place it in a paper bag. This will help keep the crust crispy while preventing the bread from drying. Avoid using plastic, as it can cause the crust to become soft. Stored this way, the bread will stay fresh for about 3 days at room temperature.
You can also freeze it. First, let the loaf cool completely. Then, slice the bread into pieces, so it’s easier to use later. Wrap the slices tightly in plastic wrap or aluminum foil and place them in a freezer-safe bag. Remove as much air as possible before sealing the bag. The bread can be stored in the freezer for up to 1 month.
Thaw the slices at room temperature or pop them straight into the toaster. You can also reheat them in the oven for a few minutes to freshen up the crust.
What to Serve with Bread Machine Sourdough Bread
This bread is great for everything from toast at breakfast to a side at dinner.
- Spread on some homemade butter or strawberry jam.
- It’s great for grilled cheese sandwiches since it doesn’t have big holes.
- Serve as a side for dinner, like with a creamy chicken noodle soup.
Questions and Troubleshooting
Check my Sourdough FAQ page to see what could have gone wrong.
The autolyze step helps improve the dough’s texture, but if you’re short on time, you can throw everything in the bread machine and still get a great loaf.
No! It’s normal for this particular recipe. Once it rests and rises, the dough will soften and be easier to work with.
Great question! The dough should look noticeably puffier, but doesn’t need to double in size. If you press it gently with a finger and it springs back slowly, it’s ready.
Yes, you can! If you’re in a rush, let the dough rise at room temperature for another 2-3 hours. The slow, overnight rise helps develop the sourdough flavor, so try it when you can.
There are a couple of reasons this could happen. If your starter wasn’t bubbly and active when you used it, that could slow the rise. Also, sourdough can be slightly slow to rise, especially in cooler kitchens. If this happens, just give it more time to puff up! If you’re having trouble with your sourdough starter and wondering if it’s still alive, don’t worry! Check out this helpful guide on how to tell if you’ve killed your sourdough starter.
Yes! Some readers have baked this in the machine. But you can’t just run a cycle from start to finish. You’ll need to remove the dough to rest in the fridge overnight, then pop it back in to bake in the morning.
You sure can. The steam and baking sheet is really a workaround for those of us who don’t have one. 😊
More Sourdough Recipes For Beginners
- My sourdough roll recipe uses the same steam technique and adds a pinch of instant yeast for a fluffy roll with a crisp crust.
- Sourdough baguettes are hand kneaded but also a similar process.
- And if you want to do all the crazy folding and buy some neat tools, here is a true artisan bread recipe you might like.
Printable Recipe
Bread Machine Sourdough
Equipment
- Bread machine (with a dough cycle setting)
- Large mixing bowl
- Measuring cups and spoons
- Damp tea towel or kitchen towel
- Baking Sheet
- Rimmed baking sheet
Ingredients
- 3 cups bread flour (15.85 ounces)
- 1 cup lukewarm water (7.75 ounces)
- ¾ cup fed sourdough starter (5.65 ounces)
- ½ tablespoon sugar
- 1 ¾ teaspoon salt
Save This Recipe
You'll join my email list which you will love. And if you don't, unsubscribe in one click. ❤️
Instructions
- Autolyze. Combine the bread flour, sourdough starter, sugar, and water in a large mixing bowl. The dough will feel drier than typical sourdough—this is normal. Do not add more water. Use your hands to make sure all ingredients are incorporated into a cohesive ball. Cover the bowl with a damp tea towel and let the dough rest on the counter for 30 minutes.Tip: Pre-measure the salt and place it in a small container on the towel to remind yourself to add it later.
- Knead. After the autolyze, transfer the dough and salt into the bread machine bucket. Then, select the “dough” cycle and press start. You don’t need to fold the dough or anything crazy like that. Just walk away.
- First rise. When the cycle ends, leave the dough in the machine to continue rising for 2-3 more hours. The dough should be noticeably puffier and soft to the touch, though it may not have doubled in size. This longer rise helps develop the flavor and texture of the bread.
- Shape the loaf. Prepare a baking sheet by lining it with parchment paper and sprinkling cornmeal over the surface. Carefully remove the dough from the bread machine and gently shape it into a round or oval loaf. The dough will be slightly sticky, but avoid using flour for shaping. Place the dough on the prepared baking sheet.
- Second Rise (overnight proof). Spray a piece of plastic wrap with cooking spray and loosely cover the shaped dough. Place the covered loaf in the refrigerator to proof overnight for 8 to 16 hours.
- Prep for baking. In the morning, preheat the oven to 450°F (230°C). Position two racks: one in the center of the oven and the other in the lower middle. Then, place an empty-rimmed baking sheet on the lower rack while the oven is preheating. Next, remove the loaf from the fridge. Dust it lightly with flour and use a lame or a sharp serrated knife to slash the top of the dough, allowing the loaf to expand during baking.
- Bake with steam. When the oven is fully preheated, carefully pour 1 cup of water into the baking sheet on the lower rack to create steam. Immediately place the loaf on the center rack and close the oven door. Bake the loaf for 45 minutes until it reaches a deep golden-brown color. Remove from the oven and allow the bread to cool on a wire rack for at least 4 hours.
- Slice and serve. Once the bread has fully cooled (after at least 4 hours), use a sharp, serrated knife to slice the loaf into even pieces. Enjoy fresh or toasted with your favorite toppings!
Video
Notes
Nutrition


Have you had any luck doubling this recipe to make 2 large loaves right away?
I have never tried it, but I don’t see why not. it doesn’t take up half the bread machine bucket during the rise.
Hi Katie, very excited to try this recipe. I was just wondering how long you need to let the mix rest for step 1 please?
Thank so much.
Amy
hi Amy! about 20-40 minutes 🙂
Hi
Dough cycle…what length if time do you set the dough cycle for as my machine has various times in its menu.
Thanks.
my dough cycle is a total of 90 minutes: 30 minutes mixing and kneading (it kneads on and off), and then 60 minutes rising
I made this as my first ever sourdough with (strong) 50% white and 50% wholemeal flour and it turned out great!
I added maybe a tablespoon extra water at the autolyse stage to incorporate all the floor.
Has anyone tried baking this as two smaller loaves (boules maybe?) – I’m wondering how I would need to adjust the baking time
I have done two smaller loaves (got the idea from a reader!) and they take about 30-35 minutes 🙂
Thank you Katie! Really pleased to have found this recipe – so many of the overly complex ones almost put me off before I’d started!
I’m getting the hang of sourdough, each loaf i make is better than the one before it. I believe this is because each time my starter matures a little bit more. We love this bread
yes Glenda I totally agree with you! the starter is so important! I’m glad you like the recipe and enjoy your sourdough journey 🙂
Hi there,
I have never baked sourdough before, but as I can’t get yeast now, and my husband has been asking me to make some for ages, I thought I’d have a go. I made the starter from scratch and have been feeding it everyday for 8 days.
I followed your recipe to the letter (we never buy any bread, and I bake all ours in a machine). We were all absolutely amazed at the end product. It looked and tasted superb, so thank you!
My question now is, how to I look after my starter if I want to make a loaf every 3 days? It’s now in the fridge. I last fed it Monday morning, and I’d like to cook another loaf on Thursday morning. Your help would be much appreciated.
Many thanks,
Tamarind
hi tamarind,
glad your bread was a success! as far as your feeding schedule, here is what I would personally do.
Tuesday. starter stays in fridge
Wednesday PM remove starter, discard some, feed, keep at room temperature until active (keep it at room temp overnight)
Thursday AM, discard again, feed again, starter should be very active, use for recipe when it’s at peak. return to fridge
and repeat 🙂
save your discard and bake with it too!
There are also many recipes you can make with discard; waffles, scones, biscuits, muffins and crumpets have all been successful in my kitchen over the past month. You would have to keep feeding your starter, but you can make so much more than just bread!
Is it imperative to do the overnight step? Is there another option? I’d like it finished earlier. Right now mine has about another hour Resting inside the bread machine.
patricia, here is what another reader tried:
“One change I made: I started the dough early this morning, and put it in the bread machine. Then I realized I wouldn’t have time before my guests arrived to leave it in the frig overnight. So I put the shaped loaf in my “proofing room,” where it’s about 80 F for an hour. It rose, not as much as my yeast breads, but still. It was beautiful! And chewy and delicious!”
I would guess it is not as sour, but it should still work!
Thanks. I ended up putting it in the fridge overnight. I will bake it in the morning.
Hello Katie,
Is your starter equal parts starter, water and flour? For example, 55 g starter, 55 g flour, and 55 g water?
Thank you. I can’t wait to try this!!
Melissa
hi Melissa- yes my starter is like that exactly
Thanks. I ended up putting it in the fridge for overnight. I will bake it in the morning. My next question is does it need to be baked at 450F for 45 minutes? Seems a long time and the parchment paper could start scorching at that high a temperature.
I’ve had my parchment brown, but not scorch. the steam makes the oven temp drop a bit. you could certainly turn the temp down if you want
Can I use a banneton with this recipe?
Yes!
This was the first time I have made sourdough bread outside of the using the bread machine for the whole process. It was nice to be able to shape the loaf instead of getting a “cube” from the bread machine. I wasn’t sure it was going to rise with just the starter alone. But, of course, it did. It was easy to make. And your directions were clear, except for resting the bread. The blog talks about 30 minutes rest, but the recipe doesn’t say. It is an amazing chewy soury sourdough. We love it. Thank you
Hi Mel, it’s very mysterious to me because I make these many times a week! But I am going to amend the instructions to say that you may need to add more flour because it seems a few people are having that issue. Thanks for letting me know.
I strongly recommend getting a bread machine to knead your dough once things return to normal and you can hunt for one at a thrift shop.
So glad it worked well for you Annie!!
Katie,
How long do you wait after feeding your starter to use it in the recipe? Mine lives on the counter right now and I feed it every morning and night. Also, thanks for the AP directions, because I can’t get bread flour either!
Cheryl
Cheryl, the best way to see if your starter is ready is: after you feed it, does it double in size after 4-8 hours? (a starter in a warm room will be faster to double). A secondary test is the float test. Simply scoop a few tablespoons of fed starter and see if it floats in a glass of water. if it passes these tests, its ready to try. I personally feel a starter is best after 30 days. but a lot of people disagree with me and have success after 7 days!
Hi
Tried this twice and crust is burnt both times on top but the bottom is only just cooked, should I try it in a DO.
Thanks
Ted
yes that would be a great way to get it more even. I would guess that when the steam hits your oven its working hard to regain temp and that’s why the crust in burning. with the dutch oven, bake about 30-35 minutes with the lid on to trap the moisture, then 15-25 minutes off to help it brown.
With the Dutch oven…..brilliant
Amazing! Couldn’t believe this restaurant quality bread came out of my kitchen!
We are at 7000 feet elevation so I was nervous to start experimenting with sourdough, but it has been amazingly forgiving–much more so than regular yeast.
I made 2 smaller loaves and they needed about 10 min less in the oven.
I love making the bread machine knead for me, it makes the process go so smoothly. Great idea!
thanks for the tip on the smaller loaves!!! I will definitely be doing that. glad you liked the recipe 🙂
I made this recipe for the first time a few months ago and it turned out nicely. It was my very first loaf of sourdough bread. I followed the instructions exactly and was very happy with the results. I tried it again a few weeks later and it was a failure. Not sure why. I decided to try again a couple of days ago. I made a loaf for my parents. The only significant change I made was baking it in a dutch oven instead of on a cookie sheet. It turned out beautifully and my parents say that it tastes delicious.
I forgot to put my starter in the fridge after feeding it, so, since I had to feed it again the next morning anyway I decided to make another loaf for my husband and me. I’m almost out of bread flour so I wanted to see how it would turn out using all-purpose flour. I hadn’t seen Katie’s comment about needing to reduce the amount of water when using AP flour, so I measured the ingredients (by weight) as described in the recipe. I autolyzed for 30 minutes, popped it in the bread machine with the salt, and turned on the dough setting. My dough setting lasts 1.5 hours. After it finished I set a timer for 2 more hours. After the 2 hours was up, I checked the dough. And–OH CRAP–I had forgotten to put the paddle back in the bread machine after washing it, so basically, I accidentally autolyzed my dough for 4 hours instead of 30 minutes! BUT, I was able to save it and I thought I’d share how I did that in case anyone else makes the same mistake.
I put the paddle back in the bread machine and turned the dough setting on again. I let it knead the dough for about 10 minutes and then turned it off. I dumped the dough into a greased mixing bowl, covered it with a warm, damp towel, and put it in my oven with only the oven light on for an hour. When I pulled it out of the oven the dough had pretty much doubled in size and looked beautiful. I stretched and folded it and put it seam-side down on a piece of parchment paper dusted with wheat germ (in lieau of cornmeal). I let it rest for 10 minutes. I decided not to shape it, because it was already mostly round. I lifted the parchment paper and dough into my dutch oven, gently oiled the dough, covered the dough with plastic wrap, and then refrigerated it overnight for 8-9 hours. I floured the top of the dough before slashing it. I then baked it at 450 degrees for 20 minutes with the lid on my dutch oven, and 20 minutes with the lid off. It rose beautifully. It’s a soft, chewy bread with a tight crumb perfect for sandwiches and has a nice crisp crust when toasted. It doesn’t smell very sour, but has a good sourdough flavor. Yay!
When I make this again with AP flour I will try to follow the directions using the reduced amount of water. I don’t know whether I just got lucky on that end, or whether the extra long autolysis helped with water absorption. But, regardless, I am very happy with the results.
I love the simplicity of this recipe and plan to keep coming back to it again and again. Thanks, Katie!
wow Cathy! I wonder if the extra long autolyse did help, it certainly makes sense that it would! I loved reading about all your different loaves. thanks for letting me know and I hope you keep me posted on any more variations 🙂
This is the first sourdough recipe I’ve tried and it went perfectly. I made my first sourdough starter this week because of not finding yeast during this lockdown. My son came over for a social-distancing Easter picnic in my back yard – my son who doesn’t like SF sourdough bread. And he loved it!
One change I made: I started the dough early this morning, and put it in the bread machine. Then I realized I wouldn’t have time before my guests arrived to leave it in the frig overnight. So I put the shaped loaf in my “proofing room,” where it’s about 80 F for an hour. It rose, not as much as my yeast breads, but still. It was beautiful! And chewy and delicious!
Thank you, Katie!
so glad it worked out jo! happy easter:)
Can the salt be reduce or eliminate it completely?
I have left it out accidentally a few times and there is very little flavor without it. the texture and rise are fine (maybe better, in fact), but I did not like the taste. however, if that doesn’t bother you, the recipe will still work in terms of rising and all that.
Hi- Love your recipe! My bread is currently in the fridge proofing…. We just moved a month ago to Sparks, NV and the elevation here is 4900ft. Any recommended changes for baking at elevation as far as temp and time? Thanks, Kim
Kim I’m sorry I don’t have any experience with high altitude baking. This is a guide I recommend, though. https://extension.colostate.edu/docs/comm/highaltitude.pdf (It’s a free PDF with bread guide on the second page.). Also, I will add that my sourdough rolls use a similar baking method with the steam and the preheated baking sheet. I had a reader at high elevation say that she baked them exactly as instructed and they came out very well.
I made 2 loaves today, one using the bread machine and one I used the machine to knead dough only. I love how each loaf turned out different using the same recipe. Handmade one turned out so pretty was very sour with an awesome crisp crust and the other a sweeter more chewy bread. Making one more tonight !
wow that’s so interesting! glad you enjoyed the recipe 🙂
I really want to make sourdough rye using half AP flour and half rye totally in the bread machine. Cynthia on April 17 you say you made one loaf entirely in the bread machine. Can you give me your instructions for doing that…. or perhaps Katie knows how to do this and what adjustments to make with the ingredients and baking time even if I must bake it in the oven.
Why do you have to add the salt later.
I made a mistake and added right away.
Turned out great
supposedly the bread rises better when the salt is added later. but like you, sometimes I add it right away and I don’t notice a huge difference!
I tried this once and it came out perfect! But unfortunately my breadmachine stopped working the next day… please advise how to adapt this recipe without breadmachine?
Tjandra instead of kneading in the bread machine you could use your stand mixer. The only this is that kneading. dough is hard on the mixer so I wouldn’t recommend it long term. Check out this post for how I do it to reduce wear and tear on the motor: https://heartscontentfarmhouse.com/how-to-knead-dough-in-a-stand-mixer/
I’ve been making kefir for years AND was interested in using it as a sourdough starter AND looking for the convenience of using my bread machine for the ‘kneading’ phase…and found this page. I substituted kefir for both the water and sourdough starter, honey for the sugar, and otherwise followed your recipe and instructions. I’ve just eaten my first slice of my first loaf. I will likely tweak the baking a bit but I’m overall very pleased with the result.
Wow that sounds amazing! Great to know that kefir works, thanks for letting me know!