Italian Butter Cookies (Filled with Jam + Chocolate Dipped)
These Italian butter cookies are a classic favorite you’ll want to bake over and over again. The crisp, buttery texture, the sweet raspberry jam, and chocolate dip coated with sprinkles. They’re just the best.
They’re perfect for Christmas, especially on a mixed tray of homemade cookies, but honestly if you change up the sprinkles you can make them any time. Be careful adding the milk and do a little test piping to make sure you like the consistency.
Italian Butter Cookies

Equipment
- Hand mixer or stand mixer
- Piping bag
- Open star tip (such as Ateco 869)
Ingredients
Cookie Dough
- 1 cup unsalted butter (softened)
- ¾ cup granulated sugar
- 2 teaspoons vanilla extract
- 2 egg yolks
- 2¼ cups all-purpose flour
- ½ teaspoon salt
- 1-2 tablespoons milk or cream
Decorating
- ⅓ cup raspberry jam
- ½ cup chocolate chips
- 1 teaspoon shortening
- sprinkles of your choice
Save This Recipe
You'll join my email list which you will love. And if you don't, unsubscribe in one click. ❤️
Instructions
- Prep the baking sheets. Line two baking sheets with parchment paper (optional but helpful for easy cleanup) and set aside. You don’t need to grease the sheets.
- Cream the butter and sugar. In a mixing bowl, cream the softened butter and sugar with a hand or stand mixer on medium speed for at least 3 minutes, until light and fluffy. Then, add the egg yolks and vanilla extract and beat for an additional minute until smooth.
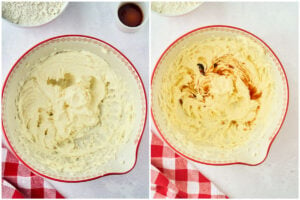
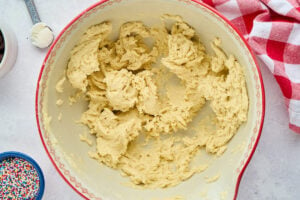
- Combine the dry ingredients. Whisk the salt and flour in a separate bowl until evenly mixed. Slowly add the dry ingredients to the butter mixture, mixing on low speed and adding 1 cup at a time until combined. The dough should be soft and smooth.

- Adjust the dough consistency with milk. Add 1 tablespoon of milk to make the dough soft and pipeable. If the dough still seems too stiff to pipe easily, add milk, 1 teaspoon at a time, until the dough reaches a very soft, pipeable consistency that can hold its shape.
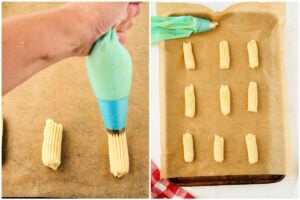
- Pipe the cookies. Transfer the dough to a piping bag fitted with an open star tip (such as Ateco 869). Then, pipe 2-inch strips onto the prepared baking sheets, leaving about 1 inch of space between each strip. You should be able to fit 12-15 cookies on each sheet. Next, cover the baking sheets with plastic wrap and chill the piped cookies for 1 hour to help them hold their shape during baking.

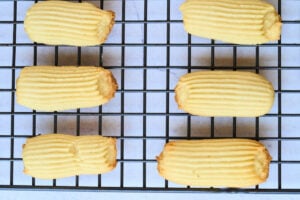
- Bake and cool the cookies. Toward the end of the chilling time, preheat the oven to 350°F (175°C). Bake the cookies for 15-18 minutes until the edges and bottoms are golden for a crisp texture. Let the cookies cool on the baking sheet for 5 minutes, then transfer to a wire rack to cool completely before filling and decorating. Do not underbake; you want golden brown bottoms and edges.

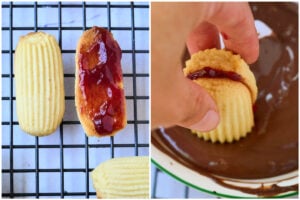
- Fill and assemble the cookies. Once the cookies are completely cooled, spread a thin layer (about ¼ teaspoon) of raspberry jam on the flat side of half the cookies. Top with the remaining cookies to form sandwiches, pressing gently to spread the jam evenly without it oozing out.

- Dip in chocolate and decorate. In a microwave-safe bowl, melt the chocolate chips and shortening in 15-20 second intervals, stirring between intervals until smooth and fully melted. Dip one end of each cookie sandwich into the melted chocolate and lay them on parchment paper. While the chocolate is still wet, sprinkle with your choice of sprinkles for a festive touch. Allow the cookies to cool on the parchment until the chocolate hardens completely.

Notes
Did You Make This?
I would love it if you would leave a review!Even though they seem fancy, I find these cookies surprisingly easy to make because you get a long break between each step. Make the dough, take a break, bake them, take a break. Makes life easy.
A Newsletter you’ll love
Daily recipes from the farmhouse, Sunday meal plans, seasonal ideas, straight from my kitchen to your inbox.
I promise to keep your email address safe. Unsubscribe at any time
If you love this recipe, you’ll also enjoy Chocolate Italian Butter Cookies, which have an extra touch of cocoa in the dough for a richer flavor.

I hope it becomes a favorite for you, too.
Key Ingredients and Tools
Here are some key tools and ingredients that can improve your cookies. Each one plays an important role in making the perfect cookie!

- Large Open Star Piping Tip: A tip like the Ateco 869 is great for making those nice, ridged cookies. Its size helps get the right thickness and texture so the cookies bake evenly and look professionally made. Look for it in specialty baking shops or online if you can’t find it in regular stores.
- Piping Bag: A strong piping bag (either disposable or reusable) makes it much easier to pipe the dough. It helps you control the dough’s flow, ensuring each cookie is the same size and shape.
- Unsalted Butter: Using unsalted butter lets you manage the saltiness of the cookies, letting the sweet, buttery taste come through. Make sure it’s softened for easy mixing and a smooth dough. If unavailable, you can use salted butter instead; just cut the salt in the recipe by half.
- All-Purpose Flour: This flour is the main ingredient in the dough, giving it structure and texture. Scoop it into your measuring cup and level it off to avoid packing it too tightly, which can make the cookies dense. You can use a gluten-free baking blend if you need a gluten-free option, but the cookies might become a bit crumbly.
- Shortening: When added to chocolate, shortening helps it melt smoothly and stay shiny as it cools. If you don’t have shortening, coconut oil can be a substitute. Look for it in the baking aisle near oils and lard.
- Raspberry Jam: Go for a good-quality, thick jam for the best outcome. Avoid jelly or runny jams, as they can make the cookies soggy when sandwiched together. Check your grocery store’s specialty or organic section for a good brand, or consider using a homemade version if you have it.
- Small Offset Spatula: This tool is useful for accurately dipping cookies in chocolate. It gives you better control for lifting and handling the cookies without smearing the chocolate.
Using these items will help you make bakery-quality cookies, making the whole baking process easier and the cookies more impressive!
Troubleshooting and Help
No problem! If the dough feels a bit too stiff, try adding a teaspoon of milk at a time until it’s soft enough to pipe. It should be easy to squeeze but firm enough to hold its shape.
Yes, chilling is key! It helps the cookies keep their shape and gives them that beautiful definition from the piping. Skipping this step could cause the cookies to spread too much in the oven.
This can happen if the butter is too soft or the dough isn’t chilled long enough. To fix it, make sure the dough is properly chilled and firm before baking. Chill the piped cookies on the baking sheet for 15 minutes if needed. Check out this helpful guide for more tips on why cookies spread and how to prevent it.
You can definitely switch it up! Strawberry, apricot, or even fig jam would be delicious. Just make sure to use a thick jam so as not to make the cookies soggy.
Absolutely! Homemade jam works wonderfully. Make sure it’s thick enough to stay in place when sandwiched between the cookies. If you love cookies with fruity fillings, check out my Jam Jam Cookies.
The shortening helps keep the chocolate smooth and shiny, but you can substitute it with a small amount of coconut oil if you don’t have it. If you skip it altogether, the chocolate may still work but might be slightly thicker.
Of course! A medium star tip will also work, but the cookies may look slightly different. If piping is difficult, you could also gently roll the dough into small balls and flatten them with a fork.
These cookies are meant to be delicate, but if they break easily, let them cool fully before filling and dipping. If you still have trouble, chill the filled cookies for a few minutes before dipping them in chocolate.
Absolutely! You can make the dough a day in advance and keep it wrapped in plastic in the fridge. Let it sit out for 10-15 minutes if it’s too firm to pipe easily when ready to bake. Try my Soft and Simple Sugar Cookies for a soft and classic cookie perfect for any occasion. They’re easy to make and loved by everyone!
Their buttery layers, a touch of sweet raspberry, and a smooth chocolate finish make them a great choice for any dessert table. Baking them is as fun as enjoying them, whether for holidays, thoughtful gifts, or a nice afternoon snack. Each bite gives you the feel of a bakery cookie made right at home.

Love,




My daughter and I tried this recipe and they came out great! I would post a photo but at this moment I don’t see how to!
Hey Brenda, I’m so glad you and your daughter loved the recipe!
how long can I store dough in frig..I want to make as fresh as possible day 1 after making the dough and then day 5.thank you.
Hey Stephanie, you can store the dough in the fridge for up to 3-5 days. For longer storage, freeze it, and it will stay good for up to 3 months. This way, you can bake fresh cookies whenever you like. Happy baking!
I made these for the first time and they came out ok I used the exact tip you suggested and the problem is the cookie was too thick 😟. Still tasted good but I think the batter was too thick I even used milk to thin it out, seems I didn’t add enough milk??? any suggestions???
Hey Kelly, I’m glad to hear they still tasted good. If the dough was too thick, a bit more milk could definitely help. Try adding milk just a teaspoon at a time until the dough is smooth enough to pipe easily but still holds its shape once piped. Also, make sure the butter is fully softened (not melted but soft), as that can help make the batter creamier. Piping can take a little practice, so don’t worry, you’re not alone in needing a tweak or two. Let me know if you give it another go!:)
What size star tip do you recommend?
I use the Ateco 869. the size makes a big difference, it’s worth grabbing one!
Can I use a size 8 star tip?
Yes but i’d do a single dollop to make a round cookie 🙂
Can you please tell me what kind of chocolate you used to dip the cookies in and also to stuff some with chocolate instead of jam, what would work best? I tried dark chocolate but it was too bitter.
Lucia I use 1/2 cup – 1 cup semi sweet chocolate chocolate chips melted with a teaspoon of shortening. It helps it melt smoother.
These cookies are absolutely amazing! I made them for the first time last week. The flavoring of the cookie is better than any of the cookies I’ve bought in the Italian bakery. These have been my favorite cookies since I was a little girl, I never thought it would be this easy to make myself. My husband would never pick this cookie if we bought them from the bakery. He tried these, and couldn’t stop eating them. All my friends loved them! Can’t wait to make them again. The only thing I would do this time is use a bigger star tip. My tip was very narrow, so the cookies were. I bought the new one and am ready to bake again. Thank you so much for this amazing cookie recipe, I definitely will be adding it to my cookie favorites.