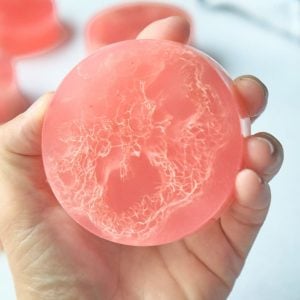
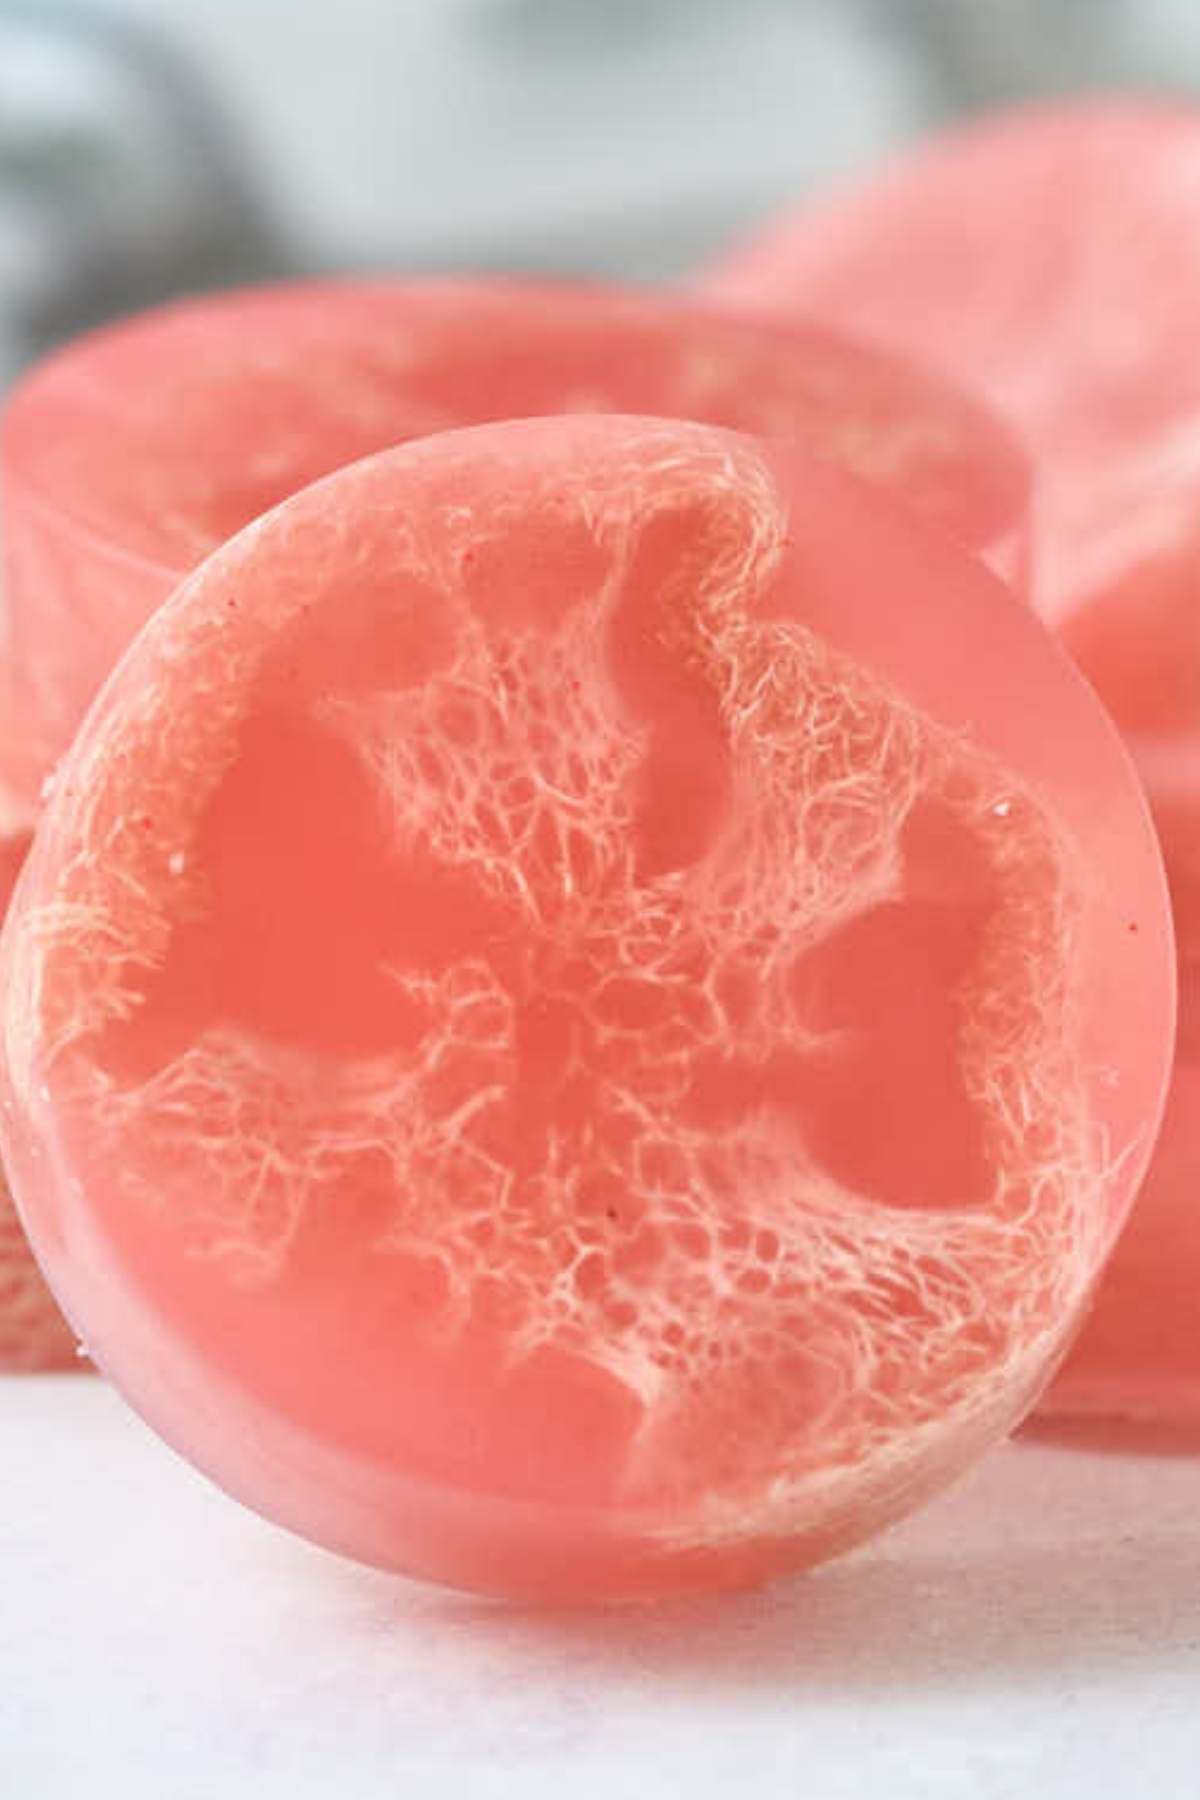
Easy Loofah Soap Recipe
If you want a simple and enjoyable DIY project that brings a bit of luxury to your day-to-day, try this loofah soap recipe! It’s a soap that lightly scrubs your skin, making you feel refreshed and ready for anything.
Unlike cold-process soap making, this one doesn’t involve handling lye. It uses a melt-and-pour method, making it simple and error-free, whether it’s your first time making soap or you’re already experienced.
These soaps are also great for your own use and can also be wonderful gifts. You can even personalize them with your chosen scents and colors for any event or mood – a fun and useful way to treat yourself and your loved ones! Plus, creating something beautiful and practical by yourself is always fulfilling.
Easy Loofah Soap Recipe
Equipment
- Microwave safe mixing bowl (or large measuring cup)
- Spatula
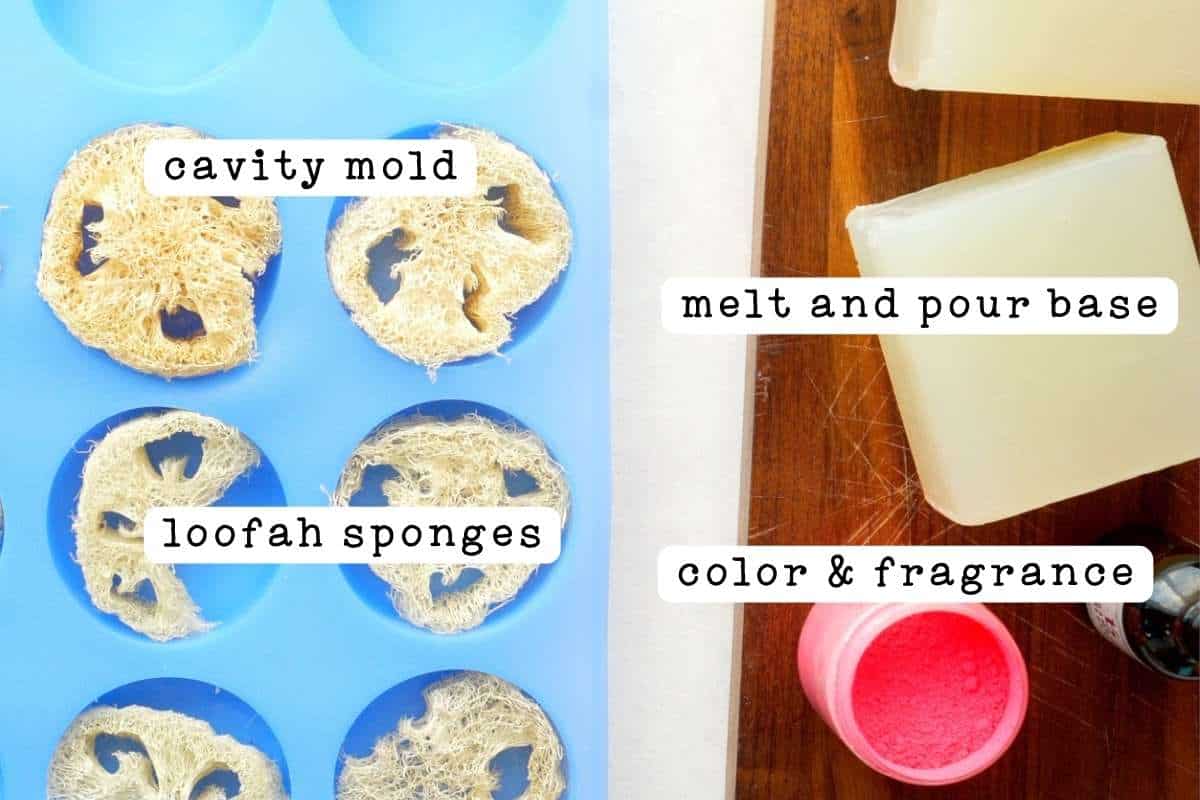
- Individual cavity soap mold (round is best)
- Cutting board
- Toothpick (optional for pushing down the loofah)
- Spray bottle with rubbing alcohol (optional for dispersing powdered colorant)
Ingredients
- 2 pounds clear melt and pour soap base (I use this base from Nurture Soap which is super clear.)
- 8-12 loofah slices (This package from Amazon is enough for 3 batches of this recipe.)
- 2 tablespoons fragrance oil (such as grapefruit)
- ½ teaspoon colorant (pick your favorite mica from Nurture Soap)
- 1 teaspoon rubbing alcohol (if using powdered colorant)
Save This Recipe
You'll join my email list which you will love. And if you don't, unsubscribe in one click. ❤️
Instructions
- Prepare the mold and loofah slices. Place the loofah slices into each cavity of the soap mold. Then, trim them if necessary to make sure they fit well. It's best to prepare the mold before melting the soap base to prevent the soap from cooling too quickly.

- Cut the soap base into chunks. Using a sharp knife, chop the melt-and-pour soap base into small chunks to help the soap melt faster. No need to be precise—roughly cut pieces work just fine.

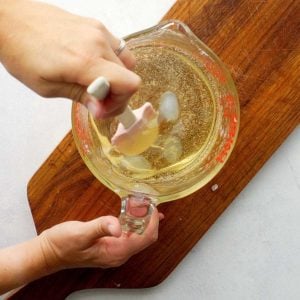
- Melt the soap base. Place the soap chunks in a microwave-safe container, such as a large Pyrex measuring cup. Microwave in 30-second intervals, stirring between intervals, until the soap completely melts. Be careful, as the soap will be very hot.
- Add the color and fragrance. If you’re using powdered colorant, mix it with rubbing alcohol to help it disperse evenly. If using a liquid color, simply add it directly to the melted soap. Stir in the fragrance oil and mix thoroughly with a spatula.
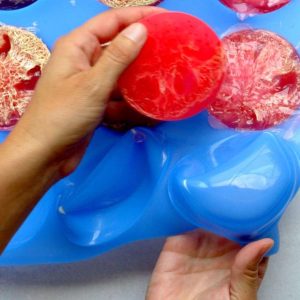
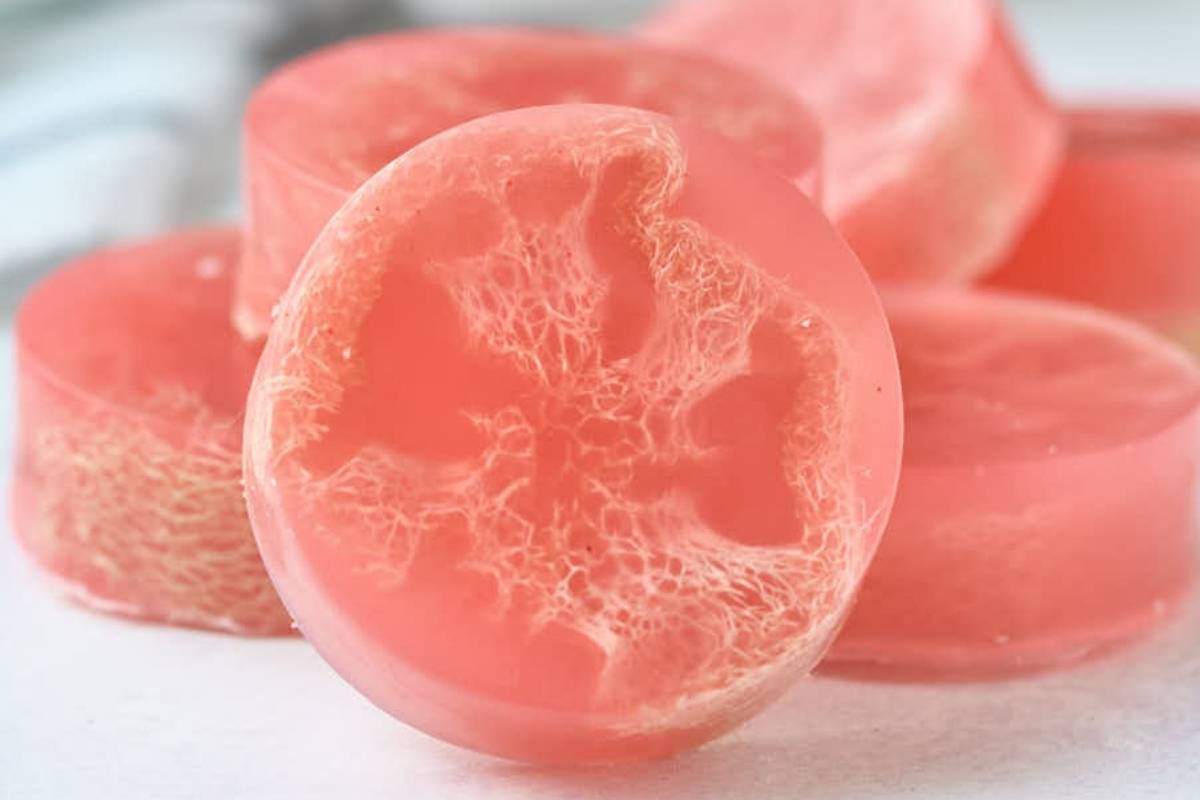
- Pour the soap batter into the molds. Carefully pour the melted soap mixture over the loofah slices in the mold. It’s okay if the loofah sticks out on one side. If you want the loofah fully submerged, use a toothpick to push it down while pouring.
- Allow the soap to harden. Let the soap cool and harden for at least 4 hours. For larger bars, you may need to wait up to 8 hours. Once the soap is fully set, gently remove it from the molds.


Notes
Ever since I began crafting these loofah soap bars, I stepped up my daily self-care. The soft scrub from the loofah and the zesty smell make each shower feel extra special. They’ve quickly become my favorite project because they turn out so lovely, and I can mix and match different smells and colors. What’s great is how simple they are, even if you’re starting. After creating my first set, I was hooked. Now, I always keep some ready, and they’re gone in no time because my friends keep asking for them!
If you want to explore more advanced soap-making techniques, I also have a collection of cold-process soap recipes you might enjoy.
I hope you love it as much as I do!
Key Ingredients and Tools
When crafting this loofah soap, here are essential tools and ingredients you’ll need to make sure it turns out well.
- Loofah slices: These natural scrubbers are derived from the loofah plant, which you can buy at health stores or online. They’re great for scrubbing away dead skin, making your soap more efficient at exfoliating. If unavailable, you could use a natural sponge or pieces of exfoliating gloves for a similar scrubbing effect.
- Clear melt-and-pour soap base: This ready-to-use soap base can be melted down easily and form your soap’s core. Choosing a good quality base is crucial for it to melt properly and have a smooth feel.
- Fragrance oil: Choose fragrance oils that are safe for your skin and meant for soap-making. Don’t use perfumes or essential oils not intended for use on the skin, as they might lead to irritation. You can also substitute essential oils such as lavender or peppermint. Just add a little at a time so the smell isn’t too strong.
- Mica powder: It’s used for adding color; this powdered pigment is common in makeup and soap-making. It provides beautiful, natural shades and doesn’t block pores. You can find it at craft stores or online. Try liquid soap color or natural options like cocoa powder or turmeric for coloring, though the hues might not be as bright.
- Rubbing alcohol: Keep a spray bottle of rubbing alcohol ready to remove any bubbles on the soap’s surface after pouring so your soap looks smoother and more professional. Witch hazel is an alternative for removing bubbles, but it might also not work.
These tools and ingredients will greatly help the soap-making process, aiming for the best outcome. Equipped with these, you’re on your way to making a fantastic batch of loofah soap!
Troubleshooting and Help
Absolutely! Just make sure the loofah is clean and dry before using it. If your loofah is too big, cut it into smaller pieces to fit snugly in your soap mold.
Nope! You can melt the soap base on the stovetop using a double boiler. Just stir it regularly and keep the heat low so it melts evenly without burning.
Of course! If you like a more natural look, you can leave the soap base clear or just add the fragrance. The soap will still work just as well!
Yes, you can! Just be careful not to add too much, as large bits can clog drains or feel rough on the skin. Dried lavender, rose petals, or finely ground oats work well in small amounts.
Any soap mold works, but silicone molds are the easiest to use since they allow easy removal. Round molds work best for this recipe, but you can use any shape you like!
Definitely! Just pop it back in the microwave for 15-20 seconds and stir until it’s fully melted again. You can keep doing this until you’re ready to pour.
Handmade soaps like this usually last several weeks, depending on how often you use them. Just keep them in a dry place on a soap dish that drains well to prevent them from becoming mushy.
These extra tips should make the process even smoother. Let me know if you have any more questions—I’m happy to help!
I hope you have as much fun making this loofah soap as I do. It’s a simple and enjoyable way to bring a touch of luxury to your daily life, and it’s perfect for creating thoughtful, handmade gifts. The coolest part is that you can make it your own by choosing your favorite smells and colors, making each batch special.
Whether you stick to the basic recipe or mix things up with new combinations, this recipe is great for beginners and those who have made soap. Feel free to play with different shapes or extra ingredients like dried flowers or essential oils. Enjoy the making process, and have fun putting your unique spin on it!


thank you! my loofah soaps are awesome 👍
hey annie! I’m so glad! hope you enjoy all winter long 🙂
Thanks for always being there Katie when I need to learn how to do something like Loofa Soap. You are amazing!
I went a step further and powdered up some pink Himalayan salts and threw some in (with organic tangerine and grapefruit essential oils) as extra exfolient and it turned out awesome.. great recipe thankyou ☺️❤️
did you dilute the essential oils or use 100% oil?
Great guide and so easy. Thank you
Thank you for sharing this easy tutorial on how to make the homemade loofah soap. Looks refreshing! Should try this!