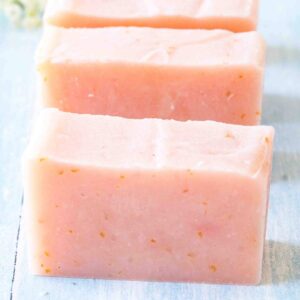
Pink Grapefruit Soap Recipe (Cold Process)
Super pink, super refreshing, the best fragrance. I love this soap recipe. It’s the perfect morning shower soap. I love to make this in early spring when nothing is in season, and it’s ready for those hot summer days. If you’re brand new to soap making, read this first.
Grapefruit Soap Recipe
Equipment
- safety equipment (goggles, gloves, mask)
- Thermometer
- Non-reactive containers
Ingredients
- 4.27 ounces lye
- 7.5 ounces water
- 2.5 ounces grapefruit juice
- 11 ounces olive oil
- 11 ounces coconut oil
- 6 ounces shea butter
- 2 ounces castor oil
- 2 teaspoons grated grapefruit zest
- 3 tablespoons of grapefruit essential oil
Save This Recipe
You'll join my email list which you will love. And if you don't, unsubscribe in one click. ❤️
Instructions
- Prepare the lye solution. Wear your gloves, goggles, and mask, and work in a well-ventilated area. Then, using a digital scale, measure the lye and water separately in non-reactive containers. Next, slowly add the lye to the water (never the other way around) and stir until completely dissolved. The solution will heat up due to a chemical reaction, so be cautious of the heat and fumes. Set the lye solution aside in a safe place to cool to about 90-100°F.
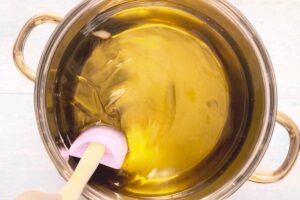
- Melt and measure the oils: Measure all oils (olive, coconut, shea butter, and castor oil) into a pot or heat-safe container. Then, gently melt the oils over medium-low heat until fully combined. Once melted, remove from heat and allow the oil mixture to cool to 90-100°F.
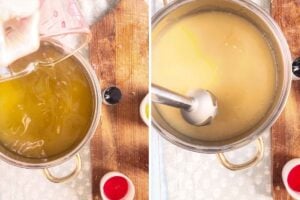
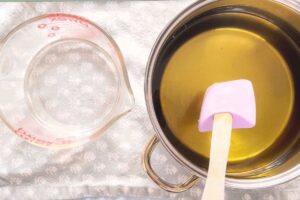
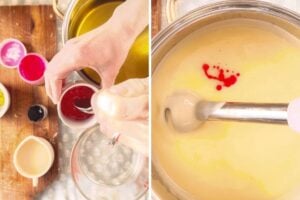
- Add the grapefruit juice. Make sure the lye solution and oils are at similar temperatures (within 10 degrees of each other), around 90-100°F. Then, carefully add the grapefruit juice to the lye solution. Stir gently. The solution may turn orange—this is completely normal.

- Blend the lye solution with the oils. Pour the lye solution into the melted oils slowly. Use a stick blender to mix until the soap mixture reaches trace—a pudding-like consistency where the mixture leaves a trail when the blender is lifted.
- Add the color, fragrance, and zest. At trace, stir in the grapefruit zest and essential oil by hand. If using colorants, blend them with a small amount of oil before adding them for a smooth distribution. Pour the soap batter into your prepared mold immediately, smoothing the surface as needed.
- Gel phase. Preheat your oven to its lowest setting (around 170°F or “warm”). Turn off the oven and place your soap mold inside for about 1 hour. This step encourages the gel phase, which deepens the soap’s color and texture. Leave the soap in the oven to set for 24 hours, undisturbed.
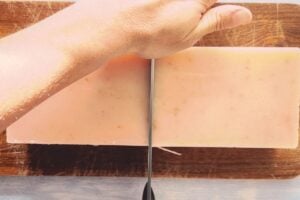
- Unmold and cure. Carefully remove the soap from the mold and cut it into bars. Then, allow the bars to cure in a well-ventilated space for at least 2 weeks. For a harder, longer-lasting bar, extend curing to 4 weeks.
Notes
In our home, the quest for the perfect homemade soap never ends. We’ve experimented with countless scents and ingredients, but this one is our new favorite. There’s something about the fragrance that we love. This recipe is super cleansing and perfect for the shower or use as a hand soap next to the kitchen sink.
Try this cold process soap specifically designed for the shower to create durable and perfect soaps for daily routines.

The secret to beautifully vibrant soap is the addition of fresh grapefruit juice and zest, which give it that gorgeous citrusy boost. I love this recipe because it’s beginner-friendly but feels like a special treat whenever you use it.
Watch the Video
Key Ingredients and Tools
Lye (Sodium Hydroxide): This is essential for all cold process soaps. It works with oils to create soap through a process called saponification. You can find lye at specialty soap-making stores or online. Be careful when handling it, as it can be very harsh.
Grapefruit Juice: Fresh grapefruit juice gives the soap a natural citrus flavor and helps create a lovely orange color when mixed with lye. Strain it well to remove any pulp affecting the soap’s consistency. You can also use lemon or lime juice instead for a similar citrus taste, but the color might look a little different.
Grapefruit Essential Oil: This oil adds a bright and refreshing scent to the soap. You can find it in the essential oils section of natural food stores or online. If unavailable, you can use another citrus oil, like lemon or lime.

Olive Oil: This oil is important in many soaps because it moisturizes the skin. Use pure, extra-virgin olive oil for the best outcome. It’s usually available in most grocery stores, but avoid blends containing other oils. Sunflower or sweet almond oil can replace olive oil but might slightly change the soap’s texture.
Castor Oil: This oil helps create a bubbly and rich lather in the soap. It’s available at pharmacies, natural health stores, or online. Make sure it’s cold-pressed and pure for soap-making. Avocado oil can work instead of castor oil, but it may change how bubbly the soap is.
Shea Butter: This adds a creamy texture to the soap and helps moisturize the skin. You can find shea butter in natural food stores, craft shops, or online. Use unrefined shea butter for the best quality. You can swap it for mango butter or cocoa butter, which moisturizes well.
Silicone Soap Mold: Silicone molds are flexible, making it easier to take the soap out without breaking it. They come in many shapes and sizes and can be found in craft stores or online. You can use a lined loaf pan if you don’t have one.
Stick Blender: This tool is important for quickly mixing the lye solution and oils. A stick blender makes the process much faster than stirring by hand. If you don’t have one, you can stir manually, but it will take longer.
These tools and ingredients are crucial for making this recipe work. With them, you’re ready to create some beautiful and nourishing soap!
Troubleshooting and Help
Sure, you can. Don’t use one with added sugar because it will cause the soap to heat up even more
That’s totally normal! The natural acids and sugars in the juice react with the lye and create the orange color. It won’t affect the final soap, so no need to worry.
This usually happens if the soap overheats. Try insulating it less next time or skipping the oven phase if your workspace is already warm. Soap can still be used—it’s just a cosmetic issue.
Skipping it is an option, but the gel phase helps with the soap’s texture and appearance. If your kitchen is warm, you might find the soap naturally enters this phase without the oven. Just keep an eye on it!
Absolutely! You can use natural colorants like mica powder or infused oils to create a pop of color.
Over time, this has become one of my favorite bars. I love how refreshing it is, and everyone loves to get it as a gift.


Hi Katie,
Your soaps are just beautiful! Which mica brand do you use, and the color? I never had any luck picking out colors for my soaps. Thank you!
hi Susan! I use a pink fuchsia mica from Nurture Soap. 🙂
Hello, looks like a great soap, might try it!
Are you using 5 % superfat?
yes 5% 🙂
Thank you Katie for making such amazing and helpful recipes and videos. You have taught and helped so many of us. I have learned to make some of your bread recipes, dinners, jams, and soap. Sincerely, Cheryl
I have strained water that whole kefir limes have been boiled in. Could this be used instead of grapefruit juice?
yes, any really any waterbased liquid will work in any soap recipe.
There is a step for sodium lactate but it isn’t in the ingredients list?
hey nikki, it’s optional and flexible. the step just shows where you would add it and if you chose to. i do not.