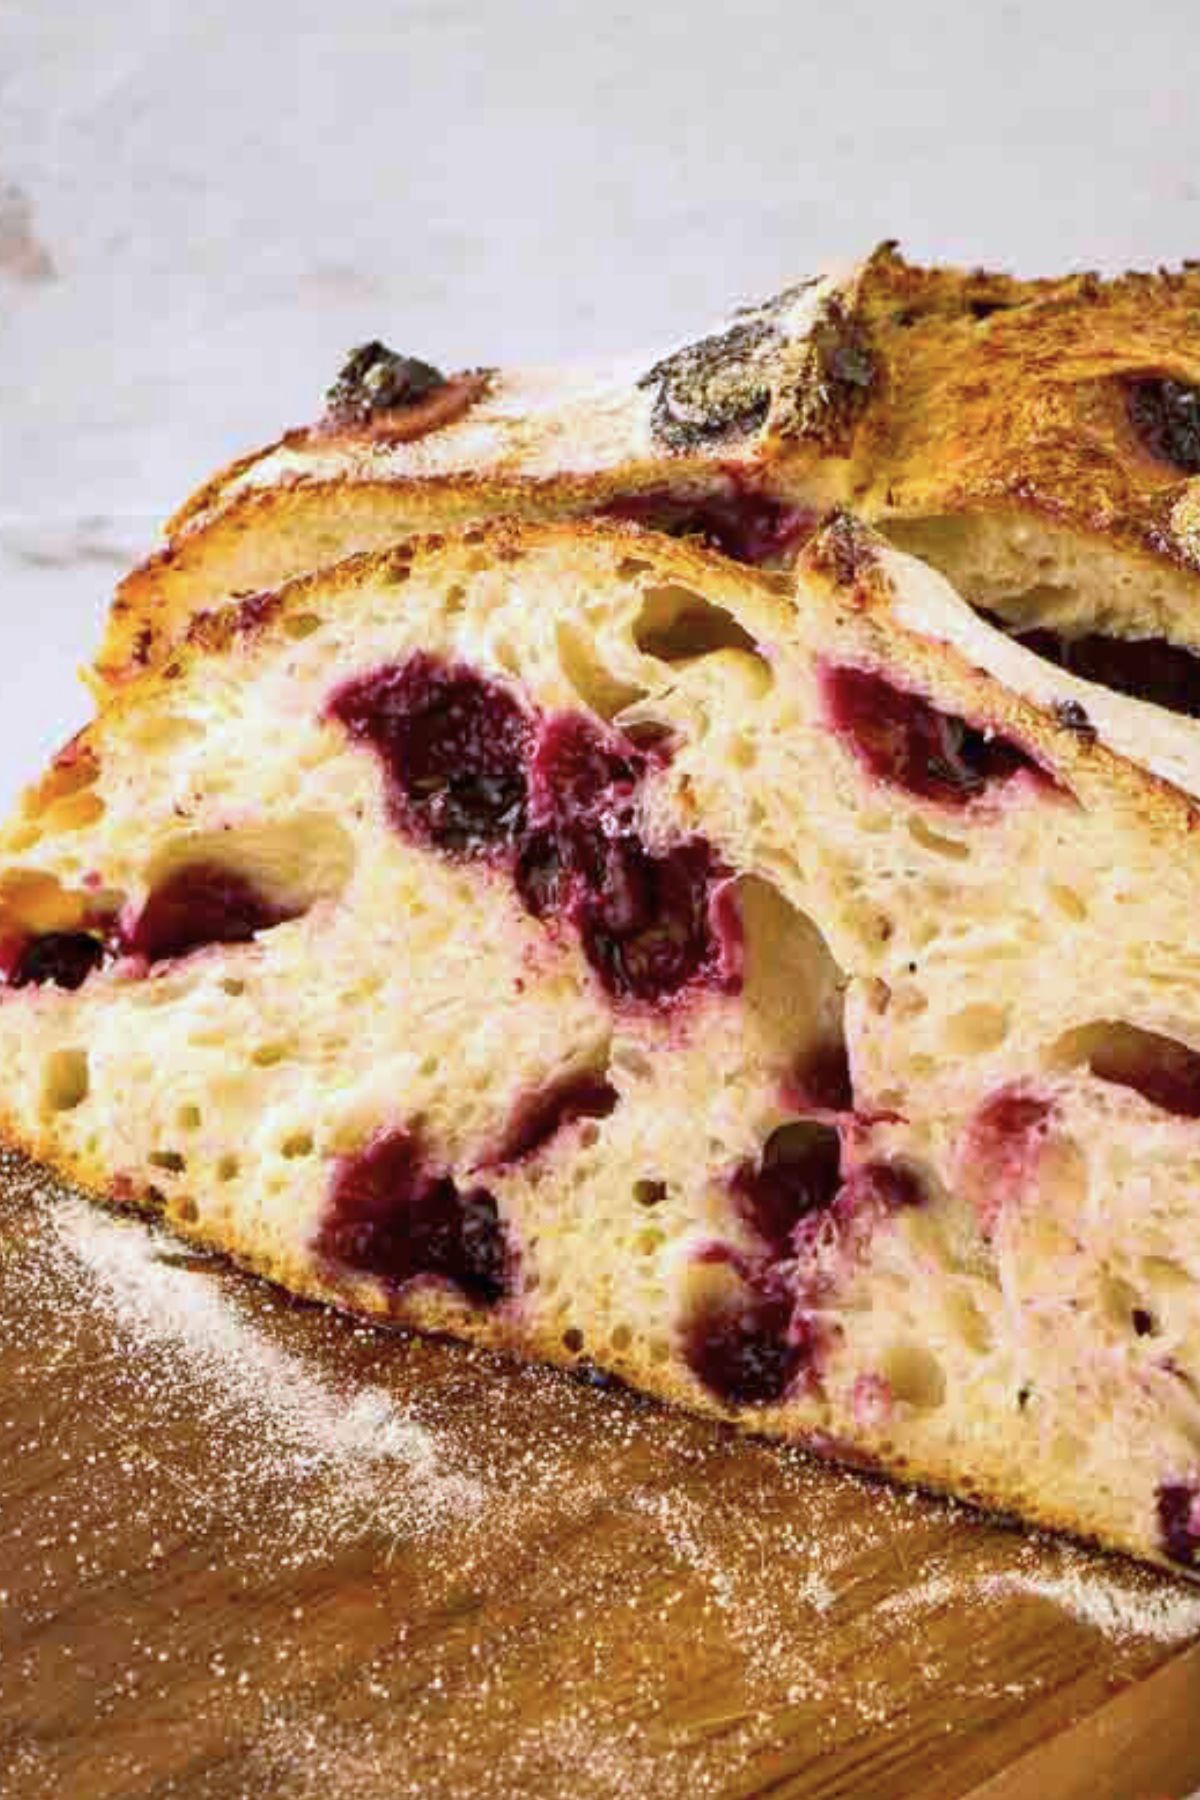
Life-changing? Yes. Because it will replace all those silly and expensive prepared breakfast foods you buy, and your kids will love it too. It’s bright, slightly sweet, and makes the whole kitchen smell delicious while it bakes. The base dough is forgiving and reliable, perfect for anyone who’s struggled with artisan sourdough in the past. This is a loaf that never disappoints.
If you’re kind of tired of just regular sourdough, this is a great twist. I also have a recipe for jalapeno cheddar sourdough bread that uses a similar process.
Table of Contents
Ingredients and Tools You’ll Need
If you don’t have a starter, you can make your own starter. But it takes a week, so plan ahead! Use fresh blueberries, not frozen. Rice flour will help the dough not stick to the banneton.
Get a Free + Pretty PDF Recipe Book
Sourdough Sunday Newsletter

Every Sunday evening I’ll send you a sourdough recipe to make that week, straight from my kitchen to your inbox.
And as a thank you for signing up, I’ll send you this e-book with beautiful printable recipes right away. Simple!
You will not be added to any other email lists or my daily newsletter. But if you’re already on my newsletter, you’re welcome to join and receive both.

Heart’s Content Farmhouse is a participant in the Amazon Services LLC Associates Program, an affiliate advertising program designed to provide a means for sites to earn advertising fees by advertising and linking to Amazon.com. This means that when you click on certain links on this site and make a purchase, I may earn a small commission at no additional cost to you. I only recommend products I genuinely believe in and would use in my own kitchen. As an Amazon Associate, I earn from qualifying purchases.
If you’d like to double or triple this recipe, or use metric measurements, you can make adjustments in the recipe card at the bottom of this post.
Equipment
- Large mixing bowl
- Clean tea towel or plastic wrap
- banneton (helps your dough maintain shape before the final rise; if you don’t have one, a bowl with a floured towel works)
- Dutch oven with a lid
- Parchment paper
- Bread lame or sharp knife
- Wire cooling rack
Ingredients
- 3 cups bread flour
- 1⅓ cups lukewarm water
- ¾ cup sourdough starter (active, bubbly, and well fed)
- 3 tablespoons white sugar
- 1 teaspoon salt
- 1¼ cup blueberries (fresh is easiest)
- 1 tablespoon lemon zest
How to Make Blueberry Lemon Sourdough Bread
If you live at a high altitude, you may need to adjust your baking times or ingredients to get the perfect rise. For specific tips on how to adapt your recipe, check out these great high-altitude baking resources from King Arthur Baking.
Step One: Mix
Combine the bread flour, water, sugar, and bubbly sourdough starter in a large bowl. Stir the mixture until a rough dough forms, using your hands to incorporate any dry bits of flour. The dough will be slightly sticky but should come together.
Step Two: Rest (Autolyze)
Cover with a clean, damp tea towel and let the dough rest at room temperature for 30 minutes.

Step Three: Add The Salt And Fruit
After the 30-minute rest, sprinkle the salt evenly over the dough. Then, gently fold in the blueberries and lemon zest, careful not to burst the blueberries.

Step Four: Knead
Knead for 1–2 minutes until the salt and fruit are evenly distributed. The dough will feel slightly sticky, but that’s normal—focus on gentle handling to prevent the blueberries from breaking.
Step Five: First Rise + Stretch And Folds
Cover the dough with the damp towel again and let it rise in a warm place for about 3 hours. During this rise, reshape the dough into a ball once every hour using stretch and folds. Lift a side of the dough up to stretch it, and then fold it back down over towards the center. This folding helps strengthen the dough and build a structure for the final loaf.

Step Six: Second Rise (Proofing)
Generously dust a banneton or a bowl lined with a clean towel with rice flour to prevent sticking. After the 3-hour rise, shape the dough into a tight ball and place it seam-side up into the prepared banneton. Then, cover it with plastic wrap or a damp towel and let it proof overnight in the refrigerator for 8–12 hours. This slow, cold fermentation deepens the flavor of the bread.

Step Seven: Prep For Baking
Preheat your oven to 450°F (232°C) the next morning with the Dutch oven placed inside to heat up. Then, remove the dough from the fridge and carefully turn it onto a piece of parchment paper, aiming for it to land in the center. If needed, gently reshape it into a round loaf. Using a sharp knife or bread lame, score the top of the dough with a few deep slashes to allow for expansion during baking.
Step Eight: Bake
Once the oven is preheated, carefully remove the hot Dutch oven and transfer the parchment paper with the dough into it. Cover with the lid and bake for 25 minutes. Then, remove the lid and continue baking uncovered for another 25 minutes.

Step Nine: Finish And Cool
For an extra crispy crust, remove the loaf from the Dutch oven and bake it directly on the oven rack for an additional 5 minutes. The bread is done when it reaches an internal temperature of 200°F–210°F (93°C–99°C) and the crust is a deep golden brown. Then, carefully remove the bread from the oven and allow it to cool on a wire rack for at least 3–4 hours before slicing. This cooling time helps set the crumb structure inside the loaf.
Storage Instructions
Once the bread is completely cooled, wrap it tightly in plastic wrap or store it in an airtight container. It will stay fresh at room temperature for about 1 day.
If you want to store it for longer, it freezes well. After the bread has cooled completely, slice it (this makes it easier to grab individual pieces later). Wrap the whole loaf or individual slices tightly in plastic wrap, then place them in a freezer-safe bag or container. It will keep in the freezer for up to 1 month.
What to Serve with Blueberry Lemon Sourdough Bread
This bread is great for breakfast.
- Spread some butter, cream cheese, or blueberry preserves over a toasted slice.
- Enjoy with Greek yogurt.
- Use it to make French toast.
More Sourdough Bread Recipes
Active, discard, simple, or fun – I’ve got you covered.
- If you’re short on time but still want that delicious blueberry-sourdough combo, try this sourdough blueberry quick bread for a faster alternative.
- If you’re looking for versatile bread with a softer texture, you might also enjoy baking this sourdough egg bread, perfect for sandwiches or French toast.
- For a daily sandwich bread that’s soft and sturdy, try this honey wheat sourdough sandwich bread.
- Sourdough bread with gruyere and caramelized onions is my new favorite combination!

Questions and Troubleshooting
Your starter should be bubbly and active before you use it. If it doubles in size within 4-6 hours of feeding, it’s ready to go! If not, give it another feed and wait a little longer.
No worries! You can use any oven-safe pot with a lid that can handle high heat. The key is trapping steam inside to get that perfect crust, so make sure the lid fits tightly.
It might be over-proofed if your dough feels very loose, doesn’t hold its shape well, or doesn’t rise much during baking. It’s best to keep an eye on it and bake sooner if you notice it getting too puffy during the second rise.
You can, but the long, cold rise helps develop that deep sourdough flavor. If you’re short on time, you could let it proof at room temperature for a few more hours, but the taste and texture will be slightly different.
Yes, it’s tough to wait, but it’s worth it! Slicing too early can make the bread gummy inside. Let it cool so the crumb can set—you’ll get cleaner slices and a better texture.
This could be due to a few things. Check that your sourdough starter is active and bubbly, and make sure you give the dough enough time to rise in a warm spot. Cold temperatures can slow things down, so you might need to extend the rising time.
Printable Recipe

Blueberry Lemon Sourdough Bread
Equipment
- Large mixing bowl
- Clean tea towel or plastic wrap
- Dutch oven with a lid
- Bread lame or sharp knife
- Wire cooling rack
Ingredients
- 3 cups bread flour
- 1⅓ cups lukewarm water
- ¾ cup sourdough starter (active, bubbly, and well fed)
- 3 tablespoons white sugar
- 1 teaspoon salt
- 1¼ cup blueberries (fresh is easiest)
- 1 tablespoon lemon zest
Save This Recipe
You'll join my email list which you will love. And if you don't, unsubscribe in one click. ❤️
Instructions
- Mix. Combine the bread flour, water, sugar, and bubbly sourdough starter in a large bowl. Stir the mixture until a rough dough forms, using your hands to incorporate any dry bits of flour. The dough will be slightly sticky but should come together.
- Rest (autolyze). Cover with a clean, damp tea towel and let the dough rest at room temperature for 30 minutes.
- Add the salt and fruit. After the 30-minute rest, sprinkle the salt evenly over the dough. Then, gently fold in the blueberries and lemon zest, careful not to burst the blueberries.
- Knead. Knead for 1–2 minutes until the salt and fruit are evenly distributed. The dough will feel slightly sticky, but that’s normal—focus on gentle handling to prevent the blueberries from breaking.
- First rise + stretch and folds. Cover the dough with the damp towel again and let it rise in a warm place for about 3 hours. During this rise, reshape the dough into a ball once every hour using stretch and folds. Lift a side of the dough up to stretch it and then fold it back down over towards the center. This folding helps strengthen the dough and build a structure for the final loaf.
- Second rise (proofing). Generously dust a banneton or a bowl lined with a clean towel with rice flour to prevent sticking. After the 3-hour rise, shape the dough into a tight ball and place it seam-side up into the prepared banneton. Then, cover it with plastic wrap or a damp towel and let it proof overnight in the refrigerator for 8–12 hours. This slow, cold fermentation deepens the flavor of the bread.
- Prep for baking. Preheat your oven to 450°F (232°C) the next morning with the Dutch oven placed inside to heat up. Then, remove the dough from the fridge and carefully turn it onto a piece of parchment paper, aiming for it to land in the center. If needed, gently reshape it into a round loaf. Using a sharp knife or bread lame, score the top of the dough with a few deep slashes to allow for expansion during baking.
- Bake. Once the oven is preheated, carefully remove the hot Dutch oven and transfer the parchment paper with the dough into it. Cover with the lid and bake for 25 minutes. Then, remove the lid and continue baking uncovered for another 25 minutes.
- Finish and cool. For an extra crispy crust, remove the loaf from the Dutch oven and bake it directly on the oven rack for an additional 5 minutes. The bread is done when it reaches an internal temperature of 200°F–210°F (93°C–99°C) and the crust is a deep golden brown. Then, carefully remove the bread from the oven and allow it to cool on a wire rack for at least 3–4 hours before slicing. This cooling time helps set the crumb structure inside the loaf.
Video
Notes
Nutrition


This recipe does not work. The dough is too wet and it does not turn out of the banneton. A day wasted on a bread that didn’t turn out for a party.
I am sorry it did not work for you, but it does work.
My bread turned out to be more on the wet side and after adding inclusions, total fail, bread did not rise and now I’m going to make a French toast bake out of it.
Amazing! I even made it GF and it has been my favorite loaf I’ve made so far!
How do you recommend storing it?
there are storage notes at the bottom of the recipe in the notes section
WOW!! This is the first recipe I have tried adding in fruit. This bread blew me away and is our favorite!!!
Delicious!! Top with lemon curd to have the tastiest treat ever ❤️
I don’t understand why all the ingredients are in grams except the starter. I converted on Google the cup to g conversion but it would be helpful if you changed the recipe to include the gram for the starter. The conversion is more then I typically do for bread, and didn’t rise or taste as expected.
I’m disappointed because when I changed the starter measurement to grams, it seemed like way too much.i went with it anyways. My dough is a sticky , wet mess. Hoping it still turns out. 🥲
Is a long final proof required?
hi diane, yes, it’s in step 4 🙂 you could also do a 4 hour room temp proof
When do you incorporate the sugar ??
hey lily, it’s in step 1 🙂
I didn’t see it mentioned in step one? I read it several times. I just added it when I folded in the lemon and blueberries.
sara i promise you it’s there… right after it says “mix and autolyze” in bold, it’s listed 🙂
I was worried about this bread as it was very sticky when putting it together but honestly it was amazing. I stayed at 450 with 25 covered and 20 uncovered. It was perfect! Great recipe, thanks for sharing.
hi heather so glad it was a success! thanks for letting me know 🙂
I made a traditional sourdough loaf today and had extra active starter and a container of tart blueberries so I made a loaf, came out delicious. Got a little too dark at 450° for last 20 minutes but the inside was perfect. I think the next time I will lower the temp to 425° for the last 20 minutes.
Great recipe!Thx
Thanks Lynda! you’re right about the dark crust i think it’s from all the sugar! 🙂
What if you don’t have a banneton?
use a bowl lined with a flour-dusted tea towel
I was looking for something different to make with my active starter. I had blueberries so decided to try this recipe. I was a little nervous as the dough was really wet, but it came out perfectly. Delicious toasted with butter or cream cheese.
Awesome Heather! Thank you! I’ve actually never tried with cream cheese but sounds perfect!
I baked this recipe. The recipe did not say to lower oven temp when you remove lid, and the top almost burnt completely .. I recommend 420 F.
SIDE NOTE: We like to make smaller loaves and the recipe does not change the GRAM measurement when you downsize the loaf size. I’m new to baking and need all of the help I can get.
Hey Colleen, yep manually put in the grams so the recipe can’t do the math. i should note that somewhere. i typically do not lower my oven temp when i remove the lid.
Uhm this may be the best loaf I’ve ever made! I used AP flour and just used a little bit less water and it turned out amazing!
Perfect! thank you so much for letting me know, Jessie! ❤️
This is the most amazing bread EVER! So soft and fresh tasting with bursts of sweetness w the blueberries.
Would dried blueberries work in this recipe?
I haven’t made the bread yet but I was wondering if the Dutch Oven is mandatory my family doesn’t have one and I wondering if it could be made without one.
Yes! While you’re preheating the oven, place an extra rimmed METAL baking sheet on a lower rack. When you put the loaf in the oven on the middle rack, pour a cup of water on the hot spare baking sheet at the same time. You’ll get steam, which mimics what the dutch oven does. 🙂
I used both frozen blueberries and dried blueberries. It turned out beautiful. The dough was wet but it didn’t affect the final bake.
Thank you for letting me know that! I make this with frozen blueberries sometimes with no trouble too.
I won’t be using frozen blueberries next time. This made the dough very wet & sticky. Ok in the end😃
Hi Jude! I’m going ta add a note not to use frozen! Thank you for letting me know that. 🙂
Love to try this. How much is 3/4c started in grams?
No ingredient list is shown when I “skip to recipe” or when I “print recipe.” Did you know this?
I did not! I’m so sorry, I’ll add it now!