As they say, the bread makes the sandwich. Or maybe I just say that. Either way, these sub rolls are going to take your homemade sandwiches to the next level. I’ve made them every week of my life for over five years. They’re super soft, super fluffy, and easy (really, I promise) to make. If you’re brand new to bread baking, I’ll walk you through each step. Shall we?

If you’ve never made bread, this is a good place to start. Like all yeast breads, it’s a simple process. Knead, rise, shape, rise, bake. Easy, right?
A few things to keep in mind: use common sense. If your dough is super wet and sticky, add some more flour. Let the pictures guide you so you know what it should look like. Don’t overthink shaping the rolls.
Ingredients and Tools You’ll Need
A stand mixer is not strictly necessary, and you can knead by hand. I personally hate this, but it’s doable. It will take at least 15 minutes, and you’ll need to keep going until you see those “windows”. However, you do need metal baking sheets, not glass or ceramic.
Get Access to
All my Free planners, Printables, binders and more
Get a copy of this frugal recipe binder with lots of crockpot favorites, pasta dishes, casseroles, and more inside the subscriber library. Plus SO much more.


Equipment
- Stand mixer or bread machine
- large bowl (for first rise)
- kitchen scale (optional)
- Plastic wrap or a damp cloth (to cover the dough while rising)
- 2 rimmed metal baking sheets (This is essential for creating steam, definitely no glass or ceramic pans, which can shatter when the water hits the hot pan.)
- Parchment paper
- Pastry brush
- cooling rack
Ingredients
- 3 ½ cups bread flour (This creates chewier rolls with better structure than all-purpose flour. In a pinch, all-purpose works, but the texture won’t be quite the same.)
- 1 ¼ cups water
- 3 tablespoons sugar
- 2 ½ teaspoons instant yeast (Mixes right into your dough, rises without trouble, no proofing first.)
- 1½ teaspoons salt
- ¼ cup vegetable oil
How to Make Italian Sub Rolls
If you live at a high altitude, everything’s a little different. The biggest change is that the dough rises fast! Watching your dough and maybe using less yeast or cutting down on rise time can help. Here’s a high-altitude baking guide from King Arthur Baking for more advice on adjusting recipes for altitude.
Step One: Knead The Dough
Add all ingredients to a stand mixer fitted with a dough hook, a bread machine, or a large mixing bowl if kneading by hand. Then, knead until the dough is smooth and stretchy, about 8-10 minutes. To see if it’s kneaded enough, try the “windowpane test”: stretch a small piece of dough thin enough to let some light through without it breaking. The dough should be smooth and slightly sticky to the touch, but it should clear the sides and bottom of the bowl. If using a bread machine, allow the kneading cycle to finish.

Step Two: First Rise
Place the dough in a large, lightly oiled bowl and cover it with a damp cloth or plastic wrap. Let it rise in a warm place for 1 hour, or until it has doubled in size and is very puffy.

Step Three: Rest
After the first rise, gently deflate the dough and divide it into 8 equal pieces. For best results, use a kitchen scale to make sure you get even portions. Loosely shape each piece into a log. Then, cover the logs with plastic wrap and let them rest at room temperature for about 10 minutes. This rest period will make the dough easier to shape.

Step Four: Shape
Prepare a baking sheet by lining it with parchment paper and dusting it with cornmeal. To shape the rolls, gently stretch each log into an oval roll. Pull down the bottoms of the dough to smooth out the tops and pinch the ends underneath to create a smooth, seam-free surface. Place the shaped rolls on the prepared baking sheet, leaving enough space between them for the second rise.
Do not get hysterical about this. Maybe they won’t look perfect and that’s okay. They’ll still be rolls in the end and next time they’ll look even better.
Step Five: Second Rise
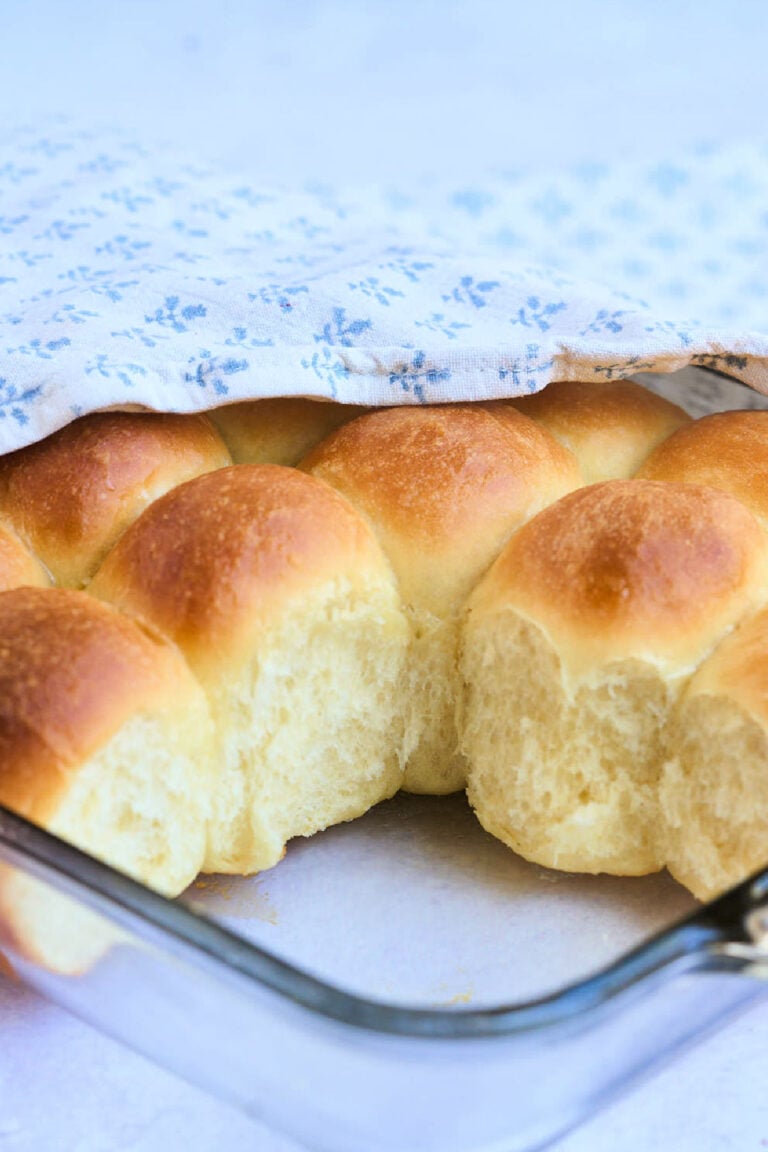
Brush the tops of the rolls with melted butter using a pastry brush. Cover them with heavily greased plastic wrap to prevent sticking and allow them to rise in a warm place for about 45 minutes, or until very puffy.

Towards the end of the rising time, preheat your oven to 425°F. Place a rimmed metal baking sheet on a lower rack in the oven to preheat as well. (It must be metal!)
Step Six: Bake With Steam
When the oven is hot, pour 1 cup of water onto the preheated metal baking sheet to create steam.

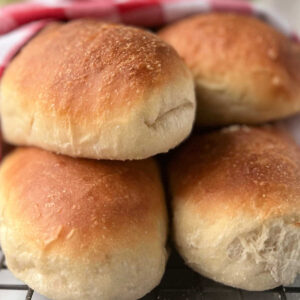
I know it seems scary to be pouring things into a hot oven, but don’t skip it. Immediately place the rolls on the middle rack of the oven. Bake for 15-19 minutes, or until the rolls are golden brown and sound hollow when tapped on the bottom.
Step Seven: Cool And Serve
Remove the rolls from the oven and cool on a wire rack. Let them cool completely before slicing for sandwiches.
Storing Homemade Sub Rolls
Once your rolls have cooled completely, store them in an airtight container or a zip-top bag at room temperature. They’ll stay just fine for about 2 days.
To make ahead, you can cover the dough after the first rise and place it in the refrigerator overnight. Let it come to room temperature the next day, shape the rolls, and allow them to rise a second time before baking.
These rolls freeze very well. Once they’re completely cooled, put them in a freezer-safe bag or wrap them in plastic wrap. Then, put them in a freezer bag. They’ll stay fresh in the freezer for up to 3 months.
When you’re ready to use the rolls, take them out of the freezer and just let them thaw at room temperature, which usually takes a couple of hours. You can rewarm them, but for a sandwich, room temperature is just fine.
Questions and Troubleshooting
There are a couple of possibilities. Old yeast and a cold room are the most common. Next time, let the dough rise in a warmer spot, like a turned-off but slightly warm oven.
Eh, not really. It does look lovely and helps prevent sticking. If you don’t have any, use parchment paper alone or sprinkle a little flour.
Don’t overthink this. Just shape it into an oval with seams at the bottom. After you do it yourself a few times, you’ll see there’s no real wrong way to do it.
They should be golden brown and feel light for their size. But if you aren’t sure, it’s better to let them bake a minute or two longer than to take them out too early.
You’ll want to look for a gluten-free bread recipe for best results. It’s not my specialty, sorry.
Make It Your Own
This is a basic dough you can customize.
- Brush with olive oil instead of butter before baking
- Top with sesame or poppy seeds
- Add garlic and parmesan
- Add dried herbs to the dough – oregano or basil are both good!
- Shape into shorter rolls for slider buns or longer loaves for hoagies
- Try semolina instead of cornmeal on the bottom

More rolls we love
- Old fashioned soft and buttery yeast rolls are perfect for the holidays.
- These no-knead dinner rolls are super easy (but they do need a long time to rise).
- Bread machine sandwich rolls can be made on the weekend for fresh sandwiches throughout the week.
- I love making these brioche burger buns for burger night.
- A bread machine is an easy way to make dinner rolls.
Printable Recipe
Soft Italian Sub Rolls
Equipment
- Stand mixer or bread machine
- large bowl (for first rise)
- kitchen scale (optional)
- Plastic wrap or a damp cloth (to cover the dough while rising)
- 2 rimmed metal baking sheets
- Pastry brush
- cooling rack
Ingredients
- 3 ½ cups bread flour
- 1 ¼ cups water
- 3 tablespoons sugar
- 2 ½ teaspoons instant yeast
- 1½ teaspoon salt
- ¼ cup vegetable oil
Save This Recipe
You'll join my email list which you will love. And if you don't, unsubscribe in one click. ❤️
Instructions
- Knead the dough. Add all ingredients to a stand mixer fitted with a dough hook, a bread machine, or a large mixing bowl if kneading by hand. Then, knead until the dough is smooth and stretchy, about 8-10 minutes. To see if it's kneaded enough, try the "windowpane test": stretch a small piece of dough thin enough to let some light through without it breaking. The dough should be smooth and slightly sticky to the touch but should clear the sides and bottom of the bowl. If using a bread machine, allow the kneading cycle to finish.
- First rise. Place the dough in a lightly oiled large bowl and cover with a damp cloth or plastic wrap. Let it rise in a warm place for 1 hour, or until it has doubled in size and is very puffy.
- Rest. After the first rise, gently deflate the dough and divide it into 8 equal pieces. For best results, use a kitchen scale to make sure you get even portions. Loosely shape each piece into a log. Then, cover the logs with plastic wrap and let them rest at room temperature for about 10 minutes. This rest period will make the dough easier to shape.
- Shape. Prepare a baking sheet by lining it with parchment paper and dusting it with cornmeal. To shape the rolls, gently stretch each log into an oval roll. Pull down the bottoms of the dough to smooth out the tops and pinch the ends underneath to create a smooth, seam-free surface. Place the shaped rolls on the prepared baking sheet, leaving enough space between them for the second rise.
- Second rise. Brush the tops of the rolls with melted butter using a pastry brush. Cover them with heavily greased plastic wrap to prevent sticking and allow them to rise in a warm place for about 45 minutes, or until very puffy. Towards the end of the rising time, preheat your oven to 425°F. Place a rimmed metal baking sheet on a lower rack in the oven to preheat as well.
- Bake with steam. When the oven is hot, pour 1 cup of water onto the preheated metal baking sheet to create steam. Immediately place the rolls on the middle rack of the oven. Bake for 15-19 minutes, or until the rolls are golden brown and sound hollow when tapped on the bottom.
- Cool and serve. Remove the rolls from the oven and cool on a wire rack. Let them cool completely before slicing for sandwiches. These rolls are best enjoyed within 2 days or can be frozen for later use.
Video
Notes
Nutrition


Love your recipe…. I make it weekly… especially for a family member that needs a soft roll.
I follow your recipe exactly to make Round Sandwich/Burger Buns… Mix and knead in a kitchen-aid mixer for 10 mins. After the first rise, I form the round buns (75g each) the yield is 11. Note: I did cut back on the oil in the recipe to 35ml, from 1/4 cup (56ml)
thank you Jan for the tip about round buns. I love soft sandwich rolls too, especially when using round cheese. I’m glad you like it!
I made the recipe twice, im still convinced that 11/2 cups of liquid to 31/2 cups of flour is incorrect. I put the ingredients in my Kitchen Aid and watched pieces of dough flop around because it is to dry. I ended up kneading by hand but the dough won’t stick to itself. I made sub rolls and a loaf. But me thinks something is amiss!
hi earl, it’s definitely correct! hundreds of people have succeeded with it . but that doesn’t mean YOU are wrong either, you just need to judge your dough and add a bit more water. it will vary all the time depending on the humidity of your kitchen, howe you measure your flour, etc. if the dough isn’t coming together, adjust 🙂
made it twice too and perfect!!
loosely followed the recipe,turned out fine. grandson loves em
thanks Joe.
thank you! I’ve always loved fresh bread and appreciate the time you’ve put into making our bread machines more useful when we don’t want those big holes in the bottom of our bread.
hi! yes put that little guy to work!
Have followed this recipe to a T twice and both times dough never rises no matter how long I let it sit and the yeast is always brand new
Hi Kaitlyn. This is probably too much flour and not enough liquid in your dough. Make sure that your dough looks like the pictures as you’re working through the recipe, or it just needs more time. If you put it in a warm place and let it sit, it will rise. I promise.
My dough was super wet. I kept adding flour. We’ll see how it ends up .
I’m just starting out learning about baking. If you read enough of these, how to post, you really think about “ just go to store and buy a bun”. They make you think you need to be a scientist. I tried your recipe and I got to tell you, it was easy. I have a convection oven (fan) so I dropped the temp by 25F. And they browned beautifully at the 15 min. mark. Thank you for your recipe. It was great.
hey Tony, yes I’m so glad you agree! it’s easy and I wish everyone would try instead of getting stuck reading. thanks so much for making these 🙂