Easy Bread Machine Sourdough (Truly Foolproof)
Most people love the idea of baking with sourdough because they see pictures of beautiful artisan loaves with deep crust, slashes, and all the rest. And then the reality of their bread is a flat, weird situation that is not quite what they expected. Anyone else?
It’s time to end that sadness forever. Because once you master this bread machine sourdough recipe, you’ll have a foolproof loaf you’ll be proud of every time.
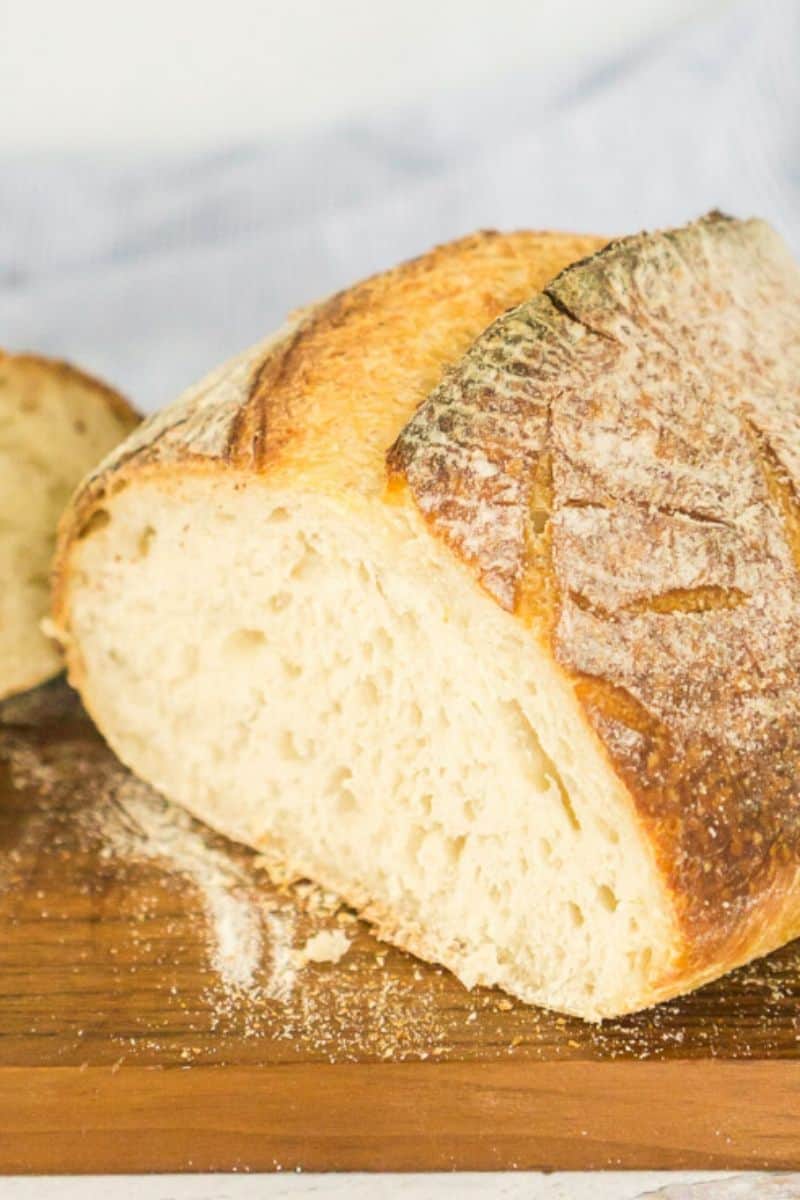
Over time, this has become my go-to for daily baking. It’s incredibly easy, especially since my bread machine handles most of the kneading. With just a few basic ingredients and letting the dough rise overnight in the fridge, I always end up with a crispy loaf on the outside and soft and chewy inside.
It’s perfect for sandwiches, toast, or even just a buttered slice. At first, the dough might seem a bit dry, but I’ve learned that’s completely normal. Resist the urge to add extra water and trust the process, and it turns out perfectly every time.
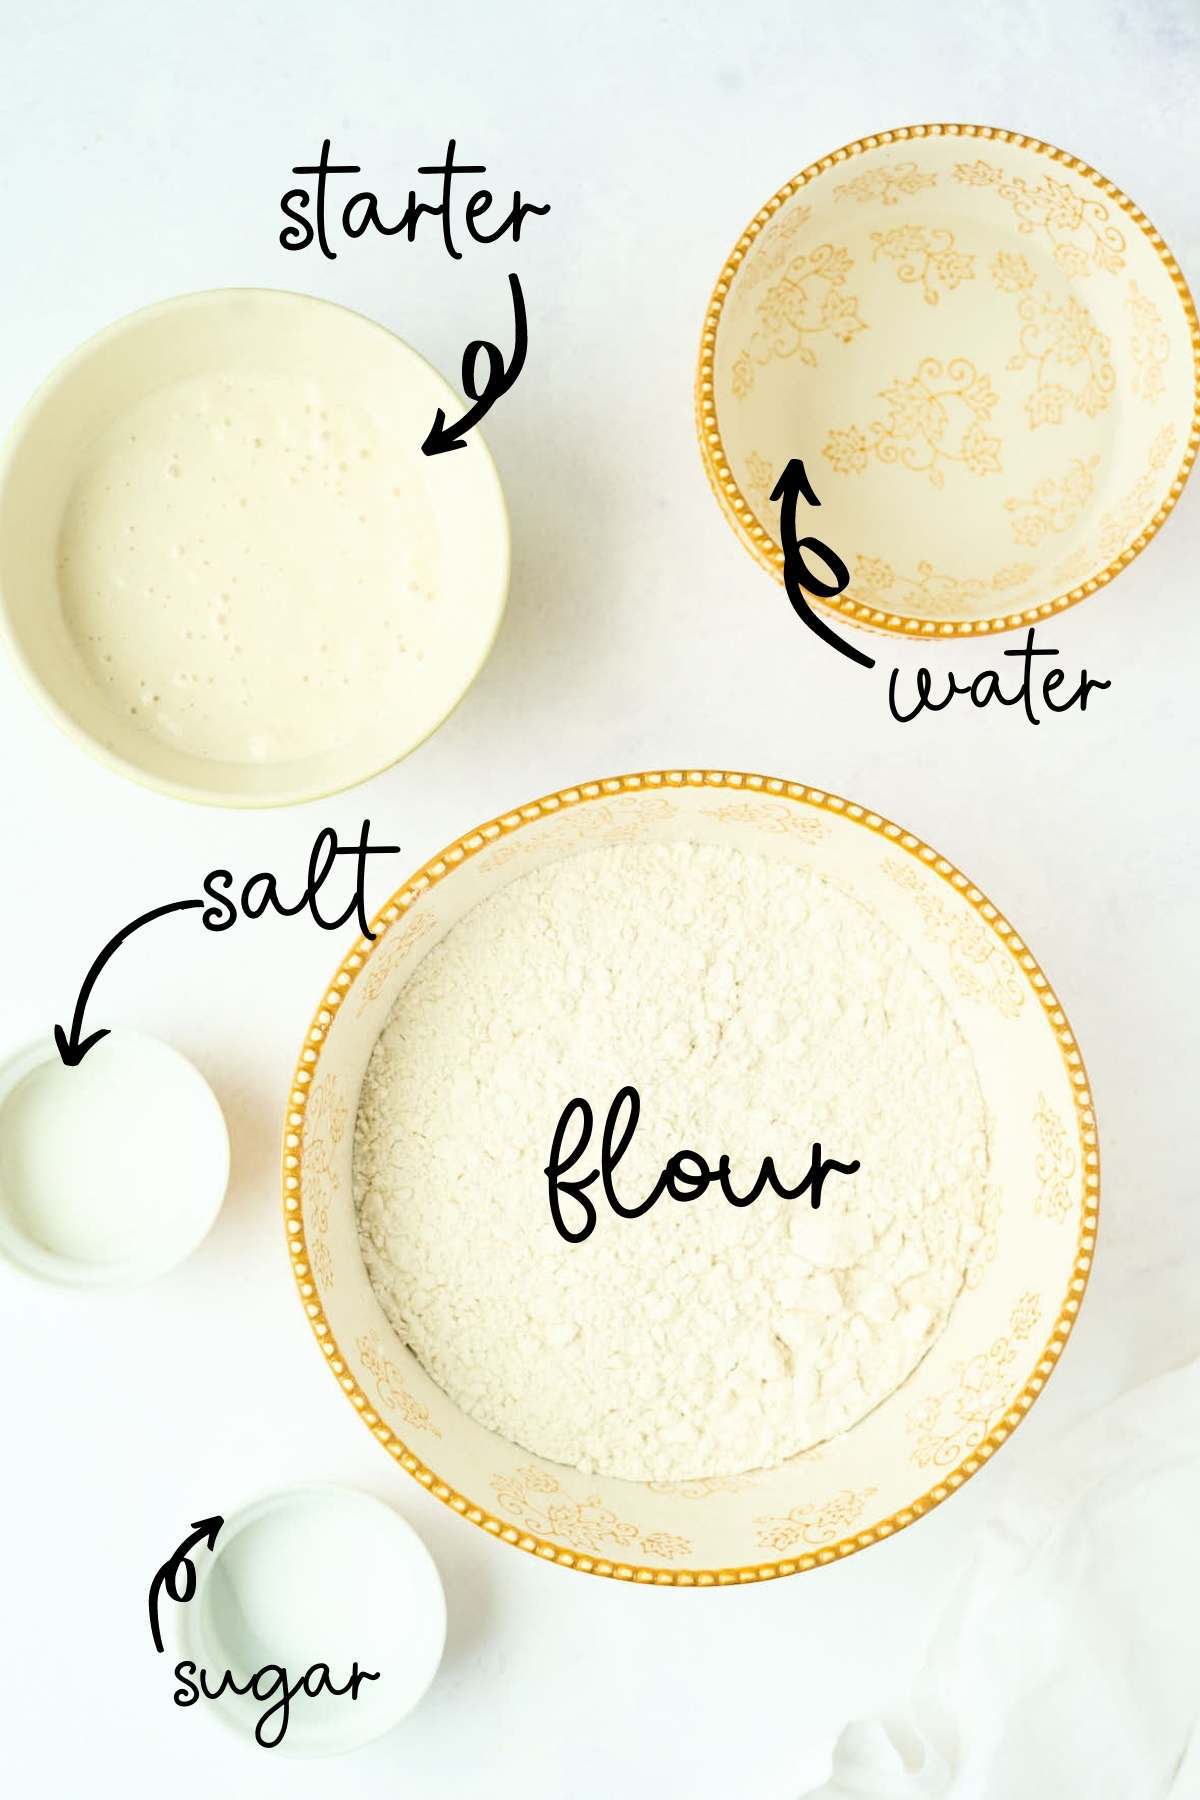
Ingredients and Tools You’ll Need
We’re using the bread machine to do the kneading, but you can also do it in a stand mixer. Make sure your starter is bubbly and active.

Heart’s Content Farmhouse is a participant in the Amazon Services LLC Associates Program, an affiliate advertising program designed to provide a means for sites to earn advertising fees by advertising and linking to Amazon.com. This means that when you click on certain links on this site and make a purchase, I may earn a small commission at no additional cost to you. I only recommend products I genuinely believe in and would use in my own kitchen. As an Amazon Associate, I earn from qualifying purchases.
Equipment
- Bread machine (with a dough cycle setting) (It does the kneading for you. If you don’t have one, kneading by hand or using a mixer works, but a bread machine simplifies the process.)
- Large mixing bowl
- Measuring cups and spoons
- Damp tea towel or kitchen towel
- Baking Sheet
- Parchment paper
- Rimmed baking sheet
Ingredients
- 3 cups bread flour (15.85 ounces) (regular or wheat flour will work too, but bread flour will make your bread chewier and stronger)
- 1 cup lukewarm water (7.75 ounces)
- ¾ cup fed sourdough starter (5.65 ounces) (You can also easily make your own at home with flour and water—it takes about 5-7 days to get a strong starter going.)
- ½ tablespoon sugar
- 1 ¾ teaspoon salt
How to Make Bread Machine Sourdough
Step One: Autolyze
Combine the bread flour, sourdough starter, sugar, and water in a large mixing bowl. The dough will feel drier than typical sourdough—this is normal. Do not add more water. Use your hands to make sure all ingredients are incorporated into a cohesive ball. Cover the bowl with a damp tea towel and let the dough rest on the counter for 30 minutes. Tip: Pre-measure the salt and place it in a small container on the towel to remind yourself to add it later.

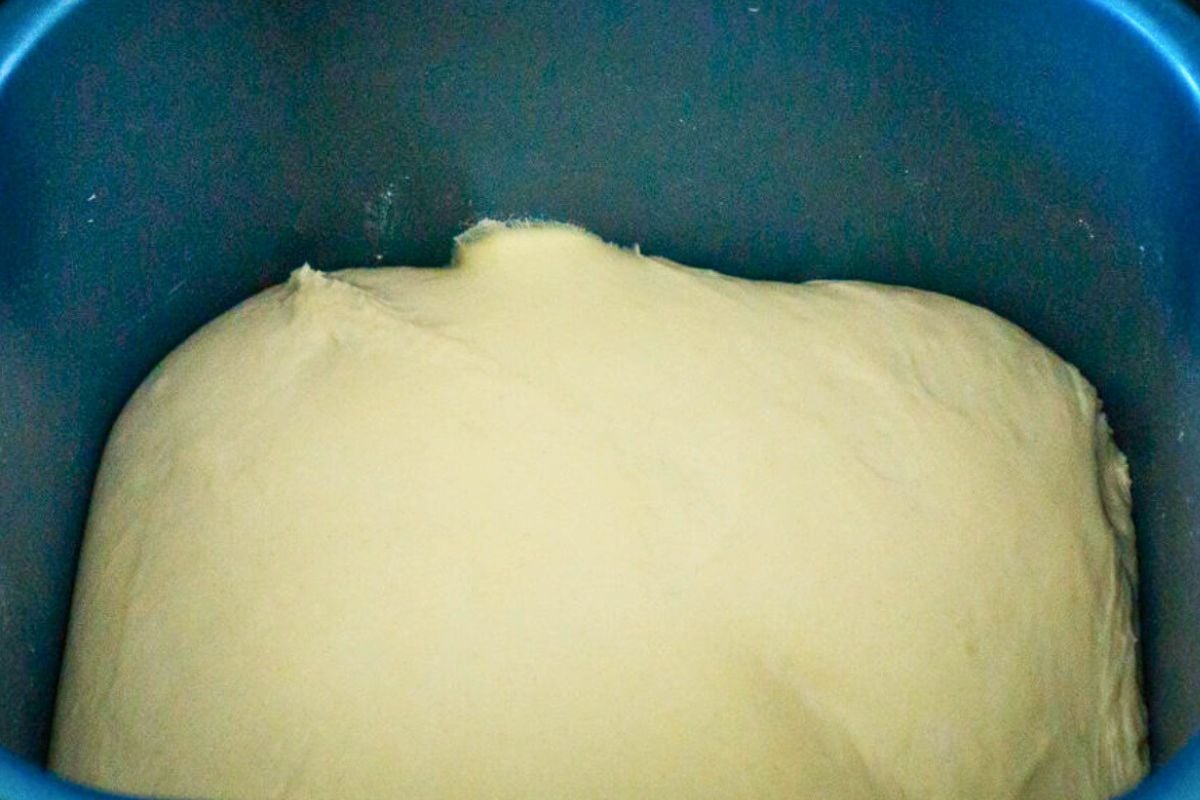
Step Two: Knead
After the autolyze, transfer the dough and salt into the bread machine bucket. Then, select the “dough” cycle and press start. You don’t need to fold the dough or anything crazy like that. Just walk away.
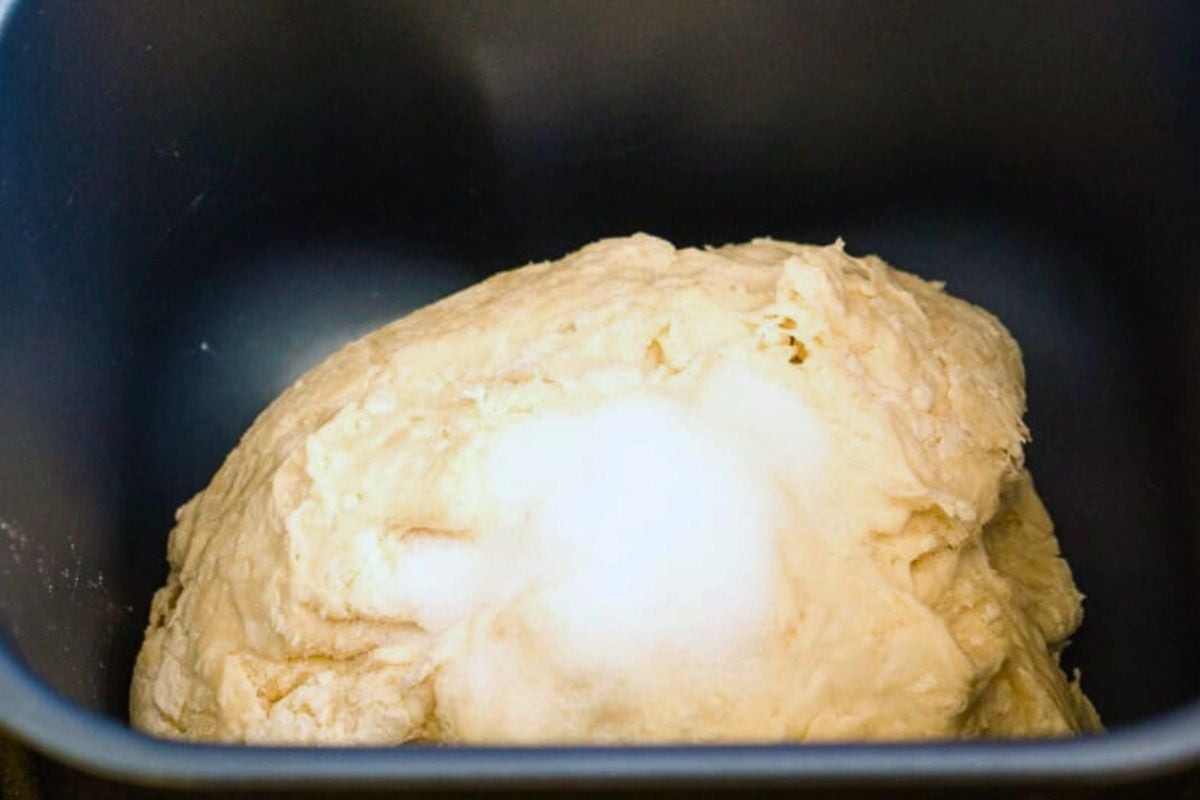
Step Three: First Rise
When the cycle ends, leave the dough in the machine to continue rising for 2-3 more hours. The dough should be noticeably puffier and soft to the touch, though it may not have doubled in size. This longer rise helps develop the flavor and texture of the bread.
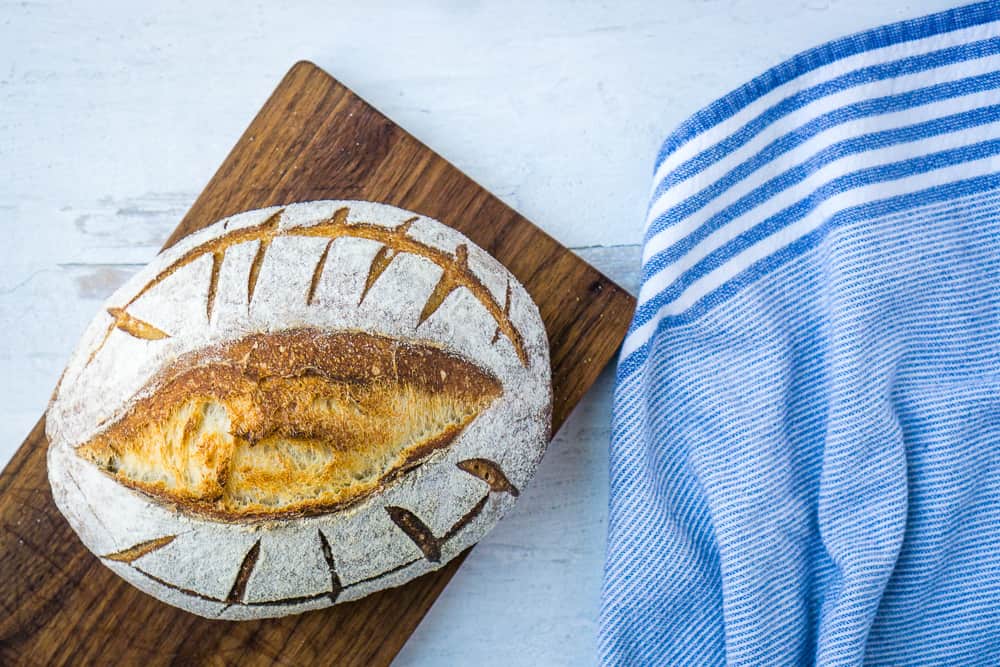
Step Four: Shape The Loaf
Prepare a baking sheet by lining it with parchment paper and sprinkling cornmeal over the surface. Carefully remove the dough from the bread machine and gently shape it into a round or oval loaf. The dough will be slightly sticky, but avoid using flour for shaping. Place the dough on the prepared baking sheet.
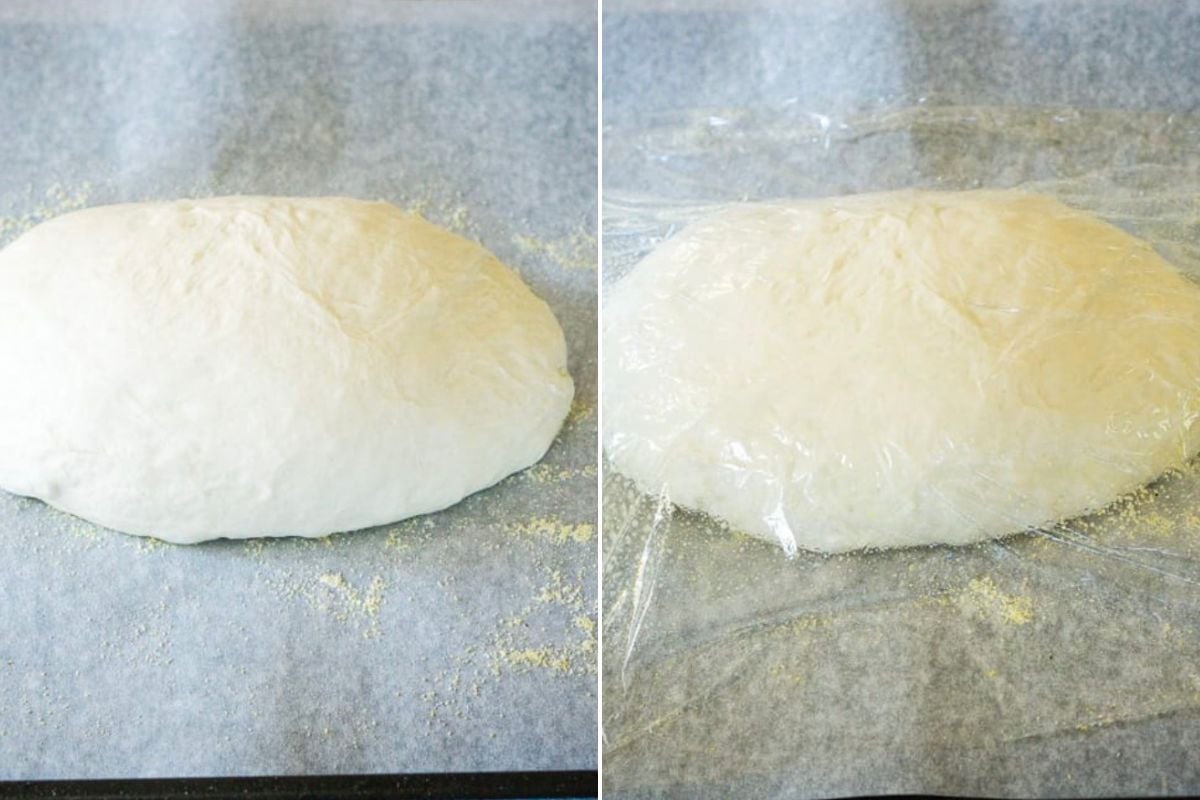
Step Five: Second Rise (Overnight Proof)
Spray a piece of plastic wrap with cooking spray and loosely cover the shaped dough. Place the covered loaf in the refrigerator to proof overnight for 8 to 16 hours.
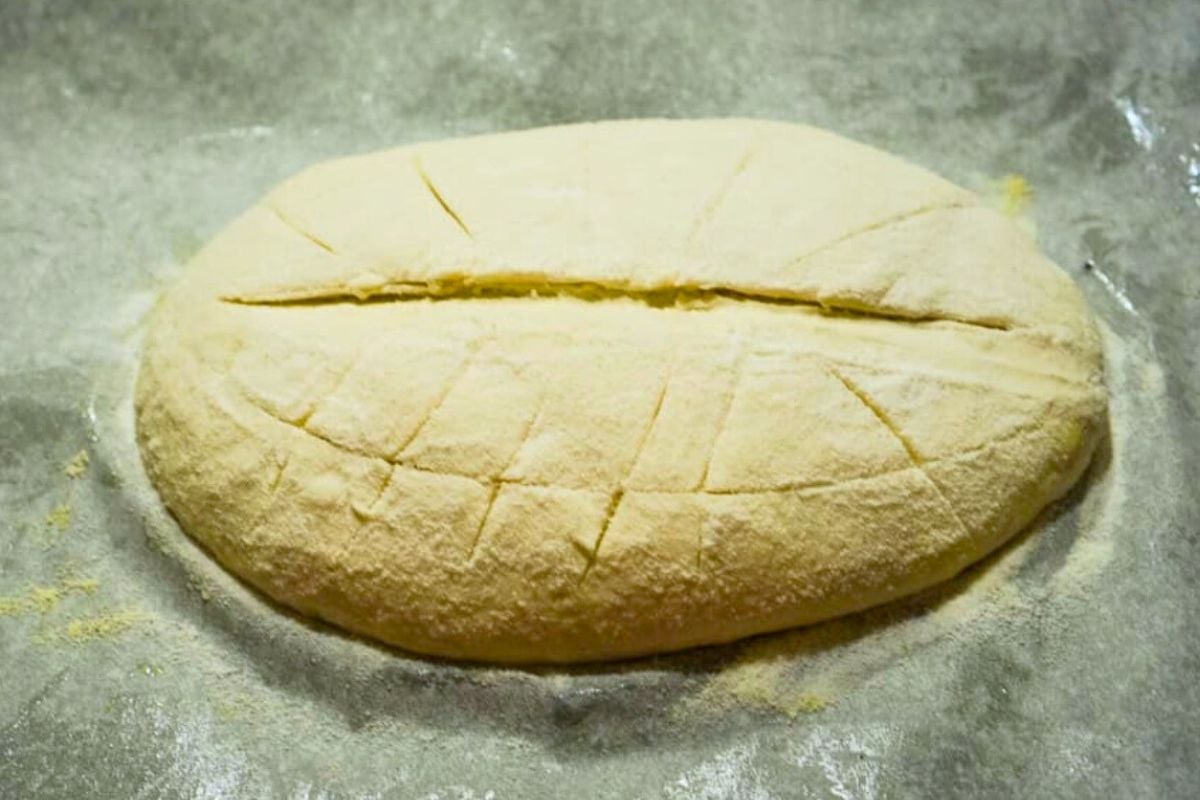
Step Six: Prep For Baking
In the morning, preheat the oven to 450°F (230°C). Position two racks: one in the center of the oven and the other in the lower middle. Then, place an empty-rimmed baking sheet on the lower rack while the oven is preheating. Next, remove the loaf from the fridge. Dust it lightly with flour and use a lame or a sharp serrated knife to slash the top of the dough, allowing the loaf to expand during baking.
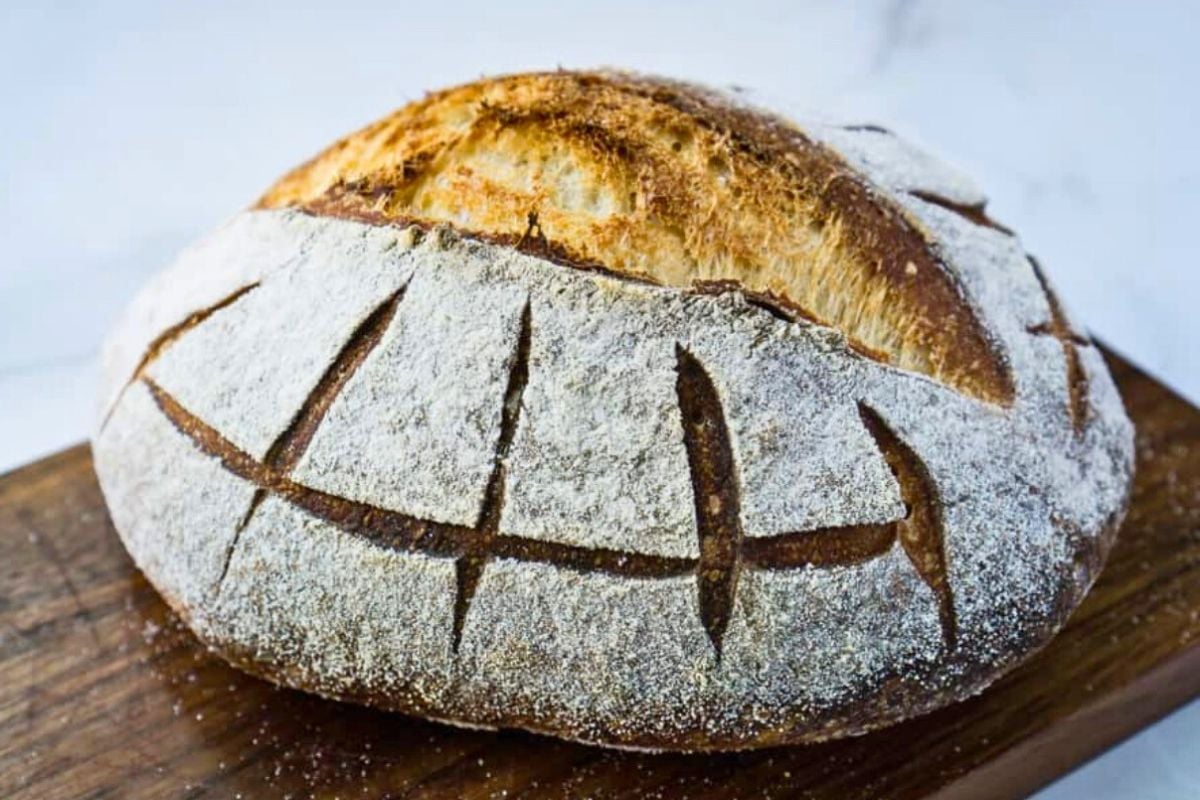
Step Seven: Bake With Steam
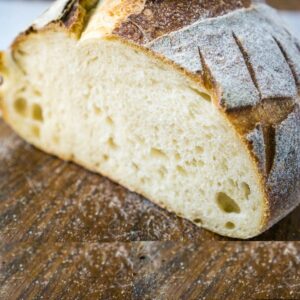
When the oven is fully preheated, carefully pour 1 cup of water into the baking sheet on the lower rack to create steam. Immediately place the loaf on the center rack and close the oven door. Bake the loaf for 45 minutes until it reaches a deep golden-brown color. Remove from the oven and allow the bread to cool on a wire rack for at least 4 hours.
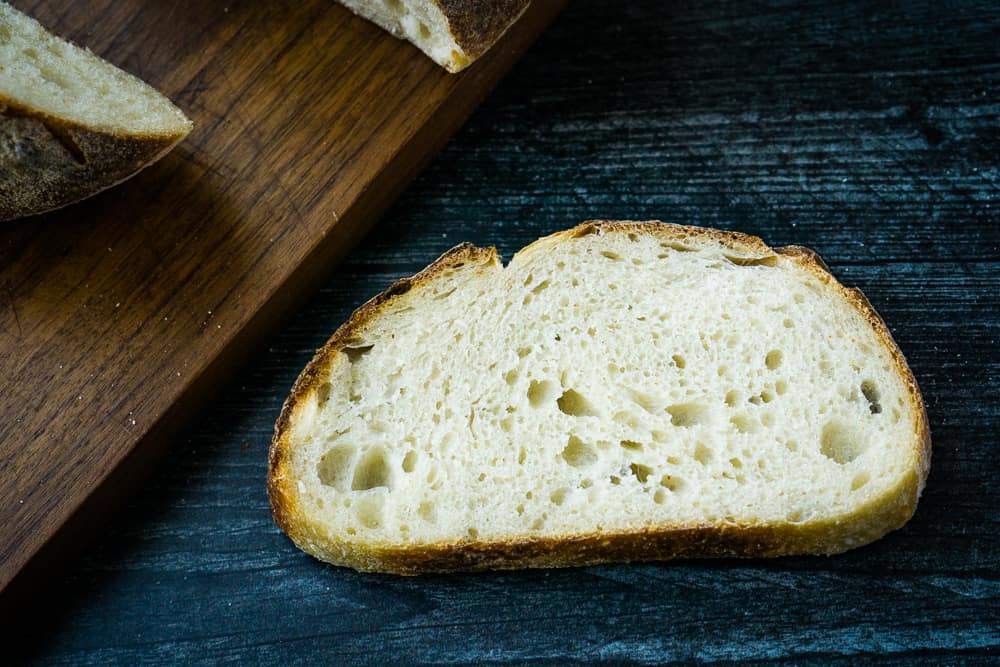
Step Eight: Slice And Serve
Once the bread has fully cooled (after at least 4 hours), use a sharp, serrated knife to slice the loaf into even pieces. Enjoy fresh or toasted with your favorite toppings!
Storage Instructions
Once the bread has completely cooled, wrap it in a clean kitchen towel or place it in a paper bag. This will help keep the crust crispy while preventing the bread from drying. Avoid using plastic, as it can cause the crust to become soft. Stored this way, the bread will stay fresh for about 3 days at room temperature.
You can also freeze it. First, let the loaf cool completely. Then, slice the bread into pieces, so it’s easier to use later. Wrap the slices tightly in plastic wrap or aluminum foil and place them in a freezer-safe bag. Remove as much air as possible before sealing the bag. The bread can be stored in the freezer for up to 1 month.
Thaw the slices at room temperature or pop them straight into the toaster. You can also reheat them in the oven for a few minutes to freshen up the crust.
What to Serve with Bread Machine Sourdough Bread
This bread is great for everything from toast at breakfast to a side at dinner.
- Spread on some homemade butter or strawberry jam.
- It’s great for grilled cheese sandwiches since it doesn’t have big holes.
- Serve as a side for dinner, like with a creamy chicken noodle soup.
Questions and Troubleshooting
Check my Sourdough FAQ page to see what could have gone wrong.
The autolyze step helps improve the dough’s texture, but if you’re short on time, you can throw everything in the bread machine and still get a great loaf.
No! It’s normal for this particular recipe. Once it rests and rises, the dough will soften and be easier to work with.
Great question! The dough should look noticeably puffier, but doesn’t need to double in size. If you press it gently with a finger and it springs back slowly, it’s ready.
Yes, you can! If you’re in a rush, let the dough rise at room temperature for another 2-3 hours. The slow, overnight rise helps develop the sourdough flavor, so try it when you can.
There are a couple of reasons this could happen. If your starter wasn’t bubbly and active when you used it, that could slow the rise. Also, sourdough can be slightly slow to rise, especially in cooler kitchens. If this happens, just give it more time to puff up! If you’re having trouble with your sourdough starter and wondering if it’s still alive, don’t worry! Check out this helpful guide on how to tell if you’ve killed your sourdough starter.
Yes! Some readers have baked this in the machine. But you can’t just run a cycle from start to finish. You’ll need to remove the dough to rest in the fridge overnight, then pop it back in to bake in the morning.
You sure can. The steam and baking sheet is really a workaround for those of us who don’t have one. 😊
More Sourdough Recipes For Beginners
- My sourdough roll recipe uses the same steam technique and adds a pinch of instant yeast for a fluffy roll with a crisp crust.
- Sourdough baguettes are hand kneaded but also a similar process.
- And if you want to do all the crazy folding and buy some neat tools, here is a true artisan bread recipe you might like.
Printable Recipe
Bread Machine Sourdough
Equipment
- Bread machine (with a dough cycle setting)
- Large mixing bowl
- Measuring cups and spoons
- Damp tea towel or kitchen towel
- Baking Sheet
- Rimmed baking sheet
Ingredients
- 3 cups bread flour (15.85 ounces)
- 1 cup lukewarm water (7.75 ounces)
- ¾ cup fed sourdough starter (5.65 ounces)
- ½ tablespoon sugar
- 1 ¾ teaspoon salt
Save This Recipe
You'll join my email list which you will love. And if you don't, unsubscribe in one click. ❤️
Instructions
- Autolyze. Combine the bread flour, sourdough starter, sugar, and water in a large mixing bowl. The dough will feel drier than typical sourdough—this is normal. Do not add more water. Use your hands to make sure all ingredients are incorporated into a cohesive ball. Cover the bowl with a damp tea towel and let the dough rest on the counter for 30 minutes.Tip: Pre-measure the salt and place it in a small container on the towel to remind yourself to add it later.
- Knead. After the autolyze, transfer the dough and salt into the bread machine bucket. Then, select the “dough” cycle and press start. You don’t need to fold the dough or anything crazy like that. Just walk away.
- First rise. When the cycle ends, leave the dough in the machine to continue rising for 2-3 more hours. The dough should be noticeably puffier and soft to the touch, though it may not have doubled in size. This longer rise helps develop the flavor and texture of the bread.
- Shape the loaf. Prepare a baking sheet by lining it with parchment paper and sprinkling cornmeal over the surface. Carefully remove the dough from the bread machine and gently shape it into a round or oval loaf. The dough will be slightly sticky, but avoid using flour for shaping. Place the dough on the prepared baking sheet.
- Second Rise (overnight proof). Spray a piece of plastic wrap with cooking spray and loosely cover the shaped dough. Place the covered loaf in the refrigerator to proof overnight for 8 to 16 hours.
- Prep for baking. In the morning, preheat the oven to 450°F (230°C). Position two racks: one in the center of the oven and the other in the lower middle. Then, place an empty-rimmed baking sheet on the lower rack while the oven is preheating. Next, remove the loaf from the fridge. Dust it lightly with flour and use a lame or a sharp serrated knife to slash the top of the dough, allowing the loaf to expand during baking.
- Bake with steam. When the oven is fully preheated, carefully pour 1 cup of water into the baking sheet on the lower rack to create steam. Immediately place the loaf on the center rack and close the oven door. Bake the loaf for 45 minutes until it reaches a deep golden-brown color. Remove from the oven and allow the bread to cool on a wire rack for at least 4 hours.
- Slice and serve. Once the bread has fully cooled (after at least 4 hours), use a sharp, serrated knife to slice the loaf into even pieces. Enjoy fresh or toasted with your favorite toppings!
Video
Notes
Nutrition


Hi Katie,
Made this wonderful sourdough bread this morning. Wowzer, it turned out as a work of art! So very pleased. Can’t wait to cut into in a few hours. 💓
Can this recipe be doubled for 2 loaves at once?
yes!!!
Why must we mix the flour starter, sugar and water and let it sit 30 minutes instead of just adding everything into the bread maker right from the start?
it’s a step called “autolyze” that supposedly helps hydrate the flour. HOWEVER, sometimes i skip it and can’t really tell the difference!
I made the bread but found the instructions for my Wolfgang Puck bread maker incredibly vague so it ended up kneading several times. That and the rise made it far stickier than when it went in and impossible to shape into a loaf, so I put it into a loaf pan and cooked it in my Oster oven (on bake, not convection). I did check it at one point where the top was browning nicely, but the bottom and edges were still white. Now, it is dark brown on top, but perfectly browned on the rest of the loaf.
One question: why do I have to wait four hours to slice it. I love warm, freshly baked bread. What happens if I slice it sooner?
It will actually be gummy in the middle if you slice it too soon. I know it sound weird but it finishes baking as it coolss 🙂
Hi Katy,
The bread maker I would using only allows for a 1.5 loaf. Would this recipe work in that bread machine?
Thanks,
Mimi
Yes since it’s not baking in there it will be just fine 🙂
Hello Katie,
I’m so glad I found your site. I have been torn between hard dense and funny looking bread machine bread and spending two days on made from scratch sourdough bread. This has been the perfect in between. You have cut my time in half and delivered a tasty, good looking loaf. My question is what do you think is the correction to the bread flattening out on the bottom and expanding outwards once I put it in the oven. I get a good rise but it kind of flattens outwards so I get a flat bottom and half dome look. What makes bread a bit more stiffer that keeps it’s shape.
thanks
jason
hi jason- try adding just one more ounce of flour at the beginning. another technique that makes a difference is to bake the loaf in a PREHEATED dutch oven (just put the dutch oven, lid and all, in the oven while it preheats, and carefully lower thte bread + parchment paper in once it’s hot) this will give you great oven spring and a nice shape 🙂
Hi Katie
Thanks for posting this recipe. I’ve been making white & wholewheat sourdough bread, from knead to bake, in bread machine. It tasted good but the texture was too tight and dense. I’m going to try your recipe now. Please could you let me know if I want to add seeds or chopped nuts, at what stage I should add them and would that mean a second knead in machine? If so, knead for how long? And will there be any modifications to the main ingredients because of that? Thanks
I would add them when your machine has 1-3 minutes of kneading time left. You’ll need to set a timer. Some machines have a cycle that will beep for you: it might be called fruit or but bread setting
How long would you knead using a stand mixer and at what speed?
Would you then let it rise on the counter for how long before putting it in the fridge?
Thanks
Mike i’d do about 1o minutes with a five minute rest halfway, on low. then let it rise 4 hours in a warmish place (like a turned off oven) this will better mimic the bread machine
Great recipe! This was my first sourdough and it came out beautifully! Thanks for the detailed information.
Just made my 1st sourdough and this was amazing! The only issue was the crust came out a bit darker and hard to chew than I’d prefer. The inside was perfect! Anything I can do to get a lighter crust?
Hi Kate, Thanks for the recipe. Could I ask if you use FAN FORCE setting in the oven or just BAKE? Can i use a chasseur with the lid on to bake this bread?? How would you suggest I get the steam affect inside the chasseur then??
i would bake on regular bake. if you are using a covered baker of any kind, you can just skip the steam. the moisture in the loaf will be trapped and have the same effect. 🙂
Very misleading. I clicked on this recipe because it was for a bread machine but the only thing the bread machine was used for was to mix and rise the dough. I am looking for a bread recipe that won’t heat up my kitchen during the summer I thought this was it.
Obviously not.
Thank you so much for this recipe, its great!
I really want to increase the size and make a much larger loaf. Do you have any recommendations for cook time say if I doubled it?
I’ve done it and baked for 70 minutes!
Thanks for the recipe. I was wondering how to do this in my machine. I altered the recipe a bit because I felt it was a little dry. I added about 80 more grams of water.. which may have been a little over kill… and I baked it in a big pyrex dish with a large dome lid. I misted it with water before putting it in the oven. turned out amazing. I’ll cut down on the water a little next time. But beautiful open crumb, lovely texture and a really nice shiny . I instagrammed some pics at you. Thanks for providing the path
This recipe worked very well for me. It turned into a beautiful and delicious loaf. I baked it in my clay baker after soaking the lid in water for 15 minutes. It turned out great!
Thank you for this wonderful recipe.
so happy you like the recipe!
Besides looks, why can’t this be baked in a bread machine? I lIve in the desert where I e rarely use the oven for about eight months, so traditional sour dough bread as a staple is not an option 2/3 of the year. Thanks.
jennifer, you absolutely can bake it in the machine. the only issue is the overnight rise. you can pull out the bucket, cover it and put it in the fridge, and then set a bake only cycle in your machinee.
Thank you. I love your bread recipe.
How long is the knead cycle on your bread machine? I have to do a special programming on mine to just knead and rise once. When you let it rise in the machine, what is the temperature setting? thanks!
mine is a 30 minute knead with 2 5 minute rests. i would guess the rising temep is about 90! i checked the manual and it doesn’t say.
Hi Katy,
How far ahead do you need to feed the starter? I’m so wanting to try this, but not sure about the “fed starter” part. Thanks in advance for your response.
hi margaret! it really depends on your feeding schedule and the strength of your starer. i typically feed mine, wait 4 hours, then start this recipe. the key is you want your starter bubbly and the height of its “power”. i have a post specifically on maintaining your starter if you’re still working on your routine and need some more help. 🙂
Hi Katie, I made my first loaf of sourdough bread this past weekend using your bread machine recipe and it turned out beautifully. Thank you for sharing this recipe. Much appreciated. 🙂 I will be making this bread again and again. Thanks again!
This was a great recipe. I was worried because it didn’t rise much in my basket, but rose in the oven. I cooked it in a preheated Dutch oven. Thank you!
Same experience for me. I noticed the Easy & Beautiful Artisan Sourdough Bread recipe mentions using the water-in-a-cookie-sheet technique as a substitute for a dutch oven. Since I do have a dutch oven, want to try this again using the dutch oven. Probably is more effective keeping the dough in a tighter space.