
Ice Cream Sundae Squares


Note from my kitchen: I am almost embarrassed to share this recipe since it’s hardly a recipe at all. But it’s so easy, cute, and strangely impressive to others that I just had to. These frozen squares give everyone their own perfect ice cream sundae: complete with that magical chocolate shell layer and a cherry on top For whatever reason, it gets the biggest “wow” reaction for the least amount of work.

Each layer here plays its part: the fluffy ice cream base, the extra Cool Whip layer that adds airiness, and that glossy chocolate shell that freezes into the perfect topping that won’t slide off when you cut through it.
What You’ll Need
Note: You can use any ice cream flavor you love – mint chocolate chip, cookies & cream, strawberry, whatever. Just keep the Cool Whip plain (not flavored) no matter what ice cream you choose.

For the Base:
- 1 rectangular tub vanilla ice cream (1.5 quart/48 oz size
- 1 container Cool Whip (16 oz), divided
For the Magic Shell:
- 1½ cups chocolate chips
- 4 tablespoons shortening
For the Top:
- Sprinkles
- Whipped cream for dollops
- Maraschino cherries
How to Make
Step 1: Softening Ice Cream

You want the ice cream soft enough to mix… but not turning into soup. I usually set my timer for 10 minutes and check it. You should be able to press your finger into it easily, but it shouldn’t be pooling at the edges. If your kitchen runs hot, maybe start with 7-8 minutes. Scoop half your Cool Whip into that softened ice cream and fold them together like you’re making a delicate mousse. Just sort of fold it in.. The mixture should look marbled and fluffy.
Step 2: Spreading the Base Layer

Spread this into your pan quickly but evenly. I use an offset spatula but a regular spatula works fine. Just work fast because it starts melting quickly once it’s spread thin.
Step 3: The Cool Whip Layer
Save This Post
You'll join my email list which you will love. And if you don't, unsubscribe in one click. ❤️

Now spread the rest of your plain Cool Whip right on top of your ice cream mixture. It doesn’t have to be perfect, just relatively even. This layer is genius because it stays softer than straight ice cream would, making it easier to cut through later. Into the freezer it goes for 1 hour.
Step 4: Making Your Magic Shell

It’s just chocolate with shortening! Microwave them together in 30-second bursts. mine usually takes about 1½ minutes total, but every microwave is different. Stir between each burst until it’s completely smooth and glossy. Let it cool for about 5 minutes. If you pour it on too hot, it’ll melt your Cool Whip layer.
Step 5: The Chocolate Drizzle

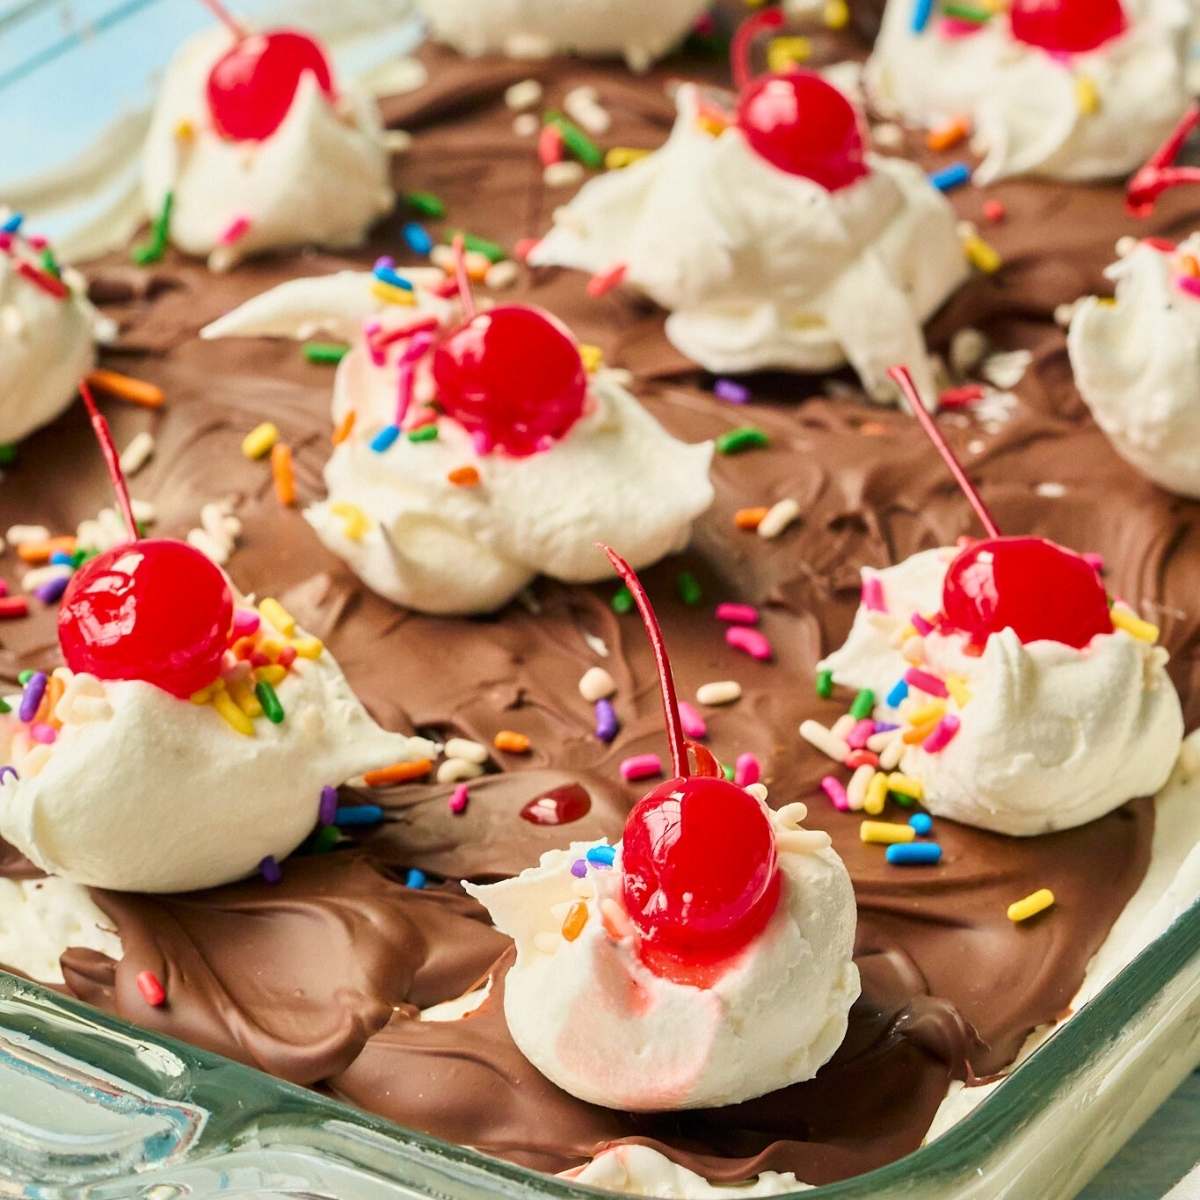
Now it’s getting fun. Just drizzle that chocolate mixture all over the Cool Whip. It doesn’t need to cover every single spot perfectly because it’s going to crack when you cut it anyway. I like to do a mix of back-and-forth drizzles and some random swirls. The chocolate will start firming up pretty quickly once it hits the cold surface, so work with confidence!
Step 6: The Final Freeze Back into the freezer for at least 2 hours…this is when everything sets up properly. The chocolate hardens into that satisfying shell, and the layers firm up enough to cut cleanly. You can actually leave it in there for up to 3 days at this point if you’re making it ahead.
Step 7: Garnish

You want to work somewhat quickly here. Pull it out and immediately add your whipped cream dollops in a grid pattern. I usually do 3 across and 4-5 down, so each square will have its own dollop. Press a cherry into each whipped cream mound and shower the whole thing with sprinkles. The whipped cream will firm up a bit in the freezer, but I usually add these toppings right before serving for the freshest look.
Step 8: Cutting Perfect Squares

Run your knife under hot water, dry it quickly, and make your cuts. The hot knife glides through that chocolate shell with a satisfying crack. Wipe and warm the knife between cuts if you want really clean edges. Serve immediately!
Storage Instructions
Once assembled with all the toppings, these squares will keep in the freezer for up to 3 days. Just cover the pan tightly with plastic wrap or aluminum foil. The whipped cream dollops will firm up and might not look as fluffy after day one, but they’ll still taste great.
Customization Ideas
- Chocolate Version Use chocolate ice cream, dark chocolate chips for the shell, and top with chocolate sprinkles. Add mini chocolate chips between layers if you want extra texture.
- Birthday Cake Squares Birthday cake or confetti cake ice cream works great. Add crushed golden Oreos before the magic shell and use rainbow sprinkles on top. You can actually stick birthday candles right into the squares.
- Mint Chocolate Chip Mint chip ice cream with the regular chocolate shell, topped with crushed Andes mints or candy canes during the holidays.
- Strawberry Shortcake Strawberry ice cream with white chocolate chips for the shell (still need the shortening). Top with crushed freeze-dried strawberries – looks pretty and adds great flavor.
- Peanut Butter Cup Chocolate ice cream, make the shell with half chocolate chips and half peanut butter chips, then top with chopped Reese’s pieces.
- Coffee Flavored Coffee or espresso ice cream with regular chocolate shell, sprinkled with instant espresso powder and chocolate shavings on top.
- Cookies & Cream Cookies and cream ice cream with crushed Oreos mixed into the Cool Whip layer, then more crushed Oreos on top instead of sprinkles.
Printable Recipe
Ice Cream Sundae Squares
Equipment
- 1 13×9 inch pan
- 1 Microwave safe bowl
Ingredients
- 1 tub (1.5 quart) vanilla ice cream rectangular container preferred
- 16 oz Cool Whip divided
- 1½ cups chocolate chips
- 4 tablespoons shortening or coconut oil
- whipped cream for topping
- maraschino cherries for topping
- sprinkles for topping
Instructions
- Mix base layer. Let ice cream soften at room temperature for 10 minutes. Mix half the Cool Whip into the softened ice cream and spread into a 13×9 pan.
- Add cool whip. Spread remaining Cool Whip on top. Freeze for 1 hour.
- Make chocolate shell. Microwave chocolate chips and shortening in 30-second intervals, stirring between, until smooth (about 1½ minutes total). Let cool 5 minutes.
- Drizzle and chill. Drizzle chocolate mixture over Cool Whip layer. Freeze for 2 hours until firm.
- Garnish. Before serving, add dollops of whipped cream in a grid pattern. Top each with a cherry and sprinkles.
- Serve Run knife under hot water between cuts for clean squares. Serve immediately.
Notes
Nutrition

Related Articles
See ALL
How to Make Spooky Halloween Chex Mix: A Sweet and Crunchy Treat
Blueberry Cobbler (With Pie Filling)
Strawberry Ice Cream Pie (Sweet, Creamy, Super-Easy)
Maple Caramels
Super-Easy Chocolate Ice Cream Pie
Old-Fashioned Strawberry Ice Cream
How to Wake Up (Super) Early and Why It Will Absolutely Change Your Life
Cold Apple Cider Punch
Homemade Italian Sandwich Bread
How to Make Tomato Powder from Leftover Skins (A Frugal Favorite)
Homemade 4th of July Ice Cream with Berry Swirls
17 Old-Fashioned Fall Bundt Cake Recipes You’ll Love
See all
Related Articles
5 Ingredient Crockpot Mississippi Chicken
How to Make Spooky Halloween Chex Mix: A Sweet and Crunchy Treat
Southwest Barbecue Chicken Salad with Creamy Cilantro Ranch
Apple Spice Cake with Boiled Caramel Frosting
Hot Pepper Jelly Glazed Wings
49 Cozy Fall Recipes From a Farmhouse Kitchen
Old Fashioned Peanut Butter Balls with Rice Krispies
Slow Cooker Shredded Beef Tacos
How to Make Tomato Powder from Leftover Skins (A Frugal Favorite)