If you’ve never tried making sandwich bread at home, starting with my overnight white sandwich bread recipe is just the thing. This yeast bread recipe is simple, thanks to its long, slow rise that adds flavor while you’re busy with other things. You’ll get a soft, fluffy loaf perfect for sandwiches.

I like to start this in the evening after dinner. Then, all I have to do in the morning is shape it, let it rise a bit more, and then bake. It’s an easy way to fit bread making into your daily routine. In a warm kitchen the bread will rise too much. If it’s summer, just pop it in the fridge overnight and take it out in the morning.
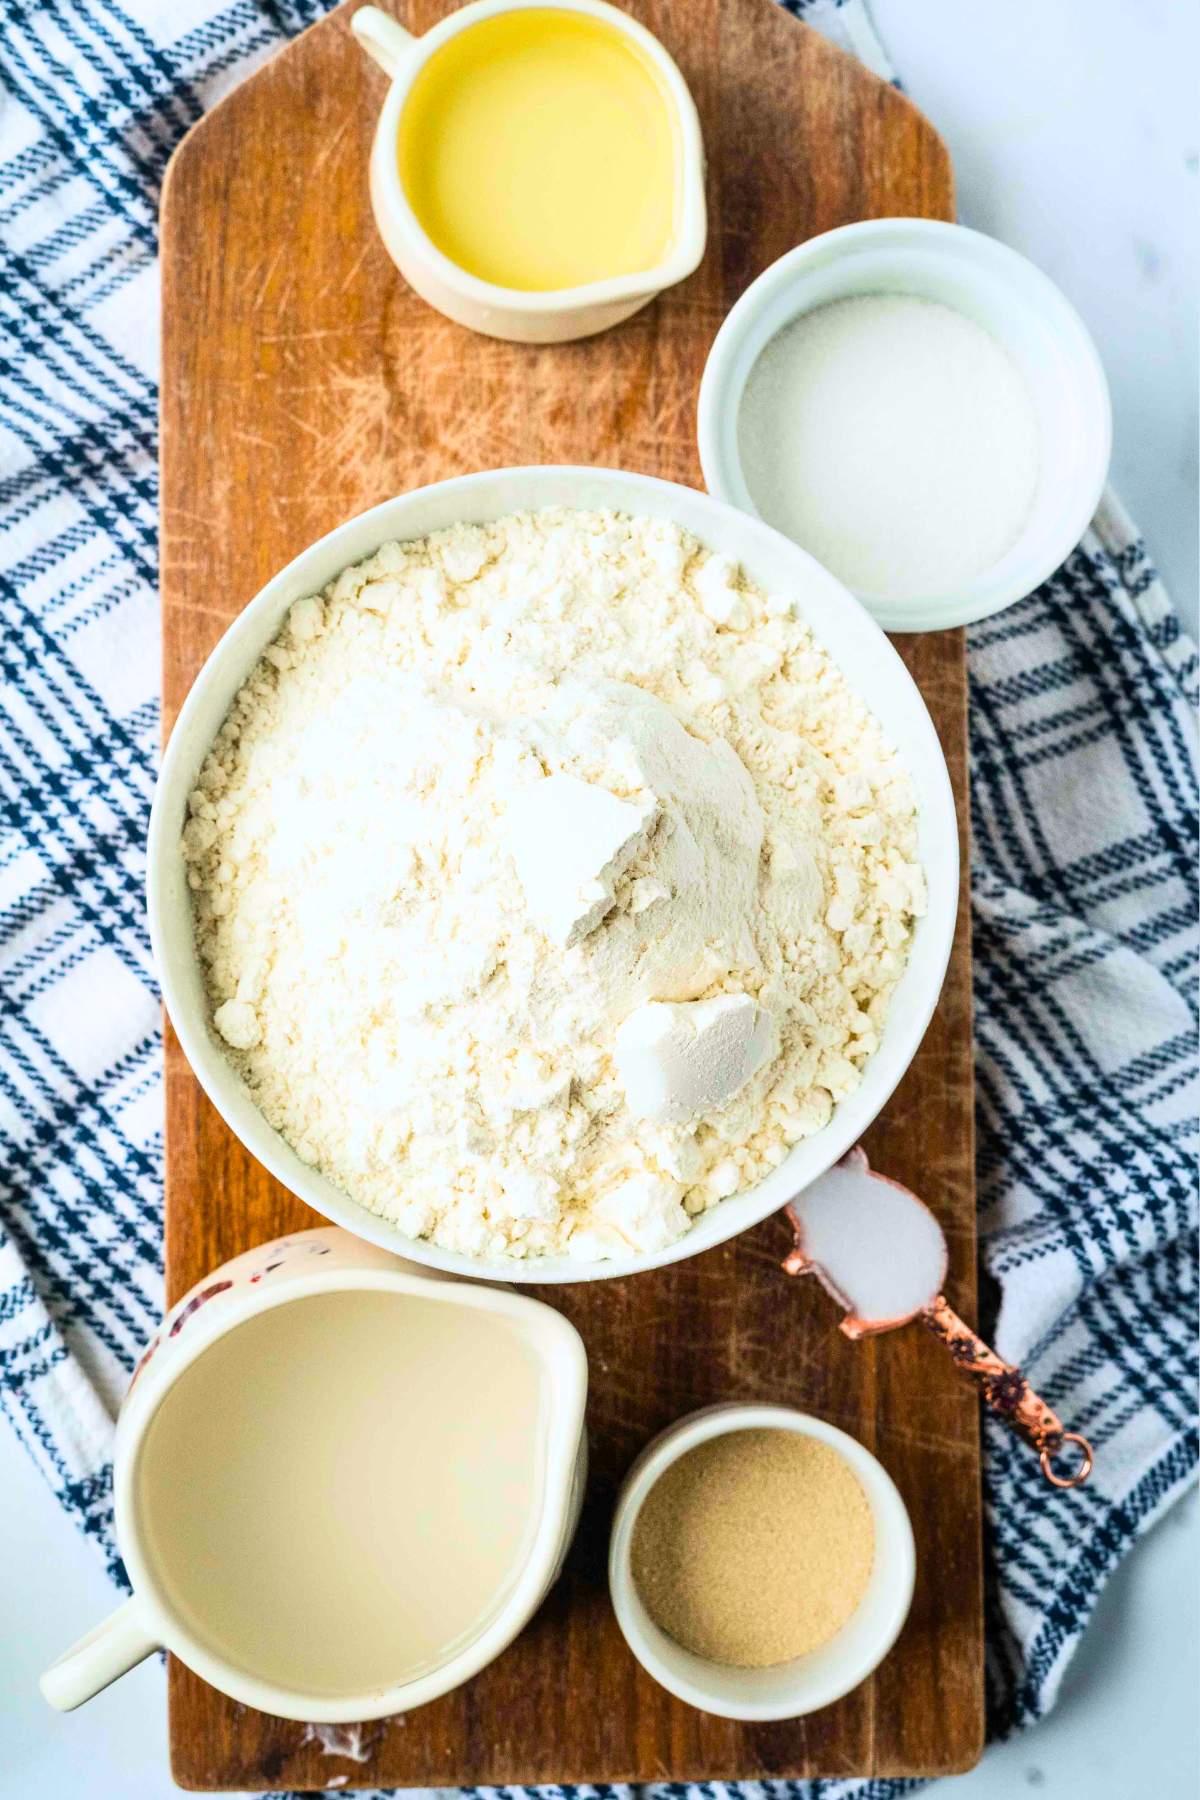
Ingredients and Tools You’ll Need
Bread is so cheap to make. It’s just basic pantry ingredients.
Heart’s Content Farmhouse is a participant in the Amazon Services LLC Associates Program, an affiliate advertising program designed to provide a means for sites to earn advertising fees by advertising and linking to Amazon.com. This means that when you click on certain links on this site and make a purchase, I may earn a small commission at no additional cost to you. I only recommend products I genuinely believe in and would use in my own kitchen. As an Amazon Associate, I earn from qualifying purchases.
Equipment
- Loaf pan (standard size)
- Plastic wrap or a damp cloth
- Stand mixer with a dough hook (or bread machine, or your hands)
- Mixing bowl
- Wire cooling rack
- Bench scraper or spatula
- Pastry brush
Ingredients
- 3½ cups all-purpose flour
- 2 tablespoons granulated sugar
- 1 ¼ teaspoons instant yeast
- 1 teaspoon salt
- 1 cup water
- ¼ cup vegetable oil or melted butter
How to Make Overnight Sandwich Bread
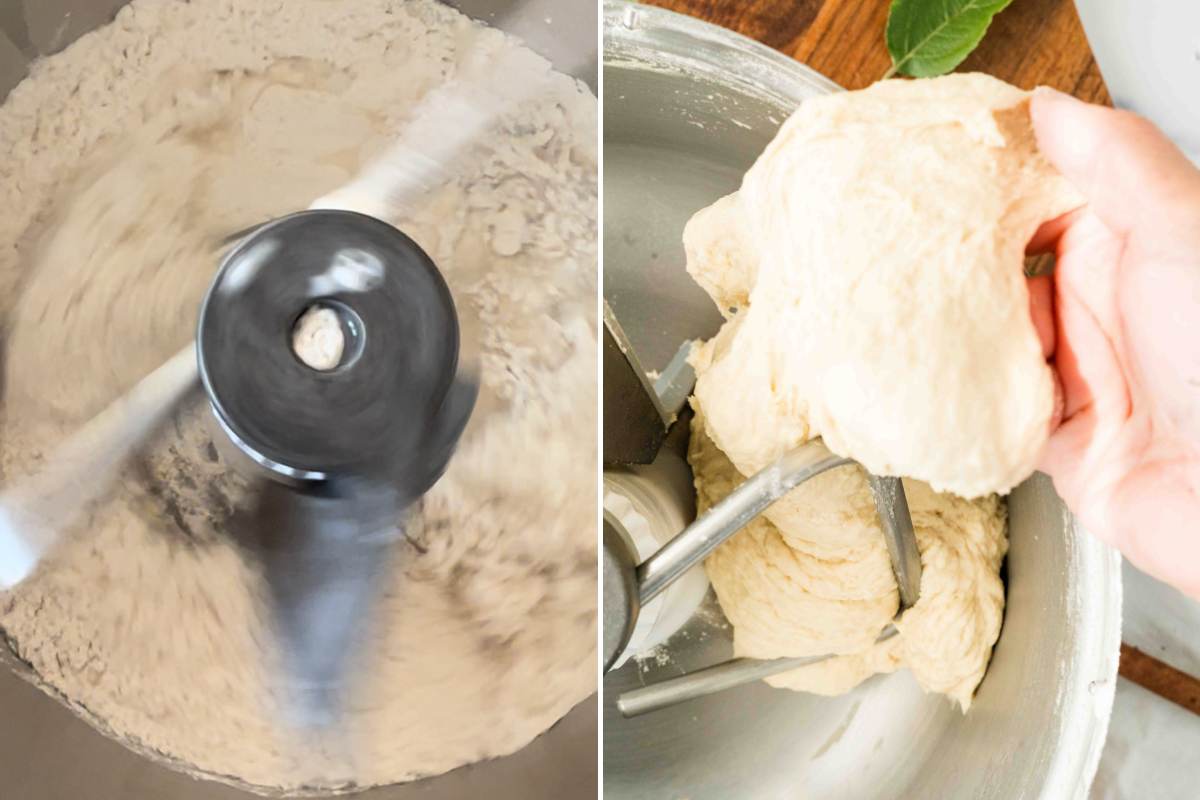
Step One: Knead The Dough
Combine the flour, sugar, yeast, and salt in a large mixing bowl. Then, slowly add the lukewarm water and vegetable oil (or melted butter). Using a stand mixer with a dough hook, bread machine, or your hands, knead the dough for about 5 minutes. The dough should be soft, smooth, and slightly tacky.
Get Access to
All my Free planners, Printables, binders and more
Get a copy of this frugal recipe binder with lots of crockpot favorites, pasta dishes, casseroles, and more inside the subscriber library. Plus SO much more.

The long rise time will further develop gluten, so don’t worry about under-kneading.
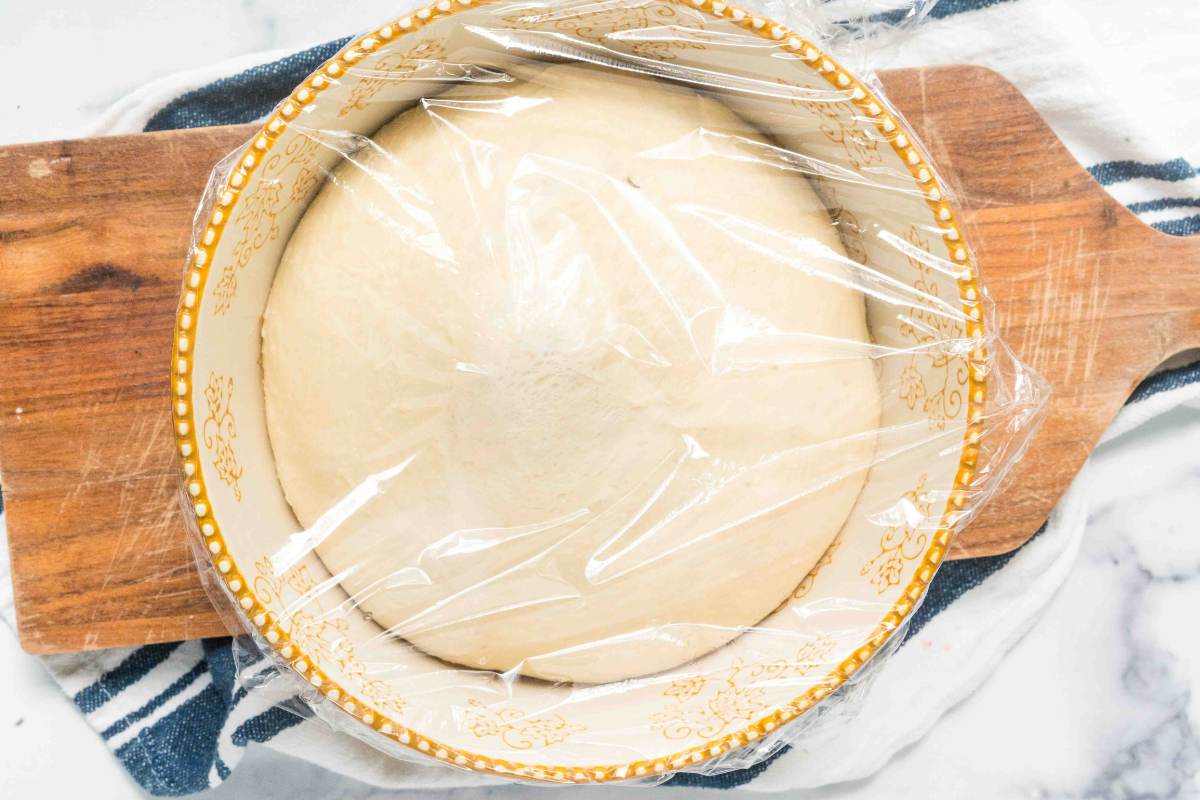
Step Two: The First Rise (Overnight Fermentation)
Cover the bowl with plastic wrap or a damp cloth and leave the dough to rise at room temperature for 8-12 hours, depending on your kitchen’s temperature. The dough may take closer to 12 hours to double in size in cooler environments.
If the dough hasn’t risen much overnight, try giving it more time in a warmer spot, like near a window with sunlight or inside your oven with just the light on. As long as the yeast is still active, it’ll eventually rise.
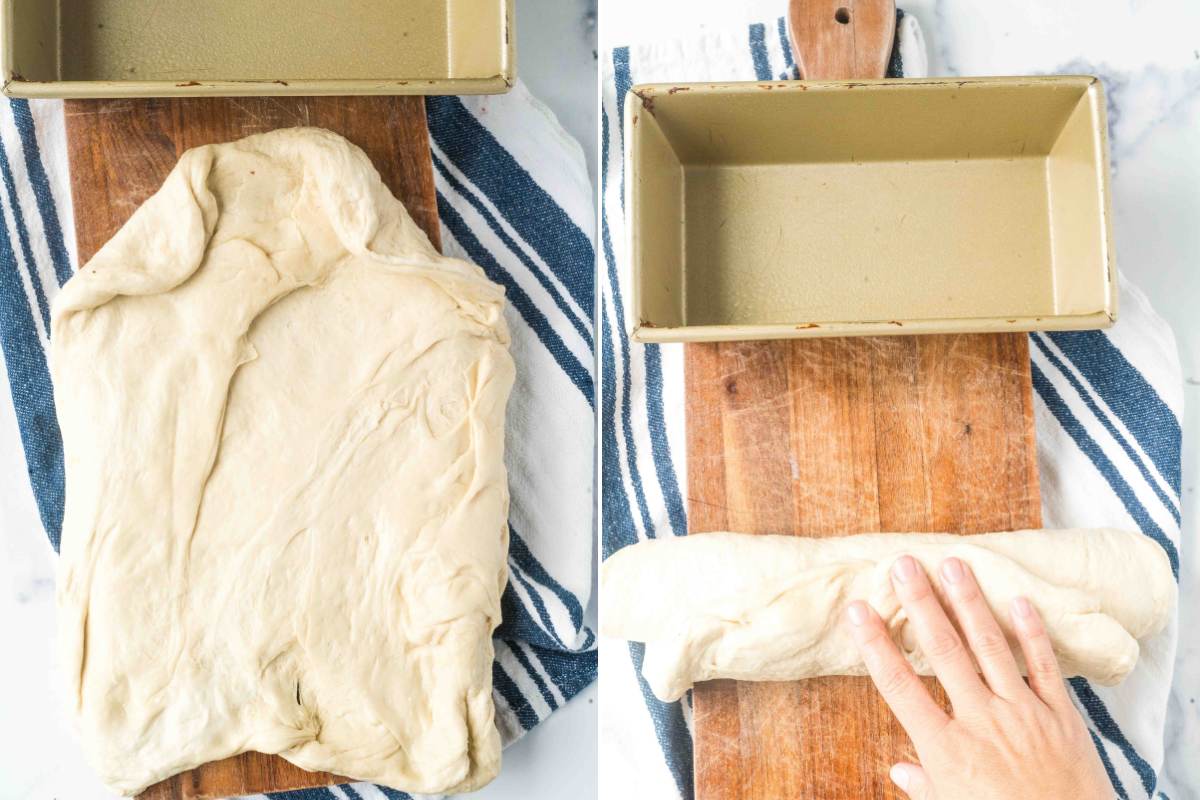
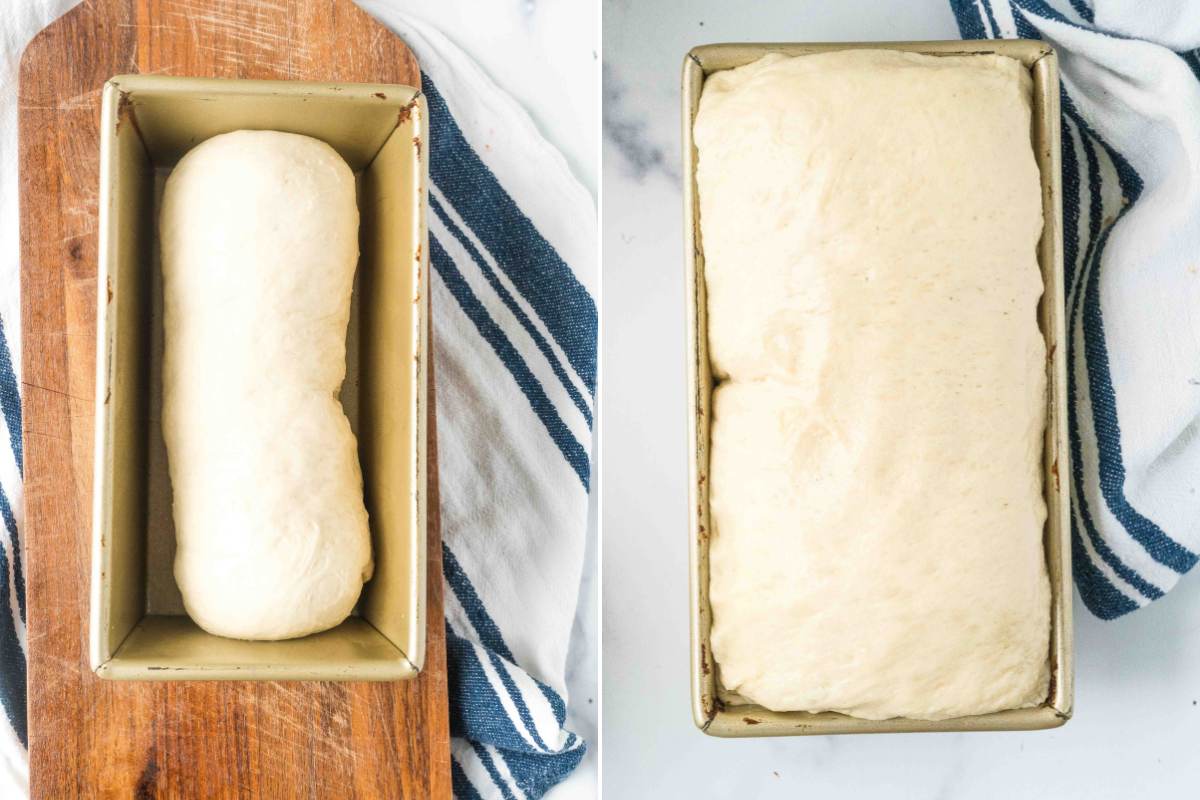
Step Three: Shape The Loaf
After the overnight rise, your dough should have doubled in size and be full of air bubbles. Then, gently turn the dough onto a lightly floured surface and stretch it into a 9 x 18 inches rectangle. Next, tuck the corners neatly, then roll the dough from the top down into a log. Pinch the seam to seal the loaf tightly.
Tip: Lightly flatten the dough before rolling for an extra smooth shape.
Step Four: The Second Rise
Lightly grease a standard-sized loaf pan with nonstick spray or melted butter. Place the dough seam-side down into the prepared pan. Cover it loosely with greased plastic wrap or a damp cloth. Let it rise in a warm place (like a turned-off oven) for 1-2 hours or until the dough has risen about 1 inch above the rim of the pan.
Tip: Preheat your oven to 350°F (176°C) for about 30 minutes before the dough completes its second rise.
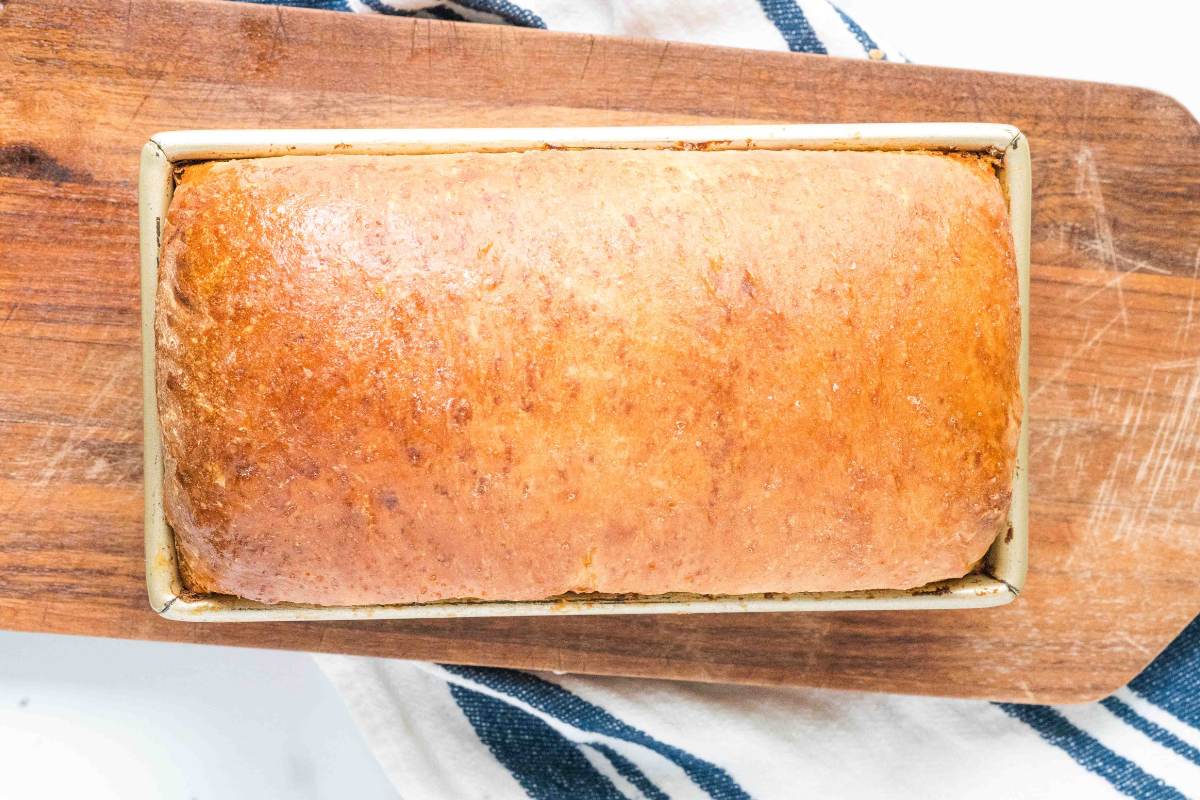
Step Five: Bake The Bread
Once risen, bake the bread for 30-40 minutes or until the top is golden brown and the internal temperature of the bread reaches between 190°F and 210°F. Remove from the oven and immediately turn the loaf onto a wire cooling rack. Allow it to cool completely before slicing.
Optional: Brush the top of the bread with melted butter right before or after baking for a softer crust. Alternatively, dust with flour before baking for a rustic look.
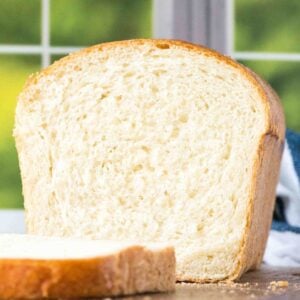
Step Six: Slice And Serve
Once the bread has completely cooled, slice it into even pieces with a serrated knife. Serve it as sandwich bread, toast, or however you like!
Storage Instructions
To store your bread, first make sure the bread has cooled completely. For short-term storage, wrap the loaf tightly in plastic wrap or place it in an airtight container, and it will stay fresh at room temperature for up to 3 days.
If you want to freeze it, slice the bread first and place the slices in a freezer-safe bag or an airtight container. You can store the bread in the freezer for up to 3 months.
How to Use A Basic White Loaf
The best thing about this bread is that it goes with everything!

- Toasted it in the morning and spread it with homemade raspberry jam.
- Make a sub sandwich with deli meat and cheese.
- Serve it toasted with butter as a side to scrambled eggs.
- Use it for grilled cheese with a bowl of tomato soup.
Printable Recipe
Overnight White Sandwich Bread
Equipment
- Loaf pan (standard size)
- Plastic wrap or damp cloth
- Stand mixer with a dough hook (or bread machine, or your hands)
- Mixing bowl
- Wire cooling rack
- Bench scraper or spatula
- Pastry brush
Ingredients
- 3½ cups all-purpose flour
- 2 tablespoons granulated sugar
- 1¼ teaspoons instant yeast
- 1 teaspoon salt
- 1 cup water
- ¼ cup vegetable oil or melted butter
Save This Recipe
You'll join my email list which you will love. And if you don't, unsubscribe in one click. ❤️
Instructions
- Knead the dough. Combine the flour, sugar, yeast, and salt in a large mixing bowl. Then, slowly add the lukewarm water and vegetable oil (or melted butter). Using a stand mixer with a dough hook, bread machine, or your hands, knead the dough for about 5-7 minutes. The dough should be soft, smooth, and slightly tacky.Tip: The long rise time will further develop gluten, so don’t worry about over-kneading.
- The first rise (overnight fermentation). Cover the bowl with plastic wrap or a damp cloth and leave the dough to rise at cool room temperature for 8-12 hours, depending on your kitchen’s temperature. The dough may take closer to 12 hours to double in size in cooler environments. If your kitchen is very warm, put it in the fridge
- Shape the loaf. After the overnight rise, your dough should have doubled in size and be full of air bubbles. Then, gently turn the dough onto a lightly floured surface and stretch it into a 9 x 18 inches rectangle. Next, tuck the corners neatly, then roll the dough from the top down into a log. Pinch the seam to seal the loaf tightly.Tip: Lightly flatten the dough before rolling for an extra smooth shape.
- The second rise. Lightly grease a standard-sized loaf pan with nonstick spray or melted butter. Place the dough seam-side down into the prepared pan. Cover it loosely with greased plastic wrap or a damp cloth. Let it rise in a warm place (like a turned-off oven) for 1-2 hours or until the dough has risen about 1 inch above the rim of the pan.Tip: Preheat your oven to 350°F (176°C) for about 30 minutes before the dough completes its second rise.
- Bake the bread. Once risen, bake the bread for 30-40 minutes or until the top is golden brown and the internal temperature of the bread reaches between 190°F and 210°F. Remove from the oven and immediately turn the loaf onto a wire cooling rack. Allow it to cool completely before slicing.Optional: Brush the top of the bread with melted butter right before or after baking for a softer crust. Alternatively, dust with flour before baking for a rustic look.
- Slice and serve. Once the bread has completely cooled, slice it into even pieces with a serrated knife. Serve it as sandwich bread, toast, or however you like!
Video
Notes
Nutrition


I made the dough last night and woke up in the middle of the night and it was ready to shape. I kept the dough in my bathroom as it’s the warm place in the house and I wanted it to rise faster. It worked! Had nice risen loaves a couple hours later. Great recipe.
hooray Eliza! great work 🙂 thanks for letting me know it all turned out.
Followed the directions and did not get the soft rise overnight and not much rise in the the loaf pan even on proof?
l am just worried about your temperature guide. You said the temperature should be and l quote “Preheat your oven to 350°F (230°C).” 350°F should be between 175/180°C. l think l will give this recipe a try. Kind regards, Elza.
Hello, made both whole wheat bread and all purpose one, both didn’t rise over night, so I read your page, and put them in a warm oven for like 10 mins and got them out, do I have to let them rise another 8-12 hours to see if they work?
hey naomi,i’d give leave them at room temp, you should see a difference soon!
I use the same ingredients for making regular (not overnight) bread…won’t the first rise overflow if I let it sit for 12 hours?
I’ve been trying to not buy store-bought bread and make my own to stay away from processed food, additives, and ingredients I don’t want in my family’s bodies. This is a really great recipe, nice and spongy. I’ve tried other recipes and it’s been hit or miss – clearly mostly miss because I was still searching. But this one is really good. I’m printing it to keep in my arsenal. Thanks so much for sharing! Oh, and I doubled the recipe to make 2 loaves and had no issues.
Trusting your recipe for company tomorrow. Will report back. Thank you. It’s 10pm so letting it settle overnight.