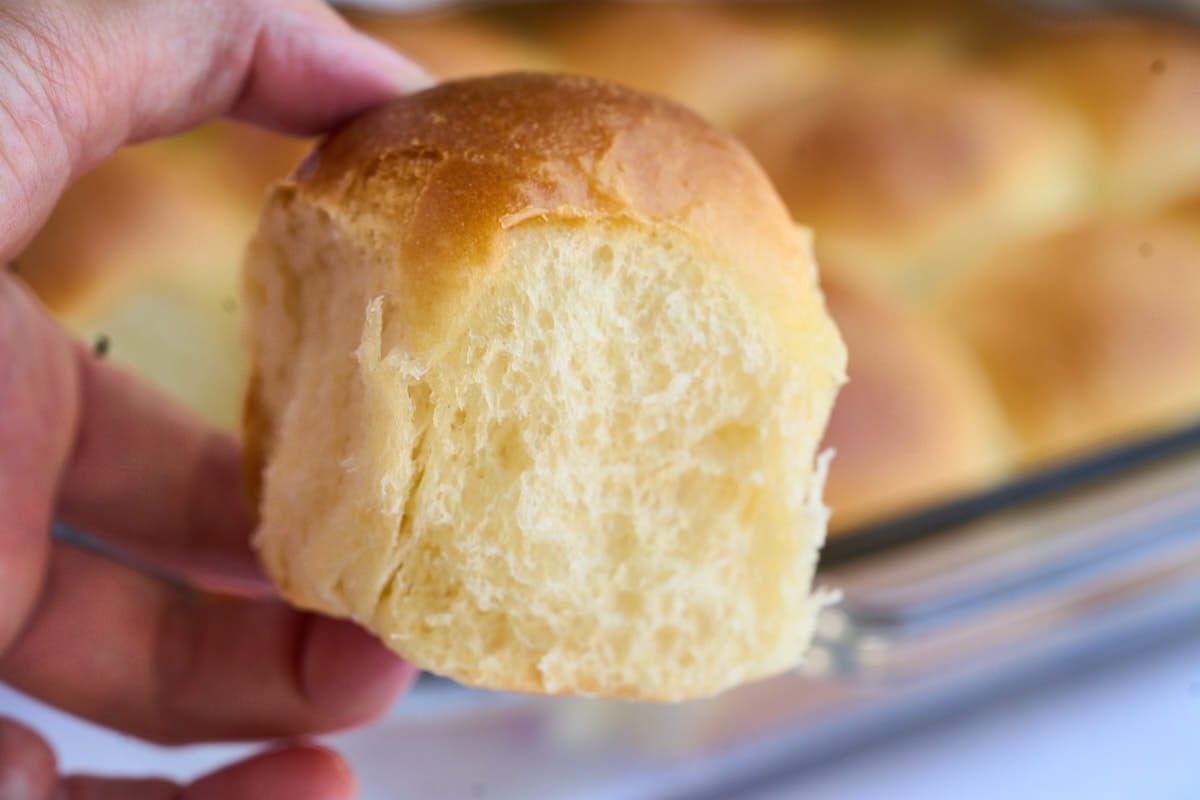
You won’t be disappointed with these old-fashioned soft yeast rolls. They’re fluffy and buttery, rise beautifully, and melt in your mouth. We make this yeast bread recipe for Thanksgiving and Christmas every single year, but also on random weeknights just because we love ’em.

Plenty of yeast makes these relatively foolproof. If you don’t rush them and follow the instructions, you’ll be just fine. When you’re baking them, use your common sense, not the timer. If they aren’t golden brown, put them in for a few more minutes. You can do this!
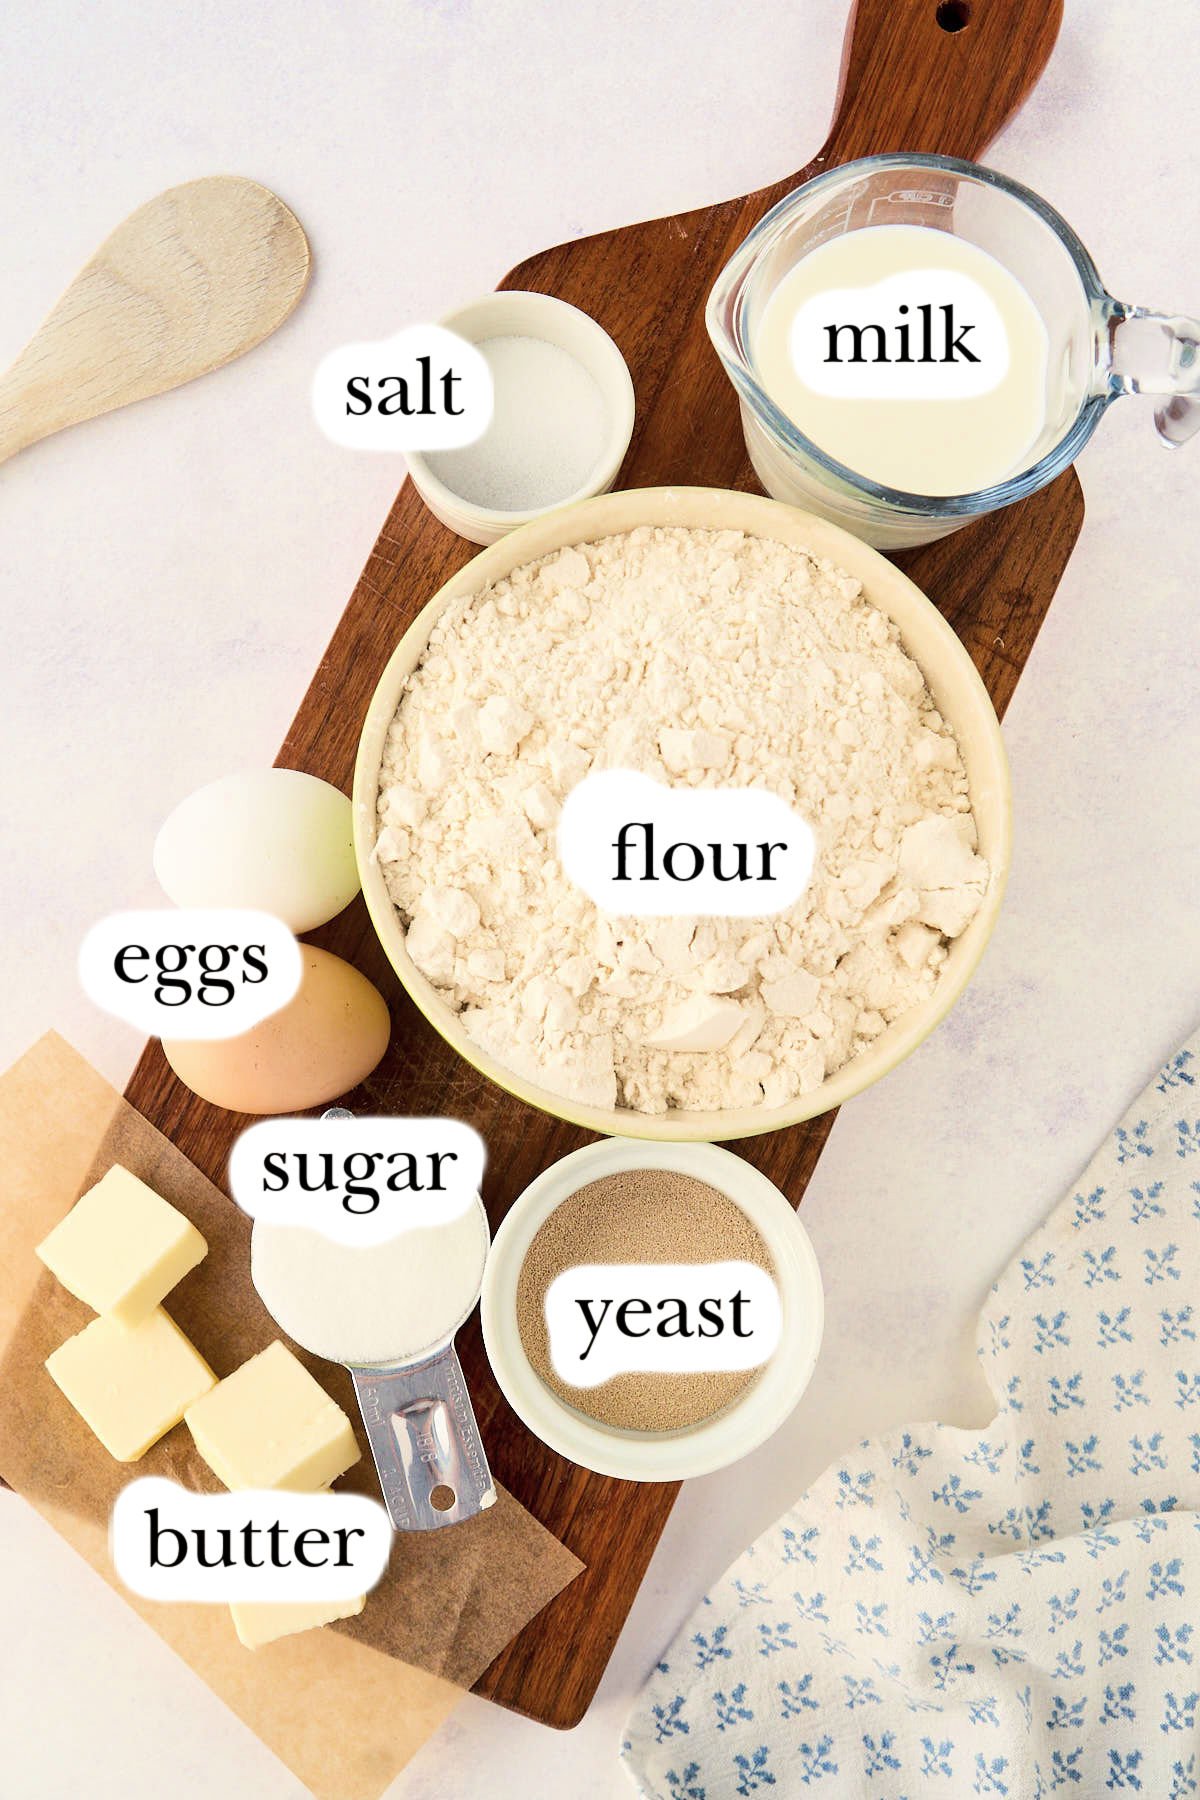
Ingredients and Tools You’ll Need
Instant yeast is quicker and less picky about temperatures than active dry yeast. If you aren’t happy with your bread results, buy a package of this and enjoy your life. And NO, you don’t have to proof your yeast first!
Heart’s Content Farmhouse is a participant in the Amazon Services LLC Associates Program, an affiliate advertising program designed to provide a means for sites to earn advertising fees by advertising and linking to Amazon.com. This means that when you click on certain links on this site and make a purchase, I may earn a small commission at no additional cost to you. I only recommend products I genuinely believe in and would use in my own kitchen. As an Amazon Associate, I earn from qualifying purchases.
Equipment
- Large mixing bowl or stand mixer
- 13×9 glass baking dish
Ingredients
- 2 eggs (room temperature)
- ¾ cup milk
- ¼ cup water (room temperature)
- ¼ cup vegetable oil (or melted butter)
- ¼ cup sugar
- 1 ½ teaspoons salt
- 4 cups all-purpose flour (You don’t want bread flour here; all-purpose flour is perfect.)
- 1 tablespoon instant yeast
- 3 tablespoons melted butter (for topping the rolls)
How to Make Old-Fashioned Yeast Rolls
Step One: Knead The Dough
Combine eggs, milk, water, vegetable oil (or melted butter), sugar, salt, flour, and instant yeast in a big bowl. Then knead the dough by hand, with a stand mixer using the dough hook attachment, or with a bread machine set to the “dough” cycle. If the dough seems dry or dense, add a bit more milk. The dough is kneaded enough when you can stretch a small piece thin enough to see light through it without tearing (windowpane test).
Get Access to
All my Free planners, Printables, binders and more
Get a copy of this frugal recipe binder with lots of crockpot favorites, pasta dishes, casseroles, and more inside the subscriber library. Plus SO much more.


Step Two: The First Rise
Shape the dough into a ball and place it in a clean, lightly oiled bowl. Next, cover with plastic wrap or a damp tea towel. Allow to rise in a warm place for 1 hour or until doubled in size.

Step Three: Divide And Shape
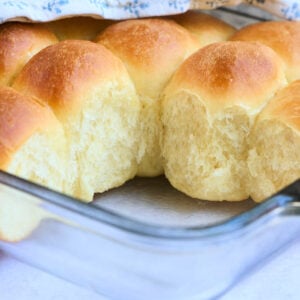
Turn the dough out onto a clean surface. Then, divide it into 24 equal pieces using a sharp knife. Next, shape each piece into a ball by pinching the bottoms until the tops are smooth. Spray a 13 x 9 glass baking dish with nonstick spray and place the dough balls inside.

Step Four: The Second Rise
Cover the dish with greased plastic wrap and set it in a warm place to rise until they are very puffy, for about 45 minutes. Preheat the oven to 350°F (175°C) towards the end of the rising time.

Step Five: Bake
Remove the plastic wrap and brush the rolls with 2 tablespoons of melted butter. Bake for 18-20 minutes, until golden brown. Brush with the remaining 1 tablespoon of melted butter while still warm.

Step Six: Serve
Let the rolls cool for about 20 minutes. Serve directly from the pan or transfer to a serving dish.
Storage Instructions
Leftover rolls will stay fresh at room temperature, tightly covered, for 2-3 days.
Homemade rolls freeze quite well. Allow them to cool completely and freeze for up to 1 month. Warm in a 200-degree oven for 10 minutes before serving.
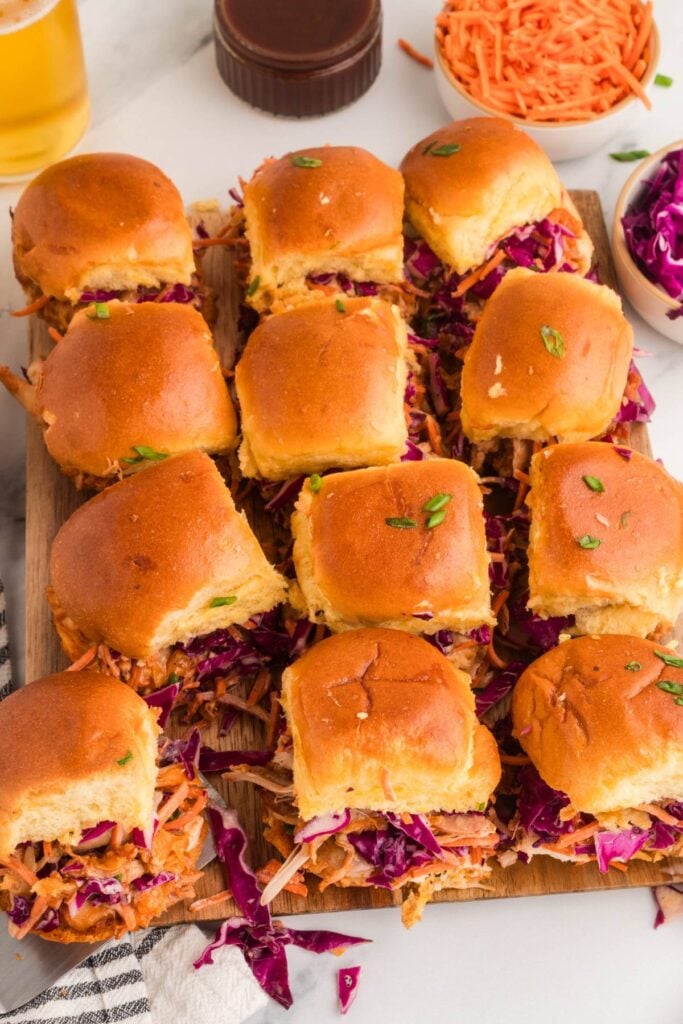
What to Serve with Old-Fashioned Yeast Rolls
These work for everyday or a holiday dinner.
- Serve these at Christmas with deep-fried turkey and mashed potatoes.
- Homemade creamy chicken noodle soup and a roll on the side for a cozy everyday meal.
Make It Your Own
- Add herbs like rosemary or thyme to the dough.
- Make them (partially) whole wheat by replacing 1 cup of white flour with wheat flour.
- Top with seeds or herbs before baking.
Questions and Troubleshooting
I prefer to use a mixer with a dough hook, but you can absolutely do it by hand. If you have a bread machine, using the dough cycle is a great and easy choice.
Yes, I am. I promise.
More Dinner Roll Recipes
- For a more crusty texture, try my easy crusty sourdough rolls.
- These garlic parmesan dinner rolls add lots of extra flavor to a classic roll.
- Make bread machine dinner rolls for your next holiday – super easy!
Printable Recipe
Old Fashioned Soft Yeast Rolls
Equipment
- Large mixing bowl or stand mixer
- 13×9 glass baking dish
Ingredients
- 2 eggs (room temperature)
- ¾ cup milk
- ¼ cup water (room temperature)
- ¼ cup vegetable oil (or melted butter)
- ¼ cup sugar
- 1 ½ teaspoons salt
- 4 cups all-purpose flour
- 1 tablespoon instant yeast
For Topping The Rolls
- 3 tablespoons melted butter
Save This Recipe
You'll join my email list which you will love. And if you don't, unsubscribe in one click. ❤️
Instructions
- Knead the dough. Combine eggs, milk, water, vegetable oil (or melted butter), sugar, salt, flour, and instant yeast in a big bowl. Then knead the dough by hand, with a stand mixer using the dough hook attachment, or with a bread machine set to the "dough" cycle. If the dough seems dry or dense, add a bit more milk. The dough is kneaded enough when you can stretch a small piece thin enough to see light through it without tearing (windowpane test).
- The first rise. Shape the dough into a ball and place it in a clean, lightly oiled bowl. Next, cover with plastic wrap or a damp tea towel. Allow to rise in a warm place for 1 hour or until doubled in size.
- Divide and shape. Turn the dough out onto a clean surface. Then, divide it into 24 equal pieces using a sharp knife. Next, shape each piece into a ball by pinching the bottoms until the tops are smooth. Spray a 13 x 9 glass baking dish with nonstick spray and place the dough balls inside.
- The second rise. Cover the dish with greased plastic wrap and set it in a warm place to rise until they are very puffy, for about 45 minutes. Preheat the oven to 350°F (175°C) towards the end of the rising time.
- Bake. Remove the plastic wrap and brush the rolls with 2 tablespoons of melted butter. Bake for 18-20 minutes, until golden brown. Brush with the remaining 1 tablespoon of melted butter while still warm.
- Serve. Let the rolls cool for about 20 minutes. Serve directly from the pan or transfer to a serving dish.
Notes
Nutrition


can you use self rising flour
I would not, the baking powder will result in a different consistency.
seems pretty easy. I’m making them for the 1st time in years. my rolls weren’t the best in þast.
Hi Katie,
First time roll maker here! This recipe is perfection! Thanks for sharing. I’ll be making these rolls often!
yay Ticole! so happy to hear this!
I just tried this out for the first time yesterday. It came out perfect! I haven’t baked rolls since I was a kid. It tasted just like my grandmas rolls!!!! Can I use this dough for cinnamon rolls ?
hi shayla! you sure can! maybe a tad more sugar. 🙂
Just made these today. Love the all in one method. I used the wet ingredients at room temperature. My first proof didn’t quite double and the second proof really didn’t do much. I think the place I put it was not warm enough so will try a warm oven next time. They are still quite soft but a little dense. Can’t waiting to make these again. BTW I weighed out the servings, probably took a bit too long too.
yes, warmish oven will make all the difference!
I’ve made these at least 3 times now. Very easy and it only gets better each time. I put them in the (turned off) oven with the light on for the rise and give them plenty of time. Better than the local bakery! So yummy with soup on a cold night. I will be making them regularly from here on out.
hi pam! i ‘m so happy you like them. there’s something extra good about them in the cold, i agree! 🙂
question, is it possible to mix, rise & shape the rolls then refrigerate overnight and take out for a prolonged second rise the next day?
In the process of making this now. Sitting on my oven proofing for the 2nd time. Followed everything to a T except i ended up sprinkling in a bit more flour because it was a bit sticky. But just the additional sprinkle of flour brought it all together. Cant wait to try the finished product!
Question could I put these in the fridge overnight after shaping before the second rise?
Is it possible to use active dry yeast instead of instant? What would I do differently if so?
yesi t’s absolutely fine! the only difference is your rising times might be just slightly longer. it will still work! 🙂
The way you have this recipe written is so easy to follow, and the pictures were super helpful for comparison! Because of your recipe, I was able to create rolls that actually sent me back to my childhood – they’re just like the ones my grandma would make. They are delicious, beautiful and super super soft and fluffy. Thank you. 🥲❤
Amber I’m so happy to hear this! I hope you enjoy these rolls for many years to come ❤️.
turbed out great!
so glad to hear it! 🙂
Yep Yep, these are amazing.
I’ve never made rolls before, and I don’t think I’ll ever buy them again. I can’t believe Im going to admit this, but I put the eggs in my robe pockets to come to room temperature, and I completely forgot to add them into the dough. I realized it when the dough was already formed and being kneaded. It was taking a really long time to come together and I couldn’t figure out why. I threw the eggs in and figured I would have to make a new batch anyway, so I might as well test the “add later” idea. To my UTTER surprise, it actually still WORKED! After all that time, I couldn’t wait for a second rise and cook time, so I thought the rolls in the fridge and let them rest on the counter the next day before baking them. I am so pleasantly surprised that my failures still turned into fantastics rolls. YOU RULE!!
hi serene! did you know putting eggs in your pocket is actually a recommended trick?! or sticks of butter! i’m so glad the rolls worked well for you! 🙂
There is something wrong with this recipe. I measured everything just as recipe stated…4 cups of flour, etc. dough never formed, just soupy. Added another 8 cups of flour, still soupy
sabrina there is no possible way that a little over 1 cup of liquid + 8 cups of flour created something soupy. sorry they didn’t turn out for you but i would check your ingredients snd see if something is off. I made them yesterday and they were fine.
Oh Katie these look absolutely delicious!!! They look yellowish, is this due to farm fresh eggs? I am going to make these tomorrow and I hope they come out as beautiful as yours!! Could I use half of the dough to make a small loaf of bread? Thank You and I hope you and your family have a nice Thanksgiving!
hey robinn! yes, i used our eggs which are very orange give it a darker tint. I think a small loaf with half the dough would be just fine! happy thanksgiving 🙂
the look yummy! I have always been intimidated by bread making because I thought that I would kill the yeast by adding water that was too hot, but your recipe sounds pretty easy. I’ll definitely try making these
I love your recipe for Old Fashion Rolls. I have made them every week for church after the first try. The recipe was easy to follow and the rolls were delicious! I am not a very experienced bread baker and they still came out great.
hi beth! so glad you enjoyed them! 🙂 thank you letting me know!
Great recipe turned out great
thank you rachael! enjoy the holidays and hope you use it again then 🙂
mam
you need to proof read your instructions you never have any to activate the yeast.
next No one has done and reviewed because of people such as yourself there are to many ads popping up. you people have ruined Pinterest. they ruin your entire recipe and you are added to my don’t look if done by list
i bake bread three times a week and never proof my yeast. it is an unnecessary step.
as for the rest of your comment…ugh.
Why does everyone complain about ads popping up? I don’t have ads on Pinterest!
Would love to try, but seems like the print button is broken.
The old fashioned soft yeast rolls did not turn out for me. I followed the directions and every step! I was so disappointed! What did i do wrong?
Hi geraldine, it’s hard to know without seeing how they turned out. if they didn’t rise, it could be that your kitchen was too cool or your yeast was old. if they were too dense, it can be too much flour… you may need to add a splash or 2 of water next time until the dough is soft. after a while you’ll be able to tell by look and feel when the dough s right/ has risen enough. hope this helps 🙂