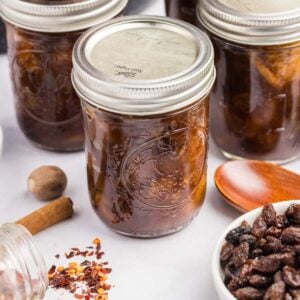
Spiced Apple Chutney (Canning Recipe)
Fruit and spices blend perfectly in this apple chutney recipe. This is delicious spread on a sandwich, topping meats, or set out with a cheese and cracker board. This is a great canning recipe for when you’re tired of all the normal apple stuff 😉. It’s delicious, a little different, and something you’ll make year after year.

I know you’ll love this recipe! Even if you’ve never had chutney and it sounds weird to you, give it a chance. It’s delicious.
Table of Contents
Ingredients and Tools You’ll Need
The ingredients are just like in a dessert. Spices, fruit, and raisins. Delicious.

If you’d like to double or triple this recipe, you can make adjustments in the recipe card at the bottom of this post.

Equipment
Ingredients
- 6 cups diced tart apples, such as Granny Smith (Their firmness and tartness balance the sweetness and spices beautifully.)
- 1 cup diced onion
- 1 cup raisins
- 1 cup brown sugar, packed
- 1 ½ cups apple cider vinegar (Adds a tangy flavor and is crucial for preserving.)
- 1 tablespoon ground ginger
- 1 teaspoon ground allspice
- ½ teaspoon ground cloves
- 1 teaspoon salt
- ½ teaspoon crushed red pepper flakes
How to Make Apple Chutney
My best advice for canning is to make it as fun and as easy as possible. Use an apple slicer if you have one. Canning is hard work, and anything that can make your job easier is nice.
Step One: Prepare The Jars
Begin by sterilizing your jars and lids. Boil them in water for at least 10 minutes, then keep them hot until ready to use.
Step Two: Combine Ingredients
In a large, non-reactive pot, combine diced apples, onion, raisins, brown sugar, apple cider vinegar, ginger, allspice, cloves, salt, and red pepper flakes. Bring the mixture to a boil over medium heat, stirring frequently.

Step Three: Simmer
Reduce the heat and let the chutney simmer for about 45 minutes to 1 hour, or until it thickens. Stir occasionally to prevent sticking. You can briefly pulse in a food processor or with a stick blender if you’d prefer a smoother chutney.

Step Four: Fill Jars
Once the chutney has thickened, remove it from the heat. Ladle the hot chutney into the prepared jars, leaving about ½-inch of headspace. Remove any air bubbles with a non-metallic spatula. Wipe the rims clean, then place the sterilized lids on the jars and screw on the bands until fingertip tight.

Step Five: Process
Place the jars in a waterbath canner, making sure they are completely submerged in water. Bring the water to a boil and process the jars for 10 minutes. Adjust the processing time if you live at a high altitude.

Step Six: Cool And Store
After processing, remove the jars from the canner and let them cool on a towel for 12-24 hours. Check the seals before storing in a cool, dark place. The chutney will keep for up to a year.

Storage Instructions
Pretty much all home-canned food is stored the same.
Store the sealed jars in a cool, dark place like a pantry or a cupboard for up to a year. Avoid direct sunlight and fluctuating temperatures.
Once opened, the chutney should be refrigerated. In the refrigerator, it will last for about 2 to 3 weeks.
How To Use Apple Chutney
It’s actually very versatile. You can use it anywhere you would use jam, and also on top of roasted meats. Which would be pretty weird with jam 😉.
- Put it with a cheese platter. It complements a variety of cheeses, especially sharp cheddar or creamy brie.
- Use on roasted meats, like pork, chicken, or turkey.
- Add some to your regular sandwiches and burgers to make them fancier.
- Use it for breakfast on toast or as a topping for oatmeal.

More Apple Season Recipes You’ll Love
Apples are cheap, crowd-pleasing, and go with just about anything.
- Tender pork chops and apples cooked in a crockpot. They are a cozy and delicious meal.
- This apple cinnamon quick bread is easy to make and filled with the warm, comforting smells of cinnamon and fresh apples.
- Preserve the taste of autumn with this homemade apple pie filling for canning. It’s perfect for creating pies, cobblers, and more all year round.
- Spread some homemade old-fashioned apple butter on your morning toast. It’s a rich and smooth blend of apples and spices that’s reminiscent of grandma’s kitchen.
Printable Recipe
Apple Chutney for Canning
Equipment
- Water Bath Canner
Ingredients
- 6 cups diced tart apples such as Granny Smith
- 1 cup diced onion
- 1 cup raisins
- 1 cup brown sugar packed
- 1 ½ cups apple cider vinegar
- 1 tablespoon ground ginger
- 1 teaspoon ground allspice
- ½ teaspoon ground cloves
- 1 teaspoon salt
- ½ teaspoon crushed red pepper flakes
Save This Recipe
You'll join my email list which you will love. And if you don't, unsubscribe in one click. ❤️
Instructions
- Prepare the jars. Begin by sterilizing your jars and lids. Boil them in water for at least 10 minutes, then keep them hot until ready to use.
- Combine ingredients. In a large, non-reactive pot, combine diced apples, onion, raisins, brown sugar, apple cider vinegar, ginger, allspice, cloves, salt, and red pepper flakes. Bring the mixture to a boil over medium heat, stirring frequently.
- Simmer. Reduce the heat and let the chutney simmer for about 45 minutes to 1 hour, or until it thickens. Stir occasionally to prevent sticking. You can briefly pulse in a food processor or with a stick blender if you’d prefer a smoother chutney
- Fill jars. Once the chutney has thickened, remove it from the heat. Ladle the hot chutney into the prepared jars, leaving about ½-inch of headspace. Remove any air bubbles with a non-metallic spatula. Wipe the rims clean, then place the sterilized lids on the jars and screw on the bands until fingertip tight.
- Process. Place the jars in a waterbath canner, making sure they are completely submerged in water. Bring the water to a boil and process the jars for 10 minutes. Adjust the processing time if you live at a high altitude.
- Cool and store. After processing, remove the jars from the canner and let them cool on a towel for 12-24 hours. Check the seals before storing in a cool, dark place. The chutney will keep for up to a year.
Notes
Nutrition


WAY TOO MUCH VINEGER…. INEDIBLE.
hi Kevin, this is a savory condiment, almost like a relish.
Delicious! Put on blackened salmon and it was outa this world!!!!
so glad Carolyn! we love it on all meats!
how many pints does this make!
6 half-pints